Here you will learn:
- Advantages of a barrel stove
- Assembly sequence
- Modernization of the design
- Interesting potbelly stove with stonework
An old 200 liter metal barrel is an excellent material for making a simple potbelly stove. The resulting stove is suitable for heating any non-residential premises, from garages to outbuildings. A 200-liter barrel stove has a simple design and does not cause any difficulties even for novice craftsmen. Let's look at the features of this simple heater and discuss the assembly instructions.
About the design
A homemade potbelly stove made from a barrel has a height of 89 cm, a diameter of 60 cm and a weight of 21 - 25 kg, has a solid hearth and a fairly high chimney. Sawdust, shavings, dry firewood and fuel briquettes are used as fuel. Due to the rather thin metal walls and the height of the body, the efficiency of such a furnace does not exceed 15 - 20%.
The principle of its operation is quite simple: wood is placed in the firebox and ignited. When burning, firewood releases a large amount of thermal energy, which is transferred to the body of the potbelly stove. The heated metal releases heat into the surrounding atmosphere and heats the room. The amount of heat increases due to the long chimney through which hot smoke moves to the street.
Expert opinion
Nikolay Davydov
Stove maker with 15 years of experience
For the correct flow of gas-dynamic processes in a potbelly stove made from a 200 liter barrel, the blower should be located as low as possible. Otherwise, the lower part will take a significant part of the thermal energy and redirect it to the ground. If you need to place the ashpit higher, you can wall up the lower part of the container with bricks.
Types of stoves depending on location vertical model
Depending on the plane in which the metal tank will be located, there are two types of homemade potbelly stoves: vertical and horizontal.
Each of these types of heating devices has its own advantages and disadvantages. A vertical barrel stove is installed not on the floor, but on legs. To make the door, you will need to cut out the side of the tank and provide it with hinges
It is important to remember that the hinges must be fixed to the barrel and the door not from the inside, but from the outside.
A mandatory element of this design is a perforated metal plate, which is called a grate. To fix such a grille, you can use ordinary corners. In order to make a blower, you will need to prepare a metal pipe with a gate valve. The thickness of the metal walls must be sufficient, otherwise the structure will quickly burn out.
The damper for a long-burning wood stove, located in a vertical plane, is fixed with special bolts. When igniting fuel inside the tank, open the blower as far as possible.
A hole in the shape of a circle must be made in the upper part of the canister. It will be needed to connect a chimney structure to a homemade stove. The pipe is joined to a metal surface using welding equipment.
The function of the grate is to protect the bottom of the canister from burning out, as well as to retain thermal energy. Thus, this element is necessary when installing a homemade long-burning stove.
Design features are determined depending on the purpose of the device and the place where it will be located. If you wish, you can download a ready-made drawing of a potbelly stove on the Internet. However, in this case it is necessary not to make a mistake with its volume.
The vertical version of a homemade heating device is easy to assemble. You can find application for such a unit both in a private home and in the country. The firewood used to light a heating device of this type is selected depending on the dimensions of the firebox.
Choosing a quality barrel
To make a potbelly stove, you can use any steel barrel used in the petrochemical, paint and varnish, chemical, and metallurgical industries for storing and transporting technical products:
- bulk - oils, solvents, paints, diesel fuel, sodium liquid glass;
- pasty - thick lubricants, bitumen;
- bulk - caustic soda, various plasticizers.
They are produced in two types - with an open and closed top; they also differ in the thickness of the bottom, lid and shell.
Any of these containers can be used as a potbelly stove if you first thoroughly clean and rinse its inner surface. However, the thinner the walls of the container, the faster they will burn out and the stove will fail. Therefore, for a potbelly stove you need to choose a product with a metal thickness of more than 2 mm.
Expert opinion
Nikolay Davydov
Stove maker with 15 years of experience
Well, the best option is a stainless steel barrel. High-alloy stainless steel is most resistant to high temperatures in the fuel combustion zone, which means a stove made from it will serve for a longer period.
How a stove can be used in a garden plot made from a barrel with your own hands
The furnace is fired up as follows:
- Dry solid fuel is tightly packed into an empty cylinder to such a height that the upper plane of the piston is below the lower boundary of the chimney opening. Do not add wet wood, which can slow down the movement of the piston during the combustion process.
- Place wood chips, a rag or paper sprinkled with diesel fuel or kerosene on top, close the lid with the piston.
- Open the valve completely, set fire to the rolled paper and throw it into the pipe. When the wood burns well, close the damper, setting the minimum gap for air flow.
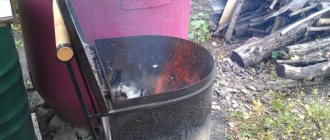
Cooking shish kebab on a homemade stove
On a homestead, a stove made from a 200-liter barrel can be used to heat greenhouses, light a bathhouse, or burn garbage.
Additional materials
To build a heating device, in addition to the 200-liter metal barrel itself, you will need the following additional building materials and stove fittings:
- small steel sheet;
- corner;
- fireclay brick for a vertical model or a reflector for a horizontal one;
- a small piece of channel;
- steel pipes for the chimney;
- fittings for the grate;
- sand, clay for making mortar;
- asbestos cord;
- combustion door;
- blower door;
- basalt wool for chimney insulation.
Instructions
At a certain point in construction, the question arises of how to properly construct a potbelly stove yourself. A 200 liter barrel just becomes one of the most suitable frames. The stove can be distinguished by shapes and sizes; it can be round, square, located horizontally or vertically. It all depends on your imagination and the room.
To understand the operating principle of the device, it is enough to understand the diagrams and assembly stages.
Vertical model
Vertical stoves are manufactured in the following sequence:
- Preparing an opening on the side of the barrel to make it possible to load fuel.
- You can purchase the door in advance or try to replace it with a cut-out part from the wall of the container - welding a handle and hinges to it for ease of opening and closing the firebox.
- Just below the door, cut an additional hole to install the blower door. To create a blower, a thick-walled pipe is used, which could move along metal slats, but not be completely pulled out.
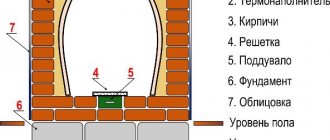
- Grate bars are mounted 20 cm above the bottom of the barrel - this is a metal plate with holes; it can be replaced with a cellular part made of reinforcement. Fixation is carried out using a steel angle.
- Metal legs are welded at the bottom of the barrel, or the structure is simply installed on bricks.
- The role of the cooking panel is performed by steel wire; it is welded to the top lid of the oven.
- To protect the walls from burning inside, the firebox can be lined with refractory bricks, giving it the shape of a semicircle using a grinder. The masonry is done with a special oven mortar, which contains part fatty clay and two parts sand. This mixture is diluted with the minimum possible volume of water, it should turn out very thick.
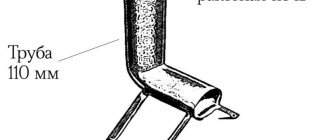
- Then the chimney is formed. The hole for the pipe is at least 15 cm in diameter, usually made on the side or top of the barrel. The height of the pipe is more than 4 m. To reduce the load on the body, the chimney should also be secured to the wall.
- You can make a rotary or moving valve on the chimney. It will help to quickly adjust the removal of heated smoke, completely blocking the chimney when the stove is not working.
Vertical oven
Horizontal model
From a barrel with a volume of 200 ml you can also make a device for heating a room, which would have a horizontal location. First, it is important to prepare the structure to support the frame. The height is calculated taking into account the operating characteristics. When choosing this indicator, you should first pay attention to the area of the room where you plan to install a homemade potbelly stove.
The drawing always takes into account the specific placement of the furnace. The assembly of a horizontal unit is carried out almost identically to a vertical one. In more detail, the process includes the following steps:
- It is necessary to form a hole in the bottom of the prepared barrel, which will be used to remove ash. It is important to understand that its size should not be too large.
- Now you need to build an ash pit. Its dimensions should not be more than a third of the height of the canister. The height of a 200 liter barrel is 85 cm - the calculation is based on this parameter. The material you need to choose is a regular sheet of metal that would be suitable in thickness. It is connected to the bottom of the heating device. Welding equipment is used for this.
- To arrange the ash pan, it is necessary to provide another viewing window; the compartment must be cleaned through it. Then the installation of the chimney structure is carried out. The two most popular pipe locations are on the back wall or on top.
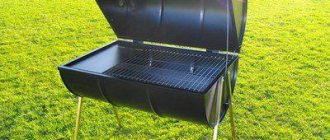
Horizontal stove
A long-burning potbelly stove, which is placed horizontally, can be used not only for heating garages, basements, and various buildings, but also for cooking and heating food. For this purpose, it is supplemented with an arched panel. The device turns out to be mobile, so you can even take it with you into nature.
Required Tools
To build a high-quality potbelly stove from a 200-liter barrel with your own hands, you need to prepare a minimum set of tools, consisting of:
- welding machine;
- grinders or hacksaws for metal;
- standard hammer, pliers and chisel;
- steel brush;
- drills with a set of drills;
- measuring instruments: tape measure, level and plumb line.
Personal protective equipment is also needed when welding: a protective mask, dielectric gloves, protective clothing made of thick fabric and closed shoes.
Conclusion
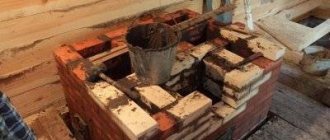
It is quite possible to make a brick potbelly stove from bricks yourself. Such a furnace increases efficiency from 50-60% to 70-75%. However, it is still not cost-effective enough to fully replace stove heating. Although it retains heat more efficiently than iron, it requires the connection of a heating panel for constant use.
As a temporary source of heat, a brick potbelly stove, made with your own hands in a garage or greenhouse, is fully justified.
The design can be further improved by clad in metal. This will increase the service life and protect the stove from damage.
Where is the best place to install?
When installing a potbelly stove from a 200 liter barrel in a garage, it is important to follow established fire safety rules. In a small room, the heating device should be placed in a place opposite the door. In this case, the distance from it to the walls or other interior items should be at least 50 cm.
Expert opinion
Nikolay Davydov
Stove maker with 15 years of experience
No flammable items should be placed near the stove, and when moving, you should be careful not to accidentally contact exposed skin with its body to avoid burns. The room where the potbelly stove is installed should be well ventilated, at least naturally.
Making a potbelly stove
When a certain moment comes, many people wonder how a potbelly stove should be made from a barrel with their own hands. And in general, how to make a potbelly stove from a 200 liter barrel.
The potbelly stove is created in different sizes and shapes. It can be round and square, vertical and horizontal. It all depends only on your imagination.
Horizontal stoves are considered simpler than vertical stoves. In such a stove, in place of the door, a part of the bottom is attached, which is cut out. She sits on her hinges. At the opposite end of the barrel there is a hole to which a metal pipe should be attached, which will serve as a chimney for such a stove. Then you should put a grate in the middle of the barrel. It plays an important role, as it will help retain heat for a longer time, and also protect the so-called bottom from burning out. If you really want to create a hob, you will simply have to weld thick steel wire.
Do you want to build? See detailed instructions on our website!
Before you get to work, you will need to prepare some tools. To begin with, it is best to stock up on a welding machine, as well as a full set of clothes for working with it, a grinding machine, wheels for grinding and cutting metal, a hammer, a wire brush, pliers, a tape measure and a drill.
At the required level in the barrel, you should first mark and then cut two rectangular holes that will serve for the ash pan and firebox.
The parts that remain after cutting should not be thrown away, as they can later be used to make the door. To make the door complete, metal strips are attached to it, and then a special latch with a handle is installed.
Then, on the inside of the barrel, just below the firebox, no more than 10 cm, angle-type brackets are attached, which will later serve for laying the grate.
For the manufacture of the grate, ordinary fittings are used. You need to cook it yourself.
It is best to weld the legs to the bottom of the barrel, but in the upper part you need to cut a hole for the future chimney and weld a pipe into it.
The door is installed on the hinges that have already been attached in advance. Only after installing the door is a hook for the lock attached.
If you want to achieve a more aesthetic appearance for your stove, then you should carefully clean all welding seams. Heat-resistant paint is suitable for painting, after applying which your potbelly stove will be practically indistinguishable from the factory one.
After complete completion of all work, the potbelly stove is connected directly to the chimney, which is already connected to the street.
Features of operation
When operating the stove, it is necessary to alternate its lighting cycles, which include:
- fuel storage;
- ignition of the stove;
- direct combustion process with room heating;
- cleaning of ash products from the combustion and blower sections.
The most important stage is the placement of fuel, which must be placed in a certain order to facilitate the ignition process. First you need to put paper and thin dry firewood on the grate, light a fire and close the door.
Once the kindling material has ignited, larger logs can be added. Wood must be loaded carefully to prevent the fire from dying out. Once the wood has been fully loaded, the fire door must be closed tightly.
The draft in a potbelly stove can be adjusted by using a valve on the chimney or by slightly opening the ash door.
While the stove is burning, you must not touch its body to avoid getting burned.
To restore draft after a long period of burning, it is necessary to periodically disassemble the chimney and clean its elements from accumulated soot.
Chimney construction process
The complexity of the process of constructing a chimney for a potbelly stove in a country house directly depends on the location of the stove in the room. For example, bringing a pipe out through a window is much easier than making a hole for a chimney in the roof. In this regard, before installing a potbelly stove, you should take into account the design features of the building.
Safety rules and structural measurements
If you plan to install the stove outdoors, then installing a chimney will not cause much difficulty, the main thing is to choose a suitable location
It is important to remember that the stove structure should be located away from flammable objects and active recreation areas
Constructing a chimney indoors will require knowledge of safety rules that will help avoid fire. The material from which the pipe is made must have increased heat resistance and can easily withstand temperatures above 1 thousand degrees. If you plan to install a potbelly stove near walls lined with clapboard or plastic, then the part of the wall located in close proximity to the stove is sheathed with fireproof material.
Don't forget to decide on the pipe size
The hole through which the chimney will enter the ceiling must also be decorated with non-combustible materials, since the entire structure becomes very hot when the stove is operating. For these purposes, a special glass is used to prevent contact of the hot pipe with the edges of the hole. If there is more than one potbelly stove installed in a building, then a separate smoke exhaust system is made for each of them.
After calculating the diameter of the pipe for the potbelly stove, you will need to calculate the total length of the pipeline, but first you need to accurately determine the location of the stove in the room. Then determine the specific location where the chimney will be vented outside. When measuring the length of the pipeline outdoors, you need to take into account that the height of the pipe above the ridge should be 1.3-1.7 meters.
It is more difficult to carry out installation work indoors
Installation of all system elements
Installing a stove installed outdoors is not difficult. To assemble the system, you will need a pipe of the required diameter, which is placed on the pipe extending from the potbelly stove. The pipe must be put on the pipe, and not inserted into it. Otherwise, smoke will leak out at the junction of the nodes. The procedure for installing a smoke exhaust system in a room is much more complicated and consists of several stages:
- the pipe section is securely attached to the furnace pipe;
- the pipeline is extended using connecting elbows;
- the smoke exhaust is passed through a passage glass and discharged onto the roof or behind the wall;
- all connecting nodes are securely fixed.
A section of pipeline located outdoors must be insulated with heat-resistant material. During operation of the potbelly stove, condensation inevitably accumulates on it. To get rid of the condensate accumulated in the system, a tee is installed on the outer section of the pipeline, equipped with a faucet for discharging liquid. In the place where the horizontal and vertical pipelines connect, an inspection window is made to make cleaning the chimney easier.
The final stage is checking the functionality of the smoke exhaust system. If you managed to properly make a chimney for a potbelly stove, then after igniting the stove the necessary draft will be created and the smoke will quickly be discharged outside. During the combustion process, you need to ensure that smoke does not leak into the joints of the nodes. If a smoke leak is detected, the connections must be sealed using heat-resistant sealant.
The principle of operation of "Bubafoni"
The well-known law of convection states that when heated, warm masses move upward, and cold ones take their place. The work of “Bubafoni” is based on this principle: when the fuel burns, the air heats up and rises, entering the outlet pipe; the cold flow enters the stove through the pipeline. This is how constant circulation of air masses occurs. This in turn supports the fuel combustion process.
The furnace design includes a damper on the inlet pipe (gate). By setting the gap at a certain level, you can regulate the intensity of fuel combustion.
The work process ends with the complete burning of the wood and the lowering of the piston with the load to the bottom of the fuel tank. It is possible to stop the operation of the furnace ahead of schedule if you completely close the damper on the inlet pipe. This will stop the flow of oxygen into the stove. Another way to complete the heating process is to use fire safety equipment.
Installation Rules
Like all heating appliances, during their operation, potbelly stoves must be treated with full responsibility and strictly follow the safety rules:
- do not leave the stove unattended, on children or people who have no experience in using such devices;
- place the stoves at a safe distance from furniture and interior items, at least 1 meter;
- do not overload the stove while firing the stove;
- for the firebox, use only oil that has been free of water impurities;
- do not block the chimney during combustion;
- Do not leave any objects on the surface of the stove to dry, even after it has gone out.
From rims
The materials to weld a potbelly stove, in addition to a couple of disks, will also require a piece of pipe 30 - 45 cm long with a similar diameter, a sheet of metal, and a pipe for removing smoke. This potbelly stove is easy to assemble:
- To adjust the diameter of the pipe to the size of the disks, the ribs are cut off at the joints. After welding, a vertical structure is obtained.
- An opening for the firebox is made on the side surface.
- A door is made from the cut piece.
- To allow air to enter the firebox, a square hole with a side of 10-12 cm is cut out in the lower disk.
- A hole is made on the back of the upper disk for the chimney pipe.
- To construct an ash pan, a metal circle is welded to the bottom.
- To heat food on a potbelly stove made with your own hands, install a hob made of metal 4 - 5 mm thick on the upper disk.
Method three. We use an old heater to dispose of waste
If you have an old sauna stove lying around, do not rush to send it to the landfill. Even if it is very rotten or rusty. We can turn a heater that has long been unusable into a fairly good garbage disposal by installing it at our summer cottage. We do it as follows. First, using available tools, we remove all internal elements from the heater - leaving only the grate and, of course, the body itself.
After this, we take sheet steel and weld it to the base from the inside, thus strengthening the entire structure.
In this case, we will be able to load garbage directly from above, although before loading large items, it is recommended to light a flame in advance using dry branches and paper. Directly during the combustion process, it is advisable to cover the stove with an iron sheet, placing pieces of brick under it - this will ensure the unhindered escape of smoky gases.
Advantages and disadvantages
Like any equipment, the Bubafonya stove has both positive and negative sides. Among the advantages, the following are noted:
- long burning period;
- uncomplicated operating conditions;
- simplicity of design;
- low cost of fuel raw materials;
- cheap components;
- availability of self-installation of equipment, provided that you have skills in working with a welding machine;
- easy transportation due to small size and weight.
The disadvantages include the following:
- Difficulties in maintenance: it is inconvenient to clean the bottom of the tank and remove combustion products, namely soot and ash.
- The appearance of condensation on the pipe walls, which leads to a decrease in efficiency.
- The classic version of the stove is characterized by insufficient heat accumulation. To correct this point, you should construct an additional water jacket, cover the stove with heat-insulating material, or make brickwork.
- Heating the bottom of the fuel tank requires placing non-combustible material underneath it or constructing a small foundation.
- The need for ventilation in the room.