Author: Yuriy Fedorovich Kolesnikov, thermal power engineer
How to build an outdoor stove with your own hands is a relevant question both for residents of non-gasified regions and for inhabitants of completely civilized places. The first are interested in the opportunity to cook food in the warm season using waste fuel (dead wood, dead wood, construction chips) - a home heating and cooking stove in the summer is not very economical, and it makes the house very hot while cooking dinner. Secondly, the opportunity to sit by the fire in the gazebo or on the lawn in a relaxation corner at the dacha or on your own property, while at the same time preparing shish kebab or barbecue ribs, without shelling out a mind-boggling amount for a turnkey branded garden stove. Both are also attracted by the opportunity to receive home-smoked products that are obviously not adulterated and are much cheaper than store-bought ones.
Possible problems
During construction, several mistakes can be made.
Connection of foundations - due to different loads, differences in subsidence are possible, which is why the furnace may warp in the future.
If you take river sand instead of quarry sand, the masonry mortar will not be strong enough due to the smoothness of the sand grains and their poor adhesion.
Hewn and cut bricks collapse faster, so when laying it you should try to install it with the cut side inside the seam.
When laying a chimney, it is necessary to use a special plug so that the mortar does not remain on the internal walls, and the surface of the masonry is cleaned of mortar every 4-5 rows.
If you do not make a cleaning hole in those places where the chimney changes direction, soot will accumulate in it. When installing dampers and doors, we must not forget about the property of metal to expand - masonry cannot be done without a small gap.
These and other mistakes can be avoided if you consult with an experienced craftsman before starting work.
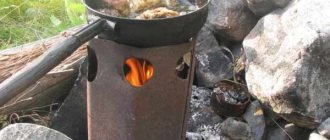
Stove-washer
Laundry stoves require a small amount of fuel.
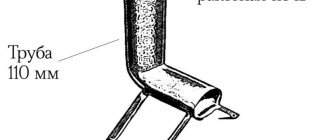
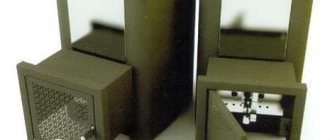
They are used not only for heating water when washing clothes, but also for steaming, as well as cooking tomatoes, mushrooms, marinades, steaming food, etc. These laundry stoves are made from sheet roofing or other steel. The thicker it is, the longer the service life, and vice versa. Light weight allows you to carry it anywhere. Figure 115 shows the laundry stove with all its details and dimensions. However, these dimensions can be reduced or increased depending on the availability of material and tank.
The stove consists of a metal casing, most often black steel (iron), a pipe and an enameled cone-shaped tank with a lid. You can use a galvanized steel tank, but then it cannot be used for food. The enamel tank is inserted into a casing, at the bottom of which there are three strong legs, slightly bent outward, which gives the stove stability.
At a distance of 80 mm from the bottom of the casing there is a combustion hole, closed by a door. Several holes of round, square or triangular shape are punched under it. If they are round, then the diameter is 15 mm. These holes serve as a blower. An ash pan in the form of a box is fixed under the firebox.
At the top of the casing, approximately 1/3 of its height, there are two handles for carrying the stove. The upper part of the casing does not have a hard side, thanks to which the tank fits tightly into the casing, which prevents the escape of smoke and hot gases. During combustion, hot gases wash the tank from all sides, and it heats up faster. To boil laundry, place an enamel tray with holes or a wooden grate at the bottom of the tank, which protects the laundry from burning. A pocket is fixed from the upper edge of the casing at a distance of 90-100 mm, which is necessary for the exit of smoke and hot gases. For this purpose, a corresponding hole is cut in the casing. The pocket has a cone-shaped shape with an upper diameter of 130 mm, closed from above the hole with a lid, to which is attached a pipe for a chimney (like for a samovar) with a diameter of 100 mm and a height of 50-100 mm. The pipe must be equipped with a wind suppressor, which prevents smoke and gases from escaping through the firebox.
To protect the lower part of the casing from rapid burning, an insert (second wall) made of steel of any thickness with a height of 200 mm is inserted into it. The combustion hole in it is 20-30 mm larger than in the casing. The insert is made with a diameter 20 mm smaller than the inner diameter of the casing. At the bottom of the casing there is a tray with bent legs or feet up to 50 mm high and numerous holes. This pan serves as a grate.
Individual parts of the stove can be secured using seam joints, welding or rivets. The tighter the connections, the better.
This stove is easy to make at home. To do this, first of all you need to buy a cone-shaped enameled or galvanized tank or make it from the appropriate metal, such as aluminum. Instead of a tank, you can use a cone-shaped bucket. Depending on the size of the tank, the dimensions of the stove also change.
The casing can be made from several pieces of steel, achieving a tighter fit of the pieces to each other. To protect the casing from destruction, its internal space is insulated with sheet asbestos.
If a flat tank is used instead of a cone-shaped one, then the casing is made cone-shaped.
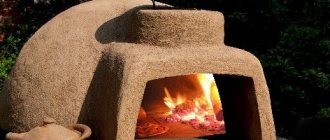
A stove of this design can be made of brick, but it must be installed permanently. Instead of brick, it can be made of adobe, using thick clay mortar for this purpose. Under the influence of high temperature, the clay is fired and forms a durable shard that will serve for a long time. The clay solution should be so thick that when you step on it with your foot, almost invisible prints would remain on it.
Source
Recommendations for using a small stove
In order for the stove to be useful and save money, it is necessary to monitor its condition. Even a minor crack increases the loss of efficiency. For better heating, use only dry wood for kindling. Be sure to close the view.
Major cleaning of soot is carried out once - in the summer; in winter, minor cleaning is done, but at least 3-4 times per season. Accumulated soot reduces the heat output of the device. If the viewer, valves or door are faulty, you cannot light the stove, because they control the draft and help carbon monoxide evaporate.
Despite all the nuances in the construction and operation of a mini-oven, it acts as an excellent heating device and can compete with modern gadgets in the speed and delicacy of preparing many dishes. It’s not for nothing that our ancestors considered the stove to be the soul of the house and placed the structure in the middle of the hut.
Not even a few centuries passed before she returned to us, only in a slightly different form. But its small size is not the main thing, because in terms of its functions and the wonderful atmosphere that is created in every home, the device is very similar to the good old Russian stove.
Cooking questions
In order to correctly make the stove you like, and before that, choose the right design, you need to know exactly what which outdoor stove can do. Therefore, before the technical and construction aspects, we will have to be distracted by culinary issues.
Oven or smokehouse?
An oven and a smokehouse are completely different devices. The furnace is required to “squeeze” as much heat as possible from the fuel load and not allow it to be wasted in space. Therefore, furnaces are designed (perhaps intuitively, based on the experience of generations) to burn fuel to the final combustion products - carbon dioxide and water vapor.
On the contrary, what is required from a smokehouse is not high thermal efficiency, but as much smoke as possible. But not just smoke that eats your eyes. Firstly, smoke for smoking should ideally not contain solid particles of unburned fuel. The final product should be smoked, not soot-encrusted. Anyone who has seen how a good industrial smokehouse works has probably noticed that in the area where the product is loaded, there is almost no visible smoke.
Secondly, smoke for smoking should not contain substances harmful to health. It is impossible to organize this chemically when burning organic fuel, so smokehouses are built in such a way that harmful impurities either “skip” past the smoked substance, or are neutralized and settle before it.
There is an important point here: in the temperature range of approx. It is extremely undesirable to smoke at 35-50 degrees, because... It is at such temperatures that there is a high probability of acid condensation; it is formed as a result of the interaction of chemically active particles of unburned fuel, the so-called. free radicals, water vapor and air oxygen. The acidified product not only tastes disgusting, but is also dangerous to health. Therefore, a trace is distinguished. types of smoking:
- Cold – the temperature in the smokehouse is up to 35 degrees. Preparation of products - salting in brine (saturated solution of table salt) and soaking immediately before loading into the smokehouse. Smoking time – from 5-6 days; breaks are not allowed. The taste of the finished product is the highest; shelf life without the use of means and methods of additional preservation can be calculated in months and years.
- Semi-hot (semi-cold) – smoking temperature 60-70 degrees. Preparation of products - short soaking in brine. The smoking period until ready is 0.5-2 days. Taste qualities are very high; the taste and bouquet are similar to those of cold smoked products. Keeping quality up to a month; usually up to 5 days.
- Hot – at a temperature of 85-120 degrees. Product preparation is not necessary. Smoking time – 1-5 hours. The taste qualities are very high, but the taste and aroma are not the same as those of cold smoked products. Shelf life without additional preservation up to 36 hours.
Considering the above, we can conclude that, firstly, the smokehouse for an outdoor stove must be a separate device. Any stove is not a smoke generator for smoking and it is impossible to set up the smoking process from the stove only by loading fuel and supplying air into the firebox; you also need to select the length of the flue from the outlet of the stove to the smoking chamber. Secondly, to feed a smokehouse with smoke, the simplest stove with low efficiency and a smoke tooth is best suited, see below.
Grill, grill and barbecue
An open flame is the enemy of any cooked food. Burning is only the visible and palpable “tip of the iceberg”: exposure to high temperatures on food products causes hydrolysis of fats, breakdown of carbohydrates and deep denaturation of proteins, saturating food with substances that are very harmful to health. In simple cooking ovens using solid fuel, direct contact of the food with the flame is avoided in various ways. What they have in common is that the food is not only baked, but also smoked, which is why, when properly prepared, its taste improves.
Grill
The hearth oven, which is commonly called a barbecue, is actually a classic Anglo-Saxon grill, the diagram of which is given on the left in Fig. Confusion arose in Canada, where French and English were mixed together. The grill structure follows from Anglo-Saxon culinary traditions, the essence of which was exaggeratedly but accurately expressed by Stubb from Melville’s novel “Moby Dick”: “You must take a piece of meat, from afar for a moment show it a slightly smoldering coal and immediately serve the steak to me!” Remember “bloody roast beef” from Eugene Onegin? In restaurants, baked meat is still offered rare - half-raw with blood, medium - baked until soft, juicy, like a kebab, and well done - crispy in a crispy crust.
Grill, barbecue and barbecue equipment
Note: if you find yourself in the southwestern United States, there may be something strange on the menu - hanaban (pronounced hanaban). This is a kebab in spices, removed from a skewer, something like Arabic khusal.
The grill is suitable for cooking rare, medium, and well done meat. This is achieved by placing the grate with the product at different levels above the brazier with coals. Coals rarely flare up, because... scattered in a thin layer over a dense floor and air access to them is limited. If they flare up, then the piece is simply moved to the side.
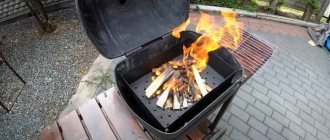
Brazier
Rare meat can be very tasty, but in southern countries, where pathogens of various diseases thrive, it can also be very dangerous. In addition, in many countries of the South they do not eat pork at all, and beef and lamb are rare and harsh. Hence the design of the barbecue (in the center in the figure): a holey under and partly the walls of a deep tray, a thick layer of coals. The meat is heated not only by thermal radiation, but also by a flow of hot air.
B-B-Q
In a real French barbecue (oh, those pampered paddling pools!), heat radiation is not involved at all in cooking. The design of a barbecue oven is quite complex (on the right in the figure), but reliable and multifunctional:
- Thanks to the separate cooking chamber with a hood, wind and outside temperature have almost no effect on the quality of the finished product.
- If you close the chamber portal with a flap lid, like in a Russian oven, the chamber turns into a semi-hot or hot smoked smokehouse.
- You can bake bread, cook pot roast, etc. in the oven. If salting the dish is undesirable, it is cooked in a container with a tight lid.
- Woodshed and dryer are relative concepts. Here and there you can dry mushrooms, berries, and fruits that require different drying modes. Additionally, it is regulated by dampers.
Note: pay attention to the protrusion of the hearth, which does not completely isolate the firebox from the oven. This is the so-called. a smoke tooth or jib is a radical means of reducing the dependence of the technical performance of any outdoor stove on weather conditions, see below.
Purpose of an outdoor stove
In addition to cooking in the fresh air, it will become an assistant in many matters:
- canning vegetables, berries;
- drying mushrooms, fruits;
- smoking meat and fish.
There are many advantages to purchasing it. The garden stove does not consume gas or electricity, as it runs on wood or coal. Its location near the gazebo will make it convenient to receive guests or have dinner with the family, and the interesting design of the structure will turn it into a decoration for the estate.
Users often search for:
- Woodpile for firewood at the dacha
- Firewood storage shed
If you decide to do it yourself, it is worth considering that:
Purchasing high-quality material guarantees the durability of the device. It is better to choose a combination oven
It's more practical. When choosing a site for a future structure and carrying out construction work, it is important to follow safety precautions. Accurate calculation of the amount of materials will save money and reduce the time of all processes.
Criteria for a good stove for a summer residence
A country stove must satisfy several conditions, which makes it a more or less desirable heating device in a country house:
- It should warm up quickly and give off heat well . This will allow you, when you arrive at the dacha, not to walk around the room for several hours in winter boots and a jacket.
- It should have compact dimensions , if only because the larger the stove, the longer it will heat itself until it begins to warm the air in the rooms. Proper placement of the stove at the junction of rooms will allow you to heat even several rooms. In a one- or two-room house, building a bulky stove makes no sense at all.
Compact stove does not take up space in a small room
- No one wants to buy a carload of firewood and find out there isn't enough for the heating season. Economic considerations are paramount, which means the furnace must have the highest possible efficiency .
- Since the summer cottage can be located far from the gas main, the stove turns from a heating device into a means of cooking. Having an oven and hob is a plus.
- Implementing a long-burning mode will allow you not to waste time and not be distracted by constantly adding logs to the firebox.
Types of brick kilns
Differences in furnace device designs are manifested in the masonry features, shapes and sizes.
Simple BBQ
A popular design for outdoor structures is the barbecue stove. It is erected using simple brickwork, which resembles the letter “P”.
5b6027f1fd565a39b7d9f054b8937253.jpe d4c248074f8a46e4f1b275d8d06f7af7.jpe 61ec0d7d7f3aed387a642719567fc2b2.jpe
The inner walls have several projections to secure grates for meat and a metal sheet for coals. The structure is light in weight, so there is no need to build a massive foundation.
For the base, choose scraps of concrete pillars. Raise the device to the height that will be convenient for comfortable cooking.
Outdoor stove with smokehouse
In the design of such a stove, a smokehouse is installed above the hob in the smoke collector. It can be created from more affordable materials than a barbecue. A special feature of the stove with a smokehouse is the absence of fire-resistant masonry.
Scheme of a direct-flow chimney for a stove
This device is more difficult to build than the previous ones, but the increased ease of use and attractive appearance cover all the shortcomings.
These products look like a fireplace. However, this is not quite true. Using an open flame in this type of stove is dangerous. This is explained by the design of the pipe - it is direct-flow.
Cooked on such stoves using coals. Firewood is used only at a great distance from residential and outbuildings.
Features of operation
The operation of a brick kiln in a country house has its own characteristics:
- The fresh masonry of the stove must dry. This will take at least two weeks;
- the first firebox should be using paper, wood chips and no more than 15–20% of the total amount of fuel material;
- To determine whether the oven is completely dry, you need to pay attention to the internal damper. The absence of condensation will indicate readiness for normal operation;
- flammable materials cannot be used as fuel material;
- before kindling, it is necessary to open the vent, and after it, ventilate the room;
- you cannot light the stove if there is no draft;
- If cracks appear on the walls of the furnace, they must be repaired with mortar.
A metal stove has its own nuances during operation:
- the metal body of the stove should be equipped with legs so that there is minimal contact with the floor;
- Wall surfaces must be insulated from heat and sparks. For this, metal sheets, thick foil and other non-flammable materials are used;
- During the combustion of the combustion material, a coating of soot forms on the walls of the furnace, which reduces heat transfer. In this regard, the internal and external surfaces of the structure must be cleaned. This is easy to do with the help of special scrapers, brushes and ruffs;
- during operation, the metal becomes very hot, which, if you are careless, can get burned;
- firewood and other combustion material must be stored at a distance of at least 40–50 cm from the ash pan and the door to the combustion chamber;
- Open containers with water should not be left above or near a hot stove. Moisture that gets on a hot stove will instantly turn into hot steam, which can cause burns.
Video: stove for a country house or for a garage
Prices for factory stoves
Owners of dachas and country cottages should consider stationary or mobile purchased stoves.
A barbecue oven made of red refractory brick with a length of 1.4 m, a firebox width of 0.98 m, a height of 2.12 m, and a depth of 1.3 m without installation will cost 78 thousand rubles. The same structure made of aerated concrete costs 55 thousand. The price of a brick oven 2 m long and deep, equipped with a cutting table and a built-in sink, will be 105 thousand rubles.
A product of smaller depth, 71 cm, without additional devices and cladding will cost 54 thousand.
Building a stove yourself will be much cheaper. Regardless of the type of design chosen, it will delight the owners with delicious dishes over a fire and make evenings with family and friends warm and cozy.
Welcome to visit
After completing the construction of the stove, you can invite guests, but for this you need to arrange a recreation area around it. the area around the stove with tiles . If the dining table is not located in the gazebo, then it is worth considering what the patio will be like: laid out from the same tiles or made from decking boards. You can also make tables and benches yourself. Photos and detailed descriptions of the works can be found in large quantities on the Internet. The base columns for benches and tables can be made from leftover bricks, because after building a garden stove out of brick yourself, this will not cause much difficulty.
Folded strictly according to the design, in accordance with the order and using high-quality materials, the stove will serve faithfully for many years, gathering all your family and friends at your hospitable table. Many people make stoves in the garden with their own hands; there is no need to be afraid of difficulties.
Types of garden stoves
Materials and tools
First, prepare the necessary tools:
- shovel;
- bucket for solution;
- vertical and horizontal level;
- pliers;
- trowel;
- pickaxe;
- hammer, including a rubber one.
We prepare reinforcement and formwork if we do the concreting of the foundation ourselves.
We purchase enough fireproof and fireclay bricks to cover the entire structure. Construction materials must:
- be resistant to temperature changes;
- not be subject to corrosion and other external influences;
- to be whole;
- be certified.
Then we check the availability of the necessary metal equipment:
- pipes;
- gratings;
- staples;
- gate valve;
- door;
- corners.
Their number must correspond to the furnace design.
We prepare a mortar for masonry, which will include:
- clay;
- sand;
- alabaster;
- cement, etc.
Consult with the builders first and choose the most appropriate solution option. Experts recommend cement-sand grade M250 and higher.
7181adadd41f890dd9ae31eefbcc49e8.jpe
Stage 1. Selecting material for manufacturing
Despite the huge selection of building materials, there are actually not many of them that can be used in our case.
- fireclay brick or aerated concrete - both materials are very resistant to high temperatures;
- finished metal or cast iron products are an expensive option, but installation time will be significantly reduced.
Let's look at the problem from a practical point of view. Aerated concrete blocks will cost less than brick, but in terms of aesthetics they are definitely inferior. In addition, these blocks require additional cladding.
Note! Many people resort to buying ready-made stoves, and the reason for this is their undeniable advantages: easy installation (using glue) from a kit of parts according to the included instructions.
If we talk about the combustion chamber, then everything is more complicated here, because it is extremely difficult to purchase a suitable option. Therefore, you need to do it yourself. And the design itself, in theory, should be the way you want it to be - from the preferred design to the cladding method.
Project selection
If you love fried meat, then the oven should include barbecue and grill elements. For smoked meats, you can install a smokehouse. The Russian outdoor stove includes a hob, which will provide the owners with healthy boiled, steamed or stewed dishes. And the availability of space for a cauldron - exquisite oriental: pilaf, shulem, shurpa, etc. Each type of stove has its own patterns and subtleties of masonry.
In addition to functionality, you need to think about the overall appearance, which will harmoniously combine with the entire site and the house.
Photo 2. An example of a brick structure project with a Russian stove, sink and cauldron. There is a comfortable warm place to sit on the side.
Conclusions and useful video on the topic
Video #1. A video to help independent stove makers, the material presents a visual arrangement of a heating stove:
Video #2. A detailed guide to the construction of a heating and cooking unit according to ready-made procedures, but with some changes from the contractor:
When choosing a design for your own construction of a stove for a summer residence, you need to take into account your own capabilities and skills. It is possible that someone will consider the options we have proposed to be too complex or simple. In any case, the information presented will help you get an idea of the stove structures in order to use it yourself or monitor the actions of hired stove workers.
If you had to build a brick stove for your dacha yourself, please share photos of your own designs. Perhaps you know some subtleties that we did not take into account in our article? Tell our readers about them - leave comments in the block below.
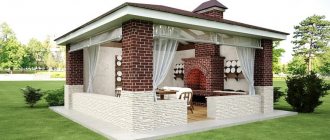
Combined brick garden stove
This model is designed to be built in a gazebo. It combines the advantages of a Russian stove and barbecue. To build such a unit, enough space is required. Benches, chairs, tables should be located away from the structure.
The main stages of laying a garden stove:
You need to decide on the parameters of the device, prepare a drawing, and also purchase everything necessary for the work. It is important to make a solid foundation of cement and sand. How to lay the base was discussed earlier. You need to wait a few days for the foundation to harden well. The furnace is laid according to the drawing
The solution is mixed from sand and clay in a ratio of 3:1. The Russian garden stove is equipped with two grates, which should be located at a height of 1 m above the stove. One of them is intended for lighting a fire, and the second will be used to prepare food. The barbecue must be placed on a concrete base. You need to organize two compartments: a cooking table where you can build a sink, and a roasting pan equipped with a smoke pipe. The chimney is the main part in the construction of the gazebo. The most convenient and correct shape is trapezoidal. When installing this system, you must be careful, because the slightest mistake can lead to structural failure. Using the drawings, there will be no problems with the construction of a Russian stove and barbecue. The main thing is to accurately observe the dimensions and required shapes.
Chimney installation
The operation of the entire garden stove depends on a correctly installed chimney. The easiest way to make a chimney without errors is to use a modular system. Having collected a sufficient number of modules, you only need to assemble them like a construction set and cover the outside with bricks. It is important that the modules fit tightly together and are firmly connected with clamps or heat-resistant sealant.
There are several rules for installing a chimney:
- Installation must begin from the stove;
- The parts must fit tightly together without forming gaps or cracks;
- Good access must be provided to all parts of the chimney so that in case of blockage, the chimney can be cleaned;
- The joints of the modules should not be in the ceiling.
How to make a Russian summer stove out of brick for outdoor cooking
The Russian summer oven is suitable for cooking dishes from any cuisine in the world. You can bake bread, pies, flatbreads, pita bread, and Italian pizza in it. The outdoor oven is also intended for cooking fish and meat dishes. A Russian stove outdoors can retain heat for a long time. Its main disadvantages are its large size and irrationally high fuel consumption, which also increases because such a stove takes a lot of time to heat up. It is recommended to heat an outdoor stove for cooking only with hardwood wood.
A classic outdoor cooking oven has no smoke ducts. The improved Russian stove additionally has a heating panel with smoke channels and a stove.
An outdoor Russian stove on the street under a canopy is placed on a base - an oven. Above is the furnace furnace and hearth.
Wood is burned in the crucible and food is prepared. The hearth contains the mouth of the furnace for the exit of flue gases from the furnace. Above the mouth there is a furnace smoke collector, and above it there is a chimney. The walls of the inclined chimney serve as a second gas threshold.
The choice of size of the firebox depends on the purpose of the stove.
When building a Russian stove outdoors with your own hands, its outer walls should be lined with thermal insulation to reduce heat loss.
To do this, you can use vermiculite with clay or expanded clay and basalt wool. You can cook in such a stove even in the cold season at temperatures down to -10° C, but much more firewood will be required. Look at the photo of the stove on the street - options for its arrangement are demonstrated:
How to upgrade and improve the operation of the furnace
Improvement and modernization of stoves for summer cottages can be carried out as follows:
- The design of a long-burning stove has one drawback. To remove ash, it is necessary to turn the heavy structure over. To get rid of this inconvenience, you can make an ash pan and grates at the bottom of the cylinder. However, such a modification risks introducing air into the combustion chamber . As a result, the wood will burn faster. Therefore, doors must be sealed, equipped with sides and seals.
- The design of a long-burning stove can be improved by the number and shape of ribs on the piston (weight). To do this, they do not use pieces of channel bars or corners, but rather curved steel strips. Thanks to the shape of the plates, the air swirls. For more efficient operation of the piston, 6 to 8 plates are welded to it. This ensures uniform distribution of air in the combustion chamber.
Heat will be distributed evenly - A brick oven will take up less space if you consider building a corner option. To construct this option, less material will be required, which means the costs will be significantly lower.
Less material required - An improvement to this type of stove is the equipment with a switch for winter and summer mode. This is convenient in spring or autumn, when there is increased dampness in the atmosphere and it is hot to heat the stove at full power. Such a switch is visible in the masonry diagram of the 6th row of a brick kiln.
An additional damper will improve the operation of the oven
Choosing the optimal location
The location of the stove for a garden house must be approached with the utmost seriousness, since not only effective heat transfer, but also your safety from fire depends on it. Of course, ideally in the old days, and even now, the place where the stove will stand was planned before the construction of the house began.
Here are the basic requirements for determining a place for the stove:
- The room where you plan to install a wood-burning stove must be at least 16 sq.m.
- The stove must be installed on a reliable foundation, which means there should be no floor beams under it. The chimney should exit in a place where there are no ceilings.
- Construction near the outer wall is not advisable, because precious heat will be given to the street. Therefore, it is better to locate it in the center of the house; the chimney will exit in the area of the ridge, and the height of the pipe will be smaller. For wooden houses, central placement is recommended for fire safety reasons.
Now let's talk about the features of choosing a place for the stove. The best option to ensure good heat transfer is to place the stove so that all walls can come into contact with the air inside the home. The rooms should not be large, then you cannot do without additional heat sources.
Therefore, ideally, it should be placed in the opening of the partition between the rooms, and the firebox would go out in the kitchen or hallway area. On the one hand, the kitchen also becomes warm with the ability to cook, and on the other hand, the living spaces are freed from garbage.
When installing a multifunctional stove in large rooms, it should again be placed in the center of the room. The stove turns into a place of concentration of comfort that gives a home. It turns out something similar to a studio apartment, with an open layout, where the stove becomes a space divider.
Stove for a cauldron
This version of the garden stove is designed for cooking in a cauldron or on a built-in stove. It has a simple masonry scheme, and can be done independently if you have certain skills.
Stove with built-in cauldron
You can, of course, just hang a cauldron over a fire and cook food, but such a stove, designed for a cauldron, will help distribute the fire evenly under it, and the dish will turn out exactly as it should be according to the recipe, and not with a burnt taste. In addition, a carefully constructed and decorated building will add a special warm note to the landscape of the site and become a decorative element.
- The first thing to start working on a stove is site planning. To do this, you need to know the dimensions of the building - in this case they are 1010 × 1114 × 800 millimeters.
Schematic diagram of a stove with a cauldron
- Next, based on the diagram, the necessary materials are purchased: brick (preferably fireproof); mortar of fireclay dry mixture and sand for masonry; doors for the blower, firebox and cleaning chamber, grate and hob made of steel with a thickness of at least 3 mm.
- A well-designed site is a reliable basis for such a stove. Since it does not have the same weight as heating and cooking buildings, it is not necessary to make a capital foundation for it. The area under the stove should be raised above the soil surface by 10-15 centimeters. The base is made using formwork, and it is advisable to reinforce the structure with five-millimeter metal wire.
- The main feature of the internal design of a cauldron stove is its shape - it resembles a truncated cone. This is done to ensure that the surface of the cauldron is heated evenly.
An important feature of the stove is the channels for uniform heating of the cauldron
- On a prepared and fully set site, you can begin laying the masonry. In this case, the bricks are bandaged in the corners, so that even rows begin with half a brick, and odd rows with a whole brick. The firebox is laid out from halves of bricks, which are cut at an angle - this is done in order to achieve a semicircular shape.
- The diagram above clearly shows that starting from the first row, a hole for the blower chamber is marked, and a door is installed on it, which is secured with metal wire.
- A grate is installed on the third row, and the laying of the walls continues.
- On the fourth row, at the back of the building, a hole is left to remove smoke and a firebox door is installed, securing it in the same way as the blower.
- Fifth row - external and internal walls are laid.
- Sixth row - the masonry around the fire door is completed.
- From the seventh to the eleventh row, work proceeds according to the scheme and the inside of the firebox is laid out.
- On the twelfth row, the structure is strengthened with a metal corner, a plate is installed on top of it, in which a round hole is made in advance the size of the cauldron.
The hole can be made with a grinder, short cuts, or using a gas cutter. Then the hole needs to be leveled, since the cauldron must fit tightly into it at two-thirds of its height.
Such a stove will help you cook not only in a cauldron, but also use the stove for boiling water or frying vegetables or meat products in a frying pan. To do this, you need to provide a lid to cover the hole for the cauldron.
Step-by-step instructions for building an outdoor brick oven
The beginning of work is drawing up a project, where the consumption of materials, their total cost and choice of location are calculated. Construction stages include:
- Pouring the foundation.
- Laying the base, blower, smoke ducts.
- Installation of grate and firebox.
- Hob fastening.
- Installation of chimney and fittings.
Brick kiln diagram
From materials and tools you need to prepare:
- fireproof, facing brick;
- cement;
- clay;
- sand;
- crushed stone;
- firebox doors, blower;
- grinder with disc attachments;
- steel pipe;
- metal rods;
- asbestos cement board;
- shovel;
- level;
- hammer;
- celt;
- cord for marking.
Let's consider a detailed description of each of the construction stages.
Construction of the foundation
It is better to pour a monolithic foundation under the stove, having previously marked the area with a nylon cord. In this case, the width of the area should be 10–15 cm greater than the width of the masonry.
A hole up to 50 cm deep is dug. The soil is compacted. Steel rods are installed horizontally. Covered with a layer of crushed stone. The pit is filled with a solution of cement and sand in a ratio of 1 to 3.
To avoid cracks in the foundation, it must be periodically watered until completely dry.
Lay out 2 layers of cinder block. An asbestos-cement slab is installed on top. This will raise the height of the oven.
Another option is to cover the monolith with roofing felt to create a waterproofing base.
Furnace laying
- The order in the first row begins with a whole brick, each subsequent one - three quarters, halves. The evenness of the masonry is checked by level.
- In the second row, a blower door is installed, which is wrapped with asbestos cord. First, 3 mm iron wire is placed in order to secure the door.
- The opening between the brick and the door should be no more than 10 mm. Having closed the vent, the grate bars are installed.
- The masonry is carried out up to the height of the fasteners of the second door. The dimensions of the brick are adjusted using a grinder.
- The top of the oven is covered with a stone slab. If you need a hob, it is better to fix it with cast iron.
The masonry of the stove is clearly shown in the photo.
Photo: lay out rows 2 and 3
If desired, an arch made of brick or stone is laid out.
Chimney
To install it, you need to take into account several important recommendations:
- The chimney fasteners begin to be installed in the direction from the stove.
- The most convenient to install is a modular system, which is lined with brick on the outside.
- At the joints, the modules are treated with a heat-resistant sealant to ensure the integrity of the seams.
- Each element of the system is connected to a depth of half the pipe section.
- The joints of the chimney parts should not pass through the ceiling of the structure. They are provided with free access to remove blockages if necessary.
- The recommended distance between brackets when attaching modules is at least 2 m.
Chimney lining
How to protect the stove from climatic factors
At the end of the masonry, the brick seams are carefully checked for integrity and rubbed down. The identified cracks are filled with solution.
da2e891df1f12cafd2d70c176d194a9f.jpeFor an aesthetic appearance and extended service life, the device is lined with fire-resistant tiles, porcelain stoneware or natural stone. You can build a canopy, which will prevent precipitation from entering the structure.
Recommended types of building materials
The range of suitable refractory raw materials is small. Let's look at the two main types in more detail.
Brick
The optimal solution is fireclay or refractory brick. Withstands temperatures up to +10000 C. Such a stove will not need finishing.
Red solid or ceramic bricks are suitable for cladding. The second one costs much more, but will also last longer. Preference should be given to brands M-250, M-500.
Even at the stage of drawing up a design diagram, you should take into account the dimensions of the brick. They produce 2 types:
- 230x114x65 cm;
- 250x120x65 cm.
This point should be reflected in the project. For example, to build a Russian stove you will need to purchase from 2200 to 3500 pieces. In addition, the solution consumption depends on the quality of the material.
To save money, you can use used bricks, but they should be thoroughly cleaned before laying.
Aerated concrete
Cheaper stove material with a high level of thermal conductivity, resistant to temperature changes, and environmentally friendly. Convenient to process and cut. Several times lighter than ceramic bricks
Its significant drawback is fragility. Upon impact, it will crack or split. It is hygroscopic, so when it freezes it can begin to crumble.
For an aerated concrete stove, it is recommended to erect a canopy and additionally line it.
Calculation of basic parameters
Before choosing a working design for a heating device, it is necessary to make a preliminary calculation according to the parameters of a particular room. The most accurate method is to determine the dimensions based on the heat output of the furnace. In order not to go into complex calculations, for well-insulated houses they use a simplified calculation scheme proposed by I.V. Kuznetsov. This method uses the average thermal power removed from one square meter of the surface of the unit (TMEP). For a conventional firebox, take the value 0.5 kW/sq. m, and if intensive heating is necessary, which occurs during severe cold weather - up to 0.76 kW/sq. m.
In principle, these values are enough to select a suitable project from those that can be found in the public domain. If the available options are not suitable for any reason, then you will need to calculate the parameters of the main elements of the furnace and design your own design.
Firebox
The dimensions of the firebox are determined based on the maximum volume of the fuel fill. In this case, the amount of combustible materials is calculated using their calorific value and specific gravity, focusing on the required power. The volume of the firebox should be 2–3 times larger than the obtained value, which will allow the stove to be reheated at extremely low temperatures. When calculating the size of the combustion chamber, it is necessary to take into account that the maximum filling should not exceed 2/3 of the volume of the combustion chamber. In addition, the dimensions of the firebox and all its components must be adjusted to the size of the bricks used for laying the stove. In your calculations, you can use special tables designed taking into account the need to heat rooms of various sizes.
Calculation table for the main elements of a brick kiln
Ash pan
The height of the ash pan depends on the type of fuel used. For low-ash combustible materials such as coal or peat briquettes, this value is taken equal to 1/3 of the height of the firebox. If the stove is heated with wood or pellets, then the height of the ash chamber must be reduced to 1/5.
Chimney
When calculating the chimney, it should be taken into account that the place of its installation must comply with SNiP
Unlike gas heating equipment, wood stoves do not require much draft, so the best shape for the smoke channel would be a rectangle. When calculating the chimney, it is taken into account that the cross-section of the blower should not exceed the area of its flue, and all values are adjusted to the dimensions of a standard brick. Since accurate design requires operating with a lot of data and parameters, it is best to use one of the special programs. However, for the most common cases (no kinks in the smoke channel, vertical stroke, rectangular cross-section, height from 4 to 12 m), you can use average values for furnaces with a power of up to 14 kW:
- Less than 3.5 kW - 140x140 mm.
- 5 – 5.2 kW – 140x200 mm.
- From 5.2 to 7.2 kW - 140x270 mm.
- From 7.2 to 10.5 kW - 200x200 kW.
- 5 – 14 kW – 200x270 mm.
To calculate the amount of material required, it is best to use special tables. Below is one of them.
Calculation of the number of bricks
Technology issues
Base
Under the foundation of the outdoor stove, they dig a pit on the bayonet of a shovel (30 cm). First, an anti-heaving sand cushion with a thickness (thickness) of 15 cm is poured into the pit and compacted, and crushed stone backfill is placed over it to the ground level. The backfill is carefully leveled to the horizon. The extension of the sides of the pit beyond the contour of the furnace in plan is from 400 mm.
Further, if the foundation of the furnace is a ready-made concrete monolith, the foundation slab is simply placed on crushed stone. If the foundation is poured with your own hands, formwork with a height of 80-150 mm is made under it. Reinforcement is standard 2-level. Solution - from M250. It is impossible to lay the foundation of the furnace flush with the ground: it will soon become clogged with soil and its “chemistry” will ruin the lower rows of the masonry, which is equivalent to re-laying the entire furnace. To avoid tripping over the threshold of the foundation, a gently sloping blind area is made of curb stone or cement-sand mortar along its contour.
If the stove is built in a gazebo, on a veranda, or generally on a wooden floor of sufficient load-bearing capacity, the removal of the stove base must be done according to fire safety rules: from 600 mm on the side of the fire door and from 300 mm on the other sides. Asbestos cardboard with a thickness of 4 mm or basalt mineral cardboard with a thickness of 6 mm or more is placed on the floor, then a sheet of roofing iron. The iron flooring is moistened with a liquid clay solution, felt or basalt cardboard is placed on it and impregnated with the same solution. Laying the furnace structure begins when the clay impregnation is completely dry.
Brick
For an outdoor stove, you need exactly stove brick: dense, well-annealed. A rough stove or a 2-burner stove with a smoke tooth, in which the firebox does not get very hot, can be made of red working bricks, incl. hollow - the stove from it warms up faster and loses less heat in vain. Sand-lime brick is absolutely unsuitable for stoves, and fireclay masonry in outdoor stoves should be avoided: due to the high moisture absorption of fireclay bricks, it is susceptible to frost in the open air in winter.
Note: why would the authors of some publications and the rewriters who are crazy about stealing their material think that a stove can be made from gas blocks, the Almighty hardly knows. This is foamed cement mortar. Under the influence of high temperatures, cement gradually but quite quickly loses water of crystallization and disintegrates into dust.
Masonry mortar and masonry
Ordinary clay stove mortar is unsuitable for outdoor stoves: it will become limp during the period of inactivity during spring and autumn bad weather. Stoves with a relaxed thermal regime (rough, 2-burner with a smoke chamber) can be laid on a cement-sand mortar from M250 (Portland cement from M500: sand 1:3 - 1:3.5); in extreme cases, it won’t take long to completely shift them. Sometimes outdoor stoves at weekend dachas are placed on the same mortar with reinforcement of 6-7 mm thick seams with 3 mm thick steel mesh. However, with more or less regular use, a stove folded in this way will last no more than 5-7 years.
To build a truly durable outdoor stove, you will have to buy dry stove mortar for laying outdoor stoves and seal it according to the instructions. In general, this is a clay-cement-sand mortar, but the quality of the clay for it must be tested in the laboratory, and the dry mixture must be prepared on production equipment. If you don't mind taking the risk of laying down a rough or slab first, a trail of mortar for laying outdoor stoves is prepared at home. way:
- White or gray fatty clay is mixed with a large amount of water and left to “sour” for three days;
- The first two days the clay solution is periodically stirred, the third day it is allowed to settle;
- The suspension is drained, and the clay sediment is pressed through a sieve with a mesh size of 1.5 mm and dried in the shade;
- Dry clay is crushed to a fraction no larger than 1.5 mm and Portland cement grade M400 or higher is added in an amount of 10-15% of the volume of clay;
- Make a “sausage” test for the fat content of the clay-cement mixture, as when preparing stove mortar with your own hands;
- Add mountain sand of fraction 0.5-1.5 mm to the dry mixture to the desired fat content. Gully and rounded quartz river sand are not suitable. Only now the mixture is ready to work.
You need to prepare masonry mortar for the stove, from a purchased or home-made mixture, in small portions so that it can be worked out in 2-3 hours, because The clay-cement-sand mortar dries and separates in the bucket. For beginners, it is better to make a bucket of mortar at a time; it will be enough for 100-120 bricks. It is better to apply the mortar onto the brick with the palm of your hand in a layer of approx. 3 mm. The squeezed-out excess is immediately removed with a finger, and the seams from the outside are cut with a wooden stick to a depth of 4-5 mm for moisture insulation, see below.
Note: the thickness of the seam between fireclay and red stove bricks is 6 mm, because the moduli of their thermal expansion coefficients (TCE) are different.
Seam protection
Neither cladding with tiles, stone or face bricks, nor plastering with moisture-resistant plaster will completely protect the masonry joints of an outdoor stove from getting wet. A radical way to protect external joints from moisture has appeared only in our time: grouting the joints with glue for porcelain tiles. The seams are rubbed down after the masonry has completely dried (20 days at 15 degrees and 7 at 25). During the drying period, a temporary canopy is installed over the oven to avoid uneven heating by direct sunlight.
As for the internal seams, to protect them, all openings/openings in the stove structure are plugged with bags filled with dry grass, rags, etc. during winter downtime. So the temperature inside will be at least a degree higher than the outside one, which will prevent condensation. In the spring, before the first start after winter, the stove is quietly heated for an hour or two with paper, shavings, dry grass, until the smoke from the chimney brightens or becomes almost transparent. Now the furnace can be started at full speed.
Mortgages and accessories
Metal embedded parts can only be walled up in furnace brickwork; There should be no mortgages in fireclay. The thickness of the mortar layer between the metal and the stove brick is also 3 mm, so the seam with the embedded part will be 6 mm thick + the thickness of the embedded part. Because seams thicker than 13 mm are unacceptable, the maximum thickness of the embeds in the furnace is 5 mm, and the minimum, according to general building standards, is 4 mm. Wire embeds can be 3 mm thick.
Deformation gaps between the brickwork and fittings (doors, flaps, latches, gates) are required to be 6-12 mm wide. Most often, the gaps are 10 mm. Deformation gaps are filled with fluffed asbestos; As a rule, for this purpose, the fitting element is wrapped around the contour with an asbestos cord before installation. They put the fittings in place as soon as the masonry reaches the level of its bottom; It is unacceptable to push the part into the finished opening! Next, the laying is carried out by circling the fittings until they close at the top of it.
In the manuals for the construction of stoves they write that the fittings in the stove structure need to be secured only with wire, because... cast iron does not cook or cooks very poorly. This is true, which is why cast iron fittings are provided with eyes and/or grooves for 3-4 mm wire. Installation of cast iron elements of stove fittings is done as follows. order:
- As soon as the masonry is brought to the bottom of the part, grooves are selected in the bricks with a grinder for the wire whiskers. The width of the grooves is 6 mm. Laying the mustache in the masonry - from 1.5 bricks, better - 2.5-3.5 bricks. The ends of the wire should not fall on the vertical joints of the masonry!
- A wire is threaded into the lower eyes of the asbestos-wrapped fittings, the piece is put in place and the laying continues;
- In the last row of masonry before the part covering the part, grooves are selected for the upper wire whiskers, as in step 1;
- Insert the wire into the upper eyes of the part;
- Lay out the overlapping row and carry the masonry further.
At the same time, in outdoor stoves that are heated irregularly and not intensively, fittings made from ordinary structural steel are quite durable, incl. homemade. This saves a lot of money, because... cast iron fittings road. It is quite legal to attach steel stove fittings by welding to embedded parts made from a steel strip or angle.
Which stove is suitable for a garden house?
First we need to decide what function the hearth will perform for the garden house:
- If you are at the dacha only in the summer, and you only need it for cooking, a hob type stove is suitable for you. Its design does not provide heating. The combustion chamber, equipped with a chimney and an ash pan, is lined or made of brick, and a metal plate lies on top.
- Heating stoves are used by summer residents when they simply need heating, and have an electric stove for cooking. The design of such a stove is simple; it consists of a combustion chamber, an ash pan where ash is collected and a chimney. These also include fireplace stoves, with the help of which dacha owners try not only to heat their living spaces, but also to create country comfort. The efficiency of heat transfer of such structures depends on the thickness and origin of the material and the method of laying. Laying one brick allows you to heat the furnace walls up to 600 degrees; those laid out in this pattern are called Dutch ovens. Stoves can have different shapes, it all depends on the area of the room, the interior and the desires of the owners.
- In our country, the most popular is the heating and cooking stove; its design is more complex and consists of a combustion chamber, chimney, ash pan, hob and oven. To build such a stove you need a lot of space, but thanks to it, the house will be warmer, and a delicious dinner, simmered on the stove by a skillful housewife, is guaranteed. Such a stove has many accessories; it can be equipped with a drying chamber, a stove bench, and a tank for heating water can be placed in the structure. This stove option is the most multifunctional.
Types of stoves, which option is better to choose for self-production
To heat the premises of a country house, use:
- buleryan;
- brick;
- metal stoves;
- on used oil;
- long burning stoves.
Brick
Brick stoves for cottages have a simple design. It is easy to find suitable material for its construction. However, this heat source will require a heavy base in the form of a concrete slab, so it is rarely found as a heating structure in a small room in a country house.
Heater-cooking oven
Buleryan
The Buleryan heating device is a source of high heat output, which uses wood chips, small firewood and peat as fuel material. Despite its high performance, this device is expensive and requires special knowledge during installation.
Small and efficient heat source
Potbelly stove
A potbelly stove is usually small in size. This heating device allows you to create heat by burning wood. The potbelly stove is very popular due to its simple installation, reasonable price, simplicity of design and the ability to make this stove yourself.
Frequently encountered stove
On used oil
This type of stove is often used by dacha owners. This option is very convenient, since many of them have vehicles, and when servicing a car, there is always fuel oil and other liquid fuel left over. In addition, this stove is safe to use, since the fuel burns completely inside the structure.
Dual heat source design
Long burning "bubafonya"
When installing a long-burning stove, the room in the country house will be heated for a long time. It is not difficult to build such a stove yourself. All you need is skills in handling a welding machine.
The design saves fuel material
Considering the cost and performance of these heating devices, a brick option and a long-burning stove are most suitable for a summer residence. The cost of materials, production time and functionality of these heat sources make them the most popular among owners of summer cottages.
When making these stove options yourself, you will need skills in handling a welding machine and experience in bricklaying.
It should be noted that a big role in good heating of a country house is played not only by the functionality of the selected stove, but also by high-quality insulation of the walls of the building.
The stove for a summer residence is often modernized, so that not only firewood and sawdust, but also waste oil are used as fuel material.
Recommendations for choosing purchased structures
The key indicator in purchasing a ready-made kitchen stove is the type of fuel on which it will operate.
The factory-produced summer stove has several design options.
- If you have gas nearby, you should consider purchasing a gas stove with oven. Its heating temperature is adjustable. The device is ready for use at any time and does not require the cost of searching for fuel.
- A cheaper solution would be to buy an electric stove. Easy to use and convenient to transport.
- In the absence of communications, an excellent wood-burning option is a solid fuel stove. Suitable for the most remote summer cottages.
- Universal stoves allow you to use several types of fuel, which significantly saves time on cooking.
It is worth noting that factory models have a number of advantages in operation:
- a large selection of finished products of various sizes and colors; metal alloys and refractory mixtures are used as materials;
- the device’s operating scheme reduces the risk of fire and smoke leakage to a minimum;
- designs are light in weight.
- quick assembly and installation.
However, a DIY project for a closed or open summer kitchen with a stove will allow you to take into account the characteristics of the site, the wishes of the owner and save money. In addition, step-by-step construction instructions have now been developed for furnaces of varying complexity.
Budget options could be:
- Russian stove for a cauldron;
- two-burner stove with oven;
- barbecue oven with grill.
It is important to remember that when creating a furnace, you need to accurately draw up a drawing in order to take into account the nuances of construction, the amount of material required and the amount of work
Why a wood stove?
If we exclude gas and electricity, the first - due to the complexity of installing a separate pipeline, the second - as an expensive energy source for heating, there are not many types of fuel left for a country stove. Coal has a high heat capacity and produces long-lasting and persistent heat . But its cost in regions that are far from coal mining areas negates its advantages. Wood pellets and briquetted fuel have now become popular. The calorific value of these materials is higher than that of firewood, but they are also more difficult to obtain and the price is higher.
At the same time, firewood is a renewable material that grows in abundance throughout most of Russia. In forested regions it is the cheapest type of fuel . A wood-burning stove is also convenient because, if necessary, it can burn not only quality firewood, but also wood waste - old boards and wood products that are not covered with varnish and paint. Although this is not the main source of fuel, such recycling can still be beneficial.
Firewood continues to be the most affordable fuel
Making the simplest stove with your own hands (10 photos)
There are many options for stoves for cottages and houses. Some of them involve financial expenses, others require direct hands. What should we do for those who have not succeeded either with money or with skill? A simple brick stove that even a “humanitarian” can put together will help out.
The article discusses two options. The first one is suitable for those who want more or less “decent” heating and cooking equipment. The second will be useful to readers who generally do not pretend to be either a penchant for handicraft or any kind of aesthetics of the result.
Figure 1. Simple brick oven
Preparation, list of tools
Before starting work, you need to determine and mark the place that the new stove will occupy.
The chimney pipe should be no closer than 15 cm from the roof rafters.
If you are doing masonry for the first time, professional stove makers advise you to practice in advance by making a model of the future stove from prepared bricks. Naturally, without a solution. This minimizes possible risks during real masonry, allowing you to learn from your mistakes, which can still be corrected in the layout.
The stove foundation requires preliminary waterproofing; its area must exceed the area of the stove.
When laying a new row, you need to control the absolute verticality of the walls.
To build a brick kiln, the following tools are needed:
Stove-washer
Laundry stoves require a small amount of fuel. They are used not only for heating water when washing clothes, but also for steaming, as well as cooking tomatoes, mushrooms, marinades, steaming food, etc. These laundry stoves are made from sheet roofing or other steel. The thicker it is, the longer the service life, and vice versa. Light weight allows you to carry it anywhere.
Figure 115 shows the laundry stove with all its details and dimensions. However, these dimensions can be reduced or increased depending on the availability of material and tank.
Rice. 115. Stove-washer:
a - general view; b - tank; in pocket; g - insert; d - pallet; e - pipe; g - casing
The stove consists of a metal casing, most often black steel (iron), a pipe and an enameled cone-shaped tank with a lid. You can use a galvanized steel tank, but then it cannot be used for food. The enamel tank is inserted into a casing, at the bottom of which there are three strong legs, slightly bent outward, which gives the stove stability.
At a distance of 80 mm from the bottom of the casing there is a combustion hole, closed by a door. Several holes of round, square or triangular shape are punched under it. If they are round, then the diameter is 15 mm. These holes serve as a blower. An ash pan in the form of a box is fixed under the firebox.
At the top of the casing, approximately 1/3 of its height, there are two handles for carrying the stove. The upper part of the casing does not have a hard side, thanks to which the tank fits tightly into the casing, which prevents the escape of smoke and hot gases. During combustion, hot gases wash the tank from all sides, and it heats up faster. To boil laundry, place an enamel tray with holes or a wooden grate at the bottom of the tank, which protects the laundry from burning. A pocket is fixed from the upper edge of the casing at a distance of 90-100 mm, which is necessary for the exit of smoke and hot gases. For this purpose, a corresponding hole is cut in the casing. The pocket has a cone-shaped shape with an upper diameter of 130 mm, closed from above the hole with a lid, to which is attached a pipe for a chimney (like for a samovar) with a diameter of 100 mm and a height of 50-100 mm. The pipe must be equipped with a wind suppressor, which prevents smoke and gases from escaping through the firebox.
To protect the lower part of the casing from rapid burning, an insert (second wall) made of steel of any thickness with a height of 200 mm is inserted into it. The combustion hole in it is 20–30 mm larger than in the casing. The insert is made with a diameter 20 mm smaller than the inner diameter of the casing. At the bottom of the casing there is a tray with bent legs or feet up to 50 mm high and numerous holes. This pan serves as a grate.
Individual parts of the stove can be secured using seam joints, welding or rivets. The tighter the connections, the better.
This stove is easy to make at home. To do this, first of all you need to buy a cone-shaped enameled or galvanized tank or make it from the appropriate metal, such as aluminum. Instead of a tank, you can use a cone-shaped bucket. Depending on the size of the tank, the dimensions of the stove also change.
The casing can be made from several pieces of steel, achieving a tighter fit of the pieces to each other. To protect the casing from destruction, its internal space is insulated with sheet asbestos.
If a flat tank is used instead of a cone-shaped one, then the casing is made cone-shaped.
A stove of this design can be made of brick, but it must be installed permanently. Instead of brick, it can be made of adobe, using thick clay mortar for this purpose. Under the influence of high temperature, the clay is fired and forms a durable shard that will serve for a long time. The clay solution should be so thick that when you step on it with your foot, almost invisible prints would remain on it.
Rosselkhozizdat plans to publish the following books on housing and cultural construction in rural areas:
Boltinsky V. A., Lopatkin Yu. V., Maltsev Yu. L. Rural house (album-reference book of large-panel estate residential buildings)
The album introduces rural workers, party and village officials, design and construction organizations, and the construction industry to the design and planning features and production technology of low-rise rural houses, to variant solutions for their facades, to current standard and individual designs of residential buildings.
Shepelev A. M. How to build a rural house (4th ed., revised and additional)
The book tells in a popular form how to build a house with your own hands, using various building materials, including local ones.
The author pays special attention to methods of performing earthworks, masonry, carpentry, carpentry, concrete, roofing, stoves, plastering, painting, wallpaper, glass and other construction work.
This text is an introductory fragment.
Continuation on liters
Scheme for laying a stove for a home
A diagram for laying a stove for a home is the first thing that a person who decides to install heating in his home using a stove will need. In this material we will look at what layout schemes for home brick ovens exist, what are their features and differences.
Laying a stone stove can be done in the following ways:
When arranging a stove using the first method, plastering the stove is not required, since all seams are filled with mortar. The thickness of the kiln walls determines the way in which the bricks are laid. The walls are laid out with a thickness of one brick and half a brick. Sometimes you can find a masonry of 3.4 bricks. For work on the installation of a stove, it is imperative to use stove bricks. It is also called “red brick”, solid. Under no circumstances should you use bricks that have been taken from a dismantled building, expanded clay blocks or slotted bricks.
The first row is laid simply with bricks, without using mortar. The brick is leveled, the front wall and the places where all the doors will be located are determined. These operations can be called the last "estimate". When these actions are completed, the bricks are laid with mortar.
After this, they begin to lay the corners. The next stage, according to the advice of experts, is the arrangement of the contour of the entire stove. Using plumb lines, string is stretched from the ceiling to the corners of the stove. With the help of these vertical lines, you can easily navigate while working.
Considering the model of the stove you have chosen, you should determine the areas in which the following will be located: the ash pan, the combustion chamber, and the ash pan. The door under the ash pit is installed when the third row of bricks is laid, and after one row the ash pit is laid out.
After this, the firebox is arranged. Each door is attached with burnt wire. When you get to laying out the vault, you will need to cut the bricks. A calculation will be required to ensure good joining of the bricks with each other. The laying of the vault begins after the second row of bricks is laid after the firebox door.
To line the combustion chamber, special refractory bricks are used. Since facing bricks and masonry bricks have different temperature characteristics, installation of the lining to the furnace itself should not be done rigidly. When installing a chimney pipe, care should be taken to install a special valve, the adjustment of which should be smooth and easy.