Here you will learn:
- Advantages and disadvantages of gas furnaces
- Features of homemade gas stoves
- Construction of gas furnaces
- How to calculate the consumption of natural and liquefied gas
- What materials are used
- Gas-burners
- Water tank location
- DIY metal gas sauna stove
- Rules for installing gas furnaces
Today, there are a number of various modifications of hearth gas ovens, used both for cauldrons and for baking bread, which can easily compete with an electric oven. Therefore, in order to determine the most suitable model, it is necessary to clearly define the necessary parameters on which future work will be based. It is necessary to determine the location. To do this, you need to correlate the amount of heat generated and the size of the room. It should be noted that the equipment in question generates a lot of heat.
Gas furnaces can be divided into three types:
- heating systems, intended for heating and used in private households;
- heating units designed to provide hot water supply;
- household, intended for cauldrons, baking bread and heating large areas.
For example, for a bathhouse, it is better to install a heating heating system, which can have different cladding options, type of burner, as well as technology and method of heating the water available in the bathhouse. It is not safe to use an electric stove.
Methods of supplying gas to the stove
There are two ways to gasify a bathhouse:
- From the citywide system.
Individually using a balloon.
Gasification from the city system
Gas can be supplied to the bathhouse from the city pipe. If a gas pipe runs through the area, then it is more profitable to power the bathhouse from it. Let’s say right away that this is a labor-intensive task and requires knowledge and permissions. The price for the services of specialized companies is high, but once you supply gas to the bathhouse, you won’t have to worry about it for many years. And paying gas bills will be less expensive than purchasing bottled fuel each time.
For urban gasification it is necessary to carry out a number of measures:
- Receive and approve a number of documents: gas supply project, agree on technical conditions and draw up an estimate.
Purchase equipment and pipes and carry out installation.
Prepare test and technical documentation and submit the work to the local gas service.
Enter the system, install and register the meter, start it up and receive documents for maintenance and fuel supply.
It’s difficult to do all of the above points on your own; it’s easier to call a specialist. Moreover, the city gas company itself will provide and conduct pipes to the heating device.
Individual gasification
You can power the stove from a gas cylinder, which comes in different sizes. Individual gasification is suitable for areas where there is no city line. A gas cylinder can be purchased at any specialty store. But such gas supply is quite unsafe.
Safety comes first, the cylinder should not be installed in a bathhouse, its place is outside. The place chosen is easily accessible and ventilated, that is, the cylinder cannot be filled with various objects or covered with things. A fire extinguisher is hung nearby or a small box of sand is installed.
Tank location
There are several ways to place the tank in the bathhouse; the container can be:
- Removable;
- Built-in;
- Remote (i.e. placed in a separate room).
In a built-in tank, water heats up much faster, since the tank is installed directly on top of the stove or welded to the side. To install a remote tank, you will need to install a pipe system.
Advantages and disadvantages of gas furnaces
The market offers consumers a wide variety of energy resources. At the present stage of economic development, gas is one of the most profitable and efficient fuel options.
The use of gas as a power source for heating equipment is advantageous in that its cost does not break the consumer's pocket. In addition, gas has a high efficiency factor. The operation of gas heating devices is easy to use, economical and safe.
This kind of homemade heater is often used for a wide variety of purposes. It can be used to heat greenhouses, garages, and boxes. Thanks to mobility and low assembly costs, portable heaters can even be taken on hiking trips
The advantages of using gas furnaces include:
- fast, efficient and high-quality heating of the room;
- mobility and compactness of gas equipment;
- the ability to quickly move the oven to the desired location;
- independence from government communications, power outages and many other factors.
Gas equipment, like any other, has its drawbacks. However, they are relative and easily avoided.
The disadvantages include:
- the use of gas is strictly regulated by regulations;
- owners of non-residential premises will have to obtain a number of agreements and permits from the gas industry and other government bodies;
- drawing up the necessary project can cost a lot of money;
- the use of reduced and bottled gas requires compliance with safety measures.
In order for a gas stove to perform its function as efficiently as possible in a room, it is necessary to have protective screens. Such structures are equipped with reflective surfaces, thanks to which warm air does not escape, but is reflected and heats the entire area of the box.
Craftsmen are constantly improving their skills and using new techniques to design homemade units. Some modern handmade gas heaters are equipped with special blowers that allow you to control the flow of warm air
Open combustion stoves require the design and installation of a ventilation system and provision of air humidification. When the device burns oxygen, the air becomes dry. This often leads to headaches and sore throats.
Mixing experiments: what you need to know in advance
The range of colors that people use is limitless. But the main colors of the spectrum are: blue, yellow, red. They exist on their own and do not contain other pigments. By mixing them in different proportions we can get the tone we need. If the ratio of tones is the same, you get one paint, but if you change the proportions, you get a completely different color.
Green is also a derivative of basic colors. By mixing yellow + blue we get green. Add scarlet to it and you get bright brown.
The colors that are present in the rainbow are called chromatic. They absorb and reflect light waves of different wavelengths. We perceive the waves that are reflected from an object as its color. For example, a leaf of a tree absorbs all tones except green. It reflects green and we see it as such.
Black, white, gray - achromatic. A dark color eats up the waves completely, while a snow-white color displays them.
All existing shades interact with one another, which leads to such diversity in our beautiful world.
Advantages and disadvantages
Main advantages:
- almost instant heating of the garage;
- the equipment is mobile and compact, it can be moved around the box, installing it in the right place;
- not affected by power outages.
Among the disadvantages are:
- when using natural gas, a lot of approvals and inspections of gas equipment and pipe connections to the garage will be required. And the high price of the design documentation will make you think about the feasibility of this method of heating the box;
- devices powered by liquefied, bottled gas are explosive;
- thermal energy is not accumulated, so it will be necessary to equip the surfaces with protective screens with reflective surfaces. In this case, the warm air, reflected, will fall down and heat the box, and not heat the floor slab;
- When using open combustion stoves, there is a high risk of headaches and throat diseases. Fire burns oxygen and makes the air dry. Therefore, you will need to install a forced ventilation system and install a humidifier.
Modern gas furnaces are designed with disadvantages in mind. Catalytic-type gas furnaces do not burn fuel during operation. For the best and responsible choice, you will need knowledge of the types of garage heating devices.
Example of a gas heater for a garage
These devices are divided into:
- Infrared heater equipped with a ceramic burner. This is an effective method, in which the burner gives off heat not only to the air, but also to the objects surrounding the stove. Heat accumulates and gradually enters the room.
- Gas convector. This device burns natural or bottled gas in a closed firebox. For better operation, you will need to make forced ventilation to supply air into the firebox, necessary for combustion and exhaust gases out into the chimney. This work will avoid the combustion of oxygen and a decrease in air humidity.
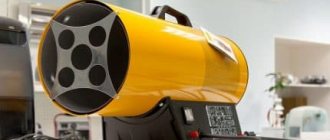
- Heat gun. Such equipment can quickly heat a room, but cannot accumulate heat. This option increases fuel consumption, so the guns are suitable for heating garages with natural gas or for short-term heating of a room.
- Modern devices operating on the principle of gas oxidation with oxygen and the release of a large amount of thermal energy. The equipment is not cheap; expensive materials are used as catalysts. Advantages - light weight, ease of operation, but you will need to take care of the alarm system or fire extinguishing.
Criterias of choice
It is important to choose a gas stove for a garage taking into account the main characteristics. Let's look at them in more detail.
Power
This characteristic will allow you to save not only on the purchase of the optimal stove option, but also during operation. A powerful stove will heat the room faster, but gas consumption will also be higher. A low-power stove will not be able to heat the room. Therefore, it is important to know even approximately the required power of the equipment to heat your garage.
You can calculate this characteristic yourself. To do this, you will need to determine the volume of the entire room and the cubic capacity of the gate. Multiply these values by the coefficients for the materials from which the garage itself and the gate are made. The resulting result will be the approximate power of the heating unit.
Material
This characteristic affects the longevity of your stove. When purchasing, you will need to familiarize yourself with the thickness and grade of steel of the body and firebox. When using structural steel, the thickness of the firebox sheet should be from 6 mm. It is better if heat-resistant steel or alloys were used in heat guns or convectors for the production of the body and grilles.
Alloy steels with a high content of chromium, silicon, and molybdenum are the best option for the production of parts exposed to high temperatures. Another option for a material that is not exposed to aggressive environments is stainless steel.
Winter summer
If the use of heaters is planned to be short-term and during the warm season, there is no point in buying expensive, powerful equipment. Small heat guns or convectors or a homemade stove that burns gas in a closed chamber will help here.
For winter and low temperatures, you will need to purchase a powerful gun or several infrared heaters and install them throughout the room. At this time, the efficiency of technology is an important factor.
Price
In this matter one should not go to extremes. You can’t try to save money and buy low-quality Chinese equipment for pennies and throw it away after a short time. But you shouldn’t buy an expensive, powerful heat gun from leading manufacturers to heat a small garage during short visits.
It is much more important to select equipment based on price and quality ratio. This is the only way to purchase good, productive gas-powered equipment for your box.
Other factors
Other factors include:
- level of environmental safety. The equipment should not harm consumers by releasing toxic substances when heating low-quality materials. Therefore, when purchasing, be sure to check the quality certificate;
- quality of garage stoves. Here you can determine who made the technique simply. Run your hand along the edges of the metal and if you find burrs, it means that your stove was not made in production. Pay attention to the quality of the paint coating, it will immediately show the experience and qualifications of the manufacturers;
- Pay attention not to the brand, but to the characteristics of the heaters. You will have to overpay for the name of an advertised company, although even the BOSCH brand is produced in 300 countries around the world. Before going to the store, go to forums on the Internet, here you can get reasoned and truthful advice.
Voting: which modern stove is the best?
| Photo | Name | Rating | Price |
| The best factory models of Russian-made potbelly stoves | |||
| #1 | Potbelly stove POV-57 | 99 / 1005 – votes | Find out more |
| #2 | Termofor Fire-battery 5B | 98 / 100 | Find out more |
| #3 | META Gnome 2 | 97 / 100 | Find out more |
| #4 | Stove Potbelly stove Teplostal | 96 / 1003 – votes | Find out more |
| Popular potbelly stoves from world brands | |||
| #1 | Keddy | 99 / 100 | Find out more |
| #2 | Guca Lava | 98 / 100 | Find out more |
| #3 | Vermont Castings | 97 / 1001 – voice | Find out more |
| #4 | JOTUL | 96 / 1001 – voice | Find out more |
| #5 | Brunner IRON DOG | 95 / 100 | Find out more |
Which of the modern stoves would you choose or what would you recommend purchasing?
Brunner IRON DOG
Save your voting results so you don't forget!
To see the results you need to vote
After the stove is installed and ready for use, it is necessary to install a chimney that can function properly, retain heat in the room and at the same time prevent combustion waste from entering the air of the room where the stove is installed. To do this, you need to correctly calculate the diameter of the pipe, its length and think about how it will exhaust the smoke into fresh air.
The pipe outlet above the roof should be located according to certain rules:
- The chimney is located from the roof ridge at a distance of up to 1500 millimeters, which means the pipe outlet should be located at a height of 50 centimeters above the top of the ridge,
- With a distance to the canopy of 150-300 centimeters, the pipeline outlet can be positioned at the same level with it,
- If the chimney is located near the edge of the roof, then its outlet should be slightly lower than the ridge, or at the same level with it,
The second option for the pipe to exit is through the wall, and not through the roof. In this case, the end of the chimney should be located just below the top of the roof ridge.
Do-it-yourself installation work should begin with choosing the place where the outer and inner elements of the furnace should be connected. An attic or roof space is perfect for this purpose. The first element of the future chimney is installed on the potbelly stove itself, on which the second, third, and so on are then placed (depending on how many sections the chimney will include).
The chimney pipe must be extended until it reaches the previously determined location at the junction of the two elements.
You need to make a hole in the ceiling, the diameter of which will be 5-10 cm larger than the diameter of the pipe: this will be required in order to cover the pipe where it passes through the ceiling with heat-insulating material. If there are insulating materials or other easily flammable objects in the cracks between the ceilings or near the pipe, they must be removed: when the pipe is heated by smoke and its temperature rises, the risk of fire of the insulating material will also increase.
A passage glass is inserted into the cut hole in the ceiling, through which the chimney pipe must be passed. Then you need to connect the pipe coming from inside the room to the outside of the chimney. The chimney should end above the roof level, approximately 10 cm above it. The place in which the hole for the pipe outlet will be cut is equipped according to the same principle as the place where the pipe exits inside the building:
- the hole must be larger than the chimney pipe itself;
- A layer of heat-insulating material must be placed between the roofing materials and the pipe.
Fixing the pipe
The smoke exhaust pipe is passed through a hole in the roof and fixed with a sheet of tin or other metal. As an alternative to tin, you can use another non-flammable fixative - bricks, which are installed in the gap between the chimney and the roof. However, in order for the bricks to hold the pipe tightly, a stand needs to be built for them from the inside. All cracks in this place are covered with ordinary clay.
Sealing seams
After the entire structure has been assembled, you need to take the sealant and, sparingly, lubricate all joints and seams to prevent smoke from entering the living room from the chimney
The sealant for these purposes must be selected with special attention - only one that is not afraid of high temperatures is suitable
Unfortunately, some sealants will simply “melt” on a hot pipe, while others will dry out easily. One way or another, a sealant that is unstable to high temperatures will lose its properties and will not be able to protect the room from smoke.
Water heater insulation
- 7-10 angles are welded to the surface of the body so that the second shelf runs parallel to the surface of the pipe. Welding is not carried out with a continuous seam, but through four tacks, the length of which is 1 cm.
- A strip 2 cm wider than the distance between the end circles of the base is cut out of thin sheet material. The length of the strip should be enough to wrap the device.
- Sides are made on both sides of the strip, the width of which is 1 cm. Using pruning shears or scissors for cutting metal, the sides are given a sawtooth shape. The teeth are marked with a zigzag. They should have the shape of an equilateral triangle. The teeth on the edge of the strip, which are opposite the corner, are cut off.
- The strip is applied to the corner. It must be directed in the correct direction to wrap the unit. Once the rivets are installed, it will be impossible to correct errors in operation.
- Next you should drill the strip and corner. Seven holes should be made and the parts should be fastened using a riveting device.
- A piece of the required size is cut out of mineral wool and inserted between the corner to which the thin metal is attached and the adjacent corner.
- The insulation is covered with metal and secured with rivets.
- A similar operation is carried out with other corners.
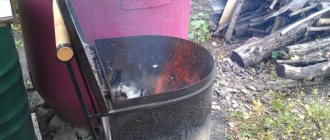
Metal sauna stove
To achieve good steam in a sauna, you need a good brick stove. It will keep you warm for as long as possible. However, such a furnace requires a serious foundation. This requires additional money and time.
In order not to spend money on pouring the foundation, you can make a metal stove yourself. Creating such a furnace does not require an in-depth study of the circuits, and its effectiveness has been proven in practice.
Although a metal stove heats up quickly, it cools down just as quickly. This is its main drawback.
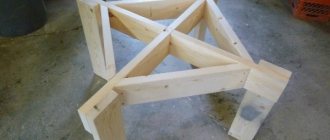
In order to assemble such a structure, you will need a metal container, sheets of metal or pipes of various diameters, a gas burner, an angle grinder, and a welding machine. Those who do not know how to use a welding machine can make a body from an ordinary pipe. This will not make the stove any worse.
Gas cylinders and pipes can be selected in other sizes. The size of the required parts depends on the size of the heated steam room. If its area is large, then it is worth making the stove larger. She will cope with her task as efficiently as possible
The result will be a stove about 80 centimeters wide and about one and a half meters high. A heater and platforms for installing a container with water are mounted on top. Thus, to create a steaming atmosphere in the steam room, you will need to pour water on the stones.
When drawing up a conditional drawing, you need to take into account the exact dimensions of all parts. Initially, you need to find a pipe or gas cylinder with a height of 180 centimeters and a diameter of 80 centimeters. In this case, the walls of the pipes must be quite thick - from 0.4 cm or more.
You will also need a metal sheet one centimeter thick, a steel rod with a diameter of one centimeter, cast iron or steel doors, a chimney pipe, a gas burner and a tap. All material can be purchased at a hardware store. You will also need tools: a grinder and a welding machine. You can rent them or borrow them from friends.
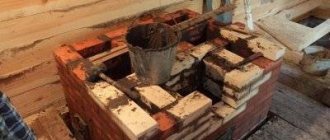
First of all, the base is prepared at the place where the metal stove will be installed. It needs to be made even and level. It is necessary to cover the foundation with fireproof material.
Two rows of refractory bricks are laid on top. Do not forget that the ceiling and all walls at a meter distance from the stove must be covered with fire-retardant material.
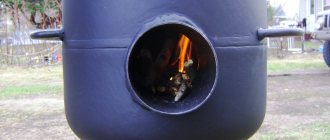
The manufacture of the furnace is carried out in several stages. First you need to cut the pipe into two parts with a grinder, one of which will be the furnace body, and the second will be used to heat the water barrel.
In the lower part of the first section of the pipe, a rectangular hole measuring 20x5 centimeters is made with a grinder. This method provides access to the gas burner.
The vast majority of gas furnaces have approximately the same structure and sequence of assembly and installation. The water tank is installed on top or welded to the side. If you want to install an advanced model, you can additionally install a number of elements and devices that will automate the control of the furnace
In the middle of the first section of pipe, another rectangular hole of the same dimensions is cut. The brackets on which the mesh will be held are welded. The mesh cells should be smaller than the size of the stones that will be laid on it.
A tap is welded at the bottom of the second pipe. Then the second piece of pipe is attached to the heater. In this case, it is necessary to check the seam for leaks. Next, you need to weld one door and hang the second on its hinges.
The pipe is insulated using refractory bricks or other material. After welding all the elements, the burner is installed and the stove is ready for use. It is worth remembering that a metal oven heats up to high temperatures, so it is imperative to cover all nearby surfaces with refractory material.
Assembling a gas stove for a sauna with your own hands is not difficult. To implement such an idea, you need to observe safety precautions and follow recommendations. Thanks to self-assembly, you can save a lot of money, and the efficiency of this design is not much inferior to store-bought models. Before you start assembling the stove, you need to carefully prepare the room.
What materials are used
As mentioned earlier, to make a stove for a gas bath with your own hands, it is recommended to use fireclay (fireproof) brick, metal or stone. Stone stoves take much longer to heat up (4-5 hours), but the temperature is maintained 3-4 hours longer than metal stoves. Brick ones are characterized by similar indicators. In turn, metal units heat up faster (rooms up to 50 sq.m. completely warm up in 2.5-3 hours), but also cool faster.
At the same time, metal stoves are lighter than their brick counterparts and are easier to manufacture, and if the outside is lined with fireclay bricks, then there will be no fundamental difference between the 2 units.
Gas sauna stove from a cylinder
To independently assemble a gas stove for a bath, you will need to collect and purchase the following materials:
- You need to buy an atmospheric burner at the construction market or in a store with gas equipment.
- Find an old but not rusty gas cylinder. A new cylinder, large-diameter pipe or sheet of metal with a thickness of 8 to 16 millimeters will also be suitable.
- For the base of the heater you will need thick metal, for example, a brake disc from a car. It will last for at least several years.
- A gas pipe with a diameter of 5 centimeters and a length of approximately 3 meters.
- A pipe with a diameter of 10 centimeters, which will be used to remove gases.
- Some copper or bronze elements to connect parts.
- Additionally, you will need to acquire the following tools: grinder, welding machine, drill, measuring instruments.
After assembling the complete set of tools, you need to use a grinder to cut off the outer part of the cylinder so that the cut diameter is equal to the external size of the brake disc. Then, using welding or a drill with bolts, you need to attach the disk to the cylinder.
The next step is preparing the air supply pipe. In a pipe with a diameter of 5 centimeters you need to drill about ten 5-mm holes.
A hole with a diameter of approximately 55 millimeters is also made at the bottom of the cylinder. The whole, that is, not drilled, part of the five-centimeter pipe should extend out of the cylinder by about two meters. It must be welded to the cylinder.
First you need to cut the workpieces with a grinder according to the sketch. Then weld all the components using a welding machine. After completing these procedures, you must also grind all welds. The same grinder copes well with this task
The pipe that will supply gas is welded in the same way. An adapter is attached to the second end of this pipe, with which you can connect the device to a gas pipe or gas cylinder.
A hole is cut out on the cylinder for the chimney and the corresponding pipe is welded. Using a grinder, a rectangular hole for the door is also cut. The hinges are welded and the door is hung directly on them. You also need to attach a handle to the door.
In this way, a simple model of a gas oven will be made. Gas is supplied to the burner through the pipe. The combustion process is started, depending on the burner, by piezo ignition or electric pulse.
Final stage of construction
The design of a gas stove for heating a bathhouse is completely built in 7-10 days. After a two-week period during which the solution dries, you can begin to test fire the stove, but you should not split it.
The process of erecting bath equipment is completed with plastering work. With the help of this finishing layer, the structure acquires a neat, finished look and additional fire protection. As a rule, alabaster is added to the solution for lining the furnace, consisting of clay, sand and water.
Before finishing, the remaining mortar is removed from the furnace walls and a putty mixture is applied. As a result, we ended up with a stove like this:
When constructing heating equipment, it is recommended to use SABK-8-50S automation. With such a device, the required temperature will always be maintained in the bathhouse. This device has four degrees of protection, which indicates its absolute safety. In the event of an emergency, this system automatically stops the operation of the furnace equipment.
Do-it-yourself gas stove for baths
What you need to prepare to build a gas sauna stove:
- Atmospheric burner.
- A gas cylinder (not old), or a pipe with a diameter of 50 - 60 cm, or metal 8 - 16 mm thick.
- The base of the heater can be made from a car brake disc; very thick metal will not burn out for a long time.
- Two gas pipes of 50 mm diameter.
- Pipe 100 mm in diameter for gas removal.
- Copper or bronze connecting elements.
- Tools (welding machine, grinder, drill, plumbing, measuring tools, etc.)
The edge of the cylinder is cut so that the cut diameter matches the external size of the brake disc. The disk is attached using welding or bolts.
Gas furnace device
A pipe is made that will supply air to the combustion chamber. Several holes (about 10 pieces) are drilled into the pipe section, after which a place is prepared for it in the lower part of the furnace body. The hole in the housing should be slightly larger than the diameter of the tube. It is welded so that the edge without holes protrudes outward from the cylinder by about 20 cm.
Everything needs to be done especially carefully when working with the pipe that will supply gas. An adapter is installed at one end, connecting the pipe to the gas source, and the second is welded into the furnace next to the air pipe.
Further steps are exactly the same as when making a regular boiler. A chimney pipe is welded into the upper part of the cylinder (it must be solid, without seams).
At the owner's request, legs can be installed. Fill the heater.
Getting steam from a gas heater is more difficult than from a wood-burning one. It takes longer to heat it, and you need to choose stones more carefully, with good heat capacity.
Options
Before you start making a gas stove with your own hands, you need to decide on its parameters, such as:
- Material of manufacture;
- Burner type;
- Location of the water tank.
How to make a gas generator stove yourself?
Gas generators, also called pyrolysis boilers, are increasingly used in everyday life. They are used for heating residential and commercial premises, cooking, obtaining hot water, captivating with their high efficiency, environmental friendliness and ease of maintenance. However, industrial designs are expensive, so the optimal solution for a thrifty owner would be a gas generator stove, made with your own hands from scrap materials.
Functioning and design features
The main principle underlying the work is the gasification of solid organic fuel when it is burned under conditions of oxygen deficiency. During the process of decomposition (pyrolysis), solid organic matter in a gas generator furnace does not burn, but slowly smolders, forming a large amount of flammable gas, which mainly consists of methane and carbon monoxide. The resulting gas from the combustion chamber enters the afterburning compartment, in which it mixes with heated air and burns, releasing a lot of heat. Depending on the design features, the gas generator can heat the coolant jacket, release heat to the environment, or perform both of these tasks.
Such furnaces demonstrate high operating efficiency, several times higher in efficiency than traditional ones. Unlike classic solid fuel boilers, the owner of a pyrolysis boiler is able to flexibly control operating modes and change the heating temperature of the coolant. To do this, it is enough to increase or decrease the amount of air supplied to the combustion chamber of a gas-generating furnace. Combustible gas can be extracted from almost any solid organic fuel: firewood, coal, peat and even linoleum. But in everyday life, the first one and wood processing waste are most often used. The most common type of wood-burning gas generator is a pyrolysis furnace, from which gas is not removed, but is burned to produce thermal energy.
The main design feature is the presence of two combustion chambers. In one, the process of decomposition of organic fuel occurs, and in the other, the resulting gas is burned. Moreover, the afterburning chamber in the first case can be located differently: under the gasification compartment, above it, or on the side. The internal structure and circuit of a gas-generating wood-burning stove for domestic needs is simple, and any home craftsman can make it.
Classic pyrolysis equipment should include:
- The housing inside which the working elements of the furnace are mounted.
- Filling chamber (hopper) for storing firewood or wood waste.
- Afterburning section of the gas released by the furnace.
- Grate for holding solid fuel and coals.
- Doors for loading firewood and removing ash from the gas generator.
- A system of air dampers to control the supply of oxygen to the working area of the device.
What is needed for making
Since homemade options are usually made from available scrap materials, they cost the owner much less than their industrial counterparts. To create a simple wood-burning gas generator with your own hands you will need: metal sheets with a thickness of at least 3 mm or a piece of iron pipe (barrel), steel corners measuring 5x5 or 4x4 cm, hinges and latches for doors, a chimney pipe of the required dimensions and configuration. The number of elements and dimensions of the specified materials will depend on the volume of the room that is planned to be heated and the additional tasks of the stove (heating water, cooking food).
DIY gas fireplace
Another convenient option for heating rooms is a gas fireplace. Purchasing such a device will cost a hefty sum, although the most savvy can independently assemble and arrange a fireplace in their box without a particularly large investment.
This kind of fireplace can be powered either directly from a gas pipe or from a gas cylinder.
You can find a wide variety of designs for gas fireplaces on the Internet. Also, some users can purchase prefabricated structures, lay out the brickwork themselves and assemble a fireplace from pre-prepared parts
The design consists of the following main elements:
- an ordinary fireplace insert or a decorative one that decorates the room;
- fireplace body made of refractory metals - cast iron or other alloys;
- burner that supplies gas;
- gas supply system.
After determining the place where the structure will be installed, it is necessary to prepare it to begin the construction of the brickwork. There must be a solid foundation. You also need to install the chimney. After the fireplace is erected, it can be decorated with a variety of decorative elements to suit the taste of the owners.
The fireplace is laid only from refractory bricks. When erecting a structure, care should be taken to ensure passage to the gas valve. After the internal elements of the masonry are installed and communication is connected to the gas burner, you should make sure that the entire system is tight.
With the help of a valve, in the future it will be possible to regulate the strength of the gas supply and, consequently, the amount of heat generated. Gas workers advise turning the burners with their holes facing down - this will protect them from contamination and moisture.
The burner should also be reinforced with protective mesh elements. This will reduce the load on the burner from the decorative material.
A pipe covered with refractory materials is supplied to the fireplace firebox, supplying gas. The gas burner is installed with the holes down and masked with artificial refractory material
The introduction of some modern devices will allow you to slightly automate the operation of the fireplace. This way you can connect a gas supply control system, depending on the level of heat generated, or an automatic gas supply shutdown system. All modifications are freely available on the market, and their acquisition depends on the desire and ability of the owners.
Beautiful decoration of the fireplace bowl is made using a variety of stones, glass, and ceramics. In addition to interior decoration, the outside of the fireplace can be decorated with tiles or in another way. The main thing is that it is a fireproof material.
It is easy to assemble a gas stove yourself with your own hands. To do this, you need to adhere to the design and safety instructions.
If you follow all the requirements and recommendations, assembling the stove will be a fun and inexpensive activity. Self-assembly of such a design will save significant money.
First of all, before installing a gas stove to heat a room, it is worth carrying out a number of preparatory measures. If you do not insulate the room, then even the most powerful equipment will not give a serious result
Therefore, it is important to carry out external and internal insulation procedures, as well as equip reflective surfaces
Preparatory stages of work
If the room is not heated in winter, then one of the main problems is the occurrence of condensation on the internal surfaces of the walls and on all objects inside.
This leads to gradual rusting of metal structures and increased humidity inside the building. It becomes impossible to store things in winter in such conditions, as they will deteriorate.
Dampness in unheated rooms is a common problem. Condensation mainly forms on the ceiling and walls. If metal devices are stored in such rooms, they quickly become rusty and become unusable. The solution is to insulate the room and start heating
Some car owners use electric heaters and homemade wood stoves to heat their garage. However, such a solution subsequently turns out to be unprofitable: the power of the electrical appliance is often insufficient, and the electric meter increases astronomical figures.
If, on top of everything else, the room is not insulated, then heat loss increases several times. Then you need to purchase an appropriate heater - very powerful and expensive.
In such cases, even a gas furnace may not be able to maintain a temperature of at least 24 degrees Celsius. Therefore, owners should first tackle the external and internal insulation of the building.
It is better to carry out two types of insulation. But everyone carries out the procedure based on technical capabilities. Sometimes there is no access to the ceiling or side walls, for example, if a garage is being insulated.
The greatest results are achieved by a combination of internal and external insulation. If it is not possible to insulate the building from the outside, then do not be upset. Modern methods of internal insulation are not only more economical, but also give a much greater effect
It is also necessary to take into account the future heating of the building using a homemade gas stove. It is strongly recommended to insulate walls, ceilings and floors with fire-resistant materials. Then the room will be fire-resistant, and the owner will save himself from unnecessary worries. It is recommended to plaster brick walls, and prime and paint metal walls.
After all the thermal insulation measures have been carried out, the heating efficiency of the garage will significantly increase, and fuel costs will be much lower.
The best place to place a homemade gas stove is the center of the room. If the heat source is not in contact with the walls, then the heat will not escape through them and a kind of thermal cap will be created in the building.
The principle of operation of a thermal cap is that first, warm air rises from the center of the room up to the ceiling. There he encounters a cold stream of air and begins to move to the sides towards the walls, where he again encounters cold streams. During such circulation, warm currents will gradually fill the entire room and warm it.
If all conditions are met, a so-called thermal cap is created in the room. Warm air circulates throughout almost the entire space of the building and does not escape outside. This ensures the entire room is warmed up.
In the image, the circulation of warm air in the room would resemble the movement inside a schematic mushroom-shaped figure. A positive heating effect is achieved even with the use of low-power stoves. However, they must generate intense air flow.
Chimney construction process
The complexity of the process of constructing a chimney for a potbelly stove in a country house directly depends on the location of the stove in the room. For example, bringing a pipe out through a window is much easier than making a hole for a chimney in the roof. In this regard, before installing a potbelly stove, you should take into account the design features of the building.
Safety rules and structural measurements
If you plan to install the stove outdoors, then installing a chimney will not cause much difficulty, the main thing is to choose a suitable location
It is important to remember that the stove structure should be located away from flammable objects and active recreation areas
Constructing a chimney indoors will require knowledge of safety rules that will help avoid fire. The material from which the pipe is made must have increased heat resistance and can easily withstand temperatures above 1 thousand degrees. If you plan to install a potbelly stove near walls lined with clapboard or plastic, then the part of the wall located in close proximity to the stove is sheathed with fireproof material.
Don't forget to decide on the pipe size
The hole through which the chimney will enter the ceiling must also be decorated with non-combustible materials, since the entire structure becomes very hot when the stove is operating. For these purposes, a special glass is used to prevent contact of the hot pipe with the edges of the hole. If there is more than one potbelly stove installed in a building, then a separate smoke exhaust system is made for each of them.
After calculating the diameter of the pipe for the potbelly stove, you will need to calculate the total length of the pipeline, but first you need to accurately determine the location of the stove in the room. Then determine the specific location where the chimney will be vented outside. When measuring the length of the pipeline outdoors, you need to take into account that the height of the pipe above the ridge should be 1.3-1.7 meters.
It is more difficult to carry out installation work indoors
Installation of all system elements
Installing a stove installed outdoors is not difficult. To assemble the system, you will need a pipe of the required diameter, which is placed on the pipe extending from the potbelly stove. The pipe must be put on the pipe, and not inserted into it. Otherwise, smoke will leak out at the junction of the nodes. The procedure for installing a smoke exhaust system in a room is much more complicated and consists of several stages:
- the pipe section is securely attached to the furnace pipe;
- the pipeline is extended using connecting elbows;
- the smoke exhaust is passed through a passage glass and discharged onto the roof or behind the wall;
- all connecting nodes are securely fixed.
A section of pipeline located outdoors must be insulated with heat-resistant material. During operation of the potbelly stove, condensation inevitably accumulates on it. To get rid of the condensate accumulated in the system, a tee is installed on the outer section of the pipeline, equipped with a faucet for discharging liquid. In the place where the horizontal and vertical pipelines connect, an inspection window is made to make cleaning the chimney easier.
The final stage is checking the functionality of the smoke exhaust system. If you managed to properly make a chimney for a potbelly stove, then after igniting the stove the necessary draft will be created and the smoke will quickly be discharged outside. During the combustion process, you need to ensure that smoke does not leak into the joints of the nodes. If a smoke leak is detected, the connections must be sealed using heat-resistant sealant.
Installation Rules
If a pipe with natural gas is used, the process of approval and acceptance of the work performed will be delayed. You will need to make a forced ventilation system in the room, install a large stove on a separate foundation, slightly recessed into the floor. Let's add to this the purchase of a gas meter and constant visits from a technician with inspections and payment for them.
But the basic dimensions for installing fire-hazardous equipment in rooms with flammable surfaces are the same for all types and types of stoves. Size to the floor made of flammable materials from 140 mm, to an unprotected wall made of wood from 700 mm. Distance to ceiling from 1000 mm. In the garage, you will need to make ventilation cavities in the walls and possibly install a chimney when using a large gas furnace or boiler.
When installing wall-mounted equipment, fasten it only to solid walls; fastening to thin partitions is strictly prohibited. The stove or convectors must be installed in safe places and not interfere with free passage and access to heaters.
The oiled floor under the stove will need to be insulated with a sheet of fiber board or metal.
Fireplace for gas heating at home
In terms of equipment costs, gas fireplaces are comparable to their electric or wood-burning counterparts. But gas fuel is much cheaper.
And, unlike firewood, gas heating using a fireplace in a country house means there are no problems with ash. Plus, you don’t have to constantly monitor the operation of the firebox and worry about chopping logs.
Fireplaces that convert gas into thermal energy are used in heating systems because... are not equipped with the devices necessary to service two circuits
According to the type of installation, gas fireplaces are:
- wall;
- island;
- built-in
In terms of their general design and internal contents (burners, automation, design of combustion chambers), they completely replicate gas boilers. In both cases, the technology for connecting to networks is identical. Differences exist only in the principle of heating the premises.
According to the principle of connecting and organizing the heating system, gas fireplaces are similar to floor-standing heating boilers
A hot water boiler is initially designed to heat water, and a regular fireplace is designed to convect air from the body and front screen, behind which fuel combustion occurs.
Features of operation
It is important before using gas stoves in the garage to make sure that the ventilation is working properly and that there is no gas pollution in the room. The valve on the gas cylinder or on the stove must be closed after each switching off of the equipment, even if it is equipped with its own shut-off valves.
Therefore, having opened the gas, we light the burner flame. If a cannon is used, the fan is turned on before the fire is lit. A reducer must be installed on the cylinder, which protects it from backlash and regulates the gas pressure.
Otherwise, the operation of a gas furnace is similar to other types of furnaces. The main thing is to be responsible and careful about the maintenance and care of equipment and your garage will always be warm.
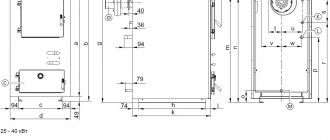
How to properly connect a muffle furnace to an energy source
If you have no experience working with electrical devices, it is better to contact a professional electrician. To connect the device to the network you must purchase:
- thermostat;
- large terminal block made of heat-resistant plastic;
- small terminal blocks made of heat-resistant plastic for splicing wires;
- contactor (electromagnetic starter);
- two-core electrical wire;
- electrical plug;
- standard casing for electrical panel.
For this oven, a single-channel thermostat M-1-K was selected, which regulates the temperature of the working chamber up to 1300 degrees. The device is capable of working according to a complex schedule; it is used to set the heating time and temperature.
Reference. The cross-section of the nichrome wire and its length, the diameter of the spiral turn, the cross-section of the connecting wires and other parameters of the electrical circuit are calculated from reference books and selected in advance.
The element has 7 connectors for connection (two terminals for power wires, two for connecting a thermocouple, three for a relay). The device is controlled by four buttons. When the thermostat is turned on, the indicator light is on. The device comes with two brackets for mounting in a panel and detailed connection instructions.
Block installation
The block is installed in the following order.
- The contacts of the thermocouple and the spiral are insulated and connected with terminal blocks to two-core wires.
- A plug is connected to the power cord.
- The thermostat, contactor and large terminal block are mounted in the panel.
- A thermocouple, a muffle spiral, and a power wire with a plug are connected to the thermostat via a contactor and terminal block.
An electric muffle furnace must be grounded.
Pipe system
The system itself consists of correctly selected and laid heating pipes, which connect your radiators and boiler to each other. There are two types of such pipeline laying systems: one-pipe and two-pipe.
When a heating system is being designed, a two-pipe supply scheme involves installing two pipes on each of the batteries, the so-called “supply and return”. Through one of them (supply), the coolant (water) enters the heating device, through the other (return), having already cooled, it returns to the boiler. The use of such a wiring diagram makes it possible to achieve the same degree of heating of the coolant in all radiators in the house. Two-pipe type wiring is divided into two main types:
- Connecting radiators in parallel-series (one closed ring).
- Using a collector, to which all radiators are connected with separate hoses (pipes).
The second type of connecting radiators makes it possible to regulate the temperature of each battery. But it also has a noticeable financial disadvantage, this is the need to install a large number of metal-plastic or other pipes for heating to provide connections to radiators. A single-pipe heating circuit made of metal-plastic pipes functions like this: the heated coolant (water) simply flows through the pipes from one radiator to another. Simply put, such a system is sequential, and this leads to a gradual cooling of the coolant along its route. This means that the last radiator in the chain will always be significantly cooler than the first battery. The main advantage of a single-pipe heating system made of metal-plastic pipes is the low cost of its arrangement.
Also very important is the degree of thermal insulation of your home. If you have taken all measures and insulated the walls, ceilings, floors, installed new good windows, and you have a modern, high-quality entrance door (doors). Then the heat loss of your heating system will be minimal and during the season, you will spend much less money than you planned.