Modern filmmakers use a lot of comic book characters for their films. And this generates a large number of fans around the world. Superheroes have become popular not only in America, where they were born, but also in Russia. Many children at matinees or other similar events want to embody the image of a certain character. And to please your baby, you can make your own costume of his favorite Superhero, for example, Spider-Man. And at such moments, parents wonder how to make a Spider-Man mask from paper or any other material.
It is not necessary to spend a lot of money and go to specialized costume stores to buy expensive costumes, since everything can be done with your own hands at home. It's not as difficult as it might seem at first glance. There are several ways in which you can make a Spider mask .
Content:
- What date is Halloween in Russia 2021
- History of the holiday for children Symbols of Halloween How to make a pumpkin for Halloween
- Versatile Halloween Costumes
- Invitations and gifts
The first plague doctors
Pope Clement 6 was the first to introduce such a position as a plague doctor. Doctors began to look for a cure for the disease, and most likely they found some weak methods, or they were able to show the appearance of progress. Therefore, this profession soon became very popular and highly paid.
So, based on the records, the salary of a plague doctor was 4 times higher than the salary of an ordinary doctor.
The main methods of treating the Black Death were bloodletting, cauterization or cutting out plague buboes, applying toads, frogs and who knows what else to the affected areas. There were no antiseptics in those days.
History of the holiday for children
Halloween is more of a British holiday. The Celts in England began to celebrate it in the 9th century. For the ancient people, Halloween was its own New Year: people celebrated the end of the harvest and lit a sacred fire.
The Celts believed that it was on this night, from October 31 to November 1, that spirits descended to Earth. Different: good and evil. Angry spirits were supposed to be appeased, and people left treats for them at the door, and they themselves left the house, dressed in costumes made of animal skins.
Later, with the advent of Christianity, the history of Halloween became intertwined with All Saints' Day, and the holidays began to be celebrated at the same time. In the United States, Halloween has only been celebrated since the mid-20th century. But Celtic traditions are actively observed: children and adults dress up in scary costumes and go from house to house, playfully demanding sweets from their owners.
Halloween symbols
The main symbols of the holiday: pumpkin lanterns, scary figurines for decorating your home and yard, sweets in the shape of tombstones, monsters, insects. The main symbol since the times of the ancient Celts has been the pumpkin head, which is usually called the “Jack-O-Lantern”.
According to legend, Jack was the name of a not very decent man who lived in Ireland many centuries ago. The drunkard Jack even managed to piss off the devil - the Irishman was not allowed into hell after his death. But there was no way for him to go to heaven because of the abundance of sins. Since then, Jack has been walking around the world, lighting his way with a pumpkin lantern. They say that the devil himself gave the pumpkin with a smoldering coal inside to the sinner.
How to make a pumpkin for Halloween
Sketch of a classic Jack. Print, transfer to pumpkin and cut out!
What could a holiday be without its main symbol? A Jack Lantern will not only decorate a “scary” night, but will also gather the whole family around it, including children - after all, making this attribute is very easy, fun and entertaining! And what emotion Jack will display (creepy, cute, funny) is up to you to decide.
Step-by-step instructions on how to carve a Halloween pumpkin with your own hands:
- First you need to choose the right fruit. Pay attention to the absence of damage and rotten areas. The surface of the pumpkin should not be very hard, and the bottom should be flat so that the finished Jack-o-lantern stands confidently on horizontal surfaces.
- Carefully cut off the top of the pumpkin (you will need this “lid” in the future). You can first draw an even circle so as not to make a mistake with the shape.
- Through the resulting hole, remove all the contents of the pumpkin - pulp and seeds. To do this, it is better to use a spoon with pointed edges. Choose the side for the “muzzle” and “scrape out” the pulp in this place especially carefully. The thinner the wall, the easier it will be to cut out the “face” of the pumpkin.
- Take a marker or felt-tip pen and draw a face on the pumpkin. The classic version is triangular eyes and a smile with teeth. But you can show your imagination and make a unique pumpkin, giving Jack a creepy or, on the contrary, a cute expression. You can print ready-made templates (see options above).
- Using a well-sharpened knife at a right angle, cut out the details of the face according to the previously drawn sketch.
- If you want to extend the life of your holiday attribute, coat all edges with Vaseline. Make small holes on the lid of the lamp (see point 1) so that the heat from the candles can escape through them. If desired, the “insides” of Jack can be rubbed with cloves and cinnamon so that the pumpkin not only disperses the shadow, but also smells fragrant!
- Light and insert a suitable size candle inside (make sure it is level and secure). Life hack: to make the candle burn longer, first keep it in the freezer for a couple of hours.
- Cover the lantern with a lid. Ready! Now the "face" of the Jack-o'-lantern has found life and seed.
Find more ideas, pumpkin templates and visual master classes in the article How to carve a pumpkin for Halloween: simple and effective ideas!
Traditions
Trick-or-treating has been a tradition that has accompanied Halloween since the beginning of the holiday. But then beggars begged the owners of the house for sweets.
Only in the 19th century did adults begin to go from house to house for candy; a century later, children got involved. Teenagers, younger children and very young children beg for sweets in scary and simply fabulous costumes: sorcerers, vampires, heroes of fairy tales and films.
In the USA and European countries, girls on Halloween tell fortunes about their betrothed; the ritual is similar to Epiphany in Russia. Children and young people play traditional games for the celebration: “The Mummy”, “Catch the Witch”, “Dracula’s Meal” and others.
Treats
Traditional treats for those begging for sweets are caramel apples on a stick and fortune bread. Apples on a stick are especially good because even small children can make such a festive treat.
Since the middle of the last century, unusual sweets for Halloween have come into fashion: finger-shaped cookies that imitate brain jelly, gummy worms, and everything that the confectioner’s imagination can conjure up.
Step-by-step photo lesson:
On the back side of the green cardboard we will draw the general outline of the mask. Outwardly, it will resemble a sleep mask. You should definitely leave room for the nose at the bottom.
Using scissors, cut out the silhouette of the future Hulk mask drawn on cardboard.
Now let's do the hair. In the film, the hero had black hair. In our craft they will be of the same tone to create a full-fledged image of a superhero. First, draw their outline on paper. Let's draw thick strands at the top, and short and small strands at the bottom in the form of bangs. Cut with scissors.
Apply glue to the top of the green base and apply a cut piece of hair from a black sheet of half-cardboard. If necessary, we adjust the overall shape of the hair or some strands.
On the green part of the Hulk mask, draw holes for the eyes on both sides. They can be drawn either in the form of small circles or in the form of a believable silhouette of the eyes.
Using small scissors, carefully cut out the holes for the eyes. You can also use a stationery or breadboard knife.
For the stern look of the Hulk's face, add furrowed eyebrows. We will also draw them on black paper and cut them out.
Glue the cut out eyebrows one above each eye hole.
Finally, we will glue a cord to the sides of the back of the Hulk mask so that the mask can stay on the face.
The paper Hulk mask is ready and can already be used for the carnival.
The superhero image always works with a bang! See how to make a mask of Batman,
Turtles , Turtles , and Spider-Man with your own hands
, and let your reincarnation inspire you to do good deeds and become the first step towards universal recognition.
How to make a Spider-Man mask
To create a Spider-Man mask you will need:
felt, black thread, elastic, paper and... mom's help.
1. Print out the mask diagram on paper, enlarging it to the desired size.
2. Make two felt mask blanks. Make a line on one of them using a sewing machine. In order for the web to come out smooth, you need to attach a paper diagram of the mask on top, or make light notes with a marker.
3. Fastening the two halves of the mask with pins, sewing them together along the edges. Before doing this, do not forget to insert an elastic band between the blanks so that the mask stays firmly on your head.
Here's what the back of the Spider-Man mask will look like.
And this is how the mask looks on a very happy child.
Option for girls:
A Spider-Man mask can also be made from paper.
Print out the image of the mask, glue it onto cardboard and cut it out. Glue a cardboard strip or rubber band. All! The mask is ready.
But the most original solution will undoubtedly be a face painting mask
. Skillful application of red paint and spider webs to the face will create an impressive effect.
How to make a Teenage Mutant Ninja Turtle mask
Ninja Turtle mask you will need:
felt, scissors, glue gun, contact tape (Velcro).
1. Print out the mask diagram, or redraw it by attaching the sheet to the screen.
2. Transfer the pattern to felt. For the ties, make two orange stripes.
3. Using scissors, cut out the parts and glue them together with a glue gun.
4. Try on the mask, and in the right places fasten the ties with sewn pieces of Velcro tape, or simply tie a knot.
Hooray! Michelangelo's Teenage Mutant Ninja Turtle mask is ready.
Here's what else a mask of one of today's popular mutant turtles might look like.
And if it takes too long to sew a whole mask for you, you can transform into your favorite character with the help of a bright bandage. Here's how it's done:
DIY Batman mask
To make a Batman mask you will need:
felt, contrasting threads, wide elastic band, needle, pencil and paper.
1. Print and cut out the mask template.
2. Cut out two Batman mask blanks from black felt.
3. Cut out the holes for the eyes using a razor blade.
4. Fix the elastic between the blanks in the right places, fasten the two halves of the mask with pins and stitch along the edges with threads of a contrasting color, retreating approximately 4 mm.
Today I want to share with you interesting patterns for crafting paper toys for your children. Such crafts for boys are very appropriate because these are super hero characters from American films and cartoons. We have already written about how to make such toys out of paper in previous posts and posted interesting diagrams. Our super hero crafts are not at all difficult to make because the designers have already thought them through, all you have to do is download a free diagram of the toy and glue the model together.
You can create crafts with your children and you will have a great time together. Make a Batman or Spider-Man toy that will later become the hero of a child’s games or take a place on a shelf in a collection of other paper models.
And if, in addition to Batman and Spider-Man, you add such famous super heroes as Captain America, the transforming robot Grendizer or the superhero Wolverine from the X-Men team, you get a whole team of super heroes. I am sure your child’s delight and happiness will know no bounds.
In addition, such a paper craft for boys is an excellent way to develop in a child perseverance, attentiveness and, possibly, a further love of creativity.
Halloween costumes for children: image ideas and makeup
Decide with your child what kind of character he will transform into: good or evil. Perhaps a shy kid will want to try on the role of a villain or, conversely, a bully child will want to dress up as an angel.
If the chosen costume requires makeup, prepare everything you need in advance:
- colored crayons;
- theatrical or face painting, appropriate for age;
- decorative cosmetics: mascara, eyeliner, powder, shadows;
- available materials: napkins, cotton pads, makeup brushes, makeup remover.
Top 5 Kids Halloween Looks:
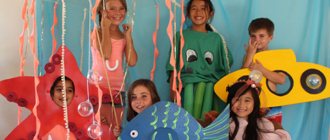
Fairy tale heroes
The idea with fairy-tale characters is especially good if you are planning a home party in honor of Halloween. The parents come to an agreement, and all the children come to the holiday in different costumes, choosing heroes based on the same theme: from Russian folk tales, European ones, or fairy tales of the same author. Adults, if they wish, can join in the celebration by dressing up as heroes from selected fairy tales. Makeup for fairy-tale characters is usually simple - just apply makeup with ordinary decorative cosmetics.
Animals
An animal costume is easy to choose for any child, regardless of age and gender. Possible outfit options: black cat or cat, spider, bat, zebra, dinosaur, dragon. The easiest way is to make a cat costume: any black clothes, a belt as a tail, and false ears from a themed store will do. To depict a cat's nose and whiskers on a child's face, a cosmetic black pencil is enough. The zebra costume looks impressive - black and white clothes and black and white makeup.
Superheroes
There are suitable superhero images for boys and girls: Batman, Spider-Man, Catwoman. It's very easy to make a Hulk costume. It is enough to put on the child torn trousers and a thick green top. For greater effect, under the suit you can place an imitation of a mountain of muscles - a puffy jacket or vest. Green face painting is good for Hulk makeup. You can do without makeup by buying a hero mask in the store.
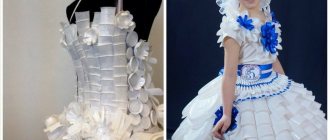
Doll
The simple look is intended exclusively for girls of any age. Any elegant dress can serve as an outfit for the doll. The main thing in the image is makeup: contoured powdered lips, bright pink blush on the cheekbones, black eyeliner around the eyes and false eyelashes, drawn on freckles. A large bright bow on the girl’s head will complement the look.
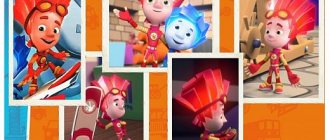
Cartoon characters
The images are just as good for a themed carnival party as fairy-tale characters. It is better for children close in age to unite for a celebration—preschool children like some cartoons, teenagers like completely different ones. Cartoons with the maximum number of characters are well suited for implementing the idea: “Smeshariki”, “Fixies”, “Fairytale Patrol”. To make up images, it is enough to use decorative cosmetics.
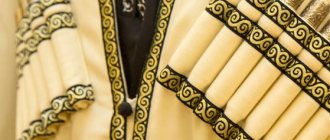
DIY strongman carnival costume for a boy: materials
The strongman masquerade costume consists of:
- jumpers;
- pants;
- belts with a large buckle;
- wristbands;
- capes;
- weights.
If you decide to start making this unusual costume, you will need to acquire:
- striped knitted fabric or vest a couple of sizes larger;
- padding polyester;
- shoulder pads cut in the raglan style;
- black knitwear (for panties) or ready-made shorts;
- artificial leather from which the belt and wristbands will be made (you can use ready-made belts - the main thing is that they have buckles);
- huge buckle;
- a piece of red or blue satin (you can use any other shiny material) - a cape will be made from it;
- pieces of gold brocade and thick non-woven fabric - these materials will be used for the collar;
- gold braid or regular New Year's tinsel for decoration.
Components
Children's Halloween party: how to organize
If you decide to throw a children's Halloween, first of all think about the guest list. The holiday will be especially successful if children of similar ages gather together.
Actively involve your child in preparing for the party. It won't be boring - neither you nor him!
Invitations and gifts
Create an atmosphere of a mysterious holiday even before the party begins: send themed invitations to your guests. You can buy them in a store or make them yourself. There are many options for invitations made with your own hands: figurines of owls, skeletons, pumpkins, bats. Mention in your letter that the party will be a costume party.
Give guests small gifts. Children of any age will be delighted by gummy worms or themed souvenirs.
Jewelry and crafts
Get your home ready for the party with crafts and decorations that are associated only with Halloween. The obligatory symbol of the holiday is a pumpkin with a carved face. The pumpkin can be depicted as good or evil; if your guests are preschoolers, choose a smiling pumpkin. The craft is simple to make: draw a face on a thin-skinned pumpkin and carefully cut it out with a knife.
Other Halloween Crafts and Decorations:
- stickers on windows similar to New Year's snowflakes; you can stick figures of ghosts, bats, black cats;
- pickled brain for older children - put cauliflower in a jar of tea and teenagers will be delighted;
- little ghosts - put pieces of white fabric on white helium balloons and draw funny faces for the ghosts;
- crafts made from autumn leaves - any kind, not just scary ones: animals, fairy-tale characters.
Fabric mask
Making a fabric mask will be much easier than previous options, and you won’t need to spend a lot of time preparing. To operate, you must use the following components:
- Red fabric.
- Scissors.
- Threads that will hold the fabric together.
- Sewing chalk used for sketching.
- Brushes for drawing.
- Paint or regular black marker.
- Mesh or gauze that will go over the eyes.