In today's review, the author will share with us his personal experience of making a homemade mini lathe.
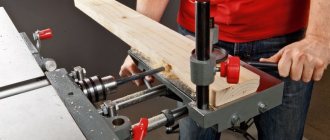
The basis of the machine is a square profile pipe 60x60 mm (wall thickness - 3 mm).
The dimensions of the professional pipe were not chosen by chance - it ideally fits a clamping chuck with a diameter of 16 mm. The result is a fairly compact headstock.
If you use a drill chuck with a diameter of 13 mm to make the headstock, then in this case you will need to use a 50x50 mm profile.
We also recommend reading: how to make a simple and compact machine for making clamps for reinforcement cages.
The length of the lathe bed is 22 mm, but if necessary it can be made longer.
Application areas of lathe
A lathe is an ancient device; it is an early device for processing a wide variety of parts from a wide variety of materials - from metal to wood, etc.
Processing is, first of all, turning surfaces both inside and outside, drilling and boring holes of different diameters, cutting threads, and forming surface relief using knurling.
If we talk about turning metal parts, then industrial turning devices produced by different factories are expensive and massive units, which are very difficult to operate.
They in no way relate to desktop devices; these are serious industrial units that, in principle, are not suitable for handicraft work. Therefore, a DIY lathe is a great idea by all accounts.
Drawing of a lathe.
You can, for example, make it in the form of a mini version, which will be quite enough for processing both metal parts and workpieces made of any other materials.
There are certain limitations when using homemade mini-machines: they are designed mainly for working with round parts, with sections such as axles, handles for tools, wheels, etc.
In mini-machines, parts need to be fixed only in a horizontal position for their rotational movements. Excess material during turning is removed by cutters, which are fixed in the support of the lathe.
Push-in connections classification, types of pipes, operating techniques and instructions for use
Collets are often mistakenly confused with jaw chucks, which are used for similar applications.
In collets designed for a shank of a certain diameter, it is impossible to fix a tool with a shank of a different size. That is why from a set of collets you should choose those that exactly match the diameter of the shank of the tool used.
Collet chuck
Collet nuts designed for tools with shanks of different diameters are no different from each other; the differences between such devices lie in the different sizes of their clamping elements.
In this regard, one nut, from which the collet can be removed quite easily, can be used in a set with clamping elements for shanks of various diameters, but it is much more convenient and practical when each collet for a router is included in the set with its own nut.
Device manufacturing algorithm
The collection takes place in 3 stages. Let's take a closer look at each of them.
Making a mini cartridge
If your drill is spinning in the wrong direction, swap the wire contacts.
Attachments for a homemade mini drill
can be purchased at any hardware store. Before purchasing, make sure they match the diameter of the collet.
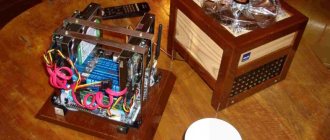
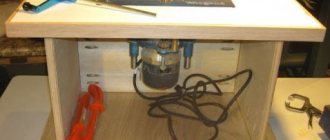
Preparing the body
As a housing for the future device, you can use either an antiperspirant container or a regular hollow tube of a suitable size.
a hole must be drilled in the cover for the drill to exit.
Connecting the elements
The motor must be installed on the reverse side. If your motor is not the right size, choose another tube. The fit must be very tight to avoid vibration as the shaft rotates. After this, it is enough to tighten the bolts on the collet and connect the resulting device to the electrical network.
One of the main disadvantages of assembling a drill with your own hands from a motor is the lower power compared to a standard device and the low strength of the drill.
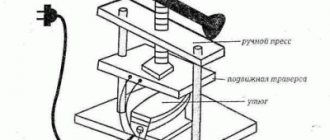
If your work requires a cutter, you can easily make one yourself from an old lighter.
To do this, remove the spinning drum from the lighter and place it on a bolt of a suitable size. Secure this with a nut and insert it into the collet hole. The cutter for surface treatment is ready!
If for some reason the cartridge does not fit in size
to the cylindrical shaft of the motor or coil, it is necessary to degrease it well and then attach it to hot glue. This will help to obtain a stable and durable structure.
Such a mini drill with purchased attachments can perform minor repairs on technical equipment, drilling plastic, thin metal, and making crafts.
The problem of consumption or lack of collet cartridges is especially familiar to jewelers. Specialists involved in the manufacture of printed circuit boards also face this problem.
Collet chucks can be created independently from available materials. However, there are some nuances that will be covered in detail in the article below.
It should be noted right away that a hastily made collet will not be dismountable. That is, strictly speaking, removing one drill from it and inserting another will not work. For this reason, the manufacturing method is more suitable for those who need to create a large number of identical holes.
So, to create a homemade collet chuck we will need:
Initially, you should wind the steel wire around the blank in the form of a rigid spring (the half rings come as close to each other as possible). Next, the resulting structure must be thoroughly soldered.
Today, anyone can easily purchase a special cam for any type of drill. This can be done both in construction boutiques that offer equipment for sale, and on the Internet (at auctions such as Ebay or Amazon).
The price of such a device does not exceed sixty rubles. Purchasing a cam will forever save you from searching for suitable collets for using various drills.
Of course, it is better to purchase a cam made of high-carbon, durable steel. To tighten it, it is recommended to use a special wrench, which is included in the kit.
Components of a mini metal lathe
The composition of any turning device is traditional; all of the following elements are present regardless of how it is made - manually at home or industrially.
The devices consist of the following components:
bed
The main load-bearing element of the entire structure, giving it rigidity and strength. The bed of a homemade metal lathe is made from wooden beams or metal blanks in the form of ready-made corners.
The main requirement for the bed is the necessary strength, since the structure of the machine is exposed to strong vibration during the processing process.
Drive unit
The main element of the part responsible for the power of work. The drive must be selected very correctly based on the power required. This is not an easy task and one that needs to be thought through carefully.
A used drive from a washing machine, a construction mixer, or something else will suffice if you are making a lightweight machine for metal work.
The number of revolutions with such drives is about 1500 rpm, and the power is 200 W or slightly higher.
- Tailstock. This is a special steel plate to which a steel corner is also welded. It is needed for tight fixation of the workpiece to the bed for high-quality processing.
- Headstock. This is the same part as the tailstock, but unlike the front one, it is fixed on the movable frame of the device.
- Front and back centers.
- Caliper.
This is one of the key factors for the working elements of the device, information about which you can read below.
How is rotation done?
The device of a lathe.
Torque is generated in the machine in different ways. You can install the working part on the rotary shaft of the electric motor directly. This approach will save a lot of things: both space and money for spare parts.
Unfortunately, such an arrangement is not always possible, so the so-called gears are appointed as the main executor of the rotational movement. They come in chain, belt and friction types.
Each type of transmission has its pros and cons:
Belting
The most budget-friendly transmission option for a motor with many advantages. The main one is reliability. Making a belt drive is simple: most often craftsmen take one from other devices.
There is also a drawback - this is its fragility, since the belts wear out quickly. You will have to change them quite often.
Chain and friction transmission
A chain drive is not cheap, and it is also much more bulky than a belt drive. But such a transmission will last much longer, so you will get “strategic” cost savings. The friction drive is located exactly in the middle between the belt and chain drives.
Main components of the device
The final quality of the processed part depends on the support. The effort, time and all other resources invested in the process can go down the drain without a well-established support. This part is located on special “sleds” moving along the frame along guide vectors.
The movement of the caliper can occur in the following directions:
- Longitudinal movement in which the working element of the device moves along the part being connected. This direction is performed when turning a circular thread or to remove the surface layer of paint or something else from the workpiece being processed.
- The transverse movement of the caliper is perpendicular to the axis of the part. With the help of this movement, holes and recesses are made.
- The inclined movement can be carried out at various angles of inclination, it is used to produce surface recesses of various configurations.
It should be remembered that the caliper, as the most active and moving part of the device, is the most worn.
Elements of a lathe.
Rapid wear is explained by the action of constant and serious vibration, which results in loosening of the fasteners and subsequent backlash, which always affects the quality of turning work in one form or another. Such a disaster can be avoided; this requires constant adjustment and adjustment of the caliper.
The caliper can be adjusted in different ways. If the backlash is adjusted, it is eliminated using a screw. Gaps can be eliminated using special inserts between the carriage and the guides.
Gaps appear when the screw, which controls longitudinal and transverse movements in planes, wears out. Oil seals can also wear out. In this case, they are washed and lubricated until completely saturated with machine oil. Sometimes they just need to be replaced with new ones.
Technology for removing the chuck from an electric drill
to perform this operation :
Dismantling with conical mating
This pairing option should not cause disassembly difficulties.
If there is a fixing screw, remove it.
If you have a tool for removing bearings, it is better to use it.
Dismantling with a threaded connection
In this case, the disassembly order is as follows:
If the operation still fails, you will have to disassemble the body of the electric drill to gain access to the spindle.
Stages of assembling a lathe
Homemade metal lathes are assembled with your own hands quickly and in an uncomplicated manner. The only thing that needs to be strictly followed is the assembly order.
A homemade lathe must be assembled with maximum precision:
- The first step is to assemble the frame from metal elements. It is better if these are channels and beams. It is necessary to calculate the load for the planned work: what size parts are you going to deal with? If, for example, you plan to process metal objects longer than 5 centimeters, the metal frame of the machine must be more than 3 centimeters thick.
- Installation of longitudinal shafts with guides on channels. It is better to fix the shafts with welding units, but they can also be secured with bolts.
- Preparing the headstock from a thick-walled hydraulic cylinder with two bearings pressed into the cylinder body.
- Shaft routing using large diameter bearings.
- Pouring lubricant into the hydraulic cylinder.
- Installation and fixation of the pulley with caliper and guides.
- Electric drive installation.
Don’t forget to use a special tool rest for good stability of the cutters for the metal lathe. A metal turning tool is one of the key elements; we work with it carefully and carefully.
Attach a metal strip with a protective function to the bottom of the machine structure - it will prevent the working part of the machine from deforming during activity.
Which motor is better
Assembly drawing of a lathe.
The electric motor is a key part of any metal lathe. The movement of the working part of the apparatus occurs thanks to it and nothing else. The more powerful the motor, the more powerful the machine itself.
The power level of the motor must be calculated depending on the planned work - the size of the metal parts that you are going to work with on your new unit.
If you plan to work with small parts, a motor with a power of about 1 kW will be sufficient. Such motors are found on sewing machines or other household electrical appliances. If your future parts are larger, choose a motor with a power of 1.5 to 2.0 kW.
The power also depends on the material you are going to work with. If, for example, your material is wood, then DIY wood lathes, including a homemade wood lathe cutter, will not require much power.
The most important issue is reliable insulation of all electrical components. The best option would be to consult a specialist. Confidence in the safety of the device and the professional reliability of the design will not hurt you: after all, you are going to work with electricity and metals. And they don't joke with them.
Design features
Main types of cartridges
for household drills the following:
There are also other varieties, for example, SDS+ and SDS-max from Bosch. But it is not worth dwelling on this issue in detail, since the type of chuck according to the method of clamping the drill does not affect the method of attaching the chuck to the drill spindle.
Attaching the chuck to the spindle of an electric drill
Actually, there are two methods of fastening:
You can find out the type of fastening by the marking:
Making a machine from a drill
The drill will look great as a drive to a lathe.
This elegant solution will save you a lot of money and make your life much easier because it has a number of great benefits:
- The modularity of the device: it is simply assembled and disassembled. The drill can be detached from the frame and reattached without any difficulty.
- This model is very transportable, you can work with it anywhere - even in the country, even in the garage.
- Significant cost savings: no need to purchase additional replacement attachments or belt drive.
To assemble a device from a drill, you will need almost the same parts as for a regular device. Only two things will not be needed: an electric motor and a headstock, and these are the most important and most expensive structural elements.
Since the machine is light and compact, there is no need to build a stable frame; a workbench or table will be sufficient. The drill is fixed using a clamp and a clamp.
Design and dimensions of a lathe.
Expanding the functions of a turning device from a drill can be done using additional attachments and other devices. You can make some great homemade woodworking machines.
There are, of course, disadvantages. You will not be able to process large parts with a drill machine. We can try to improve the model in this direction. For example, add a belt drive and complicate the machine to increase the number of revolutions.
But the game is not worth the trouble: it will lose its main advantages in the form of simplicity and ease. Thus, a homemade device made from a drill makes sense only in cases where you are working with small parts.
A lathe made from a drill is capable of many things: it can not only process parts. But also work with paints - apply them to the workpiece while it is rotating. This is also a homemade wood cutting machine.
Winding wire around a transformer and applying various types of notches on the surfaces of parts are just some examples of using a multifunctional machine consisting of a drill and a metal lathe.
Drilling process video
The drill can now be used at work. Another example: on a small electric motor it was necessary to install a drill with a diameter of 0.5 mm without a chuck and collet. First, the end plastic part from the gel pen was put on the shaft, and two suitable wire sheaths and a drill were inserted into it, one into the other. And this drill does its job successfully. There is no beat at all.
(post too old to reply)
2005-05-30 03:35:01 UTC
All_, all the pleasures just began, 40 miles from the sun.
Guerrilla radio, turn that shit up. (c) Rage Against The Machine
Yuri Y. Lesnichenko
2005-05-30 01:08:25 UTC
2005-05-30 03:39:00 UTC
Mon May 30 2005, Yuri Y. Lesnichenko wrote to Maksim Gataulin:
Try wearing it with copper (brass) foil.
2005-05-31 14:23:00 UTC
I check the alignment at rpm by lightly pressing a piece of GOI to the cartridge and turning the screws along the mark. Previously I tried this method: the shaft is tinned, heated at low speeds with a soldering iron until the solder melts, the soldering iron is removed, the solder cools down, and the alignment of the soldering is maintained. Glasses are required. Solder flies. The higher the speed, the thinner the solder layer. Grind off/scrape off excess solder at high speed. Disadvantage: the solder is soft, the screws scratch the solder.
In general, the shaft should be tapered.
The design of the chuck is quite simple, and almost all drills have similar elements. At the same time, the compact arrangement of parts and the strength of fastening can cause difficulties. The issue of disassembling a tool often becomes quite relevant.
And now the simplest machine
Today there are a huge number of drawings, instructions and videos on the Internet on the topic “how to make a homemade lathe”, with the help of which independent work on making a lathe is quite realistic and can be done by almost everyone.
You can, of course, aim for a mini-machine with program control. Or you can choose the simplest option, which will work perfectly for a wide variety of parts of various configurations at low cost.
Wooden posts are attached to the frame using bolts. The frame must be reliable, so it is made of steel corners. In extreme cases, it can be made from bars.
The device of a wood lathe.
The cutting element is fixed on a knot from the tool rest, and it will move along it. A sheet of metal should be tightly fixed on the moving surface to protect the structure from deformation. In addition, this will help position the metal turning tool exactly to the part that needs to be machined.
To make the headstock and tailstock, suitable metal cylinders with the appropriate diameter are selected. They are housed in bearing assemblies that are pre-positioned in wooden posts.
The rotational movement is transmitted through the front center, connected to the motor using a belt drive. The part is fixed between the front and rear sections and processed with a cutter from a tool rest.
There are no problems with finding and choosing an electric motor for a mini-lathe.
We have already written that a low-power motor can be found on any household electrical device; any used home appliance is quite suitable for this task. Grinding machines or drills can be used as a drive.
Safety precautions
Since we are talking about an electrical machine and working with metals, the requirements for compliance with safety regulations will be clear and strict, from which there is no escape. The first step is to check the functionality of the new machine immediately after its manufacture.
How to check the performance of the machine: the spindle should rotate without the slightest difficulty. It is necessary to measure the coincidence of the axis of rotation of the parts in the machine with the center of symmetry of the same part. The common axis should be visible at the front and rear centers.
Elements of the design of a lathe.
The electric motor is always covered with a special casing, which protects the motor from dirt and metal particles, as well as the machine operator himself. If your device is made from a drill, no casing is needed.
If you decide to equip your homemade lathe with a powerful motor, be sure to test on your home network to see if it is enough for your powerful motor. In general, it is better to adhere to established traditions and use old friends - electric motors from household appliances.
Making a homemade metal lathe with your own hands is an excellent and elegant solution from all points of view. Ease of execution, cost savings, efficient processing of parts - all this is about homemade lathes.
General operating rules
When working on a lathe, following safety precautions is the key to comfortable work.
Necessary:
- Always securely secure the workpiece before starting work, and then remove the key, if present.
- Remove all jewelry, especially chains or earrings. Tuck long hair under your overalls. Anything that may become wrapped around the product cylinder must be securely removed from the machine.
Important: Do not carry objects over a running machine. Any little thing can fall on the product and not only ruin it, but also bounce off in an unexpected direction.