A tunic is an indispensable item in the wardrobe of a modern fashionista. It is so versatile that you can wear it to the beach or an evening walk, as well as to work or a date. Nowadays, things made by yourself are gradually coming into fashion, and you can quickly sew a tunic with your own hands without a pattern. This work will not take much time, and the result will be stylish clothes like no other.
Tunics for women photos, 5 options
Models for women are no less sophisticated than for girls. Stylish, modern cut, will interest an adult lady.
The cutting technique is very simple. Basically, all models are straight or slightly flared. they advantageously hide all figure imperfections and lengthen the silhouette.
To sew, you need to measure your chest, waist, hips, arm circumference, armhole and neckline depth.
We transfer all measurements to the pattern. We draw the lines and cut them.
Basically, the tunic consists of two side and shoulder seams. Machine stitch and overlock. Sew on the sleeve. Iron all seams.
Flared tunic. Hides figure defects.
Slightly flared style. Noticeably slimming.
The model looks great with trousers, and does not visually shorten your height.
Loose fit tunic. Suitable for trousers and skirts.
Gorgeous model. Emphasizes the waist.
Taking measurements
To create a pattern for a simple tunic, you need to take traditional measurements:
- in order to adjust the sleeve width, you need to measure your arm circumference;
- The construction of the sleeve in these models is carried out from the chest, so this measurement is taken from the center of the chest to the desired sleeve length, and not from the shoulder.
- You will need measurements of your chest, hips and waist.
Taking measurements for a tunic
How to sew a beach tunic, patterns step by step with photos
A tunic for the beach is a very necessary and important wardrobe attribute. You can sew it yourself. 1. We measure the volume of the chest, waist, hips, armhole height, neck depth. We make a paper pattern according to the presented sample. 2. Fold the fabric in half, right side inward, and fasten with pins. Draw chalk along the lines. Cut it out. 3. Draw the neckline with chalk. In the front part, the depth from the shoulder line should be greater than on the back, as in the sample in the photo. You can choose the depth at the front at your discretion. There are no strict rules here. The indentation on the back is no more than 5cm. Cut it out with scissors and start sewing. 4. Glue the neck with doublerin. We process with overlock or zigzag. We wrap the edging about 1 cm and sweep it by hand. *** I advise you to steam all seams after throwing. It will be immediately clear whether the fabric fits correctly or whether modifications are needed. And then it will be easier and more pleasant to stitch on a typewriter.**** 5. Steamed along the seam. If all is well, stitch the seams. Process with overlock. Fold 1 cm and machine stitch.
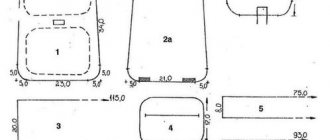
This style of product is very easy to make. All you need to do is take your measurements. For sewing you need a piece 1.40 meters wide and 70 cm long. We follow the general rules. We make the pattern according to the presented sample. The result will please you.
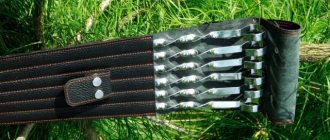
The simplest beach tunic, loose cut. Any beginner can sew it. There is no need for a pattern at all. For this style of tunic you need a piece of fabric 1.5 meters wide and about 70 cm long, with a height of 170 cm. Sew on finishing tape, 40 cm for each shoulder as in the photo. We steam all seams with an iron. The neckline area can be decorated with braid, beads, and beads.
This style of tunic is more sophisticated than the previous two. For sewing, we need a piece 1-1.20 cm long and 1.40-1.50 cm wide. To sew this tunic, you need to follow the instructions in the photo. There are some nuances there, such as the elongated rear section. According to the presented drawing, you can cut out and sew everything correctly.
For this style, you need a cut 1 meter long and 1.4-1.5 cm wide. We follow the instructions. We make the pattern according to the presented photo. Approximately you need two hours of time to complete this work.
A very interesting model. For sewing, we need a cut 1.4 - 1.5 cm wide and 1 meter long. Very easy to make. An addition to the product will be laces or elastic bands at the waist. To do this, you need to cut a strip of fabric 5 cm wide. Tuck 1 cm in width, sweep and iron. Sew it to the product in the tunic area. Insert rubber band.
beach tunic, step by step video
Dress created using drapery
You can make such an outfit in just a few minutes. Not only that, to sew such a dress in the Greek style with your own hands, you don’t need a pattern as such.
To work, take a piece of fabric across. The middle is held near one side. Both ends lead to the shoulder opposite the draped side. You can pin the fabric directly on the shoulder, or you can sew a narrow strap in the right place.
Now, with a needle with a thread inserted into it, the fabric is grabbed on the side so that it does not fall apart. It is recommended to make small, beautiful folds during baiting. The seam is made from the middle of the thigh to the armpit. After this preparatory work, the area caught on the live thread can be sewn on a machine.
It is worth understanding that the seam will be obvious, so you should carefully select the color of the threads. In some cases, you can limit yourself to hand stitching. Again, neatness and evenness of the stitching will play a huge role here.
As you can see, to make a luxurious outfit, sometimes you don’t need a complex pattern at all. Floor-length Greek-style dresses can be made in a few minutes, if you have a well-draped material on hand.
How to sew a tunic with your own hands without a pattern
Fashion trends change like the weather. The models we are interested in are not always available for free sale. And even if you find the right thing, it’s either the wrong size or the wrong color. Sewing a tunic couldn't be easier. Simple models, easy patterns. The sewing process itself takes very little time. And your wardrobe is updated. • If you do not have an overlocker, choose a fabric that will not fray after cutting, and its edges can be finished with a zigzag. All sewing machines have this function. • In terms of color scheme, bright, colorful prints look better. It is important that they are not very colorful and do not hurt the eyes. • And the most important thing. Choose the fabric that suits you.
And so, measurements:
- You need to decide on the type of neck. Triangle or semicircle, your choice. For thin ladies, a semicircle is better; it is ideal for a graceful neck.
- Fold the fabric right side inward.
- Cut out the details.
- Place the finished parts of the front and back with the front side in the middle. Baste along the seams.
- We do a fitting.
- If the finished product is a little too big, you need to reduce it at the seams.
- We sew the product on a machine. If the allowances are too large, cut off the excess. We overlock the sides of the product.
- Iron the neck together with the seal.
- We process it with a machine seam.
Greek dress without seams
Some people may not believe that you can sew a luxurious outfit without threads and needles. And the dress pattern itself in the Greek style will be made with minimal effort. That is, a piece of fabric is simply cut off from a roll!
Of course, there are some things you'll have to take care of. These are accessories for clothing, such as brooches for pinning shoulder joints and a wide belt.
So, let's start creating a masterpiece!
- A well-draped, ironed fabric is laid out on the floor or large table so that the direction of the grain thread goes transversely.
- The side cut lines are folded towards the middle of the rectangle.
- The upper folded corners are moved slightly apart to form a neckline.
- These places are fixed with hairpins (brooches) or thread.
- Now the dress is put on the figure with the open part forward. The fabric is beautifully laid out in folds and a belt is put on that will hold them in the desired condition.
If you wrap the robe a little, you will get a rather modest model of a Greek dress. And if part of the body is left open between the fabric, and the belt is fastened almost at the waist, then the model will be extremely extravagant. This style is suitable for ladies with an ideal figure and high breasts.
How to sew a tunic for plus size people, photos of models with patterns, 5 options
For plump ladies, it is quite problematic to choose clothes. You can competently embellish your shapes. Choose soft, flowing fabrics, they will decorate you favorably. But hard and rough ones will add volume. The color scheme is calm, not flashy tones. As for the style of the future product, it must first be carefully thought out, taking into account all the individual characteristics of the figure and, of course, taste preferences. If you have plump hips and small shoulders, add jewelry to your neckline. If, on the contrary, you can hide them with a flared bottom and a tapered corset at the top.
- We measure the chest area, waist, length, armhole height, desired neck depth.
- We transfer all measurements onto paper.
- We place the finished pattern on the fabric, having previously folded it with the front side in the middle. Draw all the lines with chalk and cut out the details.
- We sweep the sides, sleeves and try them on.
- If everything fits well, we move on to sewing. We process the edges of the parts with an overlocker and machine stitch them.
- Steam the seams well.
The tunic is ready.
We need a light flowing fabric. This tunic is perfect for business meetings. Follow the instructions in the photo. Airy tunic This style of tunic is quite difficult to make. It has many composite, cut-off parts. Sewing such a tunic requires perseverance and attentiveness. The fabric should be light. The product consists of component parts. The work is painstaking. But the result will please you. Flowy tunic. The tunic is quite simple to make. No complicated parts. The fabric needs to be light and airy.
Follow the instructions in the photo.
A very simple product to make. Consists of only two parts. slightly flared.
Gives a special charm.
This tunic style will suit everyone. It is very easy to sew. No complicated parts. You need a little patience. The result will pleasantly surprise you.
How to sew a tunic from knitwear, step by step photos of models with patterns 5 options
Knitted tunic. very practical product. It can be worn with leggings and shorts. It is advisable to choose soft and flowing. The pattern is very easy to use. Natural fabrics will not float in hot weather. 1. We measure the chest area, hips, neckline and armhole depth, required sleeve length, arm volume in two places. 2. Transfer all measurements onto paper. 3. Transfer the finished pattern onto the fabric. Draw all the lines with chalk. We cut it. 4. We fasten the finished shelves with pins. We outline the sides. We do a fitting. 5. If the tunic is a little big, adjust the width using a seam. And proceed to sewing 6. Topstitch the seams, overlock. We sew in the sleeves. We process the neck. 7. Steam all seams. The tunic is ready. Looks great with trousers. To complete this model you need an 80-86 cm piece of fabric. Follow the instructions in the photo, you can easily complete the job. There are no complex details in the cut, which greatly simplifies the work.
This model is very suitable for slender girls. Fashionistas will be pleased with such a tunic in their wardrobe. The pattern does not contain complex details. Follow the photo instructions and you will succeed.
Tunic for everyday wear. The decoration is a flounce. To perform this work, you need to widen the upper part of the front by 5-7 cm, from the armhole to the shoulders. This part is cut out obliquely. the back is normal and flat. Make the pattern according to your measurements.
A very successful model. The tunic looks beautiful on thin girls. The pattern does not contain any complications, without undercuts. Made according to your measurements. To make the pattern, use the instructions in the photo. You will need two lengths of fabric, 1.4-1.5 wide and 1 meter long.
You don't need a pattern to make this model. You can use a tunic you have at home as a sample. Attach it to the fabric folded in half, outline all the lines with chalk, and cut it out. Finish the seams with overlock and machine stitch. Roll up the hem and sleeves.
Knitted tunic, without overlock. Step by step.
Master class on sewing a tunic with your own hands, patterns and models 5 options
master class “Summer tunic with elastic”
We measure the volume of the chest, hips, neckline, and armhole depth. We draw a drawing. We take into account the volume of the product, add 1-1.5 cm to allowances. We transfer the prepared pattern to the fabric. We cut it. Sweep it away. We process the seams on a machine. Let's iron. The tunic is ready.
master class “Tunica made of scarves”
A very simple version of the bat. You can sew such an outfit with your own hands from several scarves.
master class “Knitted tunic”
The tunic can be decorated with beads, ribbons, and beads. They are very relevant today. You can add a belt to the tunic at the hips or waist.
master class “Tunica for a young mother”
Master Class
Master Class
Working with materials and tools
What you need to sew stylish clothes with your own hands:
- Sewing kit: thread, needles, scissors, thimble, measuring tape;
- Sewing machine;
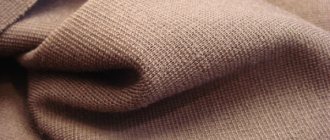
- Fabric (wool, linen, chiffon, chintz, cotton). The material is selected depending on the season and purpose; wrinkle-resistant fabrics made from natural fibers are more practical;
- Pattern. For beginners, there are many ready-made models that you can use to cut. Creating a pattern yourself according to individual measurements is also not difficult. On the website you can find detailed instructions for creating a template;
- Decor: ribbon, braid, lace, buttons, beads, applique, embroidery. You can decorate the finished product for a more attractive look and add a touch of individuality using any decorative elements. A plain outfit, stylized in national motifs, or romantic embroidery and openwork lace will complement the look.
How to sew a tunic from scarves, diagrams and patterns 5 options
This option is suitable for all occasions in life. You can wear this tunic both on the street and on the beach. It can be worn with shorts and breeches.
Tunic made of two scarves, straight cut.
For such a tunic you will need two scarves. They need to be sewn on the sides. Fold the top about 3 cm and stitch it. Pull the cord or ribbon through. It will take approximately 80 cm of braid.
To complete this model, take two scarves. Sew the side seams. Insert the tails into a ring and sew them up or wrap them and stitch them. Decorate the top of the tunic with ribbon.
For this model you will need two scarves. They need to be sewn on the sides. For the front, do not add about 15 cm on each side. For the back, 20 cm. Fasten together with braid.
This stylish model will become your favorite. An addition will be an elastic band under the bust. To do this, you need to sew a previously prepared and ironed part of the fabric from the wrong side, and thread an elastic band into it.
Tunic from scarves, step by step.
How to sew a dress tunic, models and patterns 5 options
For sewing, light flowing fabric is suitable. The product is sewn according to the same principle as a tunic, only longer. For this we need fabric 1 meter long and 1.5 meters wide. Fold the fabric in half, with the right side in the middle. Cut into two parts. Fold each part in half. We put one on top of the other. We attach the pattern. Draw the lines with chalk. We cut it. We sew the finished halves together. We process the neck. The tunic dress is ready.
drawing
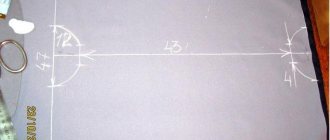
We measure volumes and create a drawing. We start drawing from the left side. We measure 7 cm from the center. Down 4 cm. When two points are connected in one line, a drawing of the shoulder will appear. Choose the type of neck. Approximately 22-24 cm. They need to be divided by 2, and draw a line 12 cm, to the shoulder. Along the edge of the fold of the fabric, go down 4 cm, this will be a recess for the cutout on the back. We deepen the front cutout by 8-10 cm. Further along the same edge we lower it from the top by 80 cm, this is the length. Along the same lines we make a segment for the hips and waist. Don't forget to divide all measurements by 4. Measure 25 cm for the sleeve. It is necessary to connect all the graphs and cut them out. The pattern is ready. It is universal. You can sew any dress on it.
Airy chiffon tunic. Can be used for everyday wear. The lightness of the cut allows the body to breathe in hot weather. The simplicity of the product allows you to sew the product in 1-2 hours.
Tunic dress with elastic. There are no complex elements in the cut. Any beginner can cope with the job.
Tunic dress made of knitted fabric. Fitted, gracefully emphasizes the waist.
Straight fitted knitted tunic with decorative elements. Very elegant. Simple cut. no complicated elements.
Stylish business tunic. Ideal for the office in hot weather.
tunic dress step by step
Greek dress with front seam
You can design an outfit in a similar way by stitching the connection of the side panels folded to the middle of the segment. In this case, you also do not need a specially designed pattern for your figure. Dresses in the Greek style have such a wonderful feature: the fabric and the ability to beautifully distribute the folds of the drapery are important.
The instructions for making the dress are quite simple.
- The fabric is folded in half crosswise face to face.
- The seam is not completely stitched. You need to leave a gap equal to the depth of the cutout. By the way, the dress can be worn either with a slit in the front or in the back.
- The resulting “sleeve” is laid out on the table so that the seam runs exactly in the middle of the product, with the embroidered edges facing up.
- Pull the edges of the cut apart slightly so that a neckline is formed.
- The corners of the free ends are fastened to the edge of the material located underneath. You can stitch the edges a little, then the dress will have hangers. And if you fasten it pointwise (with a thread or a brooch), then the shoulders will be open.
- Having treated the neckline so that it does not get wet, you can put on the dress, beautifully laying out the folds and tying the belt.
How to sew a tunic shirt, models and patterns 5 options
Very comfortable and stylish outfit. To complete it you will need natural fabrics. The product has a smooth silhouette, slightly fitted, with pockets. The pattern has darts. But even a beginner can cope with such work. Use the sample instructions in the photo. The work requires a little skill.
Tunic shirt straight cut, with sleeves and cuffs..
Stylish, long shirt dress. This season's trend.
A long tunic shirt, slightly flared at the bottom.
A tunic shirt in a large checkered pattern is a great addition to jeans and leggings.
Bright tunic shirt. A very trendy model this season.
tunic shirt, step by step
How to sew a boho tunic, models and patterns 5 options
Boho is a wonderful style. it masks figure flaws. Easy freedom style. All items have a loose, relaxed fit. The only drawback of boho is that sewing requires a large amount of fabric. This style of clothing is suitable for plus size ladies.
Light flowing fabric gives this model special comfort.
Lightweight, loose tunic. Made in light colors, the tunic will highlight your elegance.
Voluminous and free. A good addition to skirts and trousers. Boho is very trendy this season.
Voluminous tunic. Elegant and effective. Good for walking on a hot day.
A spectacular tunic that favorably focuses attention on the elegance and fragility of the silhouette.
Boho tunic, step by step.
Greek style dress styles
There are a lot of options for beautiful clothes today. It just makes my eyes wide open! And many models are available for making with your own hands, as long as you have a successful dress pattern in the Greek style at hand. Burda is a wonderful magazine. It provides readers with not only a variety of styles of outfits, but also beautifully designed patterns for cutting.
Although in many cases, some kind of exclusive dress pattern in the Greek style is not required at all. Often, an outfit is made by draping a piece of fabric over the figure and securing the garment with pretty brooches, artificial flowers, pins, or a few stitches.
Other styles are based on conventional models using embroidery on the chest, along the bottom of the dress, and on the sleeve cuffs, made in the Greek style.
DIY tunic styles, patterns 5 options
A tunic is a universal wardrobe item. It goes well with jeans, leggings, and shorts. It can be worn as a dress. An indispensable attribute on the beach. The tunic can be made in both a business and romantic style. There are many varieties of sports tunics. Every lady chooses, first of all, convenient and comfortable things.
Choosing fabric
It is better to sew a Greek dress with your own hands from cambric, but other softly draping fabrics, affordable viscose staple or luxurious natural silk will also work.
In order to sew a dress in the Greek style with your own hands, you will need 3.6 m of fabric with a width of 140 cm. Knitted tulle or plain lawn will be suitable as a lining for the skirt; you will need 2.3 m of it. You will also need elastic braid or bobbin rubber, adhesive non-woven fabric of suitable density and 6 covered buttons (optional).
How to sew a tunic for a girl, models with a pattern, 5 options
To sew a children's tunic you will need about 50-60 cm of fabric. The execution technology is the same as for adult patterns. Most often, tunics for girls are made without using patterns. It is enough to measure your height, chest volume, shoulder volume, and the desired length of the product. Mother + daughter sets are very popular this season. So if you have some fabric left, sew a tunic for your daughter.
Butterfly tunic for a teenage girl. To make it you need no more than 1 meter of fabric and a little elastic. And the beautiful tunic is ready.
Tunic for the baby. Ideal for the street and going to kindergarten. Any beginner can handle cutting and sewing.
Light flared tunic for hot summer consists of two parts, decorated with ribbon
Stylish tunic. It is sewn from scarves, gathered on a ribbon, and has only two side stitches.
A catchy straight tunic with short sleeves. Neck with elastic band. Can be combined with shorts or leggings.