- Patchwork pillow “Dresden plate”
- Pillow made of colored diamonds
- Denim pillow
- Round patchwork pillow
There are a lot of options for handicraft techniques that are suitable for making sofa cushions. One of the most preferred is patchwork (the more familiar name for us is patchwork).
Pillows made using the patchwork technique will always find their place in the interior, no matter what it is. It is ideal if such products become the subject of home decor, where ethnic or rural style is cultivated. But in principle, patchwork is a touch of comfort and homely warmth in any interior. And even fans of minimalism can be sure: a pillow made of scraps will be very appropriate.
Even an inexperienced craftswoman can master patchwork; in this matter, what is more important is not sleight of hand and a creative mind, but perseverance and accuracy.
The first point in making patchwork pillows is choosing the fabric. Of course, it should be in harmony with the upholstery of the upholstered furniture, which will be decorated with pillows. Alternatively, choose a fabric that contrasts with the upholstery. You can use the scraps left over from sewing curtains, then the pillows and curtains will create a single color ensemble in the room.
In most cases, only the front side of a patchwork style pillow is sewn from scraps, while the back side is cut out of fabric in the usual way
What are patchwork pillows?
When you want to decorate a room in a special way, bringing coziness and comfort into it, many people began to use patchwork pillows.
With the help of such design solutions, it is possible to successfully highlight an armchair, bed or sofa cushions. For those who decide to use the second option, it is important that all the necessary materials are at hand. Only by strictly following the special technique, using diagrams and taking into account all the instructions that the master class provides, you will be able not to miss a single detail. Using patchwork patchwork pillows, you can make the overall interior bright and beautiful, adding zest to it with your own hands
Using patchwork patchwork pillows, you can make the overall interior bright and beautiful, adding some zest to it with your own hands.
What are the advantages of patchwork:
Sewing from scraps is used not only for making pillows, it can be blankets, clothes and pillowcases. It is important that this style has become a real find for thrifty housewives. To sew, for example, a pillowcase, old used fabrics were selected, from which flaps of the required size were cut out. And then the desired model was created.. Using this simple method, you can make the overall interior bright and beautiful by adding an interesting detail from multi-colored scraps with your own hands.
Using this simple method, you can make the overall interior bright and beautiful by adding an interesting detail from multi-colored scraps with your own hands.
Style Features
Patchwork is a special patchwork technique. This is a direction of modern needlework in which products are created from pieces of fabric of different colors. This type of sewing arose out of necessity. In ancient times, people did not always have the opportunity and means to buy clothes or things, but sewing them themselves from pieces of fabric was a good solution.
The technique is the process of joining pieces of fabric into a single fabric. Despite its popularity throughout the world, patchwork originates specifically in the American interior. There are many types of patchwork, each with its own characteristics.
English technology. The figures are arranged according to patterns of the same sizes and shapes. This type has a clear geometry. Triangles, squares, and rectangles will do. The colors are always subdued. As a rule, 2 colors are used. The finished product is simple, laconic and very modest, which suits the interior of noble people in England.
Peculiarities
Patchwork pillow sewing was invented a long time ago; people resorted to it due to a shortage of material; at that time, any scrap was valuable. And they were sewn together in a chaotic manner, rarely paying attention to the combination and integrity of the composition. Contemporary art involves a skillful combination of different shapes, fabrics, sizes of pieces of material, as well as taking into account the compatibility of colors with each other.
A decorative product can fit into different styles. It is possible to purchase ready-made pillows and blankets. A wide range of textile products using similar techniques are on sale.
Specialized stores also sell ready-made scraps that fit in size and just need to be sewn together correctly. Therefore, if you don’t want to prepare the fabric, you can still create a patchwork pillow with your own hands.
Patchwork pillows 110 photos
A selection of interesting photographs will allow you to find out what products may be available. There are both small crafts and large, pouf-like things. Products sewn using the patchwork technique are distinguished by their simplicity, originality, and creativity.
You can quickly make a patchwork pillowcase with your own hands, because there are a lot of simple patterns that do not require special actions. Therefore, if you have machine sewing skills, and you have fabric pieces and a bunch of old things lying around in your closet, be sure to try to create an original item from these “raw materials”.
Author: Galina Kanashchuk
Types of patchwork
Before you start sewing any product, you should familiarize yourself with the patterns and templates. The activity seems easy and simple only at first glance. In fact, it requires special care and scrupulousness.
The execution technique must be carefully and carefully followed, then you will be convinced of the charm of the product itself.
Japanese
This technique combines the traditions of the West and the East. Silk fabrics and stitches are actively used. Various geometric shapes serve as the basis: squares, triangles, rectangles, rhombuses. In addition to making decorative bedspreads, this type is suitable for panels.
The spread of patchwork in Japan was also caused by the economic situation.
Knitted
Most needlewomen are familiar with it. The difference from traditional patchwork is that the patches are not sewn together, but are knitted or crocheted together. In this case, both fabric and knitting threads are used. The most popular accessory of this type is a woman's bag or a large bedspread.
It is almost universal - any product can be knitted using this technique.
Mill
It is considered the most common option. Consists of two pieces of fabric with contrasting colors. Provides the opportunity to create various figures and achieve original combinations.
Usually made from two fabrics in contrasting colors.
Log hut
The formation of patterns is done from stripes around the main element. Most often square. Laying occurs in a spiral. Another variation of this technique is to move the square into a corner.
You can also find another name for it – “Well”. In the English version it is called Log Cabin.
Crazy patchwork
Translated it means “crazy shred.” The main feature is the use of figures of various shapes. It may be irregular, crooked, or have the appearance of a non-standard appliqué. The seams are masked using braid or special embroidery. The product itself is decorated with various decorative details: beads, buttons or metal pendants.
Crazy – translated from English means crazy”, “crazy”.
Advantages and disadvantages
Before deciding whether to create this type of textile product yourself, it is worth studying its positive aspects. It must be said that the patchwork style has many advantages, including:
- patchwork pillows can serve as a design idea or complement an already selected interior item;
- can play the role of a self-sufficient accessory, or be used with blankets, bedspreads or furniture covers with the same image;
- they are sewn using a sewing machine, this allows you to get a durable and wear-resistant product;
- they can be placed in any part of the room;
- made in a variety of forms, for example, a popular patchwork round pillow, in the form of butterflies, cats, hearts, and others;
- variety of size types;
- variability of trimming shapes of shreds and colors;
- look professional due to the correct selection of texture and colors;
- differ in brightness;
- can be created from natural and synthetic fabrics;
- There are several techniques for creating a single composition;
- Pillows or patchwork pillowcases can be sewn, which are made to fit the dimensional parameters of the pillows available in the house. Pillowcases can be made with a zipper or buttons;
- it is possible to sew using various handicraft techniques (Japanese patchwork, classic, kinusaiga and others);
- an excellent way to spend leisure time; skilled needlewomen love this technique, and it is also easy to do for beginners;
- a super option for a gift to loved ones in honor of a special occasion;
- easy to care for, can be washed in a washing machine, setting the mode to 40 degrees, drying naturally;
- when choosing the right application and color, it makes it possible to visually enlarge the room;
- contribute to the creation of home comfort and can be used as elements for dividing a room into separate zones.
Note! To create a patchwork pillow, different ideas can be used. They are made single-sided and double-sided with a different pattern on each side or the same.
In addition to a large number of advantages, the product also has several disadvantages that need to be mentioned:
- it takes a lot of time to create a quality product;
- It will look aesthetically beautiful and professional only if each element is sewn carefully, and taking into account the rules of combination and work;
- it looks good when a certain pattern is created, otherwise the result is simply a motley and “screaming” product;
- The technique involves stitching together different elements. Therefore, it is necessary to sew on a complete interlining to hide this from the wrong side;
- You can get a beautiful top-class pillow only from new fabrics that were purchased for this purpose;
- When purchasing a finished product, you should be prepared that it will not be cheap. Due to manual labor. But the owner acquires an original and high-quality product that will look good in the interior.
The main points in the patchwork technique (patchwork): useful techniques for using patterns
This type of patchwork is based on somewhat unusual rules. Moreover, this technique contains some more secrets that will help make the little thing truly useful in the household. Read more about them.
Rules for selecting material for the implementation of equipment
Often, patchwork sewing uses fragments in the shape of a rhombus or a triangle. PHOTO: yandex.ru
In order for the product to ultimately gain recognition and become a reason for discussion among your neighbors and friends, it is important to monitor the quality of the material used. It is clear that remnants of various fabrics are used, however, they should not crumble, crumble, be full of holes or dirty
Since all products are made according to the mosaic principle, it is important that the textiles are non-slip, dense, preferably cotton. However, you should not ignore these types of materials: denim, silk, linen or wool
Some even use drape. As for the size of the fabric, you don’t need specific parameters of the fabric, the main thing is that it is enough for the planned number of templates and future patches. You shouldn't get stuck on one type of textile. To make your work look as original as possible, you need to try your luck in combining different textures with each other. The density of the material is determined depending on the purpose for which it will be used. For example, too thick fabrics are not suitable for night curtains, but for DIY patchwork bedspreads, capes and bedding, novice craftsmen should choose thicker textiles.
Popular articles Coffee topiary “Heart”
Remember that the size of all flaps should be the same, and the shape of the pieces that fit together should not be changed.
Product options for purchased items must have the appropriate palette PHOTO: yandex.kz
How to choose templates, make diagrams and cut out patchwork
Many bloggers who willingly share master classes and training videos provide the opportunity to buy or download special templates. The only disadvantage of downloading is that they then need to be printed, cut out and glued onto thick cardboard. However, there is always the opportunity to purchase this material at hardware stores.
Each needlewoman can make this option on her own. To do this you will need fabric, paper or cardboard. It is better to make several templates so that you can immediately apply them to the fabric and cut out the required number of pieces.
All the details in the picture can be marked with numbers, and then the fabric flaps can be numbered. PHOTO: pinterest.ru
If the diagrams are drawn by hand, then the base is pre-selected (you can make a drawing directly on it). If you are afraid of ruining something, it is better to do the rough work on a large piece of whatman paper. The drawing indicates the estimated pattern or ornament, the required number of parts, possible fabrics and colors in case there is a risk of confusing something.
When downloading from the Internet, it is better to choose templates that clearly show every detail in color PHOTO: liveinternet.ru
The templates are cut using scissors along the marked dotted line.
Please note that many patterns do not allow for seam allowance on the flaps. Therefore, the housewife must calculate this moment independently.
To prevent the product from coming apart at the seams over time, the amount of material per stitch should be at least 1-1.5 cm PHOTO: liveinternet.ru
What are the techniques for joining cut flaps into a whole canvas?
Today, two patchwork sewing techniques are used: American and block. The first method involves basting identical shapes to each other using paper templates. Next, a seam allowance is made for the turn-up, and then basted again.
Tactics using blocks takes less sewing time than English PHOTO: hu.pinterest.com
Block tactics are considered modern. It can be used by both experienced craftswomen and beginners. The technology is as follows: pieces of triangular or square shape are connected into blocks. After which it is sewn to the base, creating a specific three-dimensional pattern.
A patchwork style seam can be simple, hidden and decorative PHOTO: pinterest.ru
Textile accessories in the interior
The style of the interior is determined not only by its significant touches - such as the color and texture of the walls or the choice of furniture, but also by accessories. A special role is played by textile accessories that can add the necessary color accents, “dilute” the design of the room or, on the contrary, tie together several shades used.
The modern market allows you to easily purchase any textile, but you can achieve a truly exclusive and original design only if you give preference to hand-made items, that is, made by hand.
Interesting! You can look at the design of the chair seat in a store or on the Internet, and then implement the idea with your own hands.
Unlike furniture, textile items can be changed at least every month
Some stylistic trends imply the presence in the room of stools or chairs with hard seats (for example, wooden or with a metal frame). To add comfort to such furniture, it is enough to place soft seats on a hard surface. In addition, such accessories allow you to change the design of the room as you wish. So, you can sew sets of such seats for different seasons (in winter - with Christmas motifs, in summer - green, and so on) or simply have two or three options in different colors.
Interesting! If you are good at sewing, you can make reversible seats. When you get tired of one color or ornament, you can simply turn out the cover and transform the room in a matter of minutes.
Overhead seats are much easier to care for than upholstered chairs, because they can be removed at any time and put in the washing machine. This option is well suited for decorating chairs in the kitchen, children's room, and hallway.
Seats on chairs can either duplicate the main textiles or stand out
Recommendations for fabrics for making textile seats
First of all, you need to correctly select the fabric from which the seat will be made. A soft pad plays not only a decorative role, but also a functional one, so the material for it must be resistant to friction, wear-resistant, and can withstand frequent washing.
Table No. 1. Fabric options for making seats.
| View, illustration | Description |
| Faux suede | Practical material that is very pleasant to tactile contact. Artificial suede has a very reasonable price, attractive appearance (there are hundreds of shades of this fabric), it is durable, easy to clean, and when treated with a special Teflon impregnation, it also becomes moisture-resistant and does not get dirty for a long time. It is enough to wipe such a seat with a damp cloth to remove minor dirt. |
| Flock | Durable non-woven material with a pleasant surface. This fabric has good breathability, is wear-resistant, looks expensive, but at the same time is practical. Flock chair cushions will be appreciated by pet owners - if a pet jumps on such a seat, it will be very easy to remove its fur by walking over the surface with a wet hand. At the same time, the flock tolerates frequent use well; it is difficult to leave a snag on it or tear it. |
| Artificial fur | A good option for pillows that will be used during the winter season. Faux fur looks great, quickly returns to its previous shape as soon as a person gets up from a chair, and is easy to clean. To decorate the chairs, you can choose plain fur in a neutral or bright color, or choose original options that imitate natural furs - for example, leopard, giraffe or zebra. |
| Fleece | Lovers of cozy and warm fabrics will appreciate the fleece chair seat. Fleece is even called an artificial analogue of sheep wool - for its ability to retain heat for a long time. This is a hypoallergenic material that tolerates washing well, does not fade, and is abrasion resistant. In addition, this lightweight but durable material has a very delicate texture that is incredibly pleasant even to bare skin. |
| Microfiber | The fabric from which towels are often made is also perfect for creating a chair seat. Microfiber perfectly absorbs water, it is strong and durable, and does not lose its brightness over time. You don’t need to think that the pillow will have a “towel structure” - in stores you can find ultra-thin microfiber, the fibers of which will be almost invisible. A microfiber seat is well suited for the kitchen or nursery - in short, rooms where there is a high probability that something will spill or spill onto the chair. |
| Cotton fabrics | Cotton-based fabrics such as satin, calico or poplin are an ideal solution for summer time, as well as interiors where a romantic, light, even slightly rustic style prevails. Cotton types of fabrics are pleasant to the body, hygroscopic and do not cause allergies, are very easy to care for and are machine washable. The only disadvantage we can highlight is that the cotton material wrinkles easily - this must be taken into account, since the seat will constantly be wrinkled. But if you pull the fabric tightly, there will be no problem. |
| Linen | Linen fabrics are an exclusively natural material, and therefore will appeal to lovers of environmentally friendly, natural and hypoallergenic textile accessories. Seats made of linen will breathe wonderfully, absorb moisture, this material is pleasant to the body. Linen is suitable for sewing a pillow on a high chair for feeding a small child - it is a completely safe fabric, aesthetically pleasing and lightweight. |
| Denim | Dense and hard cotton material is perfect for making seats for chairs in a teenager’s room, or for the interior of rooms in the loft, hi-tech or minimalist style. Jeans can maintain an aesthetic appearance for years, withstands washing, does not fade or fade. There are many shades of denim - you can choose a snow-white version, classic blue, or any other so that the pillows fit well into the overall design of the space. |
| Carpet | An unusual material for making chair seats, but very practical and durable. It is worth choosing soft carpet options on a hard base - then the pillow will be tactilely pleasant, at the same time durable and reliable. This seat does not deform and will not lose its visual appeal even during constant use. |
Having decided on the fabric, you need to pay attention to the choice of colors. It just seems that the cushion on the chair seat is a small thing. In fact, this accessory can become a necessary color accent or a full-fledged participant in the interior and decor of the room. It is better to combine chair seats with other shades already present in the design. Thus, textile decor can overlap with curtains or carpet, tablecloth or fabric napkins. You can choose pillows to match the color of the sofa or bedspread.
Sewing a bedspread with your own hands is another way to save money and an opportunity to bring a piece of your soul into the interior. Detailed step-by-step instructions for making a bedspread can be found in our special article.
If there are any color accents in the room, you can also support them with pillows. So, with a neutral color of walls, curtains and furniture, you can have bright flower pots, an unusual colored chandelier or noticeable photo frames - sew the seats on the chairs in this color.
Important point! If you order curtains or a bedspread from a studio, think in advance whether you will need decorative pillows. Even if you don’t want to use textile chair seats at the moment, you can save a few pieces of fabric left over from sewing so that you can use it at the right time and create a design in a single color scheme.
The color of the seats echoes the color of the walls and the pattern on the tablecloth
Of course, chair cushions can be not only plain. The “patchwork” technique looks interesting, when the seat looks as if it was assembled from many scraps. The seats decorated with lace are interesting - they will fit perfectly into a room where a romantic interior predominates.
Fabric with polka dots or checks does not lose its relevance for many years, and if a bedspread or curtains with such a print seem too active to you, then chair seats will look great!
Reversible seat with different prints
It is worth considering that additionally you need to decorate the seats wisely. Yes, you can use lace fabric or embroidery, add appliqués to the finished product, or sew on fabric-covered furniture buttons. Other decorations, for example, bows or rhinestones, although they will look original, will seriously damage the functionality of the product.
Video – Decorative seats for chairs
Which seat filler should I choose?
Of course, fabric alone will not be enough to make a comfortable seat. Only the cover is sewn from textile material and placed on a soft base. There are several options for fillers, let's look at them in table form.
Table No. 2. Fillers for seats on chairs.
| View, illustration | Description |
| Sintepon | Light, elastic, but at the same time voluminous filler that is resistant to various deformations. Sintepon tolerates washing well and is considered a good option for stuffing a chair seat with it. |
| Foam rubber | The most common and inexpensive filler option. Foam rubber is available in various densities and thicknesses, so you can choose the ideal seat for each family member. The main advantage of foam rubber is that it is easy to cut, and the resulting part holds its shape on its own, serving as the basis for the cover. |
| Holofiber | Fibrous synthetic material in the form of small balls, can be produced either in the form of a sheet or in bulk. This is a hypoallergenic material, it is highly breathable, soft and elastic, but at the same time holds its shape well and does not deform. |
| Latex | Furniture latex is an elastic, comfortable and durable material - a seat filled with such filler will last eight to ten years without any problems. The disadvantages of the material are high cost and relatively significant weight. |
| Batting | Batting is an inexpensive, but natural and safe material that absorbs moisture well and allows air to pass through. Batting is even suitable for making children's mattresses, which indicates its high level of environmental friendliness. But, products made from batting have a significant weight, such a filler will take a long time to dry, and with frequent washing it can separate into layers. |
| Polyester | A synthetic fiber used to stuff pillows, blankets and even thin mattresses. A highly breathable, lightweight material, however, polyester has a lifespan of about three years, after which the filler may clump. |
| Polyurethane foam | The material is classified by hardness, so you can make both a very soft and quite elastic, hard seat for the chair. Thanks to perforation, polyurethane foam weighs a little, has good air permeability, and has a memory effect. |
How to make it yourself
The first photo shows the creation of a diagram, which we transfer to a sheet of paper of the appropriate size. To do this, you can use a special transparent sheet with printed squares.
Now we cut the fabric into pieces of different sizes. Preferred shapes are square and rectangle.
On each segment you need to process the edges so that they do not unravel. It is better to do this with a sewing machine. Each modern model has a function that allows you to carefully fix the edge of the fabric.
Place the two pieces of paper with right sides facing each other and sew them together.
Everything that sticks out beyond the stencil must be cut off, forming a smooth edge of the future pillowcase.
When all the patches are sewn, we proceed to framing. To do this, bend the edge about a centimeter and secure it with pins. When sewing with a machine, do not forget to pull out the pins. We do the same with all sides of the product.
We place the pillow on our pillowcase closer to one of the sides. Cover with the right edge and then the left. The fabric should overlap slightly. We fix it with pins and pull out the product.
Turn it inside out. You should sew from the wrong side not the place where it is marked with pins, but the top and bottom edges.
That's it, the patchwork pillowcase is ready, all you have to do is put it on.
These are the cute patchwork pillows you can get if you follow the recommendations.
Here's a close-up photo of the product.
DIY patchwork technique
To make crafts, you can watch tips in master classes, this is especially important for beginners. For experienced craftswomen, it is not difficult to make a unique thing, relying on experience and skills. Their pillowcases turn out beautiful and very organic, even without schematic sketches.
Regardless of the chosen manufacturing technique, you will need a diagram for the correct placement of the patches. It is also worth considering in advance the shape of the product, size, edging, if any. Before starting work, you should prepare the following equipment:
- flaps;
- a reliable sewing machine;
- filler;
- threads with a needle;
- sharp scissors;
- iron with steam function;
- additional accessories.
Step-by-step guide suitable for any patchwork technique:
- Determine the type of future product, draw an appropriate diagram. It is worth watching master classes and photographs on the topic. After this, you can begin making templates.
- Fabric preparation – pre-washing, ironing. Light textiles must be weighted with non-woven fabric.
- Transfer the pattern to the fabric and cut it out.
- Fold in pairs, sew, ironing each seam.
Patchwork style is a variety of techniques. Perfect for beginners:
- Classic style - 16 identical squares of 2-5 different colors. The fragments are sewn together in strips of 4 pieces, not forgetting to leave 1 cm for allowances. Then the blanks are sewn together. The back part is made plain, and a zipper can be sewn into one of the sides.
- Square within a square - fragments of different sizes are sewn sequentially, at an angle of 90 degrees. Two different fabrics of contrasting colors are used.
- American square - the central figure is surrounded by triangles in a spiral, differing in size, but with the same width.
- Russian square - a central figure is selected, and stripes or triangular fragments are sewn around it.
You can make a patchwork style pillow with your own hands using the following technique:
- Diamond - a detailed diagram consists of several different-shaped quadrangles and the same pentagons, designed for 6 templates;
- The mill is a successful combination of triangles and square fragments of different sizes;
- A star is a pattern of equilateral triangles.
Cross-stitch
Original pillowcases are made with a central plot. You can find fabric with a print, or you can embroider it. This is especially true for the design of small cross-stitched compositions that are too small for frames. Things with animals look cute in children's rooms. Patchwork cross stitch is suitable for beginners and craftsmen.
Tips for Newbies
Before starting work, textiles containing cotton must be soaked in hot water, rinsed in cold water, starched, and ironed. When a person first decides to do something with his own hands, he begins to get lost. Here are some tips to help beginners master the patchwork technique:
- segments can be made from the same type of textile or different;
- depending on the style, fragments may differ greatly or be identical;
- a pattern is absolutely necessary to create a patchwork-style pillow;
- don't forget allowances;
- the flaps should be prepared according to the template;
- Before starting work, it is better to rinse all fabrics in warm water and iron.
Patchwork pillows must be sewn carefully so that the seams are invisible. Craftswomen recommend ironing the craft after each machine treatment.
How to make patchworking with your own hands
The patchwork technique will not cause any particular difficulties. The main thing is to choose the right material and tools. It is also desirable to have creative skills and imagination. In this case, you can create masterpieces that will inspire admiration among others. Moreover, production will take little time.
Pillows and bedspreads
To create pillows and bedspreads with your own hands in the patchwork style, you will need scraps of any material. Next, they are laid out according to a certain pattern. To ensure that the drawing remains in its original form, it is recommended to number each piece. Two scraps are pinned together with the right side inward and stitched on a machine. This procedure should be done with all the pieces. The squares are connected into strips, and those, in turn, into a canvas.
The triangles are connected into squares and then into the main product.
From jeans
To work with jeans you need to have special skills. After all, this fabric is denser than cotton. At the same time, there is no need for a lining, which greatly facilitates the work. The methods for making things are no different from other options.
When using denim, be sure to use a thimble. Due to its density, it is difficult to pierce. You will also need an elastic needle, longer and thicker.
Old things are used as consumables: skirts, shorts, vests, etc.
Thanks to this method, you can not throw away your favorite clothes, but give them a new life, make something interesting and unusual out of them.
Popular articles Hot smoked fish with stuffing
Patchwork
For this type, you should first decide on the material. Collect all the pieces of fabric that are available, sort them by color and structure. Then you can start drawing up the diagram itself. The joining procedure usually consists of several stages: stitching together individual fragments, combining blocks that are already ready, sewing elements to the finished product.
Even if there is a material of a different texture, the product must be assembled from textiles of the same quality.
Blocks for patchwork
A block represents a detail of a future thing. Some of them are very simple, others are more complex. Let's consider both options.
Jacob's Ladder is difficult - choosing fabric in contrasting colors (for example, blue and red). Make four strips of it measuring 35x7 centimeters and four squares - 13.5x13.5 centimeters. All pieces should be of different shades. Place squares right sides together and strips separately. Sew one of the strips along the long side. Lightly press the seams. Connect it to the other right sides, without separating, cut into pieces of about seven centimeters (you should get five pieces). Do not take the pieces apart, sew them together. You will end up with four squares. Cut large squares at the corners and draw a line diagonally. Make a line at a distance of five centimeters from the line on each side, cut diagonally, but not along the lines. Iron, cut off the resulting corners, do the layout, sew everything.
Templates for patchwork patterns are sold in special stores; you can make it yourself according to the pattern.
An ordinary square is considered simple. To do this, take a flap (you can from a kit or cut it yourself). On the inside, mark a seam allowance of approximately one centimeter. Fold the product in half with the front side inward. From the inside out, sew the two sides along the marks, you should get an envelope. Next, you should turn it out and flatten it to form a rhombus. Now take the filler, cut a square in it to the size of the envelope, leave one centimeter for allowances. Insert the filler into the product, straighten out any irregularities. The open edges of the diamond should be folded inward and pinned together so that they do not stick out in all directions. Begin stitching the folded corners, removing pins as you go.
Each item made in this style is unique, even changing the shade of one of the details transforms it in a new way.
How to get started
You should start with preparing materials and tools. To obtain a decorative pillow fabric, scraps of different colors, remaining after any sewing, are initially selected. You also need to think about what the pillow will be filled with - most often the filling function is performed by padding polyester.
Handicraft tools you will need:
- objects for cutting (scissors, ruler, chalk);
- thread and needle;
- iron for smoothing and steaming;
- sewing machine.
Master class on sewing pillowcases
- Cut a piece of material to the size of the future pillowcase, for example 50x45. This will be the basis.
- Place the first piece of any shape and size on it.
- Place another free-form scrap on top of it, face to face. Where you will machine stitch, pin together. Do not pierce the pins along the seam, but across it.
- Sew on a machine. The machine needle will slip through the needles, that is, they will not interfere with the stitching. Remove the pins and trim off the excess.
- Bend the sewn flap to cover the seam and iron it from the front side.
- Next, sew on another patch. Can be positioned counterclockwise. The principle is the same: apply the front side, pin, sew, remove the needles, bend, cut off the excess, iron.
In this way, you can sew on the patches until the entire base fabric is covered. Smooth it with an iron and trim off any excess. Until the entire pillowcase is sewn, decorate the fabric.
Decorating the first sheet of pillowcase
In the Year of the Mouse, you must make an applique of the mistress of the year. The mouse can be cut out of felt, thick fabric, or raincoat fabric. You can sew over the edge. Then, from the same material, you should cut out the numbers that make up the next year - 2022 and also sew them on.
Anyone who can embroider, embroider, or make applique - everything will be appropriate and beautiful.
After this, you need to sew braid, ribbons, and lace along all the seams. You can decorate with buttons, beads, flowers that you make yourself.
How to make a second piece of product
Then we proceed to making the reverse fabric of the pillowcase:
- Take a piece of fabric the same size as the first side of the product. Let it be red satin.
- Place thin padding polyester on the wrong side of the satin.
- To prevent it from coming apart, cover it with another piece of fabric and quilt it with squares or diamonds.
- Fold both sides right side together, basting so they don't move.
- Next, make a “frame” of fabric like an inlay:
Sew a ribbon of any fabric, 5-6 cm wide, around the entire perimeter. Sew face to face, grabbing both sheets of the pillowcase.
- Fold the product onto the satin side, fold it over, and stitch, leaving room for stuffing with synthetic down.
- Rip out the old pillow. Select synthetic fluff and stuff a new pillowcase through the hole left.
- Sew up the hole.
Tips for novice dressmakers
At first glance, there is no scheme, but you still need to take into account some rules:
- Each time the edges must be aligned.
- Trim the excess fabric with scissors so that the next piece can be sewn to the even edge of the fabric.
- You should not sew fabrics of the same color next to each other; it is better to alternate them in any order.
- The product looks very nice in black and white.
Popular categories
Crochet toys
Crocheted toys have recently gained great popularity among needlewomen around the world. And it's deserved! Is it possible to remain indifferent to miniature amigurumi or furry animals knitted from pile yarn? If you consider yourself a fan of knitted toys, then perhaps the following master classes will be of interest to you.
- Crocheted mouse Vasilisa. Master class on knitting toys.
- Little Fox Lucas. We crochet a toy.
- Crochet Fox Zlata. Description of knitting toys.
DIY bears
Toy bear cubs are creatures that are always out of competition among other toys. Remember the famous Teddy bears, or the so-called attic bears, made in vintage style
Do you want to make a bear with your own hands? Pay attention to master classes on creating bear cubs
- Crochet Makar bear. Description of knitting toys.
- Master class on dry felting the “Emily Panda” toy.
- Little bear Ostap. Master class on crocheting toys.
Translations of foreign master classes
Despite the fact that many people are now fluent in foreign languages (for example, English), some still need help translating knitting descriptions. Translations of foreign master classes on handicrafts can be found on our website.
- Crochet rattle. Bear Bram.
- Crochet bunny. Master class from Kristi Tullus.
- Harry the Giraffe by Amanda Berry. We knit a toy with knitting needles (translation).
Patchwork sewing step by step for beginners
Not many people know how to make things using patchwork. For beginners, the technique, step-by-step photos, and diagrams proposed in this article will become indispensable assistants in a new business.
Blanket
Before actual work, you should decide on a pattern, choose a fabric (the best solution is one fabric of different colors, as well as a single-color fabric for the back side) and filler (usually padding polyester is used), make templates from cardboard or any other dense material (here we consider making a blanket from squares).
Step-by-step instruction:
- First of all, using templates, you need to cut out the required number of square elements. Their number and size depend on the personal desires and preferences of the needlewoman.
- Then, placing the scraps next to each other, you need to sew them together along the marking line from the wrong side. Having combined all the elements with each other, thereby creating the front side of the blanket, they should be carefully smoothed with an iron.
- The plain fabric for the backing should be laid out on a straight surface and the filling should be placed on top. The padding polyester needs to be cut out with a margin on each side. To prevent the filling from pilling in the corners, it must be quilted (from the center to the edges).
- The last step is to sew all three layers together. If the layers slip when stitching, they can be pinned down with pins or needles. To prevent the blanket from starting to fray at the edges over time, they can be stitched with braid.
Popular articles Frame for rubber bands
Rug
To make a rug, you can use small trimmings of an unlimited number of colors. However, you definitely need to purchase a single-color fabric (2.5 times larger than the size of the planned carpet), transparent fabric and filling. A single-color fabric should be laid out on a straight surface, and the filler should be placed on top so that it takes up only half of the fabric.
The second half needs to be covered with the filling on top, sewn and topstitched. Next, on the resulting “pad” you need to randomly (but artistically) distribute scraps of different shapes, colors and sizes, which are then covered with a transparent piece of fabric. Now the rug needs to be stitched over the entire area so that it does not fall apart.
Tack
It is best to use denim to make potholders, as it is quite dense and takes a long time to heat up. It can be performed using any of the techniques described above, but the most popular is the “Well” technique. To do this, you need to cut 10 strips of different lengths from denim fabric of different colors. Then all the elements must be combined according to the appropriate scheme.
Patchwork for beginners is used for sewing oven mitts, blankets, pillowcases, etc. Step-by-step technique, photos, diagrams can be found on the website.
The final touch is the framing of the potholder: you can sew any tape along the edges, which needs to be turned into a loop at the edge. This version of the technique is intended for beginners, but after getting the hang of it and studying many step-by-step photos, instructions and diagrams, each needlewoman will be able to perform more complex work using patchwork.
Patchwork entered the life of the Russian people a very long time ago, but in recent years it has not only not lost its luster, but is also becoming increasingly popular. Moreover, today this method of sewing is used not only by needlewomen for home design, but also by fashion couturiers for branded clothing.
Pillowcase with rose
An original gift with a voluminous rose in the center will delight any woman. A pillowcase with a flower for the New Year will delight your mother or friend.
Master Class:
- Cut the base of the pillow from any material.
- Cut the pieces into square shapes, with a side of 21 cm. Fold them in half twice. For volume, you can combine them with non-woven fabric.
- Sew the first piece of fabric into the center of the flower. It is better if it has the shape of an irregular hexagon. It will be easier to turn the fabric.
- Sew the next piece of fabric, but of a different color, to one of the edges of the polyhedron face to face.
- Make a small increase on the seam, sew, bend, iron. Just like in the crazy technique.
- Sew another piece to the next edge of the polyhedron and to the side of the already sewn piece.
- Moving from side to side of the polygon, selecting shades, fill the entire base.
Then sew the other side of the product, fill it with any filling and give it as a gift.
The charming Christmas tree is quick to make and looks very beautiful.
Step3: Quilting the top of the pillow
Place the backing for the main part of the pillow, right side up, on the table, then place the batting on top. And at the end, sewn front patchwork block, face up. Pin these three layers together in preparation for the next step.
Decide on a quilting pattern and get started.
Once finished, trim the fabric, batting, and pillow top to a proper 17″ square.
Overview of flap suturing techniques
There are several techniques for stitching flaps - simple and complex. For beginners, it is better to use the simplest method - squares, which are cut according to the finished pattern. This technique of stitching flaps is simple and can be done by even the most inexperienced novice needlewomen. The product can be made not only from squares, but also from circles, rectangles, triangles and other geometric shapes. Just squares are the easiest option for sewing patchwork. Let's look at the most popular techniques for joining pieces of fabric.
"Well"
This option for sewing together pieces of material is quite simple: the pieces connected in a special way create the illusion of the depth of the well. A fairly creative and original technique, dating back several centuries, it was most popular in Europe and America. The technique is based on a square, which consists of individual strips of different fabrics. There are several options for connecting strips (they are also called “logs”).
The most popular and easiest way:
- multi-colored stripes in a spiral, light and dark, are stitched to the central square (it is the center of the composition and the color accent);
- the first two strips are sewn to opposite sides of the square, each subsequent strip is stitched in such a way as to capture the previous element.
The movement goes clockwise. When the main tier of the well is ready, the technique is repeated, the tiers are built up in a similar sequence. The result is something like a fashionable 3D drawing, voluminous and deep.
"Watercolor"
The watercolor technique allows you to create a product with different shades and tints. Individual parts must be connected in series to create a color composition. Each element is a tone lighter or darker than the main color; darker tones are stitched together first, then lighter ones are added.
Using this technique to make a blanket out of jeans is quite difficult, but possible. The color palette of denim is limited to a few shades, so selecting scraps and building a color sequence will take more time.
"Quick squares"
The simplest and most affordable patchwork option for beginner needlewomen. This technique allows you to sew a blanket in a few hours. To do this, you need to cut 3-4 rectangular strips of fabric of different colors and stitch them along the long side. The result is a single piece of canvas, from which square blocks of the required size are cut out, then the blocks are connected to each other.
Crazy patchwork
This technique is for advanced and experienced needlewomen. Products made using this technique are real works of art. Crazy patchwork allows the combination of various fabrics of any geometric shape and color in any order, from sewn pieces of fabric or figuratively trimmed edges. All seams are decorated with embroidered flat or raised seams, braid, lace ribbons, beautiful buttons, beads, glass beads, and chains.
The craftswoman must carefully sew all sides of the patchwork elements together; even the smallest scraps of fabric can be used. The idea of the technique is to randomly connect various pieces of fabric and then decorate them.
By stripes
Sewing a beautiful, eye-catching product using this technique is not at all difficult. The technique is based on sequential stitching of strips of fabric of different colors of the same length and width in different combinations. The strips are carefully cut from worn denim and connected according to the chosen pattern and color palette. This technique allows each needlewoman to show her fantasy and creative inclinations. To make stitching easier, you need to develop a plan in advance for connecting the pieces and their colors.
Ideas for patchwork pillows of different designs
Not everyone can come up with new designs, but beginners should first learn how to create neat things based on ready-made designs. Among the popular design ideas, there are very original patchwork pillow designs. For example:
- classic version;
- from jeans;
- round shape;
- star;
- seat cushion.
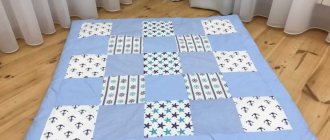
Classic patchwork pillow
Items created in a traditional style fit perfectly into any design. The main requirement is that one of the fabrics on the product matches the color of the furniture. To make pillowcases, you can use leftovers from curtains, sofa upholstery, tulle, and contrasting fabrics. The main elements of the style are rectangular stripes and squares.
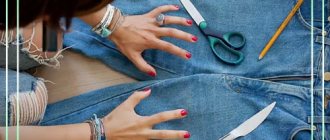
Denim pillow
The technique is completely identical to the classic style, only denim is used instead of fabric. It can be taken from old things or bought. A pillow made from denim scraps looks great if the edges of each fragment are loosened. They need to be sewn in stripes or sequentially.
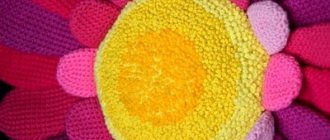
Round patchwork pillow
If square shapes have become familiar and the method of their manufacture is clear, then there are more problems with round products. You can’t make them according to the classical scheme, and most others are not suitable. An excellent option is the “Dresden plate” or “chrysanthemum petals”.
Star
Star-shaped pillows are made from triangles. There may be a square flap or two triangular flaps in the center. The shape is perfect for embroidery design. They are made in sets of 3 to 7 pieces; you can supplement the composition with a product in the shape of a month.
Pillow - seat
These things differ from others in the amount of filler. If for sofa products you need a lot of it to give it a convex shape, then a small amount goes into the seats so that you can sit comfortably. For things of this type, it is preferable to use dark, non-staining fabrics, denim is possible.
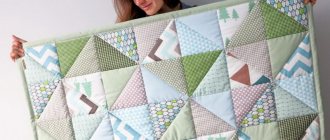
Assembling the patchwork fabric.
We lay out the cut out triangles according to the diagram, simply skip the rectangles (we haven’t cut them out yet). We take a pair of triangles that make up one square, fold them with their right sides facing each other and sew them diagonally.
We stack the stitched squares on top of each other in the same sequence.
Press the seam onto the dark fabric side.
Cut off the triangles.
After all the squares are sewn from triangles and ironed, you can start cutting out whole squares. To do this, measure the side of the resulting square. For me it turned out to be 8 cm. We cut out 16 whole squares from fabric: from fabric A - 8 squares, from fabric C - 2 squares, from fabric D - 6.
We sew a fabric from squares. One of the ways to assemble a canvas from squares is discussed in the master class: Warmer for a teapot using the Patchwork technique.
The wrong side after steaming with an iron looks like this: