Father is the most important person in the life of each of us. It is very important to please him with a pleasant and original birthday gift.
A handmade postcard is a win-win option, because in any case you put a part of yourself into the craft. In addition, with your own hands you can make an original, creative postcard, reflecting the interests, desires, dreams, and profession of your father in it. He will be very pleased to receive such a gift from his son or daughter.
All ideas on how to make a birthday card for dad with your own hands can be divided into three groups:
- simple and effective;
- made in scrapbooking style;
- voluminous and stylish.
Next we will talk about several options related to each of these groups. Remember that these are just concepts that do not have to be repeated one after another - you can add something of your own to them, special. Making such a postcard is not difficult: even a child can handle it.
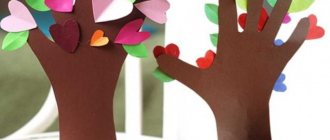
A simple card for dad from kids
All you need is cardboard, markers or pencils, scissors and glue.
- We trace the child’s palm on plain paper - we need the palms to be folded, so trace both the baby’s left and right hands. We transfer the template to cardboard and cut out two parts.
- We write a congratulation on one of the palms on the inside. If your child is still struggling with written letters, do something simpler: stick a photo of him.
- Take a strip of paper and fold it like an accordion. We attach the end to the first palm, and the opposite side to the second.
- Putting the card together.
- All that remains is to decorate the front part - this can be done using applique or using decorative elements: beads, rhinestones.
All is ready! The child will like this activity, it will allow him to spend his time usefully, and the result, of course, will bring joy to dad.
What kind of card can a child make for dad?
Iris folding
Older children will be able to make a postcard using the Iris folding technique. This is filling a picture cut out along the contour with multi-colored stripes. The diagram of the heart is given below.
In numerical order, the strips are glued outside the hole on one side and the other. Paper is used in three colors, which are indicated by letters in the diagram.
The result is an original card, on top of which you can attach a bow made of thin ribbon. It is advisable to hide the back side under a layer of thick paper so that the pasting is not visible.
Postcard for dad in the form of a car
You can make a cool shaped postcard if you make it in the shape of a car. If there are several children in the family, they can participate in preparing congratulations together.
- Using a large sheet of thick paper or cardboard, draw the outline of a car. We draw windows, doors, headlights.
- Cut it out. We cover the windows with white paper - this way we indicate that they are transparent. We will cover the headlights with paper of a different color - for example, yellow.
- You will need children's photographs , from which you need to cut out only the faces. The size must correspond to the size of the windows: we will glue in “passengers”.
- We paste in the faces so that it gives the impression that a lot of people fit in the car. You can also use photographs of your mother, grandmother and other relatives or close friends of your father.
- Use a marker to draw the steering wheel. We cut out letters for congratulations from bright shiny paper - these can be the words: “Congratulations”, “Happy Birthday!”, “Happy Holidays!” or something else.
We attach the letters to the car - the gift is ready. You can additionally attach a loop to the card: then the father will hang an unusual photo, for example, in his office and will remember his creative children.
Postcard with a car for dad
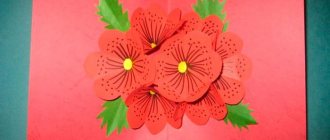
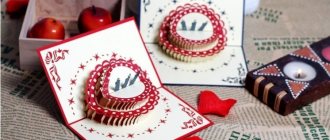
Corrugated bows
A three-dimensional craft consisting of three corrugated bow ties with different round centers looks impressive. Pay attention to the picture below. If the tie is made of plain paper, then the circle is cut out of thick paper with a pattern, and vice versa, if the butterfly is with a print, then the circle remains plain.
Let’s look at how to make a birthday card for dad below. To fold ties like an accordion, cut out a rectangular blank. So that all the folds are the same and all its edges are complete, you need to fold the paper sequentially, proceeding as follows:
- First, fold the rectangle in half.
- Fold each half in half again.
- Place the bottom edge to the second line from the top.
- Turn the workpiece over and repeat the procedure again.
- Next, bend all the edges in half again.
- Unfold the rectangle to its original state and assemble the paper, bending it forward and backward. Check that you get an “accordion”.
- Flatten it with your hands and bend it in half. In the middle you can install a paper clip with a stapler. Push the sides apart with your fingers to make the tie fluffy on the sides.
When all three butterflies are glued to the cardboard base, attach the circles cut out one at a time to the center of each craft. The greeting card is ready!
Postcard with tools
If dad is a jack of all trades , then a great idea would be to give him a card in the form of a bag of tools.
We will need:
- a set of colored paper;
- glue;
- scissors;
- cardboard of a dull color - a neutral, light shade is better.
We glue a paper pocket onto the cardboard base: to do this, cut out a rectangle slightly smaller than half of the base, glue it on the sides and bottom. You can use double-sided tape.
Now let's start making tools - we'll make a hammer, a hacksaw and a chisel:
- We draw the outlines of the tools on the cardboard: they should be large so that they look on a postcard.
- We cover the hammer: the handle with yellow, and the part with which the nails are hammered in with black paper.
- Chisel: handle – blue, tip – yellow.
- Saw: blade – yellow, handle – brown.
We insert the tools into the pocket. On top we make an appliqué with the letters “To the best dad!” We fold a 5 cm ribbon in half and attach it to the top of the card on the reverse side.
Dad will definitely love this craft!
Cake with candles
You can make a beautiful card for dad with your own hands in the form of a three-tier cake with many candles. Draw rectangles on thick cardboard folded in half. Draw the top layer of the cake as the smallest one, place the middle-sized layer in the center, and draw the largest one at the bottom. Then use scissors to cut the paper along the lines from the central fold of the future card to the corners of the rectangle. Using hand pressure, push the resulting parts forward and smooth out all the folds in the opposite direction. Now each layer of the cake needs to be sealed with strips of the same size, only cut separately from paper with a bright printed print.
The design with multi-colored dots and dashes looks beautiful, because a real cake is often decorated with sweet curly sprinkles. Candles are cut out to the same size from thick red cardboard. The candle flame has a pointed upward shape and is glued from the inside of the candle itself. When all the small parts have been collected, they are placed on each layer, distributed at an equal distance from each other.
After all the work is completed, the card is closed and presented as a gift in a closed form. Dad will be very surprised when he sees such a beautiful cake inside. Such a card (dad will be very happy to receive it from his daughter) can be placed vertically on a shelf or in the center of a holiday table.
Stylish applique card
This is an unusual card. It is simple, stylish, and has few decorative elements. A serious person with taste will like it.
Button decorated card for dad
- Let's prepare a sheet of velvet paper. Ask your mother or grandmother for buttons: you need one large blue color and smaller buttons in bright colors. The quantity depends on how many children there are in the house.
- We arm ourselves with a needle and thread and sew a large button to the front of the paper about ¼ part below the top edge (pre-fold the sheet in the form of a book, you only need to sew on one side). We place smaller buttons lower down.
- Using a black felt-tip pen, we finish drawing the torso, arms and legs of the little men - you don’t need to draw them carefully, just mark them with strokes.
- On the back we write heartfelt congratulations and give it to the birthday person.
If possible, decorate the edges of the card with lace paper.
This is how easy it is to make greeting cards for your beloved father!
Materials for production
The first thing you should take care of before starting work is the material from which the accessory craft will be made. First you need to think about what the keychain will be like. Shape, size, style - all this needs to be taken into account. After all, you can’t give a brutal man a cute felt cat.
So, to make a keychain with your own hands, you may need the following materials:
- felt, small pieces of multi-colored fabric, rags, velor, tulle, etc.;
- polymer clay (for needlewomen who know how to work with such material);
- pieces of natural and artificial fur, leather, wool, velsoft;
- beads, buttons, sequins, beads, rhinestones for decoration;
- wooden blanks, wine corks, regular Lego sets and other available materials that can become a reliable basis for a homemade accessory;
- wire, elastic bands, fishing line, tape, glue gun with rods, knitting threads, floss;
- padding polyester, foam balls for stuffing soft and bulky products;
- felt-tip pens, paints, keychain mounts and much more.
When it comes to making your own accessories, there is an inexhaustible flow of ideas, because you can use a wide variety of materials. You can sew, mold, paint, knit a keychain, showing your individuality and imagination.
Keychain mounts
To make the keychain as functional as possible, you need to take care of the reliability of the fastening. Depending on what the accessory is made of, special fixing elements are selected, which can be bought at any handmade store or ordered on AliExpress:
- Thread fastenings are an excellent option for fabric products, knitted and rag toys. They can easily be attached to keys, phones, bags.
- Chain rings are classic keychain mounts that are ideal for both soft and hard accessories.
- Rings with a flat decorative chain and a drop-down fastener are a great option for homemade projects made from polymer clay, wood, cork, plastic, etc.
- Threaded loops that screw into hard materials. It is to them that the chains are then attached.
Ideas
Are you giving away socks again? So make it more original. Make a tank out of socks. It's actually very simple, but at least it looks more interesting.
- You will need to fold all the socks into a tube except one.
- Four tubes will serve as tracks, we wrap them with one sock, and place the last remaining one as a turret on the tank.
- Use a handle instead of a muzzle.
You can create homemade items based on your father’s profession or hobbies. For example, he is a policeman. Draw a sheriff's star on the painting and decorate it as a police car. And put the bad criminals in the back seat. Of course, glue big stars on your father’s shoulder straps.
Particularly interesting crafts are made using simple materials. Using only paper you can create an emphasis on the father's strength of character. You can make the whole family out of colorful paper and remind your dad how important he is to you. Collect interesting toys for the car. For example, knit a toy from yarn and place a filler inside the belly. After all, fathers very often travel by car. And the toy will always be nearby and will serve as a wonderful reminder of your beloved relatives who are waiting at home. Slow down!
Fathers truly deserve the most sincere gift possible. Ideas should be taken from the Internet and implemented with your own strength and thoughts. Ask your mother for help, she definitely knows more about your father and will help with your endeavors. Working together always brings more results, and the effort required is reduced.
Photo gift
You can make a memorable photo craft for dad in a variety of very interesting ways. For example, place a miniature photo of your dad or all family members inside the plastic caps, and glue a magnet on the back side with hot glue or “Moment”.
The result is a wonderful homemade refrigerator magnet. You can also make a photo collage with your dad’s favorite photos and place it in the most visible place in the house.
Aquarium
If a boy builds a nostalgic aquarium, he will certainly evoke positive emotions in his dad. It is most profitable to construct a structure when the father is interested in fishing. Do you have any photos from your joint fishing trips? Put them to work.
- The first step is to find a jar with a capacity of 1-2 liters.
- You need to pour sand at the bottom and add decor from stones.
- Green threads will serve as seaweed in this installation.
- You need to put fish figures in the contents of the container so that the plot sparkles with new colors.
- The species of fish that the boy caught with his father are symbolic.
- Equip the inhabitants of the aquarium with weights.
- Do not overdo it, it is important that the fish are at the optimal level.
- The selected photo is placed in the background. The craft is ready.
All of the above is within the capabilities of girls. But due to boys’ penchant for hobbies like woodworking and working with tools, it’s the kids who should choose these methods.
Useful devices
Sons, like all men, are more inclined to rationality. Therefore, when choosing what gift to give dad for his birthday, they want to make it as useful as possible.
Phone holder made from a plastic bottle
An excellent solution in this case would be a phone holder made from an ordinary plastic bottle. It will be an original craft for dad for his birthday.
Necessary materials:
- Plastic bottle;
- Stained glass paints;
- Brush;
- Scissors.
- Stage 1 Cut out the holder of the desired shape from the bottle. It is better to entrust this stage to adults or ask for their help, since when working with scissors or a knife, you can easily get hurt.
- Stage 2 Paint the designs that seem most suitable to you. You can use inscriptions with wishes as a painting. A useful and creative gift is ready.
You can make your own phone holder in two simple steps.
Birthday gifts - all the best ideas in one place
Homemade bookmarks for dad's books
Dad loves to read or works with literature, he has a lot of books, tell your child to make a series of funny bookmarks for him as a gift. Every time he opens a book, he will remember with a smile the person who gave the memento. Manufacturing instructions:
- on thick colored paper, draw stripes for the blanks, for example, 4 cm wide and no more than 20 cm long, cut them out;
- stick the same rectangles on top, but smaller in size, filling them with wishes, poems, or photographs or pictures;
- Decorate the top of each bookmark with a satin ribbon or a bright cord threaded through a hole punched with a hole punch.
Any gift for dad, especially one made by his beloved child with his own hand, will become a source of positive energy for a man, since it keeps the warmth of a child’s soul, it emanates love and care for a loved one. This is a real amulet for dad!
Keychain from an old tie
So, grab your husband's old tie, key ring, scissors, glue and get to work!
Take the narrow end of the tie and pull it through the ring about 10-12 cm, making sure that the seam of the tie is at the bottom.
Now turn the tie face down and bend it at a 45 degree angle to the left:
Wrap the tail of the tie over the ring:
Tie your ponytail into the ring
And feel free to thread the ring inside:
Pull the ponytail through the ring and tighten the tie. The result should be a beautiful knot, exactly the same as with a traditional tie.
Turn the tie keychain over to the wrong side and cut off the excess length with scissors.
Trim the corners to imitate the front of a tie (although you can leave the cut straight)
Lubricate the edges of the cut with a small amount of glue so that the fabric does not fray (this is the easiest option; you can, of course, carefully stitch the edge of the tie using a machine or by hand).
Ready! You just made a keychain with your own hands)
To beautifully present a gift to a man on February 23, cut out a key template from cardboard and attach it to a keychain!
Original master class