A DIY Mother's Day card is a wonderful gift. Especially if such a craft is done by kindergarteners or elementary school students. Most likely, this will be their first craft made on their own. Well, the more valuable it is and the more joy it will bring to mom. And the kids themselves will be glad that they already know how to make such beautiful things as postcards. In general, wherever you look, there are advantages and joy everywhere.
There are countless different options for postcards that you can make with your own hands. Among them, there are also complex crafts that a child is unlikely to complete on his own; there are also simpler ones that children can handle without much difficulty. This article will talk about simple postcard crafts. And although they are simple, they are still beautiful and valuable both for the kids themselves and for their beloved mothers.
A homemade postcard is a source of bright positive emotions
At an early age in kindergarten, children learn simple skills in making such gifts.
Teachers show children how to make cards for their mothers with their own hands. Thick paper leaves with appliqués given for birthdays are often kept for many years. These first cards for mom are the most expensive, valuable gifts. A child cannot go to the store and buy a present for a holiday or birthday. A postcard made by yourself is the only opportunity to please your loved one with a gift. We become adults, we can afford to buy things that our mother dreams of, which will be useful to her in everyday life. Traditionally, the gift is accompanied by a card with congratulations and wishes. The easiest way is to buy it in a store. Fortunately, the choice of such products is huge. However, a mass-produced product, no matter how beautiful it is, will not be able to express your feelings.
A handmade postcard will give you unforgettable emotions.
If you want to surprise a loved one, give a bright, unforgettable experience, choose the time to make this simple but incredibly effective gift. Many sites on the Internet explain step by step how to make a card for mom. You can choose a simple or complex option, implement your creative idea or borrow ready-made proposals.
No matter what your masterpiece is, it:
- guarantees a pleasant surprise, sincere surprise, admiration;
- will reflect your feelings as much as possible;
- will be carefully kept in my mother's archive.
There is no need to think that this type of creativity is not appropriate for adults to engage in. You can make a birthday card for your mother with your own hands at any age. Bright positive emotions from such a gift are guaranteed both at 30 and at 80, 90 years old.
The postcard guarantees a pleasant surprise
What will you need for this?
- Colored cardboard.
- Colored paper.
- Glue.
- Decorations (glitters, ribbons, ballpoint pens, petals - basically everything that comes to mind).
- Colored pencils, paints - anything you can use to depict a beautiful congratulation.
Types of homemade cards
Homemade cards can have different designs. The difficulty is selected taking into account personal skills, experience in cardmaking, and the availability of professional equipment. The simplest and most accessible option is applique, which everyone mastered in childhood. Such a postcard can be incredibly attractive if you choose the right base and decor. Don't limit yourself to traditional flat images. A postcard with three-dimensional components looks much more impressive.
Flowers can evoke positive emotions in every woman. If you're planning to make a card for your mom's birthday, create a bouquet of her favorite plants on it. You can make any buds from colored paper material. These can be simple daisies, luxurious roses, elegant chrysanthemums, etc.
Draw your mother's favorite flowers on the card
You can make more complex, spectacular options for your mother. A voluminous postcard can provide the maximum effect. When it is opened, a three-dimensional composition made of colored paper unfolds. To many, such products seem incredibly complex. But anyone can create them. On sites that tell you how to make a postcard for your mother with your own hands, you can find step-by-step instructions for making these masterpieces.
Spectacular 3D card for mom
The three-dimensional design can contain flowers, hearts, butterflies, balloons, etc. The consistency in assembling the elements, the correct placement of cuts and bends will provide the composition with an accurate opening technique. You also need to think about the design of the outer part of the card, use decorative elements, and make a beautiful congratulatory inscription.
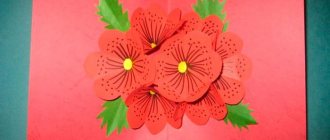
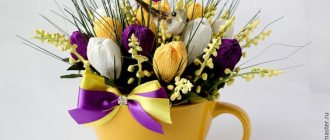
Vase with peonies for Mother's Day made of paper and cardboard with templates (for students in grades 1-4)
I present to your attention another cute bouquet - this time we will make a card with peonies from napkins. It just so happens that the topic of our article today is floral. But on the other hand, who doesn’t love flowers? And what if not to give them on such a wonderful holiday.
The materials are very simple:
- Colored cardboard;
- Napkins;
- Scissors;
- Stapler;
- PVA glue.
Stages:
Take a napkin and fold it in four to make a square. We fasten the middle with a stapler. Then we draw a flower around the bracket and cut it out.
Lightly crush some of the petals to make the flower voluminous. We make all the other blanks in the same way.
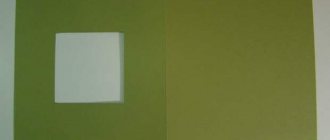
We cut out a vase from half a sheet of red cardboard (you can download a template from the Internet or draw it by hand and glue it to the base of the card. The base is yellow A4 cardboard folded in half.
We glue flowers to the top of the work, making a bouquet of them. Ready. If desired, add congratulation text, beads, rhinestones and other decor.
Options for masterpieces can be very different. For example, older kids will be quite capable of creating such a voluminous postcard-book.
If you figure it out, it won’t be difficult to create a composition like this, which takes shape when the recipient of the gift looks inside the work.
Even ordinary bouquets of flowers turn out differently for everyone.
Undoubtedly, it will be interesting for children to try to make a postcard in the scrapbooking style.
Well, the youngest guests of the kindergarten will be happy to give their mothers this simple handmade gift.
Birthday cards for mom
There are thousands of different options for designing congratulations for your mother's birthday. Every year you can create something new, taking into account the preferences and tastes of each mother.
From my daughter
A postcard from your daughter, embroidered with cord, will look original. The present can be made in a short time:
- To do this, mark the location of the composition on colored (folded) cardboard.
- Then flowers are made using a large needle and string. The main goal is beautiful and soft volume.
- Using a regular thread and needle, unevenness is corrected. A bow or ribbon is glued to the base of the “bouquet”.
Congratulations are written on the inside.
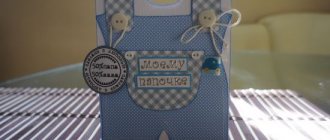
From my son
The beloved son will greatly please his mother if he chooses an unusual way of congratulations - with a 3D effect. Such a hand-made postcard for mom will make a very unusual and positive impression. You don't need to draw anything. The execution is simple:
- Buy two or three identical postcards.
- On the reverse side, each of them is divided into thin strips and numbered.
- Strips are cut - there should be 2 or 3 of each number.
- On the prepared cardboard format, glue strips of postcards by numbers - the first two (or three), the second two, and so on until the last number.
The edges of the card can be decorated with decorative tape or tape. Congratulations are written on the inside; you can make a hole on the edge with a hole punch and hang mini congratulations with wishes.
Pictures for printing postcards to congratulate your mother
Well, in conclusion, catch patterns that will become a lifesaver. With their help, children will be able to make cards themselves, paint stencils, and make an applique from the templates. They are suitable for both preschoolers and schoolchildren. Choose.
I hope you enjoyed reading my article. I wish you all creative success! Love your mothers and tell them about it more often! And for now I say goodbye to you. See you again on the expanses of my blog!
Postcard “Bouquet of Flowers”
Such a birthday card can be presented to mother from either her son or her daughter. It’s not difficult to make it yourself using a detailed master class with step-by-step photos; it won’t take much time.
Materials:
- quilling or origami paper of different colors;
- a sheet of thick light cardboard;
- decorative paper for scrapbooking;
- scissors;
- glue;
- pencil;
- ruler;
- toothpick.
Progress:
- First you need to make paper flowers. It is best to use paper of 9 shades at once. Divide it into sheets of dark and light colors. Cut the first into strips approximately 3 cm wide, the second - 2 cm wide.
- Place all strips of the same color next to each other. Make a fringe along one edge using scissors.
- Cut strips of orange paper about 5 centimeters wide. Twist them tightly onto a toothpick, and then secure with glue to form the center of the flowers.
- First attach a dark stripe to the middle of the flower, and then a light one. Carefully bend the light petals outward. This is convenient to do with a toothpick. You should work with each layer separately to make the flower look three-dimensional. Curl the dark petals inward.
- To make roses, you should take bright paper. Trace a round container on a sheet of paper with a pencil, then carefully cut the circle in a spiral. Curly scissors are suitable for this. Screw the workpiece onto a toothpick.
- Cut sheets from green paper. Form a fringe along the edges.
- If desired, for additional decoration you can use spirals of green paper, cut into thin strips and twist with a toothpick.
- Cut out tags from scrapbooking paper and attach greeting messages to them.
- Attach flowers with leaves to paper in random order. Add spirals and congratulatory inscriptions.
You can write poetry on the back of the card.
Materials and tools for cardmaking
Nowadays the popularity of any handmade products is rapidly growing. The exclusivity and uniqueness of such things makes them stand out in the ocean of mass products. Not everyone can master complex handicrafts such as sewing, embroidery, and lace weaving. But everyone can understand how to make a postcard for mom, husband, friends. Despite the simplicity of these products, receiving them evokes no less vivid positive emotions than, for example, a crocheted napkin.
Cardmaking is now popular all over the world. Creating cards for holidays, important personal and family dates is an interesting, accessible hobby. Stores sell a wide variety of consumables for such hobbies. Any creative idea can be brought to life.
Cardmaking is popular all over the world
To work on a postcard, your child will need simple stationery tools and materials. An adult who has decided to make cardmaking his main hobby needs to acquire various professional equipment and special materials. The master’s arsenal should include:
- scissors for curly trimming edges;
- sharp stationery knife;
- several types of stencils, stamps;
- hole punchers with shaped cutting elements;
- embossing kits;
- paper, cardboard material for various techniques;
- different types of pencils;
- decorative adhesives and tapes;
- flat and three-dimensional stickers, chipboards;
- decorative elements - ribbons, flowers, brads, etc.
Tools and materials for cardmaking
The presence of these tools and materials will allow you to create any masterpiece.
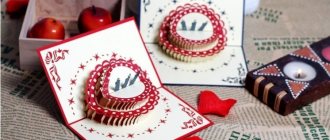
Volumetric card “Hearts”
A DIY birthday card for mom will look especially heartfelt if the central figure on it is a heart. To make it you will need sheets of thick white A4 paper and scarlet paper, glue and scissors.
All work consists of 4-5 stages:
- Preparing 2 heart templates. White paper is folded in half, and a large heart appears on it, one side towards the fold. A strip 4-5 cm wide is cut out of colored paper and folded into a square accordion consisting of 6 sections. On the extreme section, half of the figure is drawn so that its middle falls on the fold.
- Receiving figures. It is necessary to cut the paper along the contour. From white paper you will get 2 paired hearts - this is the basis of the craft. Made from colored paper - an accordion of 3 small hearts.
- Connecting workpieces. Small 3 hearts are attached using PVC inside the larger ones so that when opened they open up like an accordion.
- Inscription. Warm words and wishes can be written with felt-tip pens in any place you like.
- If the outer sides of the card remain empty, then you can glue glitter and beads on them.
Postcard Heart for mom using quilling technique
At the very beginning, we were already familiar with this style, and I decided to show many other ideas that are beautiful in their own way and may lead you to a new original gift for your mother. The first one will be shown in a video from the YouTube channel. Express your feelings and make this heart out of paper and glue.
Here are a couple more ideas.
Postcard pendant “Butterflies”
For your mother's birthday, you can make your own card-pendant in the shape of a butterfly.
A gentle and romantic craft, made in the birthday girl’s favorite colors, will require a set of tools:
- thick white paper for the base;
- lace ribbon of 2 varieties;
- scrapbooking paper;
- details in the form of flowers and butterflies;
- lace;
- beads or beads that match the overall tone of the card;
- a ready-made chipboard with pleasant, succinct content (for example, “From the Heart,” “With Love”).
The work takes a little over an hour and is divided into 4 stages:
- A blank for the postcard base is cut out of a sheet of white paper and folded in the middle. On the outside, this part is decorated with a sheet of scrapbooking paper of the same size with an unobtrusive pattern.
- After joining the two sheets, a small hole is made in the upper left corner with a hole punch, which can be fixed and reinforced with a grommet. Now you can thread a beautiful cord through the future postcard and hang the craft in a prominent place.
- The base is ready, all that remains is to decorate the front part of the craft. Pieces of lace are glued just below the middle of the cover, imitating the fencing of a flower bed. 3 flower heads are attached to one of the edges with double-sided tape. A pair of butterflies are glued above them so that their wings remain free. You can make flowers and butterflies yourself, find ready-made ones, or cut them out of postcards.
- The decoration process is completed by randomly gluing beads or seed beads, as well as attaching a small chipboard against the background of flowers.
The birthday card for mom is ready. Now you can decorate the inside of the product with your own hands by writing a couple of warm lines in calligraphy.
Popular techniques in making postcards
Experienced carmaker craftswomen use various types of techniques for creating decorative elements. You can realize your creative ideas using:
- scrapbooking,
- quilling,
- iris folding.
The simplest option is scrapbooking. This intricate word is called classic applique. You can use a variety of materials in it:
- colored paper;
- photos;
- images cut out from magazines;
- satin and silk ribbons;
- lace and much more.
Postcard for mom using scrapbooking technique
Using various available means, you can create a beautiful, informative composition that can express the whole gamut of your feelings. This technique does not require special skills, you only need creative imagination and good taste to create a unique, targeted product.
You can make your own birthday card for mom using quilling. This technique is also not complicated and allows you to implement a variety of ideas. All decorative elements are created from strips cut from colored paper. They are screwed onto any object having a circular cross-section. You can, for example, use a skewer or toothpick. The twisted spiral can be given any desired shape by pressing it with your fingers. From these details petals and flower cores are obtained; they can be elements of an animal, a bird, or a fantastic composition.
You can make a card for mom using quilling
Decorating using the iris folding technique is a little more difficult. But this method can also be mastered if desired. Various decorative elements are also created from strips of different shades. But they do not curl, as in quilling, but fold in the form of a fan.
How to Make Birthday Cake Cards
What do you need
- Thick blue or turquoise double-sided paper;
- scissors;
- ruler;
- a simple pencil;
- thick white paper;
- colored paper with drawings and patterns;
- glue stick.
How to do
1. Cut a rectangle measuring 15 x 11 cm from blue or turquoise paper. Fold it in half crosswise. Cut a rectangle measuring 14 x 10 cm from a white sheet.
2. Fold the white piece in half crosswise. On the fold side, make four cuts at equal distances from each other. The first two (at the bottom of the paper) should be the same. The third is about 1 cm shorter, and the fourth is even slightly shorter in length.
3. Fold the cut pieces as shown in the photo.
4. Unfold the strips and open the paper. Bend the cut pieces inward along the marked folds.
5. Cut out three rectangles from colored paper according to the size of the layers of the future cake. They should be quite a bit taller than the white stripes. Fold them in half and glue them to the sheet.
6. Bend and straighten the white sheet again so that the lines on the cake are more clearly visible. Cut out several candles in the form of small rectangles from bright paper, and the same number of droplet figures from yellow paper. Glue the droplets to the candles and them to the cake.
7. Apply glue to the back of the white paper and attach it to the blue base. The card can be signed next to the cake or outside.
How to make a simple postcard
Everything simple is done simply. Including a postcard. Even a 4-year-old child can easily cope with this. And even more so for older children. To make such a postcard you need to take:
- colored cardboard in A4 format or a sheet of colored paper of the same size;
- half a sheet of white paper (same format);
- paints or markers;
- multi-colored buttons of all sizes, bows, ribbons or rhinestones;
- scissors and glue.
Let's start making a holiday card.
- Carefully fold colored cardboard or paper in half.
- We write a congratulation for our beloved mother on the inner half of the sheet. These could be poems or just words from the heart. In general, whatever the child wishes and comes up with.
- Let's start decorating the outside of the card. There you can draw a picture, or stick on ribbons, bows and rhinestones. Or you can decorate the card with buttons, making some kind of composition out of them.
That's it, the simple card is ready and you can give it to your mother.
How to Make a Pop-Up Cupcake Birthday Card
What do you need
- Pink double-sided paper;
- ruler;
- a simple pencil;
- scissors;
- glue;
- White paper;
- double-sided bulk tape;
- paper of different colors;
- Red ribbon;
- felt-tip pen.
How to do
1. Fold a sheet of pink paper in half. Place it so that there is a fold at the bottom. Place a ruler at a slight angle on one edge and draw a line. Approximately in the middle, draw another slanted line so that the figure resembles a pot.
2. Cut out the part along the marked lines. Apply glue to the side edges inside the figure.
3. Connect the elements and press the paper on the sides so that it sticks together. Place a ruler in the resulting pocket and measure the distance from the bottom to the edge. Also measure the length of the bottom edge of the figure, stepping back a little on the sides. The author got 9 cm.
Draw a rectangle on white paper. Two sides should be 9 cm each (or whatever value you get), and the other two should be a few centimeters more than the distance from the bottom to the edge of the figure.
The resulting rectangle should easily fit into the pink pocket. Cut out the white piece.
4. Place the item in the pocket. Measure the length of its top edge and the height of the pocket along with the inserted white piece.
Draw another rectangle on white paper. Its length should be 2–3 cm longer than the edge of the pocket, and the required width should be approximately half the measured height.
Draw a cloud-like figure in a rectangle.
5. Cut out the cloud. Place it on top of the white piece so that it covers the pink piece. For convenience, mark the places of their contact with a pencil.
Remove the cloud. Glue several pieces of bulk tape to the visible part of the white part. Attach a cloud to them by placing it on the pencil marks.
6. Cut out small circles of different diameters from colored paper. Glue them to the cream, that is, to the part in the form of a cloud. Cut out a heart from red paper and attach it at the very top.
Tie a bow on the side of the ribbon. Cut out a small tag from white paper - a rectangle with cut corners. Write “For You” or a congratulation on it.
Glue this element to the bottom of the card and attach the ribbon horizontally above the tag.
7. Glue the ends of the ribbon to the back of the card. Write your congratulations on the white removable part.
Postcard with a surprise: step-by-step production
A surprise in a postcard is something unexpected and extraordinary.
One of the options for such a gift is very simple:
- On a sheet of paper you need to draw 2 circles using a compass, one inside the other, where the inner circle is 2 times smaller than the outer one.
- Petals are drawn between the circles. As a result, the drawing looks like an open daisy.
- A congratulation is written in the middle of the flower.
- The petals are cut, separated from each other, painted over with colored pencil and folded inward. On one of the petals you can write “I bloom in water.” This will be a hint.
- The postcard is ready. Now all that remains is to give a surprise to the birthday girl and watch as a flower with warm words opens in the water before her eyes.
"Embroidered" postcard
More precisely, not the entire card should be embroidered, but the image on it. What it will be - flowers, an animal, a pattern or something else is not so important. Everything will come in handy, everything will be beautiful. Of course, it’s easier to make such a card for your daughter, because embroidery is mostly a woman’s job.
This is how a postcard is made.
- Take half of a strong cardboard.
- It outlines the location of the future composition.
- Next, using colored thick threads and a large needle, flowers or some other image are made. It would be better, of course, if they were flowers - they were easier to make. Alternatively, you can buy ready-made flowers in the store. Flowers (or other image) should be voluminous and soft.
- Finished flowers (or something else) should be glued to cardboard. Using an ordinary needle and thread, their edges are adjusted so that they do not extend beyond the boundaries of the postcard and do not become shaggy.
- You can glue a ribbon or bow to the base of the bouquet - it will be very beautiful.
- Congratulations are written on the inside of the card.
Samples of cards for Mother's Day (can be downloaded for free)
The easiest idea is, of course, one that can be colored with pencils or felt-tip pens, using a coloring book or a finished composition as a sample. Add your own twist and you will be happy. I provide stencils and templates, use them as intended:
Postcard "with laughter"
It's not difficult to do, but you need to have a sense of humor to do it.
- Take half a cardboard sheet.
- We glue (or draw, or embroider) something funny onto it. Or simply something fun and bright that will definitely cheer up mom.
- Of course, such a postcard should also have a corresponding congratulatory inscription - just as cheerful, bright and unusual.
Well, is it really difficult? But how much joy and fun there will be when mom receives such a gift!
We give mom a musical card
Of course, making it yourself is unrealistic. Therefore, a musical postcard must be purchased in advance at the store. Fortunately, there are any number of variants of such postcards on sale now.
But you need to decorate such a gift with your own hands. This can be done in many ways: glue “music” to the inside of a hand-made card, hide it in a special envelope, disguise it among flowers so that mom does not immediately find it, etc.
Coloring pages - cards for mom
Why not take advantage of a little help and download coloring pages, remember we did this on March 8th? And now a few tips on what and how to download and “draw” using coloring books.
Bouquets! Mom will also like scenes in which children give flowers.
And if a brother and sister give a gift together, then you can color such a cute card.
And here is a cute bunny with a huge bouquet!
Mom will definitely like even a simple bouquet of daisies.
Confessions that their mother is the best (and if you decorate it beautifully with flowers, balloons and fireworks, it will turn out to be a bomb!).
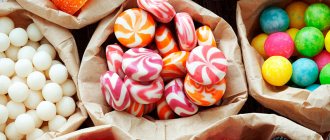
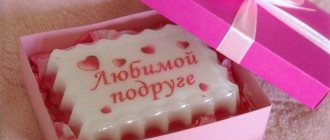
Sweets or gifts.
And here on the right you can even write a short congratulations. For example:
***
My dear Mom! Happy birthday to you! Shine like a star. Float like a butterfly. Shine like the sun. And most importantly, know that I adore you! ***Mommy, mummy, my star, Happy birthday, dear, I congratulate you. Let all the sorrows go away, let the trouble go away, You are my treasure, my mom. ***Happy birthday! I wish you health, success and happiness, May the world smile like a clear sun, May your every day be the most beautiful, May happiness always stand in your way, May your smile give people joy!
And here in each heart you can write a word - a wish. For example, smiles, love, happiness, peace, kindness, joy, health...
birthday greetings
It's so easy to make mom happy!!!
You can also give such a cute bear with a bouquet or a heart and sew a cute cat for your mother.
Ideas for cards for mom and grandma, drawn with pencil or paints
So let's draw. Since above I left a link to an article about how to draw a mother, here I will have more complex ideas. Suitable for high school students.
A lamb like this turned out very cool.
A small insert with a wish.
Variant of a hand-drawn postcard in the form of a bear with a heart. Modern and cute.
Next are the ideas for minimalist congratulations. From here you can take note of the ornament or text. Look at the font and shape of the letters. Also, such congratulations look more modern and interesting on a square base.
Balloons with letters are also interesting and unconventional.
Buttons add a unique touch to the greeting card.
Similar ideas can be made in the form of an applique and simply drawn.
To do this, I provide these templates for sketching. They can be cut out and outlined.
High school students can repeat the idea from chemistry lessons.
Mom will like even an ordinary Valentine's card.
For those who find it difficult to draw something on their own, here are the diagrams for printing.
I was also captivated by postcards with embroidery. But you can take the ornament itself as a basis. Look how laconic and stylish the card looks.
It certainly won’t be difficult for high school students to repeat something similar. Just instead of embroidery, draw the ornament with markers or gel pens. Below are some ornament ideas.
Oh, how I love this kind of self-expression through beauty!
How to make birthday cards with balloons
What do you need
- Thick gray paper;
- double-sided paper of different colors;
- ruler;
- a simple pencil;
- scissors;
- double sided tape;
- compass;
- regular glue and/or glue stick;
- glue gun;
- twine or other thick threads;
- White paper;
- felt-tip pen;
- glue stick;
- colored tape.
How to do
1. Fold gray construction paper in half crosswise. Cut a rectangle with sides 20 and 14 cm from a pink sheet. Cut a rectangle measuring 16 x 10 cm from gray construction paper.
Using double-sided tape, glue the small gray part onto the pink one, and secure the latter onto the cover of the future card.
2. Cut many strips of colored paper of different thicknesses, but the same length. These are blanks for balls. Conditionally divide one strip into three parts and bend it twice along the lines.
Draw a circle on the resulting part using a compass. Cut along the contour - you will have three circles.
3. Prepare circles from the remaining colored stripes in the same way.
4. Cut small triangles from the remaining folded paper. Glue them to the bottom of each circle.
5. Fold a small strip of paper in half. Unfold and fold each side like an accordion, as shown in the photo and video below.
6. Make as many of the same parts as you have balls. Glue them to the circles so that the accordions are on top.
7. Using a glue gun, attach a piece of twine or other thick thread to each ball.
8. Fold the long edges of the white paper about 2 cm and cut along the contour so that you get two strips folded lengthwise. Fold each one in half crosswise three times. Cut out identical triangles from them so that the bases of the shapes are on the fold. Details are in the video below.
9. Write one letter from the phrase “Happy Birthday” on each triangle. Lubricate the inside of the flags with glue, put them on two pieces of rope and glue them together. Tie the ends of these two strings together.
10. Lubricate the accordions with glue on the back of the balls and distribute them beautifully inside the card. Save a few for the cover.
11. Tie the ends of the twine, twist and cut off the excess. Using a glue gun, attach the letter flags to the card.
12. Write a congratulatory message at the bottom of the cover. Glue a few balls at the top. Cut off the excess twine and tie it with ribbon.
DIY postcard for mom: templates and master class
Today we want to offer you a master class in which we will tell you how to make a postcard for your mother with your own hands using the scrapbooking technique. Use our template and step-by-step description and see how much joy this DIY card for mom will bring.
Tools and materials Time: 1-2 hours • Difficulty: 5/10
- printed templates on A4 sheets (presented at the bottom of the master class);
- kraft paper;
- thin organza ribbon;
- lace ribbon;
- masking tape;
- “Happy Mother’s Day” stamp (if you don’t have such a stamp, make a beautiful inscription on the computer and print it);
- scissors;
- PVA or stationery glue;
- ruler, pencil;
- decorative decorations for scrapbooking (butterflies, card with a mannequin, handbag, etc.).
A DIY postcard for mom is the best gift that will sincerely delight your loved one!
This master class is suitable not only for making a postcard for a birthday, but also, for example, for Mother’s Day or March 8th.
Postcard with butterflies
Our DIY card for mom with butterflies looks very beautiful due to the correct arrangement of scrap paper with different patterns.
Step 1: Make a blank
Cut out a rectangle measuring 15x30 cm from craft paper. Fold the paper in half: this will be a blank for the postcard.
Step 2: Cut out a square
From the sheet with the inscription “Mum”, cut out a square measuring 15x15 cm.
From another sheet, cut out a square measuring 12x12 cm. Glue it into the middle of the sheet with the inscription “Mum”, placing it slightly diagonally.
Step 3: Make Different Layers
From a sheet with a different design, cut out a strip measuring 5x15 cm. Glue it into the middle of the card, horizontally.
Cut a strip measuring 4x14 cm. Glue it into the middle of the previous strip.
Tip: For each subsequent layer, use a different design of paper. This will provide the postcard with originality and multi-layeredness.
Step 4: Apply Tape
Cut a 20 cm strip from the lace ribbon. Glue it in the center of the card, horizontally. Attach the ends of the lace ribbon to the wrong side of the card.
Step 5: Connect the Pieces
Glue the layered decorative craft to the front of the kraft paper card you made in step one.
Cut a piece 50 cm long from a thin organza ribbon. Wrap the ribbon around the card and tie it with a bow.
Step 6: Apply the Stamp
Cut a piece of decorative paper 4.5 x 4.5 cm. Stamp “Happy Mother's Day” on it. Or print this inscription on a printer on a piece measuring 4.5 x 4.5 cm.
Glue the lettering paper onto a 5x5cm piece of kraft paper.
Glue a 1x1 cm piece of masking tape to the center of the card. Glue an element with an inscription to the center of this piece.
Glue decorative butterflies to the right side of the card, also using masking tape. This will provide the card with deeper volume and layering.
Postcard "Fashion"
Step 1: Cut out the blank
Cut out a 15x30 cm blank for a postcard from kraft paper. Fold it in half.
Step 2: Make Layers
- Cut out a 15x15 cm square from decorative paper.
- From paper with a different pattern, cut out a 13x13 cm piece. Glue it into the center of the previous square.
- Cut another 13 x 13 cm square. Using scissors, trim all sides in a zigzag pattern. Glue the zigzag square into the center of the previous square, placing it slightly diagonally.
Step 3: Glue the mannequin
- Cut out a piece of kraft paper measuring 5x11.5 cm. Cut out a mannequin in the center of this paper. Glue colored decorative paper to the underside of the mannequin. Glue the element onto the card.
- Cut a 15 cm piece from the organza ribbon and tie a bow from it. Glue a bow into the middle of the mannequin.
- Cut out a bag from the design paper. Use masking tape to place it at a slight angle on the right side of the card.
Of course, you can come up with any other elements you wish and glue them onto the card.
Step 4: Label
- Cut a 4.5 x 4.5 cm piece from the patterned paper. Glue it onto a piece of kraft paper measuring 5x5 cm. Stamp the blank with the “Happy Mother’s Day” stamp. Or, as in the previous version, print the desired inscription on your computer, cut it out and glue it onto a piece of craft paper.
- Use masking tape to adhere the element to the card.
- Glue the layered decoration onto the front of the card blank you made in step one.
Your DIY card for mom is ready!
Templates:
Another original and very beautiful DIY postcard for mom is presented in the video that we have selected for you as a bonus to this master class.
Source: https://masterclasso.ru/otkryitka-dlya-mamyi-svoimi-rukami
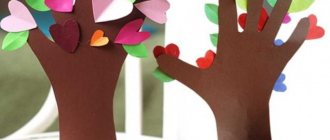
Cards from palms
This refers to children's palms, or, more precisely, their contours cut out of colored paper. The creative procedure itself is simple, funny and exciting, and the crafts are very cute and touching.
What's the best way to make a craft like this? That's how.
- We place a child’s palm on a sheet of paper and trace it with a pencil. A child can do this on his own, but it’s even better if someone older helps him.
- If you wish, you can outline and cut out one palm with a pencil, or two at once. You will get two palms if you bend the paper in half before placing your palm on it and tracing it with a pencil.
- Cut out the outline of the palm with scissors.
Well, then creativity begins. It’s easy to make a flower or even a whole bouquet from single palms. For example, this one.
And from two palms folded together, you get such excellent holiday crafts. For example, with a heart...
Or with a butterfly...
Or you can do it even simpler, and don’t cut anything out, but just smear the children’s palms with paint, and then apply them to a white sheet of paper. Even one child’s hand printed on a sheet of paper will bring joy to the mother. And if there are a lot of prints...
Volumetric card “Dress” using origami technique for the holiday
Congratulatory ideas with decor in the form of dresses are very popular now. You can simply cut them out of napkins or paper. Or you can fold it in style and I’ll give you a diagram below.
For example, this option is done in about 20 minutes.
Here is a diagram for cutting out the front face piece.
For this lace dress we take two napkins.
One of them goes to the skirt, the second to the bodice.
This option is more labor-intensive.
First of all, we make a hanger from a paper clip.
Cut out the details. We fold the skirt along the dotted lines, alternating folds. First fold down.
If the fold goes up, you get this option.
More diagrams.
You can simply make such a design.
Here is the diagram, we turn the edges towards ourselves, on the front side.
Options using the origami technique.
Detailed step-by-step folding diagram.
Here is another applique postcard with a princess. For some reason she reminds me of Cinderella.
Let's take this template with details. and cut out the blanks. Arm - 2 pieces, 3 circles per sleeve, 2 pieces of oval parts.
We make cuts where the scissors are indicated.
The circles need to be folded in half and glued. We fold the oval parts of the dress inward and fix the ends.
Assembling the application.
The hair can be made from sisal or from thin strips of paper that are wrapped around a skewer.
Another idea with an apron.
Below we will look at what little children can do simply and quickly.
Postcard with a dress made of fabric
The most notable thing about this card is the fabric skirt. We collect one edge using a needle and thread.
Assembling a fabric skirt
Glue the top part of the paper dress.
Glue the top of the dress
We complement the craft with various decorations and designs.
Postcard with a dress made of fabric
Beautiful and light cards with children's hands for Mother's Day for kindergarten children
Namely, use your cute little hands. The prints make wonderful flowers.
Here are options for combining and using children's handprints.
You can cut their shape out of paper. Here is a diagram for the craft.
For example, for an idea like this.
Open palms are always a sign of friendliness and acceptance.
You can take this template inside and glue a flower, heart or bird inside.
An interesting version of a hug postcard with a photo of a child.
This template will do.
Another idea with hands and heart.
A preschooler can create such a cupcake simply and quickly. Cut out the handprint and place it in a muffin tin. Of course, an adult helps tie the bow beautifully.
I also found some options.
Bouquet of palms.
Flower postcard with a picture of mom.
Or we simply decorate our palm with flowers. The child will cope.
Let me remind you that for applications with children it is better to use PVA glue, it is considered the safest.
Let the baby write a congratulation to his mother from the bottom of his heart. Sometimes they turn out to be very funny, but also very sincere.
Postcards made of plasticine
Children love plasticine even more than colored paper. And making different figures from it is generally one of the most favorite children’s activities. So why not make a holiday card for mom from this craft material? For example, a plasticine bouquet. Or - some picture with animals, houses, cars, etc.
It should be done like this.
- We prepare the base for the postcard - a flat rectangular board or plywood. It would be better if it was painted in some nice color.
- We sculpt an image from plasticine: colorful flowers, a landscape, a funny animal, etc.
- We glue it all to the base as we sculpt.
When the plasticine card is ready, we give it to mom.
Additional decor in creating a postcard
One of the advantages of this creativity is the absence of restrictions in the choice of materials for the implementation of ideas. A variety of objects and materials can be used to decorate a postcard. A festive, attractive look can be provided by:
- lace;
- braid;
- pearls and beads;
- pieces of textiles;
- sequins and rhinestones, etc.
Additional decor will give the card a festive look.
Ready-made decorative elements can be purchased in specialized stores. For example, boutonnieres, various stickers, chipboards, etc. can be used in decoration. Some craftswomen decorate cards with embroidery and beautiful buttons.
Postcard made of cotton pads and colored paper
A very beautiful craft that anyone, even a very small child, can make.
- Take cotton pads and a colored button. The discs are the petals of the future flower, and the button is its center.
- Cut out a stem and leaves from green paper.
- Take a colored rectangular piece of cardboard (any color can be) and glue a button onto it. We place cotton pads around it, and below - a stem with leaves along the edges.
That's it, the cute greeting card is ready. And besides, it’s also voluminous!
Flowers for mom's card
When designing a card, it is necessary to take into account the individual qualities and preferences of the mother, but floral elements are invariably used in each such product. This is an unmistakable option that can evoke positive emotions in any woman. Before you make a card for your mom, it’s worth remembering which flowers are her favorite. To create them, you can use any technique.
Cornflowers, chrysanthemums, asters, marigolds, and other buds with a similar structure can be made from several elements, connected in the center with a bead or a composition of beads that imitates the core. The paper petals need to be twisted a little to provide volume to the flower. To create a rose, you can use a spiral cut from colored paper and give it the required shape.
Rose from a strip of paper
Flowers can be not only voluminous. In scrapbooking, stamps are often used to apply several images that successfully complement the main elements of the composition. You can buy them in a store or make them yourself. Experienced needlewomen have interesting ideas for making improvised devices in their arsenal. For example, you can put images of pink buds on a postcard using Chinese cabbage. To do this, you need to cut off the root part. Paint is applied to it, the prints will perfectly imitate a rose.
Chinese cabbage stamp
You can make lilac branches and hyacinth inflorescences from colored paper. To do this you need:
- cut a wide strip of colored paper;
- cut strips along the entire length, not reaching the edge 0.5 cm;
- screw each strip onto a pencil;
- twist the resulting strip onto a skewer in a spiral;
- Wrap the remaining free part of the skewer in green paper.
Hyacinth inflorescences made of colored paper
The resulting inflorescences are fixed on a postcard and decorated with green foliage. In creating flowers, the origami technique can be used, which allows you to create any configuration from paper.
Postcard made in scrapbooking style
Doing it is also quite difficult, but difficult does not mean impossible. First of all, let us provide preliminary accompanying clarifications.
- Such cards are made from any material that is at hand: cardboard, various decor, lace, ribbons, felt, curly staplers, etc.
- In principle, you can buy materials for making postcards if you don’t have anything suitable at hand.
- The same goes for the decorations used to make the card. They can be homemade or store bought.
These photographs will tell you in detail how to make such cards. They capture the entire process from start to finish.
At the same time, it should turn out to be such beauty.