Olga Zhurbenko
Master class “Crown of the Autumn Queen”. Origami “Modules for autumn leaves”
Origami “ Modules for autumn leaves ”
1 step. We take colored paper, in this case red. Cut out a square so that all sides are equal. here is a module of size 9*9 .
Step 2. Next, bend the square as shown in the photo.
Step 3. Then, bend along the fold line in the next photo.
Step 4 Then we bend the right and left corners to the middle and bend the bottom corner, as in the photo.
Step 5 From step No. 4, we turn this lower corner inward and bend the lower right and left corners along the fold line as in the photo to the middle.
Step 6 Then you need to try and turn the corners outward, as in the photo.
Step 7 You should get the corners looking down, then bend them so they look up. As in the photo.
Step 8 This is how the module .
Step 9 Then from three identical modules we glue together a figure similar to an autumn leaf .
Step 10 I made a crown from these .
- The idea is not mine.
- The children were delighted!
- Autumn
- (excerpt)
- I
- October has already arrived - the grove is already shaking off
- The last leaves from their naked branches;
- The autumn has blown in - the road is freezing.
- The stream still runs babbling behind the mill,
- But the pond was already frozen; my neighbor is in a hurry
- To the departing fields with my desire,
- And the winter ones suffer from mad fun,
- And the barking of dogs wakes up the sleeping oak forests.
- ***
Publications on the topic:
"Crown of the Russian Empire". Sweet design. Master class Well, I finally decided to make the Crown of the Russian Empire, I had been working towards this for a long time, I was still afraid it would work out or not, I even made it master class.
Master class “Flowers of Autumn” Autumn has come. The first signs of autumn have appeared. Yellow leaves are visible on the birch trees, a cool breeze blows, and the ringing sound subsides.
Master class “Heroes of autumn - vegetables” Yes, winter is just around the corner, and although it is beautiful in its own way. I don’t want to part with the most mysterious time of the year – autumn. Like romantic.
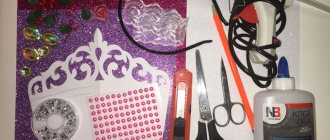
Master class of the “Gifts of Autumn” basket To make a basket we need: a plastic bottle (large 5 liters, two types of glue, scissors, tape, “Gifts of Autumn”(.
Master class “Colors of Autumn” Master class “Colors of Autumn” Purpose: To show the beauty of autumn nature. Objectives: 1. Strengthen children’s ability to work in a team and distribute work.
Master class “Portrait of the Winter Queen”. (From openwork napkins) Good afternoon, dear colleagues. Winter is a fabulous time of year. Every day there is a blizzard, then snowfall, then the trees will be decorated with frost. And all this is a trick.
Master class: crafts made from cotton swabs “Flower of Autumn” Good evening! We want to show you a master class crafts made from cotton swabs “Flower of Autumn”. Autumn is a wonderful time. Leaf fall, Indian summer. Maybe.
Master class with children of the preparatory group “Hat for the little Autumn Princess” Description: master class is intended for children of preparatory age for school, teachers, enthusiastic people Purpose: made.
Master class “Memories of Autumn” In my group (senior), I conduct a children’s creative association “Bead”. Currently, a large assortment of beads is produced.
Didactic manual “Autumn Owl” Good day everyone. Dear colleagues, I hasten to tell you about our new guest in the group. Today we have a wise owl.
Source: https://www.maam.ru/detskijsad/master-klas-korona-korolevy-oseni-517874.html
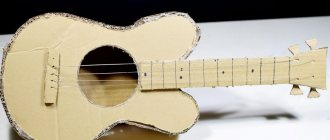
The principle of making a crown for the autumn ball
This craft is performed in several stages, but the principle of its manufacture is very simple.
- A strip is cut out of cardboard or plain paper to the size of the head of the person for whom the crown is being made. If the cardboard is light in color, then it is painted over or covered with colored or corrugated paper in autumn tones: yellow, golden, orange and red. If the strip is dyed, then you can mix all these colors with a small addition of green or light green.
- Glue paper cut-out leaves onto the strip. You can choose regular colored or corrugated paper, but you can also use light paper, and then simply paint over the cut out leaves. Details of leaves and branches can not only be glued, but also fixed with a stapler or double-sided or regular tape.
- This step is not necessary, but if you want the crown to have a gloss, then all the parts can be wrapped with transparent tape, and then simply cut off the excess.
- You can decorate the crown with rowan branches, pine cones and flowers, or other autumn elements, which are cut out like regular and voluminous appliqués.
Basic rules for creating interior wreaths
When starting to create a wreath, there are several important rules to consider. Its shape must be round. It is important to choose the correct proportions of the diameter of the outer side of the craft to the hole. The ideal option is if the diameter of the central hole is 1/2 or 1/3 of the size of the entire wreath. Dark felt, rim, cones used for decoration will visually reduce the decoration. A wreath made from light materials will appear larger.
Even a novice master who is far from floristry can make a reliable and beautiful craft. The product must be assembled tightly, with a clear distribution of the sizes of all parts. When preparing the base, it is necessary to take into account the characteristics of the material. If it is a wide sheet of cardboard, the holes must be enlarged.
For decoration, you can use any floral design that does not distort the round shape of the craft. The decor can be enclosed in the body of the wreath, assembled with a certain grouping of material, its uniform distribution. A scattered decoration scheme is also used when there are several groups of different heights.
If the wreath is assembled on a base, its reverse side should not be visible. It is necessary to decorate absolutely all technical means (glue, wire, thread).
Crown for the autumn ball made of maple leaves
We will need:
Colored paper. You need to select paper that is not very thick; it is best to use corrugated paper for leaves.
Scissors.
Stapler or glue or thread and needle.
Progress
The main rule is to choose bright colors of paper. Such as orange, red, yellow and a little green. It is necessary to cut out foliage without stems, that is, only leaves. When the required number of leaves have been cut out, they should be sewn or glued together, but you can also secure them with a small stapler. To do this, bend the sheet on the side and fix it. We place the next leaf overlapping so that the lower bend extends beyond the first leaf. The third leaf goes over the second and is fixed again, thus securing all the leaves on the crown to the required length.
After connecting all the leaves to the desired length, we combine the first and last leaves with each other, forming a crown in the form of a circle.
Let's look at the stages
- Cut a rectangle of the required width according to the volume of your child’s head. If you do not have the required color of cardboard, you can cover it with paper of the required shade;
- attach the leaves in any order, in any way that suits you;
- To prevent the leaves from shrinking, after drying, cover them with large transparent tape.
Don't be discouraged if you don't have the required attribute on hand. They can be cut out of colored paper, and they will be no worse than the real thing. Look in the pictures for more details.
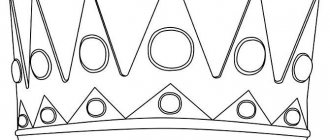
Craft template
The finished crown can be of absolutely any shape, size and made from any suitable material. Before printing and using the template, you need to adjust it to the desired size.
How to find out the size of the finished crown? Measure the circumference of the child's head - this will be the size of the product. When preparing the template, leave 1-1.5 cm for gluing the crown. You can edit the template to size in any photo editor.
From felt
Autumn is the most beautiful time of the year. Despite the chilly weather and rain, autumn is filled with a wonderful atmosphere, a huge abundance of colors and tart smells. The colorful forest and frosty air stir our soul. With bated breath we greet and see off every sunny day. This is a time of quiet family evenings, comfort and warm hugs. We also associate this time with the autumn ball. This is one of the most anticipated holidays for schoolchildren. It provides an excellent opportunity to demonstrate your talents and beautiful outfits; they also welcome autumn in kindergartens by holding matinees. For our little fidgets, this is the beginning of a creative journey. They prepare diligently: they learn poems and songs, act out skits, thereby trying on various images for themselves. And the parents are responsible for creating a suitable costume and selecting the necessary accessories. A crown for an autumn ball will be a wonderful addition to any look for both a girl and a boy.
Let's look at the stages
Before you start work, decide what material you will make it from. A paper crown is made very easily and quickly. You will need to print a suitable template from the Internet and, after choosing the color of the product, cut out the sketch. Glue the edges, decorate with various things, and you're done.
But these are children, they are in a constant rhythm. One awkward move and your work will be irreparably ruined. Paper is good, but its main drawback is that it wrinkles easily and tears quickly.
Cardboard is another matter, because it is dense and reliable. You can already be calm about your creation. And another advantage of a crown made of cardboard is that it will not bend under the abundance of decorations. So don’t be stingy and feel free to create.
Real autumn leaves will serve as an excellent decoration. For a girl, you can fill the leaves with glitter hairspray.
One important tip: involve your child in the craft and do it together. This will help him develop accuracy and thriftiness with things. It’s also just fun and interesting, and this day will remain in children’s memory for a long time.
Leaf decoration
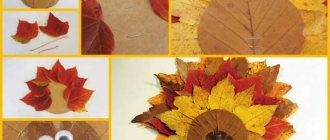
To make this product, take your baby and go for a walk in the park. Well, here you have a rich, colorful carpet of leaves, but we only need maple ones. Try to collect the brightest and most beautiful ones. If you wish, you can add a couple of green leaves, it will turn out very original.
So, you came home with a colorful bouquet. Place it on the table, taking one leaf at a time, begin to weave a crown. We think many of you wove flower wreaths as children, or at least have an idea about it; it’s almost the same principle.
First remove the thickening on the stems, then carefully bend a small part of the leaf and pierce it in two places with the adjacent stem. It feels like you are sewing, but instead of a needle you have stems. When doing these steps, rely on this photo.
Option from whatman paper
To make such a head decoration with your own hands, follow these steps:
Even an adult can try on such a crown; it will look trendy and will last for several years. If desired, you can replace one large sheet with three small ones. The principle of operation is the same, only the stencil is different.
Another simple and quick way is to use a felt crown. Felt is an indispensable material in creativity. It is easy to work with, it is not whimsical and is the same from all sides. Your product will look original and luxurious. Another plus is that you can insert an elastic band or ribbon here. This will allow you to conveniently attach the crown to your child’s head.
All decorations will also be made of felt. To make your leaves look natural, sew their outline and veins with threads.
Video on the topic of the article
Here are videos that will be interesting for studying this topic:
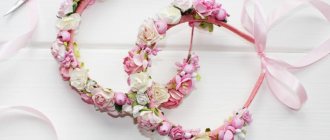
How to wear it correctly?
A headband with flowers is a very romantic accessory that most girls complement with appropriate clothing. These could be light, flowy dresses and sundresses, sandals with thin straps or ballet flats.
If you are a tanned girl, choose a brightly colored wreath, complement it with clothes with ethnic patterns and matching jewelry to get a boho-chic look. This could be a bright dress with a floral print, a sundress, or even jeans with an airy tunic.
The most win-win option for every day is jeans or denim shorts with a shirt or T-shirt. A modest wreath and a couple of stylish jewelry will complete the look.
A headband with flowers will look great on hair of any unnatural shade - pink, purple, green. An unusual hair color in itself is a statement of pretentiousness, so if you add a wreath to your hairstyle, it will look very organic.
To make flowers look organic even in an everyday look, it’s good if they match the color of at least one element of clothing. It looks especially impressive if the shoes are decorated with similar flowers. For example, you can transform old shoes this way, or glue a couple of artificial roses using superglue – it’s a matter of a few minutes.
Of course, a hoop with flowers will not always look appropriate. You can definitely go to a picnic or an outdoor festival in it – the flowers will look organic against the greenery background.
If you choose clothes in ethnic and boho style, then wreaths on your head will be the perfect complement to your look.
In combination with an evening outfit, a kokoshnik headband will also look appropriate.
You definitely shouldn’t wear it to school, to the office or to attend official events. At the very least, you may be misunderstood, and the combination of a business suit and flowers in your hair looks ridiculous.
Crown with rowan
It is not difficult to build such a headdress. We will need a headband, a glue gun, flowers, rowan berries and dry leaves. If you are preparing the autumn crown in advance and want it to last for a long time, then you will have to prepare the leaves first. They need to be ironed and allowed to dry thoroughly, preferably under pressure.
Let's start making the headdress. First of all, we glue the rowan branches. They are heavy and bulky. It will be easy to hide the rest of the flowers and leaves under them. Now we place the main accents. We will make them using large asters. They can easily be replaced with chrysanthemums or other flowers that grow in your country house or garden. When the accents are set, we begin to glue the leaves. The main thing here is not to overdo it. 3-4 large sheets and 3 small ones will be enough. The final step is gluing small dried flowers. The autumn crown is ready.
Learning to make a headband
An old, shabby hoop is not a reason to throw it in the trash. You can give your jewelry a second life using a little imagination and simple means.
- We take the old hoop, remove the old fabric and decorative elements from it.
- To hide the ends of the headband, glue small pieces of lace onto them. We secure the remaining part of the lace ribbon with a clip and wrap it around the headband along its entire length. It is necessary to leave allowances of 1 cm at both ends for gluing to the inside of the hoop.
- The central detail in the headband will be a guipure ribbon, from which you need to weave a braid. To do this, fold the ribbon in half, tying a small bow in the center.
- Pressing the knot with your finger, pull the right ribbon so that one side of the bow unravels. From the same end we will form a loop and pass it through the remaining side of the bow. Repeating this sequence with the left side of the ribbon, we get a pigtail with a length corresponding to the headband.
- Glue the braid over the lace onto the hoop, decorate with single beads, pearl thread or flowers. That's it, the hair crown is ready!
We recommend reading: How to draw a hut on chicken legs
Head decoration made of small flowers
Such a simple and elegant decoration can serve as a crown at an autumn ball. It’s quite easy to create such an accessory with your own hands. We will need a rim again, but this time a thin, wire one. Our crown will be made from orchid flowers, barberry berries and willow branches. The picture shows a sample made from artificial flowers. You can create your headdress in the same way or decorate it with live plants. We select flowers and berries in the same color scheme. If you are making a craft from artificial material, then it will be quite easy to paint it.
Let's start production. Glue flowers to the headband. There are large ones in the center, and small ones on the sides. The remaining space needs to be filled with willow branches, to the ends of which we will tie berries with wire. The weave can be chaotic and asymmetrical. The main thing is that in the end the flowers and berries are distributed evenly.
How to make a Greek headband with your own hands?
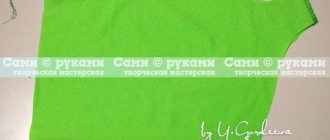
What you will need: an unnecessary T-shirt, sharp scissors, thread to match the color of the T-shirt, a sewing needle.
Since we are looking at the most budget-friendly options, we offer the simplest one: you don’t even need to go to the store. Our main tool is an unnecessary old T-shirt that you don’t mind. As a result, we will get a comfortable elastic band that can be used for Greek-style hairstyles. So let's get started:
- We start from the bottom of the T-shirt. We need to cut from three to five ribbons from it. It is important that the ribbons are the same length.
- We sew all five ribbons at the base; it is advisable, of course, that the threads match the color of your T-shirt. Next, a simple classic braid is braided from five ribbons.
- Once the braid ends, sew the ends together. Then we connect the stitched ends on both sides to make a headband-bandage.
- Our accessory is almost ready, all that remains is to hide the seams. You can use the same T-shirt for this. We suggest cutting out a small rectangular piece and carefully covering the place where the ends are held together. By the way, tapes for such a rim can also be bought in specialized stores.
Crown of maple leaves
This is a rather non-trivial way to make a headdress. Our autumn crown will consist of a cardboard rim, maple leaves and gold beads. The first step is to prepare the material. We dry the leaves and make a cardboard rim 4 cm wide. First we glue the front row of leaves. We bend the rim and secure them with a glue gun. Thus, the cardboard strip was surrounded on both sides by leaves. Next we glue the second row. Now we fix the leaves on the back side of the rim. Thus, we make the “wrong side” beautiful. The final touch is gluing the gold beads. It is advisable not to attach them along the entire perimeter of the crown; it is better to place such emphasis on the front part.
Crown hat
Children simply adore this headdress. It replaces summer wreaths with them. Even a child can make a crown for an autumn ball from maple leaves. We will tell you two methods for making it. The first method is similar to weaving dandelion wreaths. Only here, instead of flower stems, we will bend and add branches of leaves.
The second method is more time-consuming. For such a crown you will have to make a cardboard base in the form of a circle. We will tie ribbons to its ends, which will make it easy to take off and put on the headdress. The maple leaves will need to be ironed and dried first. And then, using a glue gun, fix it on a paper rim. It is advisable to make the crown magnificent. Therefore, you need to glue the leaves not in one, but in at least two rows.
Wreath-candlestick to create the mood
A beautiful wreath-candlestick will create a soulful atmosphere in the melancholy autumn season. You will need an armful of maple leaves, a cardboard circle, acrylic paint, a wide candle, floral wire and various decorative decorations (artificial pumpkins, bunches of rowan berries, spruce branches).
Glue a short tin can turned upside down into the center of the circle. We wrap it in corrugated paper and decorate it with burlap roses and other beautiful flowers. We divide the base of the rim into four parts and thread soft wire through these places. We wrap a large bunch of leaves and add decorative items.
Gothic crown
This headdress looks quite intimidating. But some girls achieve exactly this effect. It’s very easy to make an autumn crown with your own hands in this style. We will need thick wire, branches, electrical tape, paint, chains, beads and autumn leaves. Let's start manufacturing. First, let's twist the wire into a headband. Then we wrap it with a branch. For this purpose, you can use soft and pliable willow twigs. Now, using electrical tape, we attach the branches to the crown. These can be branched branches of an apple tree or rowan tree. When everything is ready, paint our headdress black. It is advisable to use spray paint for this purpose. This will ensure that the color pigment is evenly distributed. After the crown has dried, attach chains and beads to it. You can repeat the option from our sample, where one bead is in the middle, above the forehead, and the other two are located in the area of the ears, or you can come up with your own version of the decor. The final step is to string dried leaves onto the crown.
Kanzashi
Japan is considered the birthplace of the art of making flower arrangements from satin, organza, and silk. To make it you will need a minimum of tools: scissors, transparent glue, thread, ribbon, rhinestones.
By following the instructions on how to make headbands with flowers in the “kanzashi” style, you can get an original accessory:
- Squares of arbitrary size are cut from the tape - the basis for creating petals. I make sure to burn the cuts over the flame of a lighter.
- By bending the squares diagonally several times, you get triangles. To get a sharp petal, the edges of the triangles are closed to each other, fixing the joint with glue.
- Several petals are collected into an inflorescence, sewing them together. A decorative button, rhinestones, and stones are installed in the center. The finished element is glued onto the hoop.