Let's make an openwork lace crown: tips for craftswomen
A crown made of openwork lace will look very beautiful and impressive. This royal crown is very easy and quick to make. Even a novice craftswoman can handle this process.
For work, prepare all the necessary materials and tools:
- lace ribbon of the required length (depending on the circumference of your child’s head);
- starch or special spray to stiffen your royal crown;
- acrylic paints;
- sharp scissors;
- needle and thread;
- glue "Moment";
- brush;
- three-liter glass jar;
- decorative elements: beads, rhinestones, seed beads, sequins and much more.
First, cut the openwork lace to the length you need and roll this strip into a circle. Stitch very carefully so that the threads are not visible on your crown. After you have sewn the frame of the product, you should starch it well. After this, straighten your crown and put it on a three-liter glass jar. Leave your structure in this position until it dries completely.
After the entire crown structure has dried, begin painting it with a brush and paint. The paint can be applied only to the edges of the crown or to its entire surface.
When the paint is completely dry, use glue to attach beads, rhinestones, sequins, stones or beads to the crown.
Your lace lace crown is ready.
Disassembling the chair
The first step was to disassemble the chair. First of all, I wanted to get rid of the old fabric, which was completely covered in water stains. I quickly wanted to give this cute chair a second life. Even a boring office chair can be turned into something unique and unusual if you just want to.
As you can see in the photo above, the upholstery was attached to the chair simply with an incredible amount of paper clips. They weren't really that hard to take off. Just a little tiring. All you have to do is pry them up with a small flathead screwdriver and then pull them out with a pair of pliers. But there is also a special tool with which you can easily and quickly remove paper clips. If you have it, then you can use it. It just doesn't make sense to buy this tool and spend money just for one use.
Crown for the snow queen for carnival
At the New Year's carnival celebration, girls often play the role of a snowflake or snow queen. If for the first case it is not difficult to choose an outfit, then in the latter case the problem of finding an appropriate headdress may arise. Unfortunately, a beautiful crown for the snow queen is rarely found in stores. Therefore, you usually have to make it yourself.
Quick option
Advice! It is quite possible to make a crown faster if you do not cut out each tooth of the product separately, but use the continuous pattern technique.
To do this you should prepare:
- cardboard;
- fabric packaging for flowers;
- scissors;
- elastic band;
- silver braid;
- silver paper;
- threads;
- glue;
- sequins in the shape of snowflakes.
Read this: Wall Note Board: Functional Decor
A crown template is drawn on cardboard. The workpiece is cut out. The pattern is placed on the fabric and traced taking into account the allowances.
The fabric part needs to be cut out, then placed on a cardboard mockup. The allowances are folded over to the reverse side and glued to the cardboard.
Glue is applied to the underside of the workpiece, after which the crown is glued onto silver paper. This hides unsightly allowances on the back of the product.
The crown is carefully cut out. The product is decorated with large sequins in the shape of snowflakes.
The outline of the crown is framed with silver braid. Depending on the quality of the braid, you can glue it with hot glue or sew it on yourself.
The crown is ready. If the holiday is just around the corner and you urgently need to acquire a “snow” crown, then you can try a simplified version – a product made from cardboard. To prevent the crown from looking like a “hurried craft,” it is advisable to replace the cardboard with a piece of light wallpaper with a pattern.
A model of the crown is drawn on it. The template needs to be cut out.
Then the workpiece is painted with silver spray paint. Since the aerosol tends to be sprayed in all directions, it is recommended to provide for this moment and carry out painting in the corridor, having previously covered the floor with newspaper or polyethylene.
First you should paint the back of the product. On the front side you need to carry out two stages of staining. After applying the first layer, you need to dry the product and repeat the coloring.
The final step is to sew a wide elastic band along the edges of the product. You need to measure the elastic so that the crown fits tightly around your head.
The carnival headdress is ready to delight its owner. Any proposed master class will allow you to create an accessory not only for a child, but also for an adult. This is especially true for kindergarten teachers and directors of theater clubs.
We post the best photos
During the first year of a child’s life, a lot of touching photographs accumulate: the baby’s first meeting in the maternity hospital, the first smile, a favorite toy, the first tooth, the first steps, and so on - they can be hung on the wall on the first birthday. Make a photo collage or a funny wall newspaper from the photos so that guests can see firsthand how quickly the baby has grown during this time.
How to draw a crown step by step
- Step one. We draw a horizontal rectangle on a piece of paper - this is the base.
- Step two. Add two curved lines in the middle and above the shape.
- Step three. Let's draw five triangles across the top line to the middle. At the tops of the figures there are circles (these are future precious stones). They can also be depicted on the very basis of our crown.
- Step four. Let's draw the contours. Erase all unnecessary sketch lines!
- Step five. We paint our royal (or princess) headdress: the body is gold, the stones are red, blue, green (rubies, sapphires, emeralds). Ready!
Now you know how to draw a crown. You can also cut it out and attach it to your child’s head. But to do this, you initially need to take a large sheet of paper so that it is well secured around. You can also decorate the headdress with beads, gluing them around the perimeter, or with New Year's rain. This makes an excellent fancy dress costume for little princesses.
Similar attractions
Hotel Transylvania Game labyrinth
- Height: 90-150 cm
- Age: from 2 years
- Weight: up to 80 kg
More details
The Lost World of Dinosaurs The Enchanted Web
- Height: 90-150 cm
- Age: from 2 years
- Weight: up to 80 kg
More details
Smurf Village Trampoline and foam pit
- Height: 90-150 cm
- Age: from 2 years
- Weight: up to 80 kg
More details
Hotel Transylvania Game labyrinth
- Height: 90-150 cm
- Age: from 2 years
- Weight: up to 80 kg
More details
View all attractions
Did you like the attraction? Share with your friends!
Subscribe to news and special offers!
We will inform you about park news and invite you to the best events!
consent to the processing of personal data
How to beautifully draw the Snow Queen with a pencil step by step for children?
Let's make the contours of the Snow Queen's face. Her face should be clearly defined.
- Let's draw her a straight nose, expressive large eyes and a closed, emotionless mouth, eyebrows slightly shifted towards the bridge of her nose.
- We won’t draw the queen’s hair: she will have a crown on her head that covers her hair.
- The crown can be drawn in different ways as you like.
Portrait of the Snow Queen in pencil: stage 2.
Portrait of the Snow Queen in pencil: stage 3.
Portrait of the Snow Queen in pencil: stage 1.
Portrait of the Snow Queen in pencil: stage 5.
Portrait of the Snow Queen in pencil.
Next we will draw the Snow Queen in full growth, so she will look more representative and impressive. She should have a floor-length fur coat, on which snowflakes and diamond pieces of ice sparkle. Let's also make her a fur trim from white fur.
Full-length Snow Queen: stage 1.
Full-length Snow Queen: stage 2.
Full-length Snow Queen: stage 3.
Snow Queen in full growth
We post the best photos
During the first year of a child’s life, a lot of touching photographs accumulate: the baby’s first meeting in the maternity hospital, the first smile, a favorite toy, the first tooth, the first steps, and so on - they can be hung on the wall on the first birthday. Make a photo collage or a funny wall newspaper from the photos so that guests can see firsthand how quickly the baby has grown during this time.
Icy Splendor
This decoration turns out to be truly royal. Here are the step-by-step instructions:
- We make teeth. For the base we take PVC film or a thin plastic sheet (unnecessary covers for documents). We make the central element relatively high, and all the side ones are slightly lower than the previous one. As a result, there are 7 of them.
- We glue fabric with a silver pattern onto these teeth.
- We reinforce the edges with wire to keep the structure straight. This can be achieved by sewing the frame with a wrap stitch.
- We glue it with beads and rhinestones.
- We decorate the outline with pebbles.
- Several more opaque teeth should be assembled using the same type. This solution allows you to achieve a 3D effect.
- We measure the circumference of the child's head - this will be the length of the strip. Add 1 cm to the gluing.
- We hook the first triangles onto an elastic strip.
- We add additional details along the back surface. For convenience, sewing pins are used.
In what interiors should it be used?
The throne chair is a special piece of furniture, so it is not suitable for modern interiors based on a minimalist concept, clear geometry or thin lines. The throne chair will have a harmonious appearance in the following styles:
- Rococo, Baroque, Renaissance. All those styles that are characterized by high arches, an abundance of curls, carved details, solemnity and grandeur.
- Eternal classic. A low chair with rounded shapes and a restrained color scheme is suitable for this style. It is better to reduce the number of bends, curls, and carved elements.
- Classicism, neoclassicism. An elegant interior that uses symmetry, light colors, and regular shapes as a basis. Here, the lush decoration should look harmonious, otherwise you can achieve the opposite effect - pomposity and facelessness.
- Gothic style. High thrones with a minimal amount of upholstery and simple wood trim look organic here. No artificial aging, gold or silver plating. Rough simplicity and clarity of forms are welcomed. Treatment with glossy varnish will give the furniture an impressive appearance.
- Colonial style. In this case, the royal seat should look as heavy as possible. The high back and an abundance of wooden carved elements will add bulkiness. The wood is treated with dark varnishes, less often with shades of dark red. Finishing should take a back seat, with the high cost of drapery coming first.
Interior design in the above styles should only be done in spacious rooms, with high arches and good natural light. A low ceiling and a small room will distort the idea of grandeur and make the decor awkward and cumbersome. The ideal option would be a living room or dining room in a private home, where a large number of people can be present at the same time, but the room will not look crowded.
In an apartment, you can decorate a living room in one of the specified styles by connecting two or more rooms. For example, they often combine the kitchen and living room, delimiting the space with the help of furniture. Skillfully selected decor and colors will help avoid the feeling of bulkiness, and the presence of mirrors will visually expand the space. An interesting decoration for a boudoir bedroom would be a light-colored throne chair with a low back and a medium number of curls. Men welcome the placement of such furniture in their personal office. In such cases, the upholstery is made of leather, and the chair itself contains a minimum of carved elements.
Gothic style Classic Classicism Colonial style Rococo
DIY foamiran crown
It’s easy to create incredible low openwork tiara crowns from foamiran. A wide range of colors will definitely allow you to choose the most suitable one. Silver and shiny are suitable for the role of the ruler of winter. The raw materials are dense, high quality, and easy to process.
Popular articles Cute flowers - petals
The process of creating such beauty is very simple. A pattern will be needed. You can simply draw it or print a diagram. Then cut and apply the shape directly to the raw material. Then, using thin-tipped scissors, carefully make a shape.
As a fastener, you can take a rim or bend it yourself from copper. If the second option is chosen, then the metal should be disguised by wrapping it with satin ribbon or bright wrapping. The length depends on the size of the child's head.
We fasten the parts with glue or “put them on a gun”. When it dries it's time to start decorating. We cover the edges with braid and jewelry. We attach large glass or beads to the main element. This will become a colorful accent. Adding a few small details.
The charming crown for the girl is ready!
Don't throw away old discs
You can make a wonderful DIY crown for the Snow Queen from old CDs. They need to be cut into small pieces of arbitrary shape and size, and then glued onto a wire base in the form of a wreath. To secure the CD pieces, you can use double-sided tape, fabric adhesive tape, or a glue gun (this is the most reliable option).
After decorating the base, you need to take care of comfort, because you may have to wear the costume throughout the New Year celebration. To prevent the hard wire from rubbing your forehead or clinging to your hair, you need to attach a strip of soft fabric to the inside of such a wreath, placing it on glue or tape. It is important that the color of this fabric is neutral so as not to stand out if suddenly a piece of it is visible.
Of course, to understand how to make a crown for the Snow Queen from a CD with your own hands, the video shows best, but by turning on your imagination, you can imagine what the final result will look like.
Ice accessory
This crown has a “candy” effect due to the use of non-standard material.
To work on the product you will need:
- transparent PVC film or plastic (you can take old document covers);
- tulle with silver pattern;
- cardboard;
- shiny fabric (silver look);
- thread, needle;
- scissors;
- thin wire;
- silver braid;
- elastic band 2 cm wide;
- hot glue;
- decorative elements (for decoration).
First of all, the circumference of the head is measured. Based on the obtained measurement, you need to calculate the width of the base of the vertices of the future crown. There are seven of them in the product.
The height of the triangles is selected individually. You just need to take into account that the central triangle will be the highest. The parts adjacent to the central part are cut 2 cm shorter than the main part. The next two triangles are 2 cm lower than the previous ones, etc. Based on the principle described above, 7 triangles are cut out of PVC film. The same parts are cut out separately from tulle.
A corresponding tulle detail is applied to each workpiece. A wire is sewn along the edge of the blanks using an overcast stitch. All triangles are framed with silver braid. It is advisable to bend the figures slightly so that they hold their shape better. The finished transparent parts are assembled with elastic. The most convenient way to do this is on a sewing machine. The ends of the product are connected into a ring.
To create a volumetric effect, you need to complement the crown with opaque elements. To do this, two triangles are cut out of cardboard. Since these parts will be located on the front of the crown, their height should be slightly lower than the transparent triangles.
Cardboard blanks are covered with shiny fabric and secured with safety pins to the front “ice pieces” of the crown, as in the photo.
Dense and transparent parts are attached to each other. All that remains is to decorate the crown to your own taste. You can use rhinestones, beads, sequins, and lace elements in your work.
The royal ice accessory is ready.
Throne for a winter tale
You can use a dining room or children's chair as a base.
We cut out 3 pieces from thick material, cardboard, plywood or plastic to cover the chair legs in front and on the sides. You also need to prepare a blank for decorating the back.
It turns out very beautifully when the back of the chair is high with sharp spikes.
We cover all bases with patterned material or wallpaper. We attach everything to the chair with a regular construction stapler.
You can decorate to your taste.
Quick option
To do this you should prepare:
- cardboard;
- fabric packaging for flowers;
- scissors;
- elastic band;
- silver braid;
- silver paper;
- threads;
- glue;
- sequins in the shape of snowflakes.
A crown template is drawn on cardboard. The workpiece is cut out. The pattern is placed on the fabric and traced taking into account the allowances.
The fabric part needs to be cut out, then placed on a cardboard mockup. The allowances are folded over to the reverse side and glued to the cardboard.
Glue is applied to the underside of the workpiece, after which the crown is glued onto silver paper. This hides unsightly allowances on the back of the product.
The crown is carefully cut out. The product is decorated with large sequins in the shape of snowflakes.
The outline of the crown is framed with silver braid. Depending on the quality of the braid, you can glue it with hot glue or sew it on yourself.
All that remains is to try on the crown and calculate the length of the elastic band on your head. The elastic is sewn along two edges of the product.
The crown is ready. If the holiday is just around the corner and you urgently need to acquire a “snow” crown, then you can try a simplified version – a product made from cardboard. To prevent the crown from looking like a “hurried craft,” it is advisable to replace the cardboard with a piece of light wallpaper with a pattern.
A model of the crown is drawn on it. The template needs to be cut out.
Then the workpiece is painted with silver spray paint. Since the aerosol tends to be sprayed in all directions, it is recommended to provide for this moment and carry out painting in the corridor, having previously covered the floor with newspaper or polyethylene.
First you should paint the back of the product. On the front side you need to carry out two stages of staining. After applying the first layer, you need to dry the product and repeat the coloring.
When the crown has completely dried, you can begin decorating it. The edges of the product are decorated with edging with rhinestones or any silver braid. The crown is decorated with additional elements corresponding to the theme of the carnival costume.
The final step is to sew a wide elastic band along the edges of the product. You need to measure the elastic so that the crown fits tightly around your head.
The carnival headdress is ready to delight its owner. Any proposed master class will allow you to create an accessory not only for a child, but also for an adult. This is especially true for kindergarten teachers and directors of theater clubs.
Wire base
Strong wire can be an excellent basis for a royal headdress. Moreover, there are many options here too.
You can stretch white fabric over the frame, having previously embroidered winter patterns on it with beads. Instead of fabric, you can use mesh or guipure, which will be beautiful in itself. You can sew or stick on them decorations made of glass beads, beads, rhinestones, or simply cut out shiny snowflakes.
Basic rules for creating a wire crown:
- the frame should not rub the scalp,
- Do not overload the craft with heavy elements,
- carefully hide the ends of the wire.
If it doesn’t occur to you what a DIY crown for the Snow Queen should look like, the photo will tell you. Although it is the Snow Queen’s costume that provides scope for creativity. After all, here you can create not just a beautiful outfit, but also make it unique with the help of jewelry. If you want something completely exclusive, you can make a design in the form of your initials, cutting them out or embroidering them.
Vladislava Shcherbakova
Back
DIY box for a gift for any occasion
MORE
Lilies from napkins
We will be glad to hear your opinion
Leave a review Cancel
- Popular
- Comments
Master class on polymer clay using bright beads as an example
Miscellaneous
Angry Birds made from plasticine
Miscellaneous
A train made from plastic bottles as an original decoration for a garden or cottage
Miscellaneous
How to make cool slime from regular soda
What to make from
DIY snowflake crown step by step instructions
The image of a winter miracle is quite easy to convey. Ball gown and fluffy tiara. It is better to make the accessory yourself, so you guarantee originality and unsurpassedness.
Required:
- Scissors
- Gypsy needle
- White rain with short spines (approximately 3 m)
- 1.5-2 m copper wire
- Threads in the color of rain
Light or transparent hairband.
First, we create the frame of the future tiara from wire. It should look like the letter "P" with three long arms that end in three short antennae.
Let's turn everything into rain
It is important that it does not jam; Bald patches will appear. Use a semicircular needle to release the snowball if necessary.
We screw everything to the hoop. If the rim is not very beautiful, you can decorate it with rhinestones or a suitable ribbon.
Crown for the Snow Queen
Among girls, such characters as the snow queen, snowflakes or princesses always remain popular.
However, after the release of the animated film “Frozen” on the big screens, almost all the girls wanted to feel like the mistresses of snow, frost and ice.
A hand-made crown for the majestic and formidable Snow Queen will be an excellent and bright addition to the fairy-tale image of your little ice queen.
Let's look at a quick and easy way to make a crown for the snow queen
The simplest crown for an interesting snow queen character is made with your own hands from a minimal set of materials and tools. To work on the snow crown you will need the following equipment and materials:
- ready-made plastic snowflakes, generously covered with bright sparkles;
- a strip of white fabric measuring approximately sixty by eight centimeters;
- elastic band two centimeters wide, approximately sixty centimeters long;
- sharp scissors;
- white threads;
- a sewing machine, if you don’t have one, you can sew by hand;
- glue gun or clear craft glue;
The work must be very careful, so you may need a three- or two-liter jar (depending on the size of the planned crown, which is definitely needed for the snow queen - large or small). It will be convenient to put jewelry on it and calmly work with a needle or glue.
To begin, apply the elastic band to the head so that it fits snugly to the limb, but does not cause discomfort. Cut off the required amount. Then measure the circumference of your head and make a strip of fabric of the required length.
Sew it into a tube of such a size that the elastic fits evenly in it. Don't make the common mistake of cutting the fabric as much as the elastic, because it will stretch.
Glue snowflakes around the circumference, taking into account the future tension of the fabric.
A beautiful and simple DIY crown is ready.
To work you will need the following materials and tools:
- copper wire of thin and medium thickness;
- pliers;
- various shades of beads;
- ruler.
Take a ruler and measure how big the teeth on your royal crown will be. Cut the wire to a length of twenty-five centimeters. In order for the frame of the crown to be strong enough, it is necessary to make it from wire folded in three times, and do not forget to twist another layer of copper wire on top.
You now have a large wire ring. Divide the completed frame into eight equal parts. Select the locations on the copper wire where the bases of the teeth will be attached. Beads must be secured to the peaks of the crown. Large beads are suitable for this task.
They can also be secured using thin copper wire - the wire is threaded through the bead and secured to the peak.
Popular articles Miracle cake made from diapers
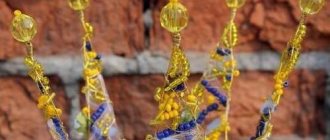
For work, prepare all the necessary materials and tools:
- lace ribbon of the required length (depending on the circumference of your child’s head);
- starch or special spray to stiffen your royal crown;
- acrylic paints;
- sharp scissors;
- needle and thread;
- glue "Moment";
- brush;
- three-liter glass jar;
- decorative elements: beads, rhinestones, seed beads, sequins and much more.
First, cut the openwork lace to the length you need and roll this strip into a circle. Stitch very carefully so that the threads are not visible on your crown. After you have sewn the frame of the product, you should starch it well. After this, straighten your crown and put it on a three-liter glass jar. Leave your structure in this position until it dries completely.
After the entire crown structure has dried, begin painting it with a brush and paint. The paint can be applied only to the edges of the crown or to its entire surface.
When the paint is completely dry, use glue to attach beads, rhinestones, sequins, stones or beads to the crown.
Your lace lace crown is ready.
A selection of videos on the topic of the article
In conclusion, we present to your attention a small selection of videos on the topic described in the proposed article. We hope that after viewing this material it will be much easier for you to make your own crown for the snow queen.
Progress of the first lesson:
1.1 Organizational moment. Before the start of the lesson, students take their seats. Each student who comes to class prepares a workplace. Greeting children. Announcing the topic and purpose of the lesson. The topic of the lesson is “Illustration for a fairy tale. "The Snow Queen"
.
1.2 Introduction to the topic. Repetition of covered material.
Teacher: “Let us remember the fairy tale by H. H. Andersen “The Snow Queen.” Remember how in the evening just before going to bed, Kai wanted to take another look at the snowy street. “White snowflakes were swirling outside the window. One snowflake fell on the edge of a flower pot and began to grow quickly before Kai’s eyes. She grew and grew, and Kai suddenly saw that a dazzling beauty was standing in front of him.” Who was that?
Students: The Snow Queen.
Teacher: The Snow Queen is the main character of the fairy tale. We have already prepared sketches of our illustration for the fairy tale, the main figure of which is the Snow Queen. The image of the Snow Queen can be drawn based on a human figure. It is customary to take the head of the person depicted as the unit of measurement for the human body. It all depends on the age and development of the human body (Appendix 1)
.
How many “heads”
are there in a woman’s figure?
Students: Answer options.
Teacher: Correct. In a female figure and a short adult, the head fits into the body 7 times. In small children, the head fits into the body 5 or 6 times. Before drawing a person, you need to outline his dimensions, his frame.
Teacher: Guys, check how many “goals”
fits into the figure you drew?
(check with the template prepared in the last lesson)
Elsa's crown from Frozen
After the release of this Disney cartoon, almost all the girls fell in love with the incredible sorceress Elsa. That is why on New Year's Day charmed little girls choose her heroine as a role model. But what is a princess without a crown?
The easiest way is to download a ready-made crown template from paper, cut it out and glue it according to the diagram. It's easy to find all the information you need on the Internet. Then decorate with different sparkles or glue glass.
For crafts, you can also use foamiran, cardboard or plastic. The decoration will be stronger and more expensive in appearance. This raw material holds its shape better.
Frame kokoshniks
An original kokoshnik hat in the shape of a green spruce is an excellent themed accessory for celebrating the New Year. Extravagant, stylish and to the point!
You can make a kokoshnik professionally according to the following scheme: make a frame from wire, cover it with a base fabric, glue brocade to it using paper clips, decorate the kokoshnik with pearl thread, sparkles, rhinestones and bugles, and tulle.
You can combine a frame kokoshnik with a cardboard one. Make carved designs in cardboard and glue translucent fabric over it. Decorate to your liking and the kokoshnik is ready!
And this kokoshnik would look great on the head of Nastenka, the heroine of the fairy tale “Morozko”.
We make a real costume for the Snow Queen from a wire base and fabric decor. We decorate the outfit in the same style. The stand-up collar with large “cold” decorations is especially chic.
Source
DIY crowns
A crown is a chic head decoration. It emphasizes the image, adds effectiveness and, of course, gives a feeling of triumph. Factory crowns are undoubtedly luxurious, but you want to make such an attribute exclusive, unique and unique. In this article we will look at: how to make a crown with your own hands.
Shiny Crown
You will need: shiny cardboard in purple, cherry and white colors, a crown template, scissors, a stationery knife, PVA glue, a glue gun, a simple pencil, a hairband, decorative elements - lace, shining stones, rhinestones, flowers of different shades, stamens, leaves ...
Master Class
- Draw or print the crown template on A4 sheet, then cut it out.
- Transfer the template to glittery purple cardstock, then cut out the crown blank.
- Cut out circles of glitter cardstock and glue them to the stones as shown in the image.
- Glue the lace to the bottom of the crown.
- Glue rhinestones to the openwork top of the crown.
- Glue a row of flowers onto the lace, alternating them by color.
- Glue the stamens and leaves next to the flowers.
- Glue sparkling stones to the center of the crown.
- Glue the crown to the headband.
The shiny crown is ready! conveys the incredibly sparkling brilliance of the shining crown.
Luxury crown
You will need: wooden board, soldering iron, 2 medical clamps, rosin, soldering flux and fat, lead-free solder, soldering iron cleaning sponge, glue gun, instant glue, gloves, wire, dishwashing liquid, towel, headband, filigree, combs , metal ovals, decorative elements - crystals, Swarovski stones, beads of various colors and sizes.
Crown on the rim
You will need: shiny pink foamiran, white felt, tulle, crown template, wooden skewer, scissors, glue gun, Moment-Crystal glue, superglue, ruler, white threads, needle, headband, pieces of textile elastic, 7 rhinestones.
Lace crown
You will need: wide lace ribbons, scissors, a centimeter, PVA glue, a glue gun, spray cream, gloves, wax paper or film, a glass, rhinestones and crystals, glitter.
Wooden crown
You will need: a thin wooden board, a pencil, a knife, paper clips, a bucket and a saucepan, hot water, glue.
Crown made of beads and wire
You will need: thick and thin wire, 8 large beads, beads of different colors and sizes, ruler, pliers.
Edible crown
You will need: chewing paste or sweet dough, rolling pin, knife, ruler, sheet of paper, pencil, jar, baking paper, pastry spray paint, pastry glitter.
Royal crown
You will need: foam board, stationery knife, corrugated paper or newspaper, red velvet, beautiful fabric, candy, double-sided tape, decorative ribbons, needles, beads, foam plastic, threads, glue gun, skewers, cross, decorative stones.
We upholster the chair
I've never completely covered a chair with fabric before. To be honest, the unknown was a little scary, and I was also afraid of ruining the material. But curiosity and interest eclipsed all my fears, and I began the work process. But before doing this, I spent the whole evening studying various videos on how to do this correctly in order to have at least a general idea in theory. The next morning the practical part awaited me, and I was ready for it.
And I finally understand why people use too many staples when they upholster furniture. If anyone brings a huge magnet within 100 meters of this chair, it will fly across the room.
After a lot of work and using an incredible amount of paper clips, I stopped my work a little to admire the turquoise velvet that I so carefully selected for this master class. Although the chair was not finished yet, I already really liked it at that time.
DIY paper crown
A paper crown is a budget and lightweight option. There are many ways to bring it to life.
First. To make it, you will need non-adhesive colored square stickers, sold at any stationery store, as well as glue for fixation.
Instructions:
1 step. Fold the square of paper in half diagonally, fixing the upper corners with glue. We make the required number of blanks, depending on the size of the head.
Step 2. We insert one piece into the other approximately until the middle and fix it with glue until we reach the end.
For the second method you will need a stencil, scissors and materials for decoration. It's simple: cut out the stencil, glue the ends if necessary and decorate the top. If you cannot connect with glue, you can use a stapler to fix the thread at the edges.
The third method allows you to create a real masterpiece. To make it, we will use the technique of twisting strips of paper - quilling.
Tools:
- scissors;
- quilling paper - strips;
- pencil;
- ruler;
- glue.
Instructions:
- We measure the circumference of the head and cut out a strip of cardboard. For now, let's put it aside and take the strips for quilling. If you don’t have ready-made ones, you can simply make them at home: draw colored sheets into strips of equal width and cut them. If the desired color is not available, but you want it, take white and use paints, markers or a color printer to give it different shades.
- We make the main element: tightly wind the strip onto an awl or needle. Then you can give the resulting spiral any shape by simultaneously pressing different corners: triangle, square, eye, arrow, etc. Fix the end of the tape with glue.
- We make a lot of such elements. Volumetric parts are pulled out and coated well with glue from the inside. It will take some time to dry.
- Let's form a pattern by connecting and fixing the pieces together. It can be like a chaotic drawing, there is also an ornament thought out in advance: a flower, lines, stars.
- Once the top is ready, cut out a strip of cardboard for the base and glue the resulting base to it.
- We place the remaining blanks in the free spaces.
- Give the product time to dry.
The royal symbol using quilling technique will look like jewelry work
It is important to fix all the parts inside and among themselves so that the structure does not collapse. If connected correctly, the decoration will last a long time
Tools and materials
So, in order to make a wooden chair yourself, you need to prepare a number of tools and materials. If we talk about tools, we should name:
- plane;
- Circular Saw;
- drill;
- screwdriver;
- wood hacksaw;
- milling cutter;
- roulette;
- pencil;
- clamps.
If we talk about materials, then you will need to have on hand:
- screws;
- furniture glue;
- sandpaper;
- stain or drying oil;
- masking tape;
- cardboard for stencil;
- dowel or lumber.
Here it should be understood that the choice of wood and the final processing technique will determine the ability of the chair to cope with the effects of natural factors, its stability, reliability and ability to withstand physical stress. For some reason, many people choose chipboard to create a chair, although this material is completely unsuitable for chairs. And especially for garden-type models. The reason is simple - extremely low resistance to moisture. And the strength of chipboard models will be lower than that of solid wood or timber models.
But natural wood, although not the most affordable material, is environmentally friendly and completely harmless. It will be the best solution if you want to make homemade chairs with your own hands. Before starting work, you should inspect the boards and bars for defects - cracks and knots. After this, the material is polished, protective materials are applied to it, and assembly is performed. If we talk about wood, then it would be best to take alder, ash, birch, and oak for such purposes.
There are two reasons here. The first is the presence of an unusual fiber pattern. The second is the high wear resistance of a product made from these materials. And the durability of such products will be high. The only drawback will be deformation under the influence of moisture and low resistance to fire. And one more important point that should also be prepared is drawings and diagrams. This issue should be decided when it is already known what material the furniture will be made from. There are several options to solve this problem:
- make a drawing with your own hand, which will indicate the dimensions and features of this chair;
- do it on a computer;
- download the finished version on one of the specialized sites.
Which option is better to choose will depend on your drawing and computer skills.