Furniture made from cardboard is a good way to turn unnecessary material into very original, beautiful furniture. Its appearance is practically no different from ordinary furniture, and cost is extremely low.
If you still have unnecessary boxes from under the refrigerator or TV, then you will only on glue and paint.
Owners of such furniture claim that it is not much different from furniture made from traditional materials. So let's figure out what advantages and disadvantages cardboard furniture has, as well as how to make it yourself .
Shelves made of cardboard boxes
Advantages
The main advantages of cardboard furniture include the following:
- Low cost;
- Originality;
- Ease of use and movement;
- Possibility of creativity.
We have already talked about the cost of such furniture; you need to spend money on glue and paint.
Cardboard furniture is not glued together, but secured with special plastic clips. It is easy to disassemble if it is necessary to replace any individual part or make a rearrangement .
To summarize, we can say that such furniture is ideal for a children's room . Firstly , it is very cheap, so you don’t have to worry about it being damaged. Secondly , it can be done together with the child, thus developing his imagination. You can even make a baby chair and use it as a high chair.
Flaws
Disadvantages include lower strength of the material. But this does not mean that the furniture will be fragile and unreliable!
Of course, it is not intended for heavy loads, but you do n’t have to be afraid to put various accessories and books on a cardboard shelf, just like on any other bookshelf.
Cons of cardboard furniture
It is not recommended to place DIY cardboard wall shelves in bathrooms and toilets, on open verandas and balconies. These are rooms with a high probability of steam and dampness. Cardboard can swell and become deformed from moisture, which will lead the furniture to a deplorable state.
The weight of the shelves can sag downward, so you have to strengthen them by adding several layers of corrugated cardboard to gain rigidity.
Since corrugated cardboard is highly flammable, it is necessary to protect products from fire by placing furniture away from the stove or fireplaces.
DIY cardboard shelf
Materials
To make a cardboard shelf you will need:
- Cardboard . The most important role in making furniture from cardboard yourself is played by the thickness of the material. The larger it is, the stronger the furniture will be. It is believed that the density depends on the color of the cardboard. The darker the material, the denser it is. But don’t rush to throw away thin material! It is often used for gluing joints. In addition, such material can be glued together to form durable, thick cardboard. If you do this, keep in mind that the waves of each new layer should lie perpendicular to the previous one;
- Glue . Necessary material for gluing cardboard furniture. You can use any type of glue, but the most preferable is “Moment” . When using it, the cardboard does not get wet;
- Tool . To cut parts, you need a stationery knife or jigsaw. The sharper the tool, the more accurate the cutting will be, so blades and files need to be changed as often as possible. Using a jigsaw will make it possible to cut several layers of cardboard. To dry the glue faster, you can use a regular or hair dryer .
Here you can learn how to make shelves in the garage.
For finishing
It's all up to your taste, you can use:
- Dye;
- Kraft paper;
- Self-adhesive;
- Remains of wallpaper;
- Other materials.
At this stage there are no strict rules - how you see the furniture is how you decorate it. Kraft paper and wallpaper are usually used to cover the joints and edges, and sometimes the entire surface of the shelves.
Description of work stages
As an example , we will look at a cardboard shelving unit . It will fit perfectly into your interior, and you can use it to store books, photo frames and similar things.
- Choose cardboard . Five-layer is ideal, it is durable and easy to handle;
- Then you need to cut the parts. With 3 sections there should be 4 , with two - 8 , with one - 2 . The height of the part with 3 sections corresponds to the height of the shelf. The height of the remaining parts is determined as follows: the convex part is the width of the shelf, the cut is the thickness. Draw the layout of the parts with a pencil or pen;
- Using a utility knife, cut out the pieces ;
- Now you need to cut strips of cardboard that will add volume to the shelf. They must be more than 4 cm wide;
- We glue them as follows (this is convenient to do with a glue gun);
- Then you need to glue both parts of the part. It is best to do this with Moment glue;
- Place a press on the parts (you can use books);
- Then assemble the rack ;
- After this, cover the uneven areas with putty and leave to dry for 24 hours ;
- Now you can start gluing with wallpaper or other materials. In this example, self-adhesive was used;
- All that remains is to assemble the parts and glue them together.
Finish options
There are no strict requirements for this type of furniture - whatever comes to your mind, do it! However, there are some interesting ideas that we will share.
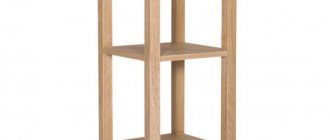
Another option for a cardboard shelf is the original rack made in the shape of a bear. Unusual, creative, stylish: such a shelf will decorate any interior, be it a bedroom, living room or office.
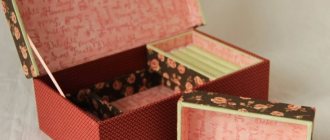
Making doll furniture from color schemes
In the old days, paper cutting houses could be purchased at almost any bookstore. Follow the instructions and use scissors and glue to create a charming dollhouse or palace with furniture.
Knowing the basics of working with any graphic editors and the principles of constructing such diagrams, you can easily make similar blanks. If making a whole palace for a doll is not part of your plans, it wouldn’t be a bad idea to create a wardrobe, chair or bed and, after printing them, make vintage furniture for your favorite. Needless to say, only laser printing is suitable for this method, since inkjet printing, although more colorful, can float or simply fade over time when it comes into contact with water.
As for the choice of glue for this furniture, it is best to use double-sided tape or a stationery glue stick
It is also acceptable to use a glue gun, but very carefully
Preparing for work
Technical characteristics of cardboard.
First you need to calculate the size of the shelf and the amount of material needed for it. The parameters will depend on its future location and your wishes. For our option, a project of 5 sections was chosen. The optimal height of the shelf is about 110 cm on the side with three sections, on the side with two - 69 cm. The width of the sections will be square, each side 30 cm.
The dimensions are known, you can start cutting the blanks. In total, you will need 2 blanks for each part, which are glued together:
- 4 parts with three sections;
- 8 pieces with two;
- 2 pieces from one.
By drawing out the details, you can calculate the size of the required sheet of cardboard. Do not forget to make all drawings in pencil, and make cuts with a construction knife. For convenient and high-quality work, use a thick, non-wooden ruler, as well as a good working surface that you won’t mind spoiling. She may be injured as a result of working with a knife.
After cutting, you will get separate cardboard shelves - parts that need to be assembled together. Before starting assembly, strengthen the structure with special stiffening ribs, which will add volume to the walls. To do this, you need strips of cardboard of arbitrary width (about 3-4 cm), which are placed around the perimeter of the part in a zigzag pattern.
Making a corner shelf
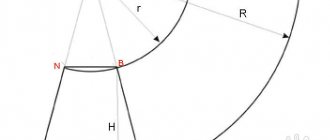
Step 1. Draw the shelves on the cardboard. You need to have a piece measuring 25x24.5 cm.
Cardboard blanks
Take a measuring tape, place one end of it in the corner and, using it as a radius, gradually turn it, mark the arc marks with a radius of 24.5 cm.
Outlining an arc
Step 2. Connect all the dots. Each shelf requires three blanks; glue them together with tile adhesive. We use Titan, but the brand doesn't matter.
Corner shelves, blanks
The parts need to be glued together in three pieces
Practical advice. In addition to this composition, you also need to have hot glue with a gun and ordinary PVA on hand.
Step 3. Cut out two side parts of the corner shelf, the size of one is 60x24.5 cm, and the size of the second is 25x60 cm.
Side parts
Step 4. Mark the locations of the shelves on the sides. We got the distances between the first and second 25 cm, between the second and third 24.5 cm, the thickness of the shelves is approximately 0.5 cm. You can change the dimensions, we chose these taking into account the height of the objects placed on it.
Shelf locations are marked
Step 5. Using a hot gun and Titan glue, glue the shelves. Work very carefully, do not skimp on the glue, the connection should be as reliable as possible.
Applying glue to fix the shelf
To strengthen the structure, it is recommended to fix pieces of cardboard of appropriate sizes between the shelves. They will perform two tasks: keep the ends of the shelves from falling and increase the strength of the side walls. Glue the second side panel in the same way.
Another layer of cardboard is glued between the shelves
Additional layer of glue at the joints
Complete product
Step 6. Start strengthening the bottom. Glue stiffening ribs between the two elements, the distance between them is approximately 4–5 cm. The upper plane of the bottom serves as the third shelf, and the bottom as a stop.
Bottom reinforcement
Step 7: Roll up the strip of cardboard and seal the gap under the bottom shelf.
A strip of cardboard covers the stiffeners
At this point, the assembly work is completed, you can begin decorating the surfaces.
Finishing the shelf
The ends and inner surfaces of the shelf should be covered with small pieces of white paper. The size of the sheets is approximately 5x5 cm, no more is needed. The fact is that the surface of the shelf should be as flat as possible, and large pieces of paper must have folds at the corners.
Step 1. One by one, coat the paper with PVA glue and finish the surfaces and edges.
Pasting a shelf with paper
Step 2. After the glue has completely dried, remove any smudges or ripples with fine sandpaper.
Step 3. Clean the surfaces from dust and cover them with three layers of white acrylic paint. Allow time to dry and finish with clear varnish. Choose the number of layers yourself, but experienced craftsmen recommend doing at least three. Make sure that all surfaces of the shelf are even, smooth and shiny.
Painting a shelf
Step 4. Decorate the product with braid and lace. Glue the material with hot glue; it is advisable to remove the burrs immediately, do not allow them to stick to clean surfaces.
You can decorate with lace, beads, rhinestones, sequins, stickers, etc.
Gluing the lace
To improve the appearance, you can additionally use colored rhinestones. In a word, show your creativity, decorate the shelf in a way that you personally like.
The shelf is ready and used for its intended purpose
Assembling a cardboard shelf
First, you need to glue all the parts and stiffeners with wood glue, since it does not deform the cardboard. Don't forget about the details placed around the perimeter. After careful gluing, place the blanks under the press. At home, they can be books or an overturned stool. When assembling, we connect all the parts in the cut out places, as if hooking them together.
Afterwards, you need to level the entire surface with putty, make the corners even, cover up holes or other manufacturing defects. This is necessary to obtain a flat surface, which will be easier to decorate later. Leave the shelves in a dry place for about 24 hours. After complete drying, make the product original, matching the style of your room.
Drawings and dimensions
First of all, it is worth mentioning the collapsible frame options. Such models are very mobile. Their parts are connected with bolts. The storage can be easily moved to the desired location. But there are also non-demountable frame racks.
To join their parts use:
- welded joints;
- self-tapping screws;
- nails (this is determined by dimensions and material).
When large in size, such assemblies are virtually stationary. It is not only impossible to take them out through a door or window, but even to disassemble them. It will only be possible to break it, so dismantling is fraught with many difficulties.
As for the console versions, such racks do not have sidewalls. But it provides for attaching the shelves to the solid rear wall.
As for folding models, they are closer to a stepladder. The dimensions are relatively small, and you can’t count on decent capacity. However, the mobility is even higher than that of the collapsible versions, and this largely compensates for the low capacity.
As for the shape, rectangular and triangular types of shelving are optimal for both the pantry and other rooms. A rectangle is generally a classic shape. You just need to choose whether to install square legs or extend the supports to support the entire structure at once
When drawing up a diagram, you should pay attention not only to the geometry, but also to the dimensions of the storage unit itself.
The height is mainly limited to 2 m. In this case, even most people of average height, without stepladders or stools, can reach the top shelf. As for the depth, it is entirely determined by the size of the objects laid out.
Hanging or protruding things are not very good, but a huge half-empty space is unlikely to be a rational choice. To store books, magazines, and flowers, you need shelves 0.3 m wide and 1 m long.
For garages and sheds, for garden tools, for wallpaper and for illuminated seedlings, it is recommended to use shelves 0.4-0.5 m wide. They can also be used to stack:
- tires;
- canisters;
- spare parts for cars and garden equipment;
- metalworking, carpentry and entrenching tools;
- fasteners;
- various clothes.
Particular attention should be paid to the shelving in the bathhouse. All of them must be mounted not only on the floor, but also on the wall, because otherwise it is impossible to ensure reliability
It is unlikely that anyone will like falling from a shelf to the floor. All such products must be made of wood and carefully polished.
This is what a rack cabinet looks like with a height of 1716 mm, a rear wall width of 1038 mm and a single section width of 324 mm. But this is a homemade budget class shelving unit. The depth of the shelves reaches 500 mm. Their length is 1550 mm. For work, plywood with a thickness of 1.5 cm and pipes measuring 2.5x2.5x0.2 cm are used.
Master class on decor
You can decorate shelves made from cardboard with your own hands using wallpaper, film, decoupage and a dozen other options. By choosing one of the simplest and most reliable options - self-adhesive wallpaper, you are betting on lightness, durability and practicality. Such furniture is easy to wash and it is easy to change the decor to another type of decoration.
It is better to finish with wallpaper before the final gluing of the parts.
The gluing process consists of the following stages:
- We disassemble the rack and glue the side machines separately.
- Take into account the presence of a margin when pasting the ends - about 1 cm per bend.
- The front part of the shelf must be covered with a solid fabric, without seams or joints.
- Do not completely cover the square sections; leave small gaps of cardboard for high-quality installation with glue.
We finish gluing the shelf with Moment glue. After gluing each part, do not forget to weigh it down with a press for better bonding. The rack is ready and you can use it for its intended purpose!
Furniture made from cardboard is an original, affordable way to transform unnecessary material into an unusual, charming thing. In appearance, it is almost no different from furniture bought in a store, but it will cost much less. If you have cardboard boxes, you will only have to purchase paint and glue. By following certain rules for processing the material, cardboard interior items will be very durable and will not bend under the load of objects.
Furniture made from cardboard is an original, affordable way to transform unnecessary material into an unusual, charming thing.
Step-by-step instruction
Making metal shelving with your own hands is not a particularly difficult process if you do everything correctly and follow the instructions exactly.
Frame assembly
The frame comes in two types: collapsible (bolted) and made by welding. As examples, consider the assembly of racks from a profile pipe and a perforated corner. The main requirement when using a profile pipe is the presence of a grinder and a welding machine. If you have such tools at hand, you can safely get to work.
Based on the drawing made earlier, we measure and mark the required size for racks, shelves and connections.
The corner product is easy to assemble and is well suited for installation on a balcony due to its light weight. You need a minimum of tools for assembly in the form of a wrench, a set of fasteners, screws, bolts and an angle grinder. Instead of a grinder, you can use a hacksaw.
- Based on the drawing prepared in advance, we mark the material.
- We cut off the required length for the posts and connections.
- We fasten the racks and lintels together using special fasteners and bolts. We twist it by hand, leaving the structure a little movable.
- We level all connections. When there is no doubt about the unevenness of the rack, you can thoroughly tighten the bolts with a wrench until the end.
- We install thrust bearings at the ends of the posts. Such parts are sold in construction stores. They will protect the surface from scratches when moving and operating the sections.
Finishing
The final stage of assembly is finishing, painting and installing shelves. To paint the body, use a paint brush and metal paint.
According to the previously applied markings, saw the prepared wooden sheets. This can be done with a jigsaw or saw. After the structure has completely dried, secure the finished shelves with self-tapping screws to the prepared fasteners.
Pros of DIY cardboard shelves
- Elegant design - you design the item with your own hands, relying on personal preferences.
- Practicality - you will only need to spend money on purchasing the necessary tools.
- Cardboard furniture can be disassembled and reassembled at any time, which is very convenient when moving or during renovations.
- You don’t have to waste time searching for a practical, something you like that will fit perfectly into your interior.
- Cardboard furniture does not contain harmful, toxic or other hazardous substances.
- Durability – the service life of cardboard furniture will be long if it has not been exposed to moisture and has been properly processed during creation.
Rack with side walls
In almost every apartment there are places that are not used in any way. Such places include a small space on opposite sides of the door, where there is usually nothing standing. If desired, it can be used rationally by placing a small rack in which you can store books, shoes or other items. The peculiarity of this design is that it should be covered with walls on the sides. You can make a rack yourself if you follow all the rules and recommendations.
Rack with side walls
Tools and materials
The list of tools and materials for making a compact shelving unit is practically no different from the list mentioned above. Prepare the following for work:
- chipboard (chipboard);
- thick sheet of plywood;
Plywood sheets of different thicknesses
- boards for the frame of the structure;
- set of self-tapping screws;
- glue for working with wood;
- impregnation (stain);
- router or electric jigsaw;
- roulette;
- paint brush and work gloves.
What you need for work
Necessary materials and tools
- Cardboard. You should understand that the thicker the material, the stronger the furniture will be. There is an opinion that the dark color of cardboard indicates its high density and vice versa - light cardboard is thinner. However, do not rush to get rid of the thin material; it will be useful for gluing joints. Or glue thin cardboard together, thus obtaining thick cardboard. If you use this method, glue the waves of each subsequent layer perpendicular to the previous one.
- Scotch tape and glue. It is acceptable to use any type, but the best option would be Moment glue. Thanks to its properties, the cardboard does not get wet, all the necessary parts are quickly and securely fixed.
- Kraft paper is used to reinforce the edges of furniture; thin cardboard can be used instead.
- White paper or tracing paper. Stick it on the entire surface for easy decoration. Please note: before applying tracing paper or kraft paper, it must be torn, not cut.
- Materials for decorating the finished product - paints, wallpaper, fabric and everything else your imagination desires.
- Pencil, tape measure for measuring and drawing details.
- Stationery knife or jigsaw. Keep an eye on the sharpness of the tool; the accuracy and quality of cutting depends on it. Replace the cutting parts of the device more often. Using a jigsaw you can cut several layers of cardboard.
- Sandpaper is useful for sanding cuts.
- To dry the glue faster, use a simple or hair dryer.
Durability – the service life of cardboard furniture will be long if it has not been exposed to moisture and has been properly processed during creation.
Description of the problem and methods for identifying intruders.
As it turns out, this is how scammers act. First, remember the moment when you “Log out” your account. If this was not the case, but the requirement to confirm it exists, then check your host file. It is located in the system32 folder. But it’s easier to get to it by clicking: Start->Run->Type “%windir%\system32\drivers\etc\hosts”->Press “Enter”. You should see a window like this:
To open the host file, select the Notepad application. Now let's look carefully at the contents of this file. The normal and standard content of host should look like this:
If so, then pay attention to the scroll bar on the right and bottom. They should be missing
If there are any, then scroll them to the maximum and observe the hitherto hidden redirection lines of the host file. It is here that you can determine which site will open in the browser when you select a particular resource. Thus, typing vk.com can redirect you to yandex.ru. You can do this yourself. Fraudsters redirect you to their websites, where the design is completely copied. And so you entered your phone number and received an SMS. Pay attention to the recipient's name. It must be vk.com! Other senders who ask to send a return SMS are definitely extortionists. In SMS from VKontakte you only receive a confirmation password, which you need to enter in the browser window in a special field.
Guide to Making Cardboard Shelving
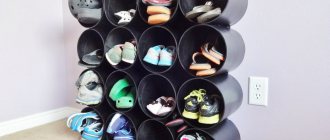
Idea No. 1. Shoe shelf
- You will need sheets of cardboard measuring 21x24 cm. Distribute them into 3 equal strips.
- Using a dull knife, you need to carefully push the strips so that they bend. Then you can glue the long sides of the sheet with colored tape. Next, make triangular oblong shapes from the sheets, secure them with tape.
- Thus, make the number of triangles you need. To fix such shelves, you need to glue the resulting triangles to whole sheets of cardboard with double-sided tape or glue. You choose the required number of rows and sections at your discretion.
- Instead of triangular sections, you can create oval ones by connecting them together as well. Calculate the required diameter for your shoes and glue the rectangular strips of cardboard so that they form an ellipse.
On the eve of the first steps of work, it is necessary to decide on the design and construction of the cardboard shelf; it can have a classic shape, be in the form of a rack or some kind of figure.
The dimensions of the desired shelf and the amount of materials depend on personal wishes.
Idea No. 2. Hanging shoe rack
- You will need several large sheets of cardboard. Based on the size of your shoes, draw the cardboard into equal rectangles and cut them out.
- Divide each of the rectangles into three parts and bend them. Bend the two sides obliquely and connect them together so that you get a pocket that is wide at the top and narrow at the bottom.
- The bottom of each pocket must be attached with glue or double-sided tape to the top of the previous one from the inside, leaving space for shoes.
- Such a shelf can be mounted on the door itself or on the wall near it - in any case, such an original solution takes up little space.
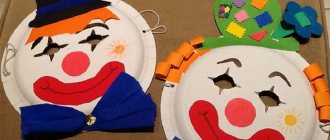
Craft from newspaper tubes
To make the next craft, you need to roll several tubes from newspaper pages. To do this, place a thin knitting needle or wooden skewer on the edge of the sheet and wind the newspaper diagonally onto it. Spread the remaining corner with PVA glue and attach it to the last turn. Depending on the size of the craft, cut tube blanks of the same size.
From corrugated cardboard you need to cut out two bench bases that look like the side contours of a chair with a back. In order for them to stand upright, they need to be connected to each other by several tubes. You can reinforce them with drops of hot glue or punch holes in the cardboard and simply insert the tubes into them. All that remains is to fill the entire space of the bench with thin pieces of newspaper, gluing them tightly to each other. After the glue has dried, the finished bench can be painted with gouache or acrylic paints.
The final stage is decoration
You can decorate cardboard products with your own hands from any materials, it all depends on your wishes and fantasies - there are many options. The simplest ones are wallpaper, film, paint.
Cover the entire surface of the product with old pieces of wallpaper, or just the inside, and paint the outside in your favorite color. You can completely paint the shelves, or use stencils or create unique patterns or designs yourself.
The simplest way is to use self-adhesive film. It has an attractive appearance, quickly and reliably sticks to the surface, unlike wallpaper, it can be washed. If defects appear on the film or you want to change the design, just purchase and stick another one.
Unusual, figured shelves are more difficult to manufacture.
Elements of a play park layout for a kindergarten: tree, bench
We invite you to take part in the script competition! Prizes for every participant! Read more…
In kindergartens, they often make play models of buildings, playgrounds, and different areas for children. Such playgrounds for dolls help children learn the rules of behavior in public places, play role-playing games, learn the features of the natural areas of our country and much more. To make such models, construction elements, ready-made miniatures of objects and various available materials are used.
In this article, Natalia Kudinova will show you how to make elements of a play layout for a children's park - a tree and a bench.
Master class “Tree” for layout
The layout contains deciduous, coniferous trees and shrubs. Let's take a step-by-step look at how to make a deciduous tree with a lush crown.
Materials and equipment
- stranded wire,
- polymer glue or titanium,
- tassel,
- acrylic paint,
- stationery knife,
- sponge,
- gouache,
- pliers,
- side cutters.
Execution steps
1. Using side cutters, cut a piece up to 15 cm in size from the wire. Cut the braid to the middle by about 7-8 cm.
2. We release the wire from the insulation and divide each bundle into 3 parts.
3. Form the crown of the tree. You can twist each part of the wiring using pliers, but you can do it well with your hands.
And again we divide the wiring. Thus, the branches of our tree decrease in thickness and increase in number. We give the branches a beautiful bend.
4. Paint the wood with acrylic paint.
5. For the foliage of the tree, use a gouache-painted sponge.
Each piece is glued to the branch with instant glue “Crystal”.
The result is a rather lush crown.
This is what the finished trees look like:
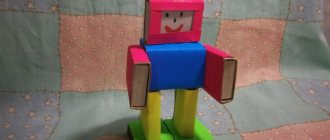
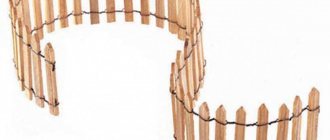
Master class “Bench in miniature” for layout
Our model has a fence and a bridge made of popsicle sticks and paper parasols. And of course, every park should have benches for rest, which is what we will do now.
Materials and equipment
- toothpicks,
- polymer glue or titanium,
- tassel,
- acrylic paint (for painting bench legs),
- any thread for knitting,
- wire,
- pliers,
- hot gun.
Execution steps
1. We tie the toothpicks together at both ends; you can coat the knots with glue to make them stronger.
2. In this way we attach 15-16 toothpicks.
3. Using wire, we use pliers to form the bends of the legs of our bench.
4. Using a hot gun, glue the bench legs and base together.
Trees and benches take their places on our park layout for kindergarten:
Did you like the product and want to order the same from the author?
Write to us here. In order not to forget the page address and share with friends, add it to your social network:
More interesting:
See also:
Vupsen and Pupsen
New photos for the competition. These are the caterpillars Oksana Zolotareva made for her son. After all...
Peacock made from plastic bottles for the garden
For everything that can be made from plastic bottles, see the corresponding section: //podelki-do...
Our VIP is a feeding trough!
We meet the competition entry from Yulia Eliseeva. DIY bird feeder “Competition for this...
Works from the competition “All the colors of autumn”. DIY crafts
Here we publish wonderful master classes from our readers, sent to the competition “All the colors are…
Leaf craft “Golden Owl”
The work submitted for our competition “Crafts from natural materials” is an owl made from leaves. Author: Glukhov...
Crafts from vegetables and fruits
On this page all the photographs of children's crafts made from vegetables, fruits, berries, sent to the competition “Under...
Crafts made from shells, clay, sand
Photos of crafts made from shells, clay, sand, pebbles and other natural materials are published here, with…
New snow figures of Izhevsk kindergarten No. 267
Dear readers, you, of course, remember photographs of snow figures made by the hands of kindergarten teachers...
"Smeshariki" - crafts for the garden
Another work for the “Second Life of Things” competition. Author of the work: Gasnikova Ekaterina Andreevna, 13 years old...
"Gifts of Autumn" Crafts made from natural materials
Crafts from natural materials Now you are also making crafts on the theme “Gifts of Autumn” for school or for...
New snow buildings for kindergarten
Snow buildings in kindergarten And again snow sculptures of teachers of kindergarten No. 267 in Izhe...
Panel “Summer Flowers” from scrap material
“Panel “Summer Flowers” Additional education teacher Yulia Sergeevna Minchenko.
This panel is... Share the news on social networks Tags: Crafts for the garden
podelki-doma.ru
Master class: decorating a product using pages of glossy magazines
- any paper for the base, newspapers can be used;
- glossy magazines;
- universal or PVA glue;
- acrylic lacquer.
It is also necessary to protect furniture from fire, it is very flammable.
Pencil, tape measure for measuring and drawing details.
Cut magazine pages into strips 1-2 centimeters wide, and twist them into tubes using a thin pencil or knitting needle. Glue the resulting glossy straws in a row onto the paper used as a basis. Then cut the canvas from the tubes into a suitable width corresponding to the location of the decoration and place it on glue. When the surface is dry, coat it with acrylic varnish.
The process is very long and tedious, but the effect is amazing.
It is best to fasten cardboard products together with special plastic clips, rather than gluing them together.
Mobile rack
The procedure for making a rack is quite simple. If there are several identical boxes, the lids are carefully cut off from them.
Using tape and plastic clips, they make a lightweight storage system from the blocks: the boxes are placed on top of each other with their sides and connected into a single whole. This shelving unit is ideal for arranging a utility room or pantry; moreover, it can be expanded, reduced or disassembled without any problems.
Master class: surface decoupage
- napkins with drawings;
- acrylic paints, acrylic varnish and brushes;
- scissors;
- iron.
In order to increase strength, place a second, slightly smaller one in a box made of thick corrugated cardboard.
Materials for decorating the finished product - paints, wallpaper, fabric and everything else your imagination desires.
Cover the surface of the rack with several layers of paint, let each layer dry, then apply another. Do not dry the very last layer completely; it should remain sticky. Remove the top layer from the napkin, run an iron over it and place it on the surface of the product. Place a clean sheet of paper on top of the napkin and iron it with an iron heated at low power.
Instead of paint, you can use wallpaper or fabric.
The napkin should completely stick to the surface, but if not, add a little paint under it with a brush and let it dry. Do not rush to the next step; the decoupage must dry thoroughly, otherwise the design will be deformed.
You should understand that the thicker the material, the stronger the furniture will be.
Please note: before applying tracing paper or kraft paper, it must be torn, not cut.
When the surface is completely dry, coat it with acrylic varnish.
However, do not rush to get rid of the thin material; it will be useful for gluing joints.
By showing your imagination and creativity to the fullest, you will create a unique interior masterpiece that will be admired by your family and guests at your home. Don’t be afraid to experiment, keep up with the times, because cardboard furniture is not only affordable, but also an original option for creating comfort and a unique atmosphere.
It is acceptable to use any type, but the best option would be Moment glue.
Kraft paper is used to reinforce the edges of furniture; thin cardboard can be used instead.
Origami bench
Before making a bench out of paper, prepare scissors and a sheet of thick A-4 paper. First, fold the sheet in half horizontally and cut it into two long rectangles along the fold. Each half needs to be folded in half again lengthwise to determine the center line. Then straighten the workpiece to its original state.
The top and bottom corners must be folded so that they reach the center fold line. You will get a long strip with triangles at the ends. Only after this bend the figure in half. The same folds need to be made on the second half of sheet A-4. You should end up with two stripes with beveled corners.
To make a bench model, you need to connect both parts by inserting one into the other with a short part. The photo shows how the triangular edges of the strips should be positioned. These are the legs of the bench. Bend the edges of the corners slightly inward so that the craft stands firmly on the table surface. You will also need to make two identical folds of paper on both sides at an angle of 90°. That's it, the paper bench is ready!