If you have access to food, water and shelter, you can survive almost anything, but fire is almost as important. Not only does it provide warmth and light, but it also gives you the ability to sterilize water, cook food, signal for help, and keep predators at bay.
Since any self-respecting prepper already knows how to start a fire without matches or a lighter, we'll focus on how to make a torch that will allow you to signal for help, move that fire to another location, or light your way on a dark night.
All you need to make a survival torch is a stick, a wick, and some fuel. These could be natural objects you find in the forest or items from your hiking backpack.
How to make a good torch
Despite modern progress, there are many situations where a torch can be useful. Therefore, it is worth knowing how to make a high-quality torch. When creating a torch, you need to rely on the following components: flammable material, fixative, stick, impregnation.
Retainer
The best option for fixation would be wire. It is quite easy to find, convenient to remove and wind. It also doesn't burn. There are other options. This applies to various metal structures. For example, clamps will do. But it’s still worth repeating that wire would be the ideal option. It is best to take a thick “thread”. It will be easier for her to fix the elements of the torch.
Stick
A mandatory quality that any torch stick must have is non-flammability. You should immediately discard the option with a plastic stick. You can take a metal stick, but holding it will be extremely uncomfortable, as it heats up. The best option is wood, but it all depends on certain parameters of the stick. It is necessary that it be hardened and have a minimal chance of catching fire. You can, for example, char it in advance. It is worth choosing certain types of wood.
Assembly
There are two different options for assembling the torch. The first type is that you initially wrap fabric around a stick and then saturate it with flammable fuel. This option is simple, but the following one should also be considered. Its main difference is the initial impregnation. This way, the fabric will have time to soak well and the torch will burn better.
Material
Absolutely any fabric is suitable for this part of the torch, but you should know certain subtleties. For example, you can take non-flammable asbestos fabric. If you thoroughly soak it with something, it will burn for quite a long time. You should avoid synthetic and polyethylene fabrics.
Impregnation
We can say that absolutely any fuel will do, but here certain nuances come into force. Rosin and wax, for example, can be quite difficult to find if you find yourself in an emergency without electricity. Pine resin has the same drawback. Gasoline has a rather pungent odor when burned. The same goes for kerosene. You can also use machine oil, but it has a rather thick consistency and will drip constantly. Vegetable oil, on the contrary, is too liquid. There are no ideal options here, but paraffin is most suitable, of course.
Material
Absolutely any fabric is suitable as a material. But there are tricks here. If you take asbestos fabric, which is positioned as absolutely non-flammable, and at the same time impregnate it with something that burns well, the process of burning the torch will be VERY long. Which is exactly what we need. Tow, felt and burlap work a little worse in this regard. As for ordinary textiles, they burn too quickly. It is better not to use synthetics and polyethylene at all, since they burn and melt at the same time, which means they can drip molten plastic onto your hands. They will also smoke a lot.
Impregnation
Honestly, absolutely any flammable material will do. The question is purely a matter of nuances. Gasoline and kerosene, for example, emit a lot of smoke when burned, and the smell is not very pleasant. Rosin, wax and paraffin do not have such shortcomings, but you can easily find them. We will have to gut apiaries, candle stores and radio equipment stores. Machine oil smells bad, is thick and drips, vegetable oil is too thin, but it is easier to find. Pine resin... You can find horseradish on a large scale. And preparing complex multi-component mixtures is long and tedious, although they give a good effect.
In short, there is no ideal option. It all depends on external factors, conditions and time availability. If you have access to paraffin, that’s great. With its help you can even make “cartridges” for reusable good torches . Well, if not, then gasoline and kerosene have long become classics. Again, if there is no access to a flammable liquid, the torch can still be assembled. Yes, it will burn much worse, but it’s better than nothing.
Retainer
The ideal option is wire. Does not burn, can be found anywhere, easy to wind and remove. You can come up with more complex options - all sorts of metal attachments, plugs and clamps. But with wire it is much easier to make a good torch . The thicker the wire, the easier it is for it to perform the second function of the retainer - to prevent the molten components of the torch from flowing down the shaft.
Stick
The main thing is that it is as non-flammable as possible. The plastic one won't work - it might melt. Aluminum and steel do not burn, but they heat up quickly, so you will have to additionally make a handle with which you can hold this good torch . Wood - depends on the type, thickness of the stick and its “hardness”. “Hardening” - preliminary firing of the working end of the stick until blackened. When a tree is covered with a layer of burnt coal, there is less chance that the core will catch fire. It is also better to use a thicker stick as it will burn longer and worse.
As for the type of wood, you definitely shouldn’t use coniferous trees - they burn very well. We are interested in aspen and larch. Both of these varieties contain quite a lot of liquid so as not to catch fire for as long as possible. You can also use one of the many fireproof impregnations. To summarize, for a reusable torch with replaceable “cartridges” it is better to take metal, but if you don’t bother with that, then a wet aspen branch will last for a long time.
How to treat fabrics
Non-flammable substances must be used as fuel. The most common choices are wax and stearin. The latter is a component of regular soap, and laundry soap is best. Instead of wax, you can take pine resin, but since we are talking about improvised means, the second option is not so often found in a box in the kitchen. The mixing proportions are as follows: for 1 kg of wax/resin, 100 grams of stearin.
There are other recipes as well. For example, a mixture that is relatively resistant to water: one part kerosene, one part rubber glue, a couple of spoons of liquid soap. These ingredients will need to be thoroughly shaken together.
You can mix rosin (pine resin) and wax (or paraffin) one to one.
The following mixture will give a pleasant smell: four parts rosin, one part vegetable oil, five parts paraffin or beeswax.
An interesting tip from the craftsmen: if you want the torch to repel mosquitoes, add a little lemon juice to the mixture when preparing it.
Manufacturing process
We basically figured out what to make it out of. Now let's look at how to make a torch. There are two methods, and the second is preferable, but we’ll still talk about both.
Method number one.
We wrap the holder with cloth as tightly as possible and lower it into the prepared solution for a long time to soak it. After that, take it out of the mixture, squeeze it hard, expelling the air, and dry it.
Method number two.
We first soak the fabrics in the solution, squeeze them very hard, and then wrap them tightly on a stick. Dry again.
The second method is good for all wax and resin compounds for a simple reason: all ingredients must be mixed and dissolved in a water bath, without bringing to a boil. If you then put a holder wrapped in fabric into it, most likely the mixture will harden before the fabric is saturated with it. But for the option with a water-resistant torch, where a kerosene-based mixture is used, the first method is perfect. That is, we choose the option of how to make a torch based on the fuel.
By the way, about gauze. It was mentioned above that it may come in handy. So, some advise using it in the second method, namely:
- divide the required length of fabric (two meters) into three or four parts;
- having wound the strip, wrap it with a layer of gauze and wait until it dries;
- then repeat this with the remaining strips.
Although, if you put a lot of effort into just wrapping the fabric tightly, it will also stick successfully. If you are still worried about how to make a full-fledged torch, you can additionally strengthen the material on the holder with wire - it should not affect the quality of combustion.
What does the device consist of?
The torch has only two parts - the base holder and the burning part.
To figure out how to make a torch, let's start with the basics. Its role is played by a pole made of bamboo or wood. Why can't other materials be used? It's just inconvenient. The material for combustion will be better secured to the wood. Moreover, wood has low thermal conductivity, and if you take a metal rod, a burning torch will quickly heat it up. The handle, by the way, should be 2-4 centimeters in diameter and at least 50 centimeters in length.
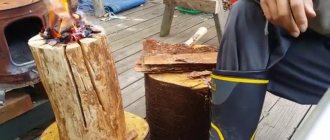
Torch based on an Indian candle
The next method of making a torch is based on an Indian candle. It is made entirely of wood, has a long burning time, and gives a very long and bright light, because it is based on large logs.
It is not as mobile as the previous one, but it is also easy to carry from place to place, and it is intended for camp lighting. To create a torch, it is better to use logs or solid thin logs made from coniferous trees, as they are the most resinous. You also need a stake on which the burning part will be located. For kindling you will need birch bark or other easily burning material suitable for igniting logs. To improve combustion, you need to make notches along the inside of the logs with a knife or an ax and fill them with wood chips. We also add thin slivers and splinters.
To tighten the candle, we use, if possible, wire or rope pre-moistened with water. The screed should be made as low as possible so that the flame does not reach it immediately. When the screed is ready, it is filled with kindling and set on fire.
And here read how Africans get out of the situation when they need to illuminate their home. In the forest, an ax with a cover, thanks to which you can hang the tool on a backpack, is always useful.
Burning part
Since we are making a torch from scrap materials, we will need two types of means:
- fabric;
- burning component.
The fabric should under no circumstances be synthetic. This fabric melts and drips, which can cause burns. Only natural fabric and as coarse as possible: linen, cotton, asbestos fabric, felt, tow. Gauze may come in handy, but more on that later, when we figure out the manufacturing process and how to make a torch so that it doesn’t fall apart during the burning process. The length of the fabric strip should be about two meters and the width - 10-15 centimeters.
Use resin
This torch is effective. If you are trying to survive where few birch trees grow, this is a great alternative to the birch bark torch described above. The method is much the same as for a birch bark torch, so you'll start by splitting the end of a stick to create a container for your wick and fuel.
Now you need to obtain and collect resin from pine or spruce. These trees produce resin to protect themselves, so it usually forms where the bark has been damaged. This soft resin can be easily removed with a knife without causing any harm to the tree. The wick can be made from a pine cone or a spare pair of socks.
Now that you have collected all the materials, let's study the process of creating such a torch.
How to do:
- Secure the handle by inserting it into the ground with the split end up;
- Use chopsticks to temporarily hold open the split ends of the handle;
- Melt the resin over the fire using the used canning. You can then coat your wick with molten resin by dipping your torch into it;
- If you don't have a means of melting the resin, you can spread it onto your chosen wick in its original form, although this may not be as effective;
- Insert the wick into the split ends of the handle;
- Remove the sticks that were holding the ends open - this will secure the wick more firmly.
Tags
Olympic torch 2014 Olympic torch 2014 Olympic torch there were torches on How to make Olympic How to make a tincture how to make a torch. How to make a florarium how to make a torch How to make a speaker How to make a magnetic one How to make a thorn with your own hands with your own hands with your own hands with your own hands with your own hands with your own hands to process the fabrics Fabric non-flammable you need to use the ingredients you will need Now you need to make
wirematerialmasterclassgood
Sconce in loft style
The next option is for real men. Since for the manufacture of this brutal lamp you will need steel or copper water pipes, threaded fittings, valves and flanges. Although ladies can also quite cope with its creation if they are not afraid to get dirty.
Copper pipes and fittings
First, you need to come up with the type and shape of the lamp, decide on the number of arms and select the necessary parts for the intended design: bends, tees, elbows, couplings, etc. It is best to take ½ or ¾ inch fittings, and use inch adapters to attach the cartridges.
Sconce from a water pipe
Step 1. Degrease the prepared parts using acetone or white spirit, wipe dry and dry.
Make sure that the parts match the threads
Step 2. Cut the wires of the required length in an amount equal to the number of lamp horns.
Wires run through pipes
Step 3. We weld to the bracket, which will serve as the lamp’s leg, a coupling for attaching it to the wall.
Step 4. We twist the fittings together in the intended sequence, wrapping FUM tape around the threads for strength and evenness of the connections.
Step 5. Pass the wires through the cavities. If the sconce will consist of several horns, it is better to do this at the initial stage of assembly and separate them after attaching the tee.
Step 6. Adapters for a larger pipe diameter are screwed last onto the ends of each branch. It is advisable to immediately select suitable cartridges for them so that there are no problems later.
Step 7. Paint the finished structure with metal spray paint and leave to dry.
Step 8. If desired, decorate the lamp with bronze or gold paint, applying it with light strokes in one direction and shading with a sponge.
Step 9. We strip the ends of the wires protruding from the adapters and attach them to the sockets. Depending on the type and diameter, the cartridges can be screwed or glued into the threaded part of the adapters.
Step 10. Screw in the light bulbs, hang the sconces on the wall and connect the wires with external wiring to the switch.
Sconce made from water pipes
Video – Lamp in LOFT style
Using the same principle, you can make not only sconces, but also table or ceiling lamps.
Knitted lamp
This option is ideal for a room decorated in a romantic or Provencal style. And lovers of crocheting or knitting will surely like it. Although you can also use the macrame technique - whichever suits you better.
DIY sconce lamp
For work, prepare: