I don’t know how relevant this is, but maybe it will be useful to someone...
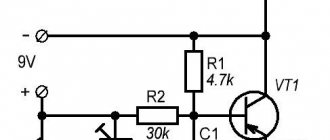
We take a 5″25 floppy drive and carefully unscrew the motor (which spins the floppy disk) from there along with the board. In my case, there were 4 wires going to the board - blue, red, turquoise and another red. The first two are motor power, respectively. plus and minus, turquoise - like a start-stop signal (I don’t know more precisely, it’s just hanging in the air), and the last red one is power supply to optocouplers. We connect the first two wires to the power supply (observing the polarity, otherwise the microcircuit will fail!), actually there is 12 V, but from 6 it also works well, and the logic does not heat up. We glue an oblong magnet onto the spindle, 10-15 cm long and with poles at the ends (this is important!!!). Then all this crap is mounted into the case with the magnet facing up, the case must be non-magnetic (aluminum is the best, or textolite at worst). If it is not possible to get a branded magnet in glass or Teflon, you can magnetize an ordinary nail (factories have the appropriate machines), stick it in a piece of glass tube and solder the ends.
If you also want to regulate the speed, remove the multi-turn trimmer located there from the board and solder a regular alternator with the same rating with wires. The only thing that sucks is that it’s very difficult to get such a stirrer to also heat, but we’re working on it!
PS: For me, this has become a real alternative to a branded stirrer for a hundred bucks. It's better to spend it on reagents, that's it.