The popularity of hair bands is at its peak. Here fantasy has no limits. Any needlewoman who has the skills of weaving kanzashi, or who wants to acquire them, will find new ideas for all occasions in this master class on creating kanzashi headbands. So, how can you decorate your head using kanzashi skills? Of course, the most popular are headbands with flowers. To create such an ultra-fashionable thing, first get the basics. To do this, simply purchase a headband or hoop. A bandage would also look good. Next, decide for yourself whether to leave the hoop in its natural form (choose it without decorations, plain), or braid it with two or more ribbons. The bandage can also be purchased or made with your own hands. Today's lessons will clearly demonstrate the creation of a base for hairbands.
Braiding the headband with two or more ribbons
To braid a headband with your own hands you will need the following materials:
- based on a simple black hoop;
- scissors;
- lighter;
- glue "Moment";
- two hairpins;
- Two colors of satin ribbons are enough, we settled on white and pink, take one and a half times less of the latter.
We start the kanzashi headband by crossing the ribbons at its very edge and secure them with a hairpin, as shown in the photo. Wrap first a pink and then a white ribbon around the base. Repeat these steps alternately until the very end of the rim. Then cut off the excess from the short tape, singe the edge, and glue it well. The remaining long tip of the white tape needs to be wrapped around the base, as in the photo, glued and singed. Do the same with the second side, which is secured with a hairpin. You can decorate such hairbands with any colors that you already know how to make, or you can explore new ideas and lessons. You can braid the headband not only with two, but also with any even number of ribbons, alternating their braiding.
How to quickly braid a headband. Method number 1.
The simplest and simplest way to braid a headband is with 1 ribbon. We take the tape depending on the width of the rim: the wider the rim, the wider the tape.
To work you will need:
- The headband is 2 cm wide.
- A ribbon whose width is 1.2 cm and length is 1.5 m.
- Glue gun, Moment glue, double-sided tape - any of your choice.
- Clothes pins.
Place a drop of glue on the end of the tape and press the tape to the rim. Carefully apply glue along the outer surface of the rim. Next, I wrap the rim with tape at an angle, trying not to “climb” onto the previous moment.
At the end of the rim, carefully glue the tape inside. We cut off the end. After wrapping the ribbon onto the headband, press it on top with a clothespin and leave it like that for 1 hour. Then we remove the clothespins. In this way you can braid a headband for September 1st and for any holiday. There are a lot of options for further decoration of the kanzashi headband. You just need to choose ribbons, lace, felt, organza, beads, and so on that match the color. And choose 1 or several types of colors.
Weaving ribbon headbands
As mentioned above, a hoop or headband can be used as a basis, the weaving of which is easy even for novice needlewomen. This MK will clearly demonstrate the ease of this process. This children's headband will be an excellent basis for an adult decoration made of satin ribbons. Weaving this base is similar to the process of creating fecheneks. You can easily find photo and video lessons on our website.
Read
Master class on kanzashi technique for beginners
The process is easy to learn for beginning crafters.
- As a base, choose two satin ribbons, the colors of which will contrast with each other;
- Fold each ribbon 10 centimeters from the edge, fold it crosswise towards each other and wrap one of them over the other;
- Pull the free end into the resulting loop and tighten the knot, holding the ribbon that you pulled out;
- Repeat the knot formation process with a different color of satin ribbon;
- Thus, you weave with your own hands until the length of the headband matches and wraps around your head.
- The weaving will be completed by processing the edges of the bandage; to do this, trim off the excess, first tying knots, then be sure to finish the edge with a lighter.
- Connect the ends of the bandage using an elastic band of the same color; if you can’t find one, then braid it with your own hands with the ribbons from which the base is made (as in the previous MK) or simply sew it around it.
You will find this weaving and its step-by-step process in the photo materials of this MK.
Kanzashi - master classes
DIY kanzashi strawberries
Kanzashi strawberries look bright, appetizing, elegant, but they are inedible. This is a great option for colorful summer hairpins for girls. Everyone is accustomed to the fact that the kanzashi technique is an unusual method of making believable and fantastic flowers and plant patterns. This tutorial shows how to make strawberries from satin ribbons. Girls who see them will definitely want to try them on, not for taste, but for their hair, because they are so beautiful.
For one flight clip we will need:
- Green satin ribbon in three different sizes (the shade may be the same or different): 3 cuts – 5*5 cm, 2 cuts – 1.2*15 cm, 3 cuts – 0.5*8 cm;
- White satin ribbon: 5 cuts – 5*5 cm;
- Red satin ribbon: 2 cuts – 5*8 cm;
- Green laces: 2 cuts – 8 cm;
- Green felt in the form of a circle - 3 cm or 4 cm;
- Yellow half bead with a diameter of 0.6 cm;
- Cotton wool or padding polyester.
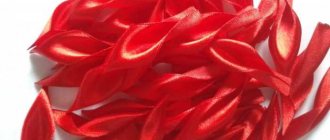
One strawberry composition will consist of two scarlet berries on laces, a white flower glued to a green meadow. To make a flower you need to prepare 5 droplet petals, for a clearing - 6 green leaves of two varieties. The accessories for the job are given above, now let’s take a closer look at the stages of making a wonderful decoration.
How to make kanzashi strawberry step by step
Let's figure out what the accessories listed in the list are for. A green felt circle is the basis of a green meadow, red satin stripes are details for the berries, white satin stripes and a yellow half-bead are for the flower, green satin details are for the leaves and tails of the strawberries. See how to make paper crafts here.
Cut out semicircles from two red stripes (for convenience and a symmetrical result, you can use some kind of round object).
Fold the semicircle in half.
Sew the two combined ends of the former semicircle (preferably with red thread).
Fill the resulting red cone with padding polyester or cotton wool. Sew the upper part with the same red thread around the circumference.
Tighten the thread - you will get a small voluminous berry.
Also sew a green strip measuring 1.2*15 cm with stitches along one side. This time it is better to use a green thread so that it is not noticeable against the general background.
Tighten the green thread, you will get a rounded, wrinkled tail for the berry. Wrap it around the green lace and glue it on. Two parts of the strawberry (red and green on the string) are ready.
For one hairpin, prepare 2 delicious details. These strawberries will also serve as tassels; girls really love such elements in hairpins.
Cut out leaves from green satin squares measuring 5*5 cm. In total you will need three such leaves for one hairpin.
Give the leaves a more realistic shape and relief. To do this, use a knife. Heat the metal over the flame of a gas burner and press it against the leaf so as to press through the veins on the leaves. Burn the outer edge several times with the flame of a lighter, stretching the hot satin with your fingers in between.
Make 3 indicated leaves, and also prepare 3 more green loops from ribbon measuring 0.5 * 8 cm.
Proceed to the formation of the last detail - the white flower. White satin squares with a side of 5 cm will be used to make the petals. Bend them diagonally.
Bend again in height. Next, bend the corner of the top layer in the opposite direction. After that, lower it down so as to highlight the fold. Do the same with the other side of the petal.
Squeeze the lower part with your fingers or a clamp, cut it off and singe it with a lighter.
Prepare 5 white teardrop petals and 1 yellow half bead.
Glue all 5 petals into a flower. Cut out a felt circle. Now all the parts for modeling the hairpin are ready.
Glue the green leaves onto the felt. Glue a white flower on top.
Glue the ends of the green laces from below and press down with felt on top.
The elegant summer kanzashi product is ready.
And all you have to do is glue an elastic band on the back. This type of hairpin is best suited in this case. Make two strawberry bushes - a couple of summer decorations.
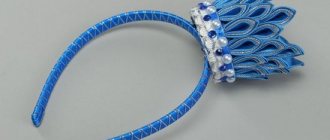
Fairytale decoration in the form of a snowflake
When the base is selected, kanzashi headbands can take on a finished look with the help of the final decorative touches. In the midst of the holiday celebrations, a child's dream will undoubtedly be delighted to have a magnificent, fairy-tale snowflake in her hair. The master class on creating such decoration is based on adding snowflakes of any shape to any type of kanzashi base. All this splendor is easily and simply created with your own hands, using photo and video lessons from this MK.
The master class requires stocking up on the following materials:
- several colors of satin ribbons, the width of which is five cm;
- needle and thread;
- felt base, if you can’t find one, then any other dense fabric base with a diameter of 4.5 cm will do;
- lighter with glue.
First of all, we will cut the ribbons from which the kanzashi will be weaved into squares with sides divided by color:
- white: 5 cm - 6 pieces and 2.5 cm in the amount of 36 pieces;
- purple: 4 cm - 6 pieces and 2.5 in the amount of 24 pieces.
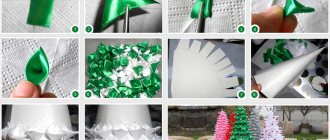
We turn all the squares into pointed leaves. To do this, the workpiece is folded in half diagonally, and then two more folds in half. If the bottom edge is squeezed well and treated with a lighter, a “blank” petal will come out. You can also leave the option with a hole as in the photo. Weaving a multi-color leaf involves separately folding the initial elements of different colors up to the penultimate one. Then you should fold the different pieces and roll them up one last time. In this way you can combine three or even four colors. If such a pointed blank is turned out, you will get reverse petals. All this will help, after studying one master class, to make snowflakes of various shapes, colors and sizes.
Read
A lesson on creating beautiful bows from ribbons using the kanzashi technique
Next, our snowflake begins to take shape. To do this, we glue together three and five pieces of small twig blanks, and string the purple parts in the amount of 6 pieces onto a thread and pull them towards the center, forming a small flower. For a large one, pull six large white parts on a thread, glue 6 purple ones with a side of 4 cm into them, and the smallest white ones into them. All components are visible in the photo. The future snowflake, made with your own hands, will delight beginners at this stage with its ease of execution.
Now let's complete the design. Glue all the elements onto the base in this order:
- Having previously smeared it well with glue, in the center of the fabric base on which the structure will be assembled, first attach the largest flower;
- glue the three-leaf parts on the sides;
- we attach the parts for five elements in the corners of the snowflake;
- on the reverse side we secure the long eyelids by gluing a narrow tape to them (photo);
- also make two cuts on the inside and insert an elastic band or elastic band. The photo shows the front and back sides of the felt base;
- glue the base inside out to the snowflake. The resulting fastenings will attach a kanzashi snowflake to a hairpin or decorate a hoop;
- The master class ends with gluing a small kanzashi flower and beads in color.
Children's beautiful hairpin or hoop “Snowflake” is ready!
Autumn kanzashi wreath step by step
1. Bright satin ribbon of all the indicated shades, suitable for the autumn theme, should be cut into pieces 3.5 cm long. Calculate the number of pieces as you wish. The more details you use, the more magnificent the wreath will turn out. You will most likely need 10 pieces of each color or a little more.
2. Using scissors, cut both long sides into satin rectangles into a semicircle. Create a leaf shape. Trim all prepared sections equally; you may have to add more details while modeling the wreath. Carefully run the flame of a lighter around the entire perimeter of each leaf. Do this only once and very quickly, just to remove any loose threads and not to melt the fabric.
3. Take a knife. Heat the blade over a burner flame. Place each leaf on a hard surface, but it is advisable to place a towel under it, and press the hot blade against the satin so as to make a barely noticeable relief of the veins. Prepare all the leaves. Make sure that the hot metal does not melt the delicate satin.
4. Wrap pieces of thin wire with tape. The winding does not have to be perfectly smooth; our task is to copy the tree branches.
5. Glue a leaf to the tip of each resulting branch. Apply a drop of glue to the back side and press it against the wire. Next, assemble the prepared parts into branches, combining 3 pieces together. You can collect branches with leaves of the same or different colors into bouquets. And then you will see if it is worth adding more leaves.
6. In general, the number of leaves can be any, depending on the splendor of the wreath. Also take ready-made decorative viburnum in sugar. Wrap 2-3 berries to the branches using the same tape. You can add one branch with a leaf to the same bouquets.
7. Start winding all the bouquets on a thick wire, alternating by color.
8. Gradually weave berries into the wreath.
9. Make the first leaves, stepping back 5-7 cm from the edge (leave room for loops), and also leave the same piece of wire empty at the end.
10. Twist the ends of the wreath into loops. Secure them together with gold ribbon and tie a bow. An elegant and stylish hand-made accessory is ready. As you can see, few accessories were used to make it, which means that the cost of such decoration is low.
The image of a mysterious autumn girl is guaranteed to you if you decorate your hair with such a wonderful accessory. Making such a wreath is really easy, but the result looks expensive and will definitely attract the attention of others. It will decorate an autumn look if it’s a sunny Indian summer outside or give a ray of light and a good mood if the weather is cloudy and rainy. Experiment and enjoy the results of your work.
How to make an autumn wreath from natural material for interior decoration, see here.
In order not to forget the address of the page and share with friends, add it to your social networks: Do you want to know news about competitions or master classes?
Attention! It is better to write urgent questions in the comments on the website (form at the bottom of the page) or, better yet, directly by email. There are no notifications about comments from the VKontakte form! This form is more for feedback Discussion: there is 1 comment
- Olga Parfenova:
March 27, 2022 at 6:07 amA very interesting technique, the wreath turned out beautiful, and most importantly, no one has anything like it.
Answer
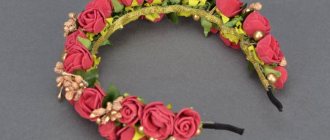
Amazing headbands with roses
Headbands with flowers are at the peak of popularity now. Wreaths, ribbons, and poppies made in the Ukrainian style undoubtedly also occupy a leading position, but the next master class will talk about them. Now we will learn how to make kanzashi headbands with rows of beautiful, unfading roses with our own hands.
We would like to provide you with some excellent video material. A fairly simple way to decorate a headband with roses, but no less effective. See for yourself that the effect of living roses does not go away. I want to admire the wreath again and again. At the same time, it can be stylized in any color scheme.
Read
How to decorate bottles, glasses and other wedding paraphernalia with ribbons
Decorating flower headbands with roses is very simple. Let's start the master class. Stock up on red satin ribbon. Width 2.5 cm, length about 45 cm. Exactly at this mark, bend the tape the first time, forming an angle of 90 degrees. Then we bend the tape one by one, as is done in the video. As soon as the short edge of the tape ends, connect the ends together and release the structure. Then, holding the short edge near the main one, tighten the structure until rose buds form. Trim off the excess and scorch the edge over the fire. You sew it with thread so that the structure holds and does not fall apart. Carefully note the puncture sites that are clearly visible in the video. Repeat the process of forming rose buds as many times as your idea requires. The size of the bud can be changed. Just take a wider ribbon or make more folds. Next, decorate your hair headbands with the resulting roses. Place larger specimens in the center, and attach small roses to the edges. Add kanzashi petals or leaves to this. Vary colors, sizes, material quality, add stones, pearls or rhinestones to headbands with flowers and roses. Each piece of jewelry will become a unique, unique work of art, made with your own hands.
Braiding method number 3
Next, we will braid the rim with two ribbons. This is also a simple and quick way to braid with ribbons. Despite the fact that there are many master classes on this topic online, it is often not possible to really understand the weaving pattern itself. We hope that our master class is more understandable. Take a narrow metal hoop 0.5 cm wide.
To work you will need:
- Metal rim 0.5 cm wide.
- Ribbon of any color, 0.6 cm wide, 1.5 m long.
- Glue gun or Moment glue.
- Lighter.
- Scissors.
Cut 2 small (1/1.5 cm) pieces of tape and cover the edges of the rim with them. Use a lighter to smooth and glue the edges. We process the other end of the rim in the same way. We bend the remaining ribbon in half.
We clamp the edge of the tape with tweezers or scissors and singe it at an angle with a lighter. Look at the photo: this triangle needs to be removed with a lighter.
We fix the tape with glue on the rim. We got it like this: 2 ribbons lie on top of each other. Take the bottom ribbon and guide it under the top one. The top tape is directed behind the rim, where it connects with the top one. Again 2 ribbons on top of each other.
Then again: the lower ribbon is directed under the upper one, and the upper one is sent behind the rim, they should connect again. And so we continue our weaving, pulling the ribbons. It turns out that we have these 2 ribbons alternately located either on the left or on the right side of the rim. If you don’t understand the weaving pattern, you can watch the video: master class kanzashi headband - attached photo below.
At the end of the rim, cut the tape and glue it with glue. There are a lot of headband decor ideas.
On video: kanzashi headbands new ideas master classes.
How to braid a headband with two ribbons? MK / How to Make Ribbon Woven Headband
Wreaths in Ukrainian style
Hairbands in the Ukrainian style are not only popular, but will also come in handy at any celebration or festive event. Therefore, we will give a video of MK on creating the most typical wreath of a Slavic beauty using the kanzashi technique. The main difference of the Ukrainian wreath is the presence of wild flowers of poppy, chamomile, and cornflower. The weaving of each of them is revealed in great detail in the MK video material in the kanzashi style. All work begins with the design of the hairband using green ribbon. Weaving is performed using the technology of braiding the base with two ribbons, which is described in detail at the beginning of this lesson. Then the process of creating each flower begins. Then the correct format for attaching all kanzashi elements to the base is shown. Headbands with flowers in the Ukrainian style will become your trump card and pearl in your handicraft collection.
Boy's bow tie
You will need: blue satin ribbon 5 cm wide, elastic band, fastener, ruler, scissors, blue thread, needle, stationery pins.
Master Class
- Prepare: two pieces of ribbon 11 cm long, one piece 25 cm long and one piece 7 cm long.
- Take an 11 cm piece of tape, fold it at a right angle, bend it in half and secure it with a pin. Make the second piece in the same way.
- Make running stitches on one piece, then, without breaking the thread, on the second.
- Pull the thread and fasten the parts together. Set the item aside.
- Fold a 25 cm piece in half, mark the center, then unfold.
- Fold the edges towards the center, making an overlap of 1 cm.
- Place running stitches, pull the thread and wrap it around several times.
- Sew the two butterfly pieces together.
- Fold a rectangle from a 7 cm segment. This will be the jumper.
- Sew fasteners to the elastic, glue the butterfly to the elastic and wrap it with a jumper.
The satin ribbon bow tie is ready!
Ball of roses
You will need: a foam ball with a diameter of 4 cm, a red satin ribbon 12 mm wide, red threads, a needle, fire, scissors, a ruler, twine, Titanium glue or a glue gun, stationery needles with beads.
Master Class
- Make a loop out of twine to hang the ball.
- Make a hole in the ball, drop glue into it and glue the loop with a knot inside the ball. Set aside to dry.
- Prepare a 30 cm piece of tape.
- Singe the ends of the tape with fire.
- Fold the end of the ribbon from the right end 2 cm at a right angle, roll it tightly towards the long end of the ribbon and sew all layers at the base.
- Roll a piece of ribbon to form a rose. Don't forget to stitch the layers periodically.
- Form 50 roses this way.
- Drop glue onto the base of the rose, glue it to the ball and secure with a needle and bead. It is better to start the process of gluing roses near the loop.
- Cover the entire ball with roses. It is worth noting that if you use a glue gun, then needles are not needed.
- Leave the ball to dry for half an hour, then remove the needles and beads if desired.
The New Year's ball of roses is ready! I recommend watching this video!
Bows with butterflies made of kanzashi satin ribbons