The frog, or toad, as it is often called in the folklore of the Slavic peoples, is a popular character in children's fairy tales and cartoons. If you invite your child to wear such a costume for a children's party, he will happily jump like a frog and croak loudly. Of course, you can buy a frog outfit at any store, but it’s best to print a frog head mask yourself.
Choosing a material to create a mask
The mask can be of two types: a cap, which is simply put on the head , and a mask, which is put on the face, with slits for the eyes. For young children, the first option is recommended, since a mask that slips over the eyes can frighten the baby and make it difficult for him to see. For older kids, the second option is good. In this case, it should be well secured with elastic bands so as not to slip off the face. If the eye slits are too narrow, they must be widened.
You also need to make a slot for the mouth. It should be wide, imitating the open mouth of a real toad.
In order to make his performance at the costume competition bright and memorable, the child can learn a poem, song, counting rhyme or tongue twister about a frog. For example, a junior schoolchild will willingly recite Andrei Usachev’s poem “Merry Kampania.”
A frog or toad costume can be not only green. A variety of options are possible: the so -called protective color (in this case, you can sew a mask from old army uniform), swamp color, olive, yellow, brown. The main thing is that the image of the amphibian is recognizable. But it’s still better to dress up the baby with a green frog, because young children perceive bright, cheerful colors best.
The characteristic warts on the body of a toad can be depicted using brown spots of gouache or acrylic paint. Eyes can be any color, but yellow ones with bright green pupils will look most beautiful. For the frog princess, you can paint on flirty long eyelashes or instead glue thin paper strips curled onto a pencil.
Paper version
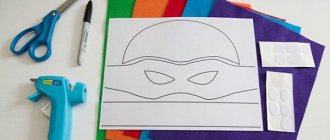
The most important detail of a New Year's costume is, of course, the mask. It can be made from paper or cardboard. For a DIY frog mask, you will need a pattern. Before the New Year they are often published in children's magazines. The paper product consists of the following elements:
- The base, which is used as a muzzle;
- An elastic band with which the base is put on the face;
- Eyes. They can be drawn or cut;
- Big mouth. The mouth should smile so that the baby is not afraid of his character.
a mask from paper or cardboard , but it will not last long and will quickly lose its presentation, especially if the child wears it during active games. Products made from papier-mâché last much longer. To do this, several layers of newsprint are glued onto a base that follows the shape of a frog's face, and then the product is completely dry and painted with gouache or acrylic paints.
Watercolor will not work because it will show through the layers of newspaper. Making such a mask takes quite a long time, so it is better to start working a few days before the holiday. The product must be allowed to dry thoroughly. You should not dry the mask near a steam heating radiator, because the paper will warp and the mask will lose its shape. For the same reason, you should not expose the craft to the sun's rays.
Mask made from improvised means
In order to cut out and sew a mask, you will need thick green or green and yellow fabric. Depending on the amount of material, it can be a full-fledged cap or just a thin headband. The headband will use half the amount of fabric. First of all, you need to download a frog mask pattern from the Internet and print it, and then transfer it to fabric . Here is a rough job description:
- The child's head circumference is measured. Based on the dimensions, the required amount of material is determined;
- The pattern is transferred to the fabric and adapted in accordance with the actual dimensions of the individual child;
- The base in the form of a cap is cut out and processed along the edges, and an elastic band is threaded so that the product fits better on the head. The elastic should not be too tight so as not to squeeze the head. For a younger child, it is better to make ties around the neck;
- Details are sewn to the base - eyes, mouth, warts.
Costume decoration
Green gloves are perfect for the frog, and you can put cardboard flippers on your feet for convincing. Both boys and girls can wear a green turtleneck and yellow shorts. If a needlewoman took a ready-made pattern for a frog head mask and printed it out, she can add her own decorative options to the template (for example, spots on a toad’s head).
You can make frog beads from cardboard or paper green leaves, cut out one stencil at a time and strung on a thick woolen thread. The Frog Princess mask can be covered with yellow or green sparkles.
Another fun decoration option is to embroider the word “KVA” in large letters on a sweater or turtleneck. If the jacket is green, you need to embroider with yellow threads, and vice versa, so that the letters stand out brightly against the background. You can make it even simpler: do not embroider, but stick on these letters, cutting them out of self-adhesive film. In this case, the decor can be easily removed after the holiday, and the sweater or turtleneck will turn into regular clothes.
Green frog shorts can be decorated with a bright yellow belt (or a green belt for yellow pants). Pants can also be decorated with themed embroidery or appliqué; it all depends on your imagination and the availability of available materials. Christmas tree tinsel in yellow and green colors goes well with the frog outfit. You can stick green rain on the Frog Princess mask
Frogs and toads love water, so you can also apply a few blue drops of water to the mask using gouache or acrylic paints. One or two such drops are enough, no more is needed, otherwise the mask will look ugly.
Dressing up as a favorite fairy-tale character is always a great joy for a child. If a child loves animals, is not afraid of toads and has a cheerful, lively character. A frog costume would be ideal. The choice of materials for its manufacture depends on the level of skill and the availability of free time. If you have little time and no desire to sew, you can limit yourself to a printed and glued paper mask. Experienced needlewomen can easily sew an original hat using ready-made patterns as a sample. You can also knit a frog's headdress with crochet or knitting needles, and then decorate it with additional details embroidered or glued from paper.
When choosing a suitable costume for a holiday, children very often give preference to the image of a frog. This image became popular thanks to famous characters from cartoons and children's fairy tales. Making a spectacular costume is quite simple with your own hands.
Making a frog costume for a girl with your own hands
Let's start creating a costume for the girl. It will consist of a T-shirt, a fluffy tutu skirt and an interesting hat with a spectacular crown on the head. Follow the following sequence of actions:
- For a sweater, take a regular turtleneck or a white/green T-shirt. You can paint water lilies or algae on it with acrylic paints.
- To make a tutu skirt, you need tulle of medium hardness. You can combine different shades of green. The amount of material depends on the length of the product and the desired pomp. On average, about 3 meters of material are used. The tulle is cut into strips 20 cm wide and a length equal to the length of the skirt multiplied by two. Next, we take an elastic band, up to 3 cm wide and a length equal to the girl’s waist circumference minus 3–5 cm. We sew it into a ring and put it on the back of the chair. We fold the tulle pieces in half and attach them with an elastic band using a knot.
- You can take a ready-made hat, or better yet, knit or sew it. The pattern can be obtained by tracing an existing headdress. Then sew the resulting parts on a typewriter.
- You need to glue the eyes to the hat. They can be cut out of thick cardboard or other material. You can glue or draw eyelashes.
- It is better to make a crown from felt. It must be drawn on the fabric and two elements cut out. Next, sew the two parts together and lightly fill them with cotton wool so that it looks voluminous and stays on the head. It is then sewn to the top of the hat.
- The look will be complemented by green gloves and tights, as well as a bow-shaped satin belt.
Step-by-step instructions for making a costume
The dress for the suit is one-piece, that is, the front and back with sleeves are cut out as one piece. To create a pattern, you can use the proposed diagram as a guide.
Sewing the dress:
- Fold the fabric into quarters with the right side facing inward. Set aside a distance from the fold equal to half the desired width of the product and draw a line. From the top fold, set aside the width of the future sleeve and also draw a line. At the intersection of the sleeve line with the side line, round the corner with a smooth line. Decide on the length of the suit and sleeves, and add hem allowances to the desired length. Draw and cut out a neckline in the corner of the fabric.
- Cut a strip of fabric 10 cm wide and equal to the length of the neck (drawstring).
- Sew the side seams. Fold in the hem and sleeves and place stitches under the elastic. Fold the drawstring in half and sew it to the neckline. Insert rubber bands. The dress is ready.
Scheme
Cap:
- Measure the circumference of the child's head, and based on the measurement, cut out two semicircular pieces of foam rubber. Hand sew them along the top edge. Cut out two small eye blanks from foam rubber.
- Trace the eye blanks onto the fabric with an allowance of 1.5 cm on each side. Sew the covers and insert foam rubber inside.
- Using the foam blank as a guide, cut out two pieces each for the outer cover of the cap and the lining. The parts of the upper cover should be 1.5–2 cm larger on all sides than the parts of the inner one. At the bottom of the covers, add 5-7 cm to the hem of the fabric. Sew the lining. Sew the outer cover along the top side, first inserting the eyes.
- Insert the lining inside the foam blank, fold the excess fabric outward and secure with stitches in a circle. Put on the outer cover, fold the excess fabric inward and sew with a hidden seam.
- Cut out the eye parts from black and white felt, sew them on or secure them with glue. Draw nostrils with a felt-tip pen. Cut a wide mouth from a piece of red fabric and sew it to the hat. If the edge of the fabric is fraying, soak it with PVA glue.
Gloves:
- Trace the child's hand onto the fabric using a small seam allowance. Extend your fingers by 2–3 cm.
- Sew and turn the gloves inside out and finish the bottom edge.
- Place a piece of foam rubber in each finger and wrap it with thread to create frog fingers. Soak the end of the thread with glue.
- At the wrist area, sew laces or tape to the gloves to secure them.
Equipment:
Overlock rating
The best overlockers for home and production according to customer reviews
Rating
More details
Sewing machine rating
The best sewing machines from budget to computerized
Rating
More details
Sew a long rectangular strip of yellow satin and decorate the suit with a bow.
DIY frog costume
Due to the versatility of the image, the frog outfit can be presented in many versions. This gives you complete freedom of action and allows you to create an outfit based on your own capabilities. Both boys and girls can transform into this hero. With the help of a spectacular outfit, you can transform into a frog princess, an enchanted prince, or a simple kind frog.
Frog head options
You can also decorate your head in various ways. The most popular are the following:
- Headband with eyes. It is a narrow bandage made of fabric or a headband to which large eyes are attached. The eyes are made large and showy with long eyelashes.
- A voluminous head made from an old cap and foam rubber. It completely covers the baby's head. There is a small space left for the head and nose. Volumetric ball eyes are glued to the top.
- Hood, cap or hat with eyes. If the jacket has a hood, then you can glue ball-shaped eyes to the top. The hood can also be sewn as a separate element. Eyes can also be quickly sewn or glued to a cap or knitted beanie.
- Crown. This is an option for the frog princess. It can be quickly made from cardboard or colored paper.
- Face mask made of felt and cardboard with an elastic band. The shape can be different, the main thing is not to forget to cut out holes for the eyes.
How to make a frog's body
The frog body can be made in many ways. It all depends on the ability to sew and other skills. To begin with, you can search among your existing clothes for trousers, turtlenecks, dresses and other green wardrobe items. So, for a boy, they often sew a suit consisting of a jacket and pants or shorts. The main part of the outfit for a girl can consist of a fluffy tutu skirt and a turtleneck or T-shirt. The skirt can also be in the shape of the sun, made of thick satin or satin. Of course, a win-win option is a dress. You can choose colored tights or knee socks. REFERENCE! The basic part of an outfit for girls can be leggings or gymnastics suits.
How to make frog legs
Of course, you can take ordinary green gloves, or better yet, make real webbed frog legs. To make the paws, first, you need to trace the outline of the child’s hand on paper. You don't need to trace every finger. Next, we transfer the pattern to the fabric and cut it out in four copies. It is better to put filler inside. We sew it on the machine and turn it inside out. Next we stitch the finger compartments using a machine. We sew five small pompoms along the edge. Paws on the feet can be made by attaching cut out toes and webs to the sole of the shoes. The paw should be wider and may resemble flippers in shape. ATTENTION! You can also sew triangular membranes made of light fabric or elastic paper to the fingers of the gloves. Fingers are filled with cotton, creating a volume effect.
Do frogs wear fur coats?
The previous version of the frog carnival costume is only suitable for girls. Now we will look at an option for a festive outfit that can be worn by both boys and girls. We will show you how to make a sleeveless vest, paws and beret from faux fur.
To make this costume we will need the following materials:
The following drawing will simplify the process of making a frog outfit.
Let's start by making a sleeveless vest. You need to cut an oval out of yellow fabric. Now you need to sew this oval in the abdomen of the frog. Make patterns, cut and sew the front, belly and back. Fold the entire lower part of the sleeveless vest by 2.5*3 cm, sew and insert an elastic band. This is how it’s not difficult and quick to get a sleeveless vest.
Now let's start making the beret. You need to cut out number 1 and make cutouts for the eyes in it. Now make the second part. Sew 2 pieces of green and yellow fur.
Place the prepared parts so that the front part faces inward. Sew the edges. Cut the fleece lining to the size of the beret inside. Fill the inside with synthetic padding and sew up the edge, having first threaded an elastic band there.
Exactly as shown in the pattern, cut out the frog's eyes. The front side should be facing inward. Now sew them along the edge, turn them inside out. Put holofiber in them. Using a blind stitch, sew them to the beret. All that remains is to glue the plastic eyes using a glue gun.
The only thing left to do is make the mittens in the form of paws and sew an elastic band inside. And the suit will be ready.
Ideas
Simple suit
It’s easy to make a frog costume if you have green items in your child’s wardrobe. A green dress, skirt, T-shirt or leggings can easily become the basis of an image; you just need to decorate them, add a headdress or applique.
White T-shirt with frog appliqué
Green tulle skirt
Headband with eyes and crown
Green dress with puff sleeves
Fabric leaves of water lilies with flowers
Eyes and crown on the rim
Complex costume
More complex costumes will require a sewing machine and a little more time. But the result will definitely please the child. Such costumes may include a smart green dress, set or overalls and a headdress depicting a frog's head. Green webbed “feet” will also serve as an excellent addition.
Green top and skirt set
Funny hat with a frog face
Stiff felt webbed feet
Green jumpsuit
Frog head cap
Frog legs gloves and slippers
Frog costume
A frog costume with trousers, shorts or overalls is perfect for a boy.
The shiny insert on the chest resembles the belly of a frog.
Baseball cap with eyes
Jacket with flared sleeves that imitate frog legs
Bright bow
Volumetric hat - frog's head
Paws with elastic bands
Varieties of frog models
There are several types of origami crafts, and the patterns for folding frogs are very different. Novice paper creators can create:
- classical;
- jumping;
- frog princess.
Any option will perfectly complement the interior of the room or become an interesting children's toy. From the presented models, you can choose the most suitable type of paper figurine.
Step-by-step instructions for beginners will help you create a craft without any special skills in the art of paper folding.
Making the torso and bottom
It is important to close the top when making a suit. To do this, you can take a green T-shirt as a basis (the shade should be similar to “frog”), which can be slightly modified.
This is how they take satin, tulle and other light fabrics (if you don’t mind, you can also take silk), which are cut into pieces. The size of the pieces should be determined by the height of the person for whom the costume is being made.
These pieces themselves are sewn onto the base (T-shirt). At the same time, they strive to fully display the appearance of the frog - all its shades, pigmentation, etc. If you want to keep the T-shirt, you can glue the fabric - this will allow you to remove the stickers after the masquerade without damaging the T-shirt.
This type of work, like the previous one, is absolutely the same for both girls and boys.
Next we move on to the belt and legs. There are differences in making costumes for boys and girls.
The easiest way to make a similar costume is for a boy. To do this, you just need green pants, which are covered with fabric in the same way as a T-shirt - repeating the natural appearance of a frog or toad.
Girls should make a skirt. To do this, cut out a blank from cardboard that resembles a ring. To avoid problems with putting on a skirt, this ring has a V-shaped neckline. The width of the ring should be 3-10 cm - depending on how full the skirt should be.
After which the workpiece should be painted or covered with green colored paper. The second option is more preferable because it allows you to better hide the cardboard. Next, take tulle; the width of the material should be 5-10 cm greater than the expected length of the skirt. This difference is folded and hemmed in the same way as curtains - making a kind of “accordion” at the top and bottom. This will allow you to make a neat suit and will not allow it to “creep”. After which the prepared ring is covered with tulle.
Under this skirt, girls should wear green leggings or pants, which are also lined with tulle, imitating frog “skin.” The skirt can also be complemented with small yellow cardboard crowns and other decorative elements glued to it.
Steps to create a figurine
A square of paper is folded diagonally: first to the left to form a triangle. The sheet is straightened. Then the triangle is also folded to the right, the sheet is aligned. As a result, the letter X should form from the folds on the paper.
The square is folded in half to form a rectangle. The fold line is folded back. A horizontal straight line is used to fold the leaf with the folds inward to form a triangle.
The workpiece is turned over so that the wide side of the large triangle is horizontal.
The side corners lift up like butterfly wings and press the layers. Then straighten again, you should get a vertical line that divides the triangle in half, another 2. It serves as a border for folding the side faces.
The wide side of the left triangle is bent to a vertical line. Next, from the center, fold again to the outer line of the triangle on the same second side of the frog. This is a paw blank.
The second leg is also made - the wide side of the right triangle is folded towards the center. In this case, similarly, the side line extends beyond the perimeter of the main triangle and below the rhombus on the first side. The inner side of the scalene triangle is folded to its outer contour, like a fan.
The bottom side should look like the letter “L” with legs extending slightly to the perimeter, which are connected just above by a horizontal line of the paper layer.
Making a frog jump is easy. On the same second side, half of the diamond is marked with a pencil. The part with the tabs is folded up to this strip so that the connecting line is placed at the same level. Next, the tail is bent back to the bottom line of the previous fold.
The figurine is almost ready. The frog is turned over with its paws down, the front (first) side up.
Making the frog's eyes. To do this, small triangles are folded from the nose towards the paws. You can draw or stick eyes, eyelashes, etc. on these triangles.
How to apply makeup to a frog costume?
- A drawing skillfully applied to the cheeks of a young beauty will add charm to her and complete the image you create.
- To do this, use face painting that is harmless to children’s health. To match the frog costume, it is best to use light green, green and yellow paints, as well as dark shades, so that you can use them to outline the contours of your artistic masterpieces.
This makeup is suitable not only for boys, but also for girls
Abstraction
Face decoration
- It is best to decorate the girl’s face with some abstract design.
We will also tell you how to sew a suit:
- brown bear
- Polar bear
- Prince
- Witches
- Ryaba chickens
- Bullfinch
What big eyes does a frog have?
Now let's figure out how you can make your own headdress for a frog carnival costume. For this we will need the following materials:
The hair hoop will serve as our base. Now take the table tennis balls and put each one in a balloon. When you have done this, tie each ball to the hoop at such a distance that it looks like eyes. All that remains is to glue the white and black circles, as shown in the next photo.
See how the paws and eyes look together.
Making a frog from plastic bottles with your own hands
Numerous original ideas for using plastic bottles are born from the huge amount of this practical and affordable material. You can easily make a variety of crafts from it, including interesting animal figurines, for example, a funny frog. This is one of the easiest plastic molds to make.
This is interesting! In Slavic mythology, the frog is associated with fertility, moisture, and rain. She is considered a talisman that brings good luck and wealth. Therefore, the more green inhabitants there are in your garden, the richer the harvest in the garden will be and the stronger the wealth in the house.
Required materials and tools
To make a plastic frog, you need to prepare the following materials:
- two plastic bottles of the same shade and shape;
- paints for exterior work in various colors. Green paint is required;
- tassels;
- felt-tip pen and scissors;
- glue gun, strong thread with a needle or wire.
The same color of the bottles is needed so that the individual elements of the craft have the same shade after coloring.
Stages of making a frog
Let's start creating the frog:
- Labels and remaining adhesive must be removed from plastic bottles. This is easy to do by soaking the containers in warm water.
- We make the body blanks. To do this, cut off the bottoms of each bottle at a height of at least 10 cm.
Basic concepts used in the Policy
- Automated processing of personal data – processing of personal data using computer technology;
- Blocking of personal data – temporary cessation of processing of personal data (except for cases where processing is necessary to clarify personal data);
- Website – a collection of graphic and information materials, as well as computer programs and databases that ensure their availability on the Internet at the network address https://yoga5stihiy.ru/;
- Information system of personal data - a set of personal data contained in databases, and information technologies and technical means that ensure their processing;
- Depersonalization of personal data - actions as a result of which it is impossible to determine without the use of additional information the ownership of personal data to a specific User or other subject of personal data;
- Processing of personal data – any action (operation) or set of actions (operations) performed using automation tools or without the use of such means with personal data, including collection, recording, systematization, accumulation, storage, clarification (updating, changing), extraction, use, transfer (distribution, provision, access), depersonalization, blocking, deletion, destruction of personal data;
- Operator - a state body, municipal body, legal or natural person, independently or jointly with other persons organizing and (or) carrying out the processing of personal data, as well as determining the purposes of processing personal data, the composition of personal data to be processed, actions (operations) performed with personal data;
- Personal data – any information relating directly or indirectly to a specific or identified User of the website https://yoga5stihiy.ru/;
- User – any visitor to the website https://yoga5stihiy.ru/;
- Providing personal data – actions aimed at disclosing personal data to a certain person or a certain circle of persons;
- Dissemination of personal data - any actions aimed at disclosing personal data to an indefinite number of persons (transfer of personal data) or familiarizing with personal data to an unlimited number of persons, including the publication of personal data in the media, posting in information and telecommunication networks or providing access to personal data in any other way;
- Cross-border transfer of personal data – transfer of personal data to the territory of a foreign state to an authority of a foreign state, a foreign individual or a foreign legal entity;
- Destruction of personal data – any actions as a result of which personal data are destroyed irrevocably with the impossibility of further restoration of the content of personal data in the personal data information system and (or) as a result of which the material media of personal data are destroyed.
There was a son, but he became a frog
If you are doing makeup on a boy's face, then you can draw a whole frog or just its face. When you apply the drawing close to the eyes, be very careful. But it’s better not to paint the area around the eyes at all if you don’t have experience in face painting.
Unlike drawings on paper, when applying face painting, the contours are done last. After all, it all depends on facial features.
Step-by-step photo lesson:
Place a sheet of double-sided A4 paper vertically.
Fold it in half, then in half again and open it to create a horizontal fold. We bend the lower right corner to the fold line, which is located in the middle.
We bend the top corner to it.
We'll do the same on the left side to get two bent corners.
Fold the workpiece with the corners facing inward.
Bend the left side to the right.
Let's reveal. Using scissors, you need to make a small incision on the fold. The cut should be no more than 1-2 cm.
We make sides on the top side.
And we will also make them on the bottom.
Let's reveal our preparation.
We attach the smaller side with our fingers and get the croaking mouth of a frog using the origami technique. Now you can glue large plastic eyes to the top and draw the texture of the frog's skin with colored pencils or markers over the entire surface of the craft. Inside the mouth you can place a red tongue cut out of colored double-sided paper. Or you don’t have to do it.
Sew not a mitten, but a real paw
Sewing a carnival frog costume is not at all difficult. For these purposes, regular casual green clothing is suitable. Now we will share with you how to make real frog legs for this costume.
To make your own paws you will need the following materials:
Felt or fleece; Narrow elastic band (width 8-10 mm).
First of all, you need to draw a hat template on paper, which will be slightly wider at the ends of the fingers. Transfer the design to the fabric. You need to make 2 of these parts.
Attach elastic bands in the middle of the palms so that the child can easily put them on independently. If the suit has long sleeves, then sew the paws to them for convenience. If they are short on the suit, then you will have to sew 1 more elastic band to the wrists. If you have unnecessary gloves at home, cut them off and sew the paws to them so as not to use elastic bands.
We complement the image with accessories
Making a frog costume with your own hands is not that difficult. Sometimes clothes of the right color and frog legs, as well as large round eyes, are enough.
Let's see how to make eyes and paws.
Materials for paws:
- fleece or felt
- elastic band 5-10 mm wide
Draw a four-toed foot with “toes” that flare out at the ends. Transfer to fabric and cut out. Attach an elastic band to the middle so that the child can put it on the palm; measure the size in advance. If the garment has long sleeves, sew the paw to the sleeve, and if it has short sleeves, add another elastic band at the wrist. Or sew to cut-off gloves (socks will also work).
Next we make a headdress with round frog eyes.
Materials for the eyes:
- headband;
- balloons 2 pcs;
- ping pong balls 2 pcs;
- felt white and black, approximately 10 cm by 10 cm;
- glue.
Use the headband as a base. You will need two green balloons, as well as two round ping pong balls, which you need to place inside and tie the structure to the rim. Glue white and black circles on top as in the picture.
As a result, you will get this set:
Add-ons
If you have to create the image of not an ordinary frog, but a fairy-tale Frog Princess, then you cannot do without a crown. An excellent addition would be the shiny arrow with which the Frog was waiting for Ivan Tsarevich. Let's look at how to make these attributes yourself.
Crown and arrow
Materials and tools:
Wooden or bamboo stick
Headband or hair clip
Beads and crystals for decoration
Making the crown:
- Cut out a blank from shiny felt or foamiran. These materials are easy to work with: they hold their shape well, are easy to cut and do not crumble. You can use one of the diagrams below or draw your own.
- Make a round bottom for the crown.
- Using glue, connect the workpiece into a ring and glue the bottom.
- Decorate the crown as you wish with beads or crystals.
- The crown can be attached to a headband or hair clip. If you made a costume with a hat, attach the crown directly to it between the frog's eyes.
Arrow for the Frog Princess:
- Cut out two pieces each in the shape of the tip and fletching of the arrow from shiny foamiran or felt.
- Wrap the stick with shiny braid and secure the ends of the braid with glue.
- Glue the tip and feather blanks in pairs, inserting a stick between them.
- Cut the plumage into thin strips, not reaching the stick a few millimeters.
Option 2: jumping craft
Figure 2 will show how to make a frog out of paper in a couple of minutes. As you can see, in order for the frog to jump, the folds of the sheet are made according to the principle of a spring, which gives the shape of a funny amphibian. Nothing complicated, even kids can do it. It’s not difficult to make the little frog jump: you need to press your finger on the back of the toy and sharply release it, “sliding” back. However, first things first and in order:
- First, let's learn how to make a frog from a rectangular sheet slightly narrower in shape. Divide such a sheet into 2 equal squares with the middle bend;
- Fold each of the squares so that a diagonal marking is formed in them (see Fig. 2), fold the future frog by bending the planes inward, as the diagram shows;
- Bend the free corners with the “ears” outward - this is the beginning of the formation of a spring mechanism to which the jumping frog will owe its skills;
- Turn the workpiece face down and form the head part of the toy, bending the upper corners of the part towards you (pressing the bends tightly);
- Grabbing the lower “legs” together with the main part of the part, make 2 folds of the workpiece, forming a push spring for the back of the amphibian;
- The jumping frog is folded, all that remains is to draw its eyes and glue the tongue. This way it will become even more interesting - much more realistic and funnier.
Similarly, you can fold such a craft from a square sheet of the correct shape. Everything here is even simpler than with a rectangular paper blank (see Fig. 2). Use different sizes of paper, thinking about how to make the jumping frog larger or smaller. But a toy that will participate in competitions for the distance or height of jumps must all be made from a sheet of paper of the same size (large frogs jump both higher and further).
Frog Princess costume and New Year tree in kindergarten
Holidays are a good reason to take a break from work and talk about something other than travel. Traditionally, on New Year's Eve, we begin a series of pleasant events - Christmas trees, performances, various special events. And traditionally, I do New Year’s photo posts, where I post photos from these events: 2014, 2015.
After a while, I read articles with pleasure, look at photographs of events that were significant for our family, and remember... The end of 2016 was marked by a trip to the Prosveshcheniye publishing house for the award ceremony for the winners of the “Memory Map Routes” competition. The next day, December 22, Sophie had a Christmas tree in her kindergarten. On the 24th another Christmas tree.
And then - certification and a concert at the dance school where Sophie studies. The week turned out to be interesting and eventful. Now it’s time to capture, to one degree or another, all these events on the blog. I’ll start with the holiday in kindergarten. Since 2017 is my daughter’s graduation year, the New Year’s holiday in the garden is the last and especially important one.
Money toad: meaning and origin
The money, or three-legged, toad is an ancient Chinese symbol of wealth, prosperity, luck and abundance. The talisman figurine is depicted as a toad with three legs, which sits on a pile of money, jewelry and gold bars and holds a coin in its mouth.
The origin of this image is associated with various legends, two versions are especially popular:
- Once upon a time, there lived an evil and vengeful creature that looked like a toad. It brought a lot of harm to people, and Buddha deprived him of his paw as punishment, obliging him to become useful and do good. From then on, the three-legged toad brings material benefits, money and good luck.
- In the second version of the legend, the cruel robber Chan Chu was turned into a toad. For many years he robbed and killed people, and at the end of his “career” he became completely unruly and began to attack even the lower gods. They turned to Buddha with a demand to punish the scoundrel. Buddha turned him into a three-legged toad that walks around the world and atones for his sins by helping people get rich.
Money Toad: Public Domain Pictures
Thus, since ancient times, the toad has become one of the symbols of wealth. Feng Shui, however, gives a broader interpretation of this image. The toad is a symbol of happiness; it promotes well-being in various areas:
- helps in concluding profitable deals;
- protects the family hearth, is responsible for maintaining energy balance;
- helps improve the health and well-being of home residents;
- creates an atmosphere of joy, helps maintain warm relationships in the family.
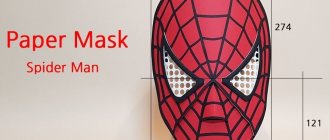
Model from a plate
The simpler the way to create a mask, the better. So why not take advantage of the things that are on hand in every home. Such a thing is a paper plate. It’s worth immediately cutting off the question: is it possible to use a plastic plate? Unfortunately, a plastic plate will not make the mask you need, and it is also less susceptible to various types of manipulation.
It is advisable to take a green plate. If you don’t have one, don’t worry, take a regular white plate and paint it green using paints. Take a plate and cut out a wah's face from it as shown in the picture. It is worth making her eyes and cheeks especially convex.
Next we start decorating. You can decorate the product using felt-tip pens, or cut out eyes from colored paper and glue them to the base. A great option is to decorate the mask with butterflies. They can be cut out of paper and glued directly to the base: it looks fun, spring-like and interesting.
This way you can make frog masks without sacrificing finances and time. The simplicity of the methods allows you to include your baby in the creative process. Usually children love this kind of pastime, and afterward they are proud of their creation and feel comfortable and confident in the mask, because it was created by their hands.
Source
Foam rubber option
Foam rubber models look fun, creative and quite unusual. For this you will need:
A foam frog mask is easy to create. You need to take foam rubber and sew a “helmet” to the size of the baby’s head. Moreover, the length should be from the back to the neck, from the front to the nose.
After the “helmet” is sewn, make a cut in the mouth area. After all, as you know, a frog has a fairly large mouth; such a cut will resemble the open mouth of a frog.
You need to lower the cut part right down to the child’s chin so that the entire face fits into the resulting hole.
Now it’s just a matter of small things – product design. Using black and white foam rubber you need to make the frog's eyes. To do this, cut out a circle of white foam rubber and tighten it with threads along the edges, giving the desired volume. Black circles are sewn on top. This is how one eye is made, and the second one is made in the same way. Afterwards, the eyes are sewn to the main structure so that they are on the child’s forehead.
This model looks extremely unusual and funny; a New Year’s costume of this kind will certainly not go unnoticed.
How to make a frog tongue out of paper
But this incredible video will teach you how to assemble something absolutely amazing out of paper with your own hands - a frog tongue. Well, not a real language, of course. And a paper craft that uses the same principle. Remember how a frog uses its tongue? It flies out of her mouth with incredible speed to grab a mosquito and just as quickly returns back to her mouth with the captured prey. Everything is the same here.
This is a very mobile and very lively craft, controlled with your fingers. The assembly and operating principle of the language are very simple. You will understand everything yourself during the assembly process. A little advice for the end - if you glue some kind of funny face or, on the contrary, a scary grimace to the tip of your tongue, you can scare your friends and make fun of your classmates in a very funny way.
For assembly you will need: a strip of thick, strong paper.
In this section, we have collected for you the best video instructions on how to make a variety of frogs out of paper with your own hands: simple origami frogs, models that jump, that open their mouths (croaking), and are put on your fingers. Diagrams and assembly videos in Russian and English.
How to make paper crafts with children 4-5 years old
I will provide templates, descriptions and ideas for paper frogs. For example, such a voluminous craft has a stand (base).
You can do something similar using this scheme. Cut the workpiece along the dotted lines or along the contour. Fold the lower free edges and glue them together.
Of course, you can always find improvised materials that will give the toy a special touch. For example, this photo uses a disposable plate as a basis. They can be either cardboard or food-grade plastic. The remaining parts are cut out of paper and glued to the body.
A funny idea with an image of the outline of the palms. The child will be interested in tracing his palms. You just need to help cut them out.
Remember the puppet theater? Where cardboard or fabric puppets are pulled by the strings. If you print this blank, all that remains is to align the holes on the torso and limbs and tie them with thread or wire.
You can make many crafts from round blanks.
Or this one.
Decorate an ordinary glass with the head of a smiling frog.
Toilet paper rolls are also used for creativity. For example, a game was invented here: you need to catch the tip of a frog with your open mouth. Believe me, this will not happen right away.
Here are some more funny green frogs having a conversation.
Or you can play with the bushings like this. Just glue on long strips that will imitate legs.
And in this version, the craft can stand, and pencils or pens can be placed inside for storage.
Like here. So for some time you can replace the organizer and pencil holder.
I offer an interesting craft on a water lily leaf.
You can use this template.
I also liked the bookmark. We made completely different ones as children, so this option is not entirely familiar. But you will definitely notice such a corner and immediately find the right part of the book.
Of course, we need to make such an assistant.
Once again the origami technique came to our aid. Take a square sheet and find its diagonals.
Fold the sheet in half and turn the corner closest to you. And we find the middle of the outer triangles.
We wrap them inside.
And on one side we hide the edges inside. To make it more interesting, glue on the eyes and tongue.
And such a princess can be made from felt.
This frog seemed very funny to me. A perky smile and long accordion-shaped limbs give her a very fabulous look.
You don’t know what else to do with your child. I'll give you an idea! Cut out the head of the wah and insert a balloon into the mouth. When you inflate it, the child will see not your face, but a frog's.
Egg trays make such cute frogs.
Here's another idea for a three-dimensional craft. With funny bellies that give frogs stability.
For the applique, I suggest printing and cutting out this blank.
I would like to show you an easy master class on creating crafts from bushings.
Hanging view of a pencil holder. It is very convenient when it hangs on the cabinet door.
This option is also interesting. Look - the strips are used the same width. This is an important nuance for obtaining volume.
These little frogs have legs that move.
There is no shame in taking such a craft to kindergarten. If a suitable topic is found))
Here's another template for cutting. In addition to these parts, PVA glue will also be useful. It is considered the safest for children.
Make another wah out of hearts.
The highlight of this craft was the body, made from strips of the same length.
This is how you can entertain kids at a birthday party. Such whistles are sold in holiday departments.
Would you like me to show you how to draw a frog beautifully? Here are the step by step steps. All that remains is to repeat.
Such kids can be useful when creating an applique or postcard.
And you can make not only green frogs, but also yellow, blue or other bright colors. Children often go beyond their usual boundaries and let their imagination run wild.