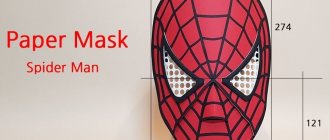
How to make a voluminous skull mask using a template
Before you make a skull out of paper, you need to prepare a template. You can make it in several ways: draw it yourself, copy it from a picture, find an image on the Internet. It is better to take a skull with a visible jaw. Next, transfer the drawing you like onto the piece of paper twice. That is, you will need two identical blanks. Don't forget to adjust the picture to the size of your face! The thicker the paper, the more voluminous the mask will be. You can even use a shoebox as material. We cut out the drawings along the contours and glue them together. Now we make holes for the nose and pupils of the eyes.
Now let's move on to the second part. We will learn how to make a skull (upper blank) out of paper. For this template, you need to transfer the same drawing onto a piece of paper, but without the lower jaw. We cut holes for the nose and eye sockets. If the selected drawing had cracks in the skull and other additional elements, now is the time to make them.
Note! Before this, we made holes only for the pupils, now we cut out the eyes completely. It is important. This will make the mask look more voluminous.
We cut out the top blank along the contour and glue it to the first part. While the base dries, let's move on to additional elements. Draw on paper and cut out the upper jaw and nose. We glue the parts to the skull. The result should be a “sandwich”. How to make a paper skull mask, you know it's time to give it color.
Now, using a piece of foam rubber, we paint the mask. Waiting for it to dry. We outline each element with a black marker or felt-tip pen.
Cosplay magazine
Information
About the organization: Greetings, friends!
Cosplay has long ceased to be an awkward hobby and costumes from an old curtain. It has become a serious hobby, supported by the skills of hundreds of cosplayers and crafters, which naturally arouses wide interest among many people. Show in full... Some people are just watching with interest, while others would like to start cosplaying themselves, but simply don’t know where to start.. The trouble is that on the Russian-language Internet there is an acute lack of information dedicated to this interesting hobby.
This blog is intended to solve this problem. In it we will cover cosplay exclusively from its practical side. That is, a sea of useful information, articles, tutorials, tips and reports awaits you here. There will never be any stupid dumps of pictures and photos here.
The project started recently. We ask you to support us. Subscribe, tell your friends, spread art to the masses!
All the best. Love you. Administration. Founded: February 14, 2014
1,212 entries Suggest news
Let's not quarrel in our public! That is, one’s own opinion is of course good, but not when it insults or offends someone. There is so much negativity everywhere, let’s try to at least reduce its amount here. For those who create conflicts and particularly heated arguments, I personally prescribe a ban for a week and a couple of good pills. Let's maintain the usual comfort together. Everyone is welcome here and everyone is valued! ヽ( ⌒ω⌒)人(=^‥^= )ノ Your Hime ps art from the beautiful Stolz.
If you urgently need to make a cylinder, but there is no fabric and time, but you have tape, then go ahead! Hatter's hat in an hour or less. Show in full... We will need: corrugated cardboard, tape, primer in a can, black paint (or whatever you need) in a can, acrylic paints, glitter glue, sushi sticks, an empty ball (I took mine from my younger brother in toys), instant glue crystal glue gun and matte varnish in a can, a piece of fabric of a different color. What to do? We make a base for a cylinder from cardboard, then we can strengthen #papier_mâché @itscosplaytime but I didn’t, we take tape and paste it over our base for imitation fabric, prime it carefully (in two layers) with tape so that the paint does not peel off during any interaction with hands and surrounding objects, then we paint, we make a pattern with acrylic, I made stains with my fingers under space, you can do it with a sponge, I think everyone knows how to do splashes, we fix everything on top with varnish. We sand the sushi sticks and give them the desired shape, paint them as we want, attach them to the hat with glue, tie the fabric at the bottom, you can add feathers and a piece of paper with numbers by burning it around the edges. Our cylinder is ready!
How and what to make a mask mount from
If you plan to only apply the mask to your face, you can glue a stick or a long and narrow rectangle of thick cardboard. If you want to use the skull without using your hands, it is better to use another method.
You will need two pieces of ribbon or an elastic band. We glue them to the mask. For better fixation, cut out two small pieces from cardboard or paper. Lubricate them with glue and place them on the ends of an elastic band or ribbon. Place the mask under the press for several hours.
Rules for purchasing gypsum
Beginning craftsmen often wonder: where to buy plaster for crafts? There are several options:
- Pharmacy.
- Hardware store.
- Construction goods store.
- Decorative art supply stores.
When purchasing a base powder, you should pay attention to the tightness of the packaging (after all, violating the integrity of the package will lead to the powder getting wet) and the expiration date.
After the shelf life expires or the rules for storing gypsum are violated, the material loses its basic properties, which affects the quality of the crafts.
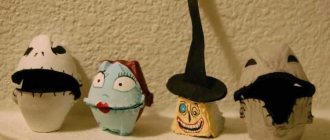
Making a paper mask in the shape of a skull for a child
The easiest way to make a skull out of paper is to print the photo from the article on a color printer, cut it out and glue it along the allowances, as shown in the pictures. But you can do it differently.
From white paper we cut out an oval according to the size of the face. This will be the base of the skull. On black paper we draw two large ovals-eye sockets and a triangle-nose. Don't forget to maintain proportions. Glue the parts to the skull. We make holes for the child's eyes. Now you can make a mount for the mask using the methods described above.
Additional materials for work
To create figures from plaster, the master will need special forms:
We recommend reading:
Crafts from plasticine: the best master class for children at school or kindergarten. 90 photos of the best ideas for creating plasticine figuresFelt crafts - the best patterns and templates. Step-by-step instructions and master class for beginners (130 photo ideas)
DIY crafts from egg trays - the best step-by-step master class, with description. TOP 100 photos of original ideas for crafts
- Silicone molds.
- Homemade frames made of wood or metal.
- Natural materials: large shells, boulders or even unusually shaped leaves.
Also during the work you may need decorating materials: paint, acrylic varnish, brushes, beads, rhinestones. Photos of finished plaster crafts will help you choose a model to work with.
Working with plaster should be carried out in compliance with safety precautions: when diluting the powder, be sure to use a mask and goggles, and when creating figures, wear gloves.
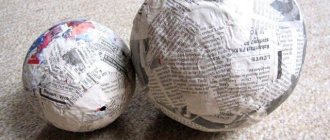
How to make a skull prop out of paper: selecting materials
Before you start, it's a good idea to have an idea of what the skull actually looks like. This is necessary so that the future props look realistic. Just look at as many pictures of real skulls as you can. Now let's take:
- Balloon.
- Vegetable oil or Vaseline.
- Marker.
- Masking tape.
- Paper or newspapers torn into small pieces. Cutting is not recommended. You just need to tear it so that the pieces of paper adhere better to each other and the transition is more invisible.
- Paste or PVA glue, diluted with water in equal proportions.
- Stationery knife or scissors.
- Putty.
- Sandpaper.
Crafts for the garden plot
Plaster figures are great for garden decoration: you can place a beautiful craft on a children's playground, on a summer terrace or along a driveway.
If the craftsman desires, you can find molds of any size, and for the manufacture of absolutely any product: full-length animal figures, turrets for a toy castle, and the castle itself (for a playground).
We recommend reading:
Crafts flowers - 125 photos of the best ideas from craftswomen. Instructions on how to make it yourself from A to Z. Simple and complex options for crafts + video tutorial- DIY crafts: TOP-200 photos of the best ideas. Schemes, master classes, modern design, new products, instructions with descriptions
Crafts from nuts - 120 photos of the best ideas for beautiful crafts. Original design options + step-by-step instructions for beginners
What is “alginate powder for impressions”
The use of this powder can most often be seen in dentistry. Using alginate, dentists make impressions to model dental prostheses, as well as to clarify the patient’s bite.
The powder sets quickly. Its “lifetime” is about fifteen minutes. So from the moment the water touches the powder, you don't have much time to stir it and then have time to stick your hand in there to create an impression.
Alginate holds its shape well, so it is often used for making impressions not only in dentistry. You can dip your hand into the alginate only after you have mixed the substance with water until it becomes thick sour cream. It will turn pink and change to yellow as it hardens.
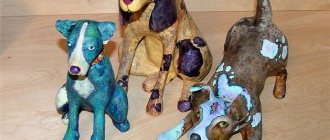
Crafts for the New Year
New Year's crafts made from plaster will help you decorate your home in an interesting way on the eve of the holiday. These can be beautiful stars, balls or snow houses, painted in a variety of shades.
Working together with a child will please everyone: both children and parents. And the bright colors and shine of the New Year's toy will lift your spirits.
Hunting trophies and their collecting
Looking around the room of an avid hunter, you can create a vivid picture of the adventures of its owner: bear claws and teeth, paws of birds of prey and ducks, various feathers and skins. But the classic and most honorable decoration is a skull with antlers, for example, a deer, elk or deer. A beautiful decoration can be made from just one horn, but sometimes the walls are covered with entire branches of these solid things.
The antlers of a large animal, such as a deer or elk, are heavy things, and before hanging such beauty on the wall, it is customary to make a special shield or medallion for it. You can either buy it in a store or make it yourself - it’s all up to the hunter’s choice. On sale you can find medallions for every taste and budget, but the best thing for an enthusiastic person who has himself obtained the skull of an animal is to make a worthy medallion for him. We'll talk about the techniques for creating such a thing.
Crafts for home
You can also make crafts from plaster to decorate your home. Miniature figurines on a book shelf, sets of fairy-tale or cartoon characters for children will complement the interior of the living room.
For lovers of indoor flowers, you can make original pots for small sedums, decorative dracaenas or a bright Christmas star.
Brief information about ungulates
Among ungulates, hunters are mainly interested in two families - full-horned and bovid. Let's look at them in a little more detail.
- The bovid family is the largest group of artiodactyls, numbering about 50 genera and 130 species. They differ from their relatives in the structure of their horns, which fall off every year and then grow back. Bovids have sharp, pointed bony growths on their foreheads, which are surrounded by a horny sheath. These growths constantly grow in length, and at the base they constantly become thicker. New layers are formed on them, which become a case for them. Thus, they grow in many layers from year to year.
- Deer family. Their horns form on the bony processes of the frontal bones, grow and fall off annually. This is a process that ossifies and is not covered with a horny sheath, like in bovids. After the antlers fall off, the deer's bone stump becomes overgrown with a cartilaginous cap covered with hair. A new horn develops from this cap, they are very sensitive, but as they grow they harden and ossify.
Garden figurine for the playground
To decorate children's playgrounds you will need crafts in the form of animals or fairy-tale characters. For example, in the form of three little pigs or a family of hedgehogs.
Bright acrylic paints will become not only a decorative, but also a protective coating. The coating layer will prevent moisture and dirt from entering, and will also significantly extend the service life of the product.