The master class outlines the basic techniques for making masks at home using the papier-mâché technique.
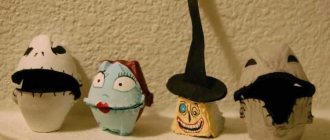
Making papier-mâché masks is very exciting and interesting. From simple and affordable materials, you can make not only a New Year's mask for children's parties, but also repeat the masterpieces of makeup from Hollywood films.
Beginning craftsmen should practice on small crafts in the form of mysterious Venetian masks. Those who are familiar with papier-mâché first-hand can try to create their first masterpiece with relief detailing of all the features of the “second person”. A skillfully sculpted and painted mask will become the main decoration of any themed party.
History of the spread of papier-mâché technology
France launched papier-mâché products into mass production in the mid-17th century; collectible dolls, sets, and decor were produced using this technique. However, later during excavations, military household items of the Chinese army were found. These include helmets and overhead protection for the body of warriors.
The age of the finds surprised everyone - they were made in the 200s BC. Archaeologists are confident that the birthplace of papier-mâché is China. Later, objects made using this technique were found in Japan and Persia.
Using technology for children's creativity
Preschool children and older children love to make things with their hands. This develops creativity and develops finger motor skills. As a rule, plasticine or clay is used as a material. But papier-mâché is no worse. After all, this is an absolutely natural, safe material (especially if it is made on the basis of paste), which children of any age will be happy to work with. Of course, it is better for one of the adults to prepare the mass itself. But everyone can sculpt it together: from the little ones to high school students.
What is done using papier-mâché technique?
In the modern world, with the development of technology, this technique has begun to be forgotten. But earlier it was used in the manufacture of furniture, lamps, boxes, snuff boxes, hats, jewelry, masks and theatrical scenery.
Today, photographs of papier-mâché crafts represent various figurines and decorative items, less often they have any functionality. But sometimes modern designers use papier-mâché in the manufacture of non-standard interior items.
What are the ways to make objects from papier-mâché?
You can make papier mache crafts with your own hands using three well-known methods:
- according to the shape of an object: in order to repeat the desired shape, special blanks are usually layered onto the object
- modeling from paper "clay"
- from plates made of paper under press
How to make papier-mâché according to the shape of an object
Each of us made crafts from papier mache as children. The master class that we all received back in school consisted of making a plate and then painting it. To repeat the shape of an object:
- you need to take old newspapers or thin paper and tear it into small pieces
- prepare a bowl of glue or paste (a mixture of one tablespoon of potato starch and 500 ml of cold water)
- dip pieces of newspaper into liquid and stick to the selected surface in several layers
- leave the form until completely dry
- carefully remove the form from the resulting object
- open the item with varnish or matte paint
Crafts from papier mache for beginners are most often made in this way. It is difficult to make a mistake in this process and the object always turns out to be the desired shape.
Paper
In fact, you can use any paper except cardboard. Since cardboard is used to make large and professional designs.
For children, it is better to take toilet paper, napkins, newspaper or sheets from a notebook.
How to make papier-mâché using modeling
This method is chosen for the manufacture of objects of complex shapes for which it is impossible to select a template. How to make a craft from papier mache by analogy with clay products:
- make paper dough from pieces of paper and paste solution, which will have a consistency similar to dough or clay
- mold the desired shape from paper dough and leave it to dry for a day in a dry, bright place
- coat with acrylic primer
Preparing material for work
For machining and modeling techniques, it is enough to tear the paper into strips or scraps, but for modeling you will need special paper dough. Let's take a step-by-step look at one of the options, suitable for large crafts:
- Tear 10-12 egg boxes or trays and 2 glossy magazines into small pieces.
- Place the paper pulp in a bucket or basin, add water and leave to dissolve for a day.
- Mix the soaked mass with a household or construction mixer until it becomes a homogeneous puree.
- Strain out excess liquid through a cloth, but make sure that the mixture does not dry out.
Ready! Keep in mind that you can prepare a lot of this mass at once, and soak it with water before use.
Important! The prepared paper dough must be mixed with PVA glue immediately before modeling. Wallpaper glue can be added immediately after straining out the water, but this mass must be stored in the refrigerator.
Paper dough
Here is an option for making paper dough for small and thin elements:
How to make papier-mâché from plates
Crafts using the papier mache technique can be made from plates that are made of paper. To do this you need:
- glue together several layers of paper of the same size
- make a base for a future craft from the resulting material
- make paper dough and apply it to the base to consolidate the result
- coat with acrylic primer
I saved from a jar with my own hands
Necessary materials:
- 2 empty water bottles, shorter ones
- 3-4 sheets of paper, pink patterns
- 4 small self-adhesive eyes
- 1 pink pipe cleaner
- 8 small pink wooden beads
- Glue gun
- Scissors
Step-by-step instruction
- On one side of each bottle we cut a slot approximately 5 cm long and 2.5 cm wide. The length of the slot should match the length of the bottle.
- We cut out a piece of paper for each bottle that will match them, and wrap it around the bottle.
- The paper should be sized so that there is about an inch of plastic at the bottom of the bottle and the spout at the top of the bottles.
- We wrap each bottle in paper and glue it with a glue gun.
- We cut out slots in the plastic from paper so that they are open. Before gluing, make sure the gap is at the top of the bottle when it lays down.
- Cut out 4 small pig ears from another piece of pink paper and 2 small round circles the same size as the bottle caps.
- Glue each circle to each bottle cap. Glue 2 ears to each bottle on the edge of the paper closest to the spout.
- Glue two eyes on each bottle about halfway between the cap and the ears.
- Turn the bottle over to the underside opposite the slit. Glue 4 pink beads to make them look like pig feet.
- We spread them equally so that the pig is already standing on four legs.
- Cut a small piece of pipe cleaner, twist it into a loose spiral, and glue it to the bottom of the bottle so it looks like a pig's tail.
The piggy bank from the jar is ready! Let's start saving.
How to choose material for making papier-mâché
Step-by-step production of papier-mâché begins with the selection of basic materials. It depends on what item you plan to make:
- thin paper (old newspapers, toilet paper, tracing paper, parchment) can be used to make small items
- cardboard is used to make large crafts that require a solid base
The fastening mixture can be made from glue, starch or flour paste. PVA glue must be diluted with plain water in a 1:1 ratio. Flour paste can be made from 100 grams of flour and 400 grams of water.
Glue
It is for schools and kindergartens that it is better to use PVA glue or paste. There’s not much to say about PVA, since it can be bought at any office supply store.
Preparation of the paste is basically normal. To do this, you need to pour one glass of flour into a convenient saucepan, add three glasses of hot water and half a spoon of salt.
At the same time, mix everything thoroughly so that there are no lumps. Then boil the resulting mixture for 10 minutes and stir constantly, then cool.
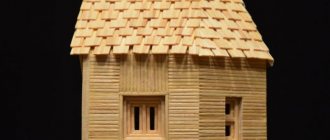
Ideas for crafts from papier-mâché
Using this technique you can make many amazing things for your home:
- pots for house plants of different sizes and designs
- original flower vases
- base for wall clock dial
- candlesticks
- lamp shades
- caskets
- piggy banks
- dishes for fruits and pastries
In addition, papier-mâché can be used to make a beautiful cover for a notebook or diary, bowls for jewelry, and even decorations themselves. Also, many interior designers make shaped moldings on windows, around mirrors and doors from papier-mâché.
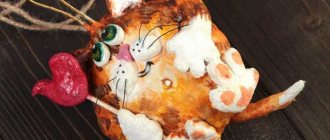
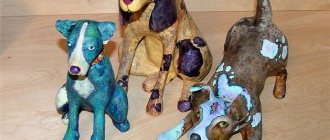
How to make a papier-mâché doll
Most often in our time, the papier-mâché technique is used to make dolls. Most often they are made not from paper dough, but according to the shape. To create the base, choose the softest and most pliable material, for example, plasticine. From it you can sculpt such small details as eyes, ears, lips.
The mold is then covered with a solution of tiny pieces of very thin paper and paste. This is practically jewelry work; it requires precise movements and correct timing to fix the material.
Sometimes an existing doll is selected for production and pasted over with a composition using the papier-mâché technique. Dolls and other items with small parts often take several days to dry.
It’s not for nothing that the papier-mâché technique has been used for so many centuries. With its help, it is possible to make so many useful, functional products. It allows you to realize all creative ideas and is accessible to everyone.
The advantage of this technique is that most of those who use it succeed in all their crafts the first time. If you do everything according to the instructions, failure can be avoided. Be sure to try it to see this theory for yourself.
Plate, saucer or bowl
- These crafts are the easiest. As mentioned earlier, all the necessary items and tools need to be prepared in advance.
- That is, take dishes, while it is safer for children to use plastic dishes, but not disposable ones.
- Lubricate the surface with vegetable oil, lay out the first layer with damp paper and then lay out layers, lubricating them with paste or PVA glue.
- There is no need to apply too many layers, about 7 is enough.
- Allow the craft to dry; after drying, carefully separate the paper part of the craft and paint it with ornaments or other designs.