Preparing to make a wheelbarrow
Before starting to manufacture a garden cart, they create drawings with their own hands based on a well-thought-out model. The main purpose of the device is first determined, what exactly is planned to be transported and over what distances. Depending on the purpose, the optimal dimensions of the body and wheels, as well as materials, are chosen.
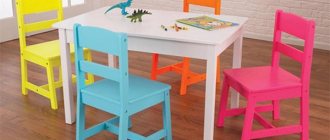
DIY garden wheelbarrow
Having drawn an exact diagram of the planned structure, you need to determine how much materials will be needed. After conducting an inspection in your household, you can say with confidence which components are available and what needs to be purchased. In this case, you can immediately calculate financial costs, determining the profitability of your actions.
Which wheels to choose
If you have unnecessary children's bicycles, scooters, or strollers, the issue of finding wheels can be resolved very easily and quickly. Without any monetary costs, a homemade wheelbarrow for a summer residence will be provided with wheels. Depending on the design design, you can use a different number of wheels - from one to four.
If there is nothing suitable on the farm, then there is a need to purchase new wheels. They can be of different prices, but you don’t need to save too much on them by buying the cheapest ones. It should be taken into account that the wheels will bear quite a large load, so it is worth taking care of high-quality and durable parts.
Important! When buying new wheels for a cart, you should pay special attention to their size. Small wheels can significantly complicate the movement of the structure on uneven ground; considerable physical effort will be required to move the wheelbarrow. Therefore, it is worth giving preference to medium-sized inflatable wheels with a metal rim, which will make it possible to move heavy loads in the cart even on loose and uneven soil
Therefore, it is worth giving preference to medium-sized inflatable wheels with a metal rim, which will make it possible to move heavy loads in the cart even on loose and uneven soil.
Optimal body material
Depending on the purpose of a homemade garden wheelbarrow, the size of the body, shape and material for its manufacture are determined. Most often, metals are used for these purposes: aluminum or steel.
Aluminum is a more expensive material, but it has a number of advantages:
- significantly reduces the weight of the finished structure, which facilitates its operation;
- The body is absolutely not subject to corrosion and does not require constant painting.
Steel is stronger than aluminum. If you have a welding unit, you can perform any operations with it, giving it the desired shape. A trolley with a steel body is heavy, which may require additional effort from the worker. At the same time, the increased strength of the body allows you to move even very heavy loads without fear of damage.
Durable body
If you have wood on your farm, you can make a cart body from wood. Old baby bathtubs or troughs can easily work. Even from unnecessary metal or plastic barrels, craftsmen make a body for a wheelbarrow. To do this, the container is cut in half vertically, and the cargo bowl is ready for mounting on the frame.
Note! The body made of a plastic barrel makes the structure quite light and mobile, however, moving very heavy bulky cargo can lead to its breakage and cracks.
What and how to make handles from
A DIY garden cart is usually made with one transverse or two longitudinal handles. The advantage of making household appliances yourself is that you can design the structure, taking into account individual characteristics of use and body type (height). Some gardeners note the particular convenience of a cart with one transverse handle, because it is comfortable to carry both in front of you and behind your back. You can move such a structure behind you, holding it with one hand, while walking along an uneven road, while it would be extremely inconvenient to carry a wheelbarrow with two handles in this way.
Handles are attached to the frame with the body, for the manufacture of which different materials can be used:
- metal,
- tree.
Most often, preference is given to metal because of its greater strength. If there are metal pipes of small diameter in the household, they can be used in the construction of both frames and handles.
Additional Information! Metal parts are best joined together by welding rather than mechanical fastening. For convenience, the part of the metal handles that you hold with your hands can be wrapped in rubberized film.
What is a cabinet for?
A tool box is a unique and multifunctional device that can be called the calling card of a master who knows his job well. A piece of furniture allows you to save a lot of time spent searching for the necessary parts or tools. In different compartments of drawers or cabinets you can store not only tools, but also other important items that could easily get lost in the garage.
There are several types of tool boxes, which differ in size and design features.
We are talking about movable and stationary structures. The former are more compact, which allows you to move all the necessary tools over long distances. Stationary structures cannot be moved due to their large size.
DIY options
If at this stage you have not yet changed your mind about making a wheelbarrow yourself, then let's start studying this topic.
First, let's look at what frame and body designs can be.
One of the options for the frame is to weld it from a square rod with a cross section of 25 mm. You need to put two wheels on the axle. In turn, the axle is a pin mounted on nuts.
We also recommend reading
The body itself will consist of galvanized sheets. They need to be cut to the required sizes and screwed to the frame. As a result, we get a household item.
In this picture, we see that the master did not try too hard to make the wheelbarrow aesthetically beautiful. He needed to make a tool for transporting earth, so that it would take a minimum of time and money.
In the picture we see the fruit of the craftsman’s labor
- An unnecessary container was taken for mixing the solution, which later became the body
- A frame was made from metal plumbing pipes. They were bent into an arc and welded together.
- The axle for the wheel was also attached by welding. And the body was tightened with wire so that it would not fall out when turned over.
This is not the most ideal car option, but it will cope with its functions.
In this picture we most likely see the result of the work of a perfectionist. Since the creator of this cart did not have a tool for bending pipes, a combination grinder was used to score the cart handles. The support legs were installed ready-made. The body is completely welded from scratch from a 3 mm thick sheet of iron.
If you look closely, you can notice something:
The edges on the body are cut very evenly, it feels like it’s not even an angle grinder. Along the entire length of the body we see very high-quality welds. Pay attention to what color paint was chosen. This is an indicator that the wheelbarrow was not made to carry earth or bricks in it, but for very clean work... Here the owner did not try to make a wheelbarrow like at the factory: the bends are not of such high quality, the quality of the seams is also not very neat
Although all this will not affect the performance of its functions
Here the owner did not try to make a car like at the factory: the bends are not as high quality, the quality of the seams is also not very neat. Although all this will not affect the performance of its functions.
Master class on making a wheelbarrow (video)
But what if you don’t have a welding machine at hand, or have never used one? In this case, there is a lot of information on the Internet on how to make a garden wheelbarrow with your own hands, with only boards, screws, an axle and devices to attach it to the cart itself.
During assembly, it is preferable to use self-tapping screws made of galvanized material. Before you start tightening the screws, make holes in the boards, but make them smaller than the screws. This is done so that the board does not split when assembled with self-tapping screws.
In this picture, we see another version of the car. A board bottom is not as practical as a galvanized sheet bottom. In this option, all that remains is to make the sides and put two wheels on the axle.
Another option for a garden wheelbarrow is to make it from a barrel. Moreover, the material of the barrel is unimportant. It can be plastic, metal, or even wood, although you will probably have to struggle with it. The barrel is cut into two parts vertically, which means that two wheelbarrows can be made from it. The procedure for performing a “barrel” cart:
- Mode purchased barrel into two parts.
- We assemble the frame, the options for which you read above.
- We make the sides or ribs on which the barrel will rest.
- We install the wheels.
As you can see, old things can sometimes come in handy, so think twice when you want to clean up your garage. Then you can wrap the holders with electrical tape to make it more comfortable for your hands. We can say that the car is ready. You can start making the “sister car”.
If you have an old bed, then we have another option for you. For this you will need: the bed itself and wheels. The wheels must be powerful. Wheels from an ancient Cossack are one of the options. The design of the trolley can be either on two wheels or on four. Assembly order:
- Removing the bed net
- We attach the wheels using welding or fasteners.
- We fasten the bottom and sides from a thick steel layer.
- We mount the handle - to your taste, but it is better to make it with the letter “p”, because it will be more ergonomic.
That's it, the creation is ready. It turns out to be a good homemade garden wheelbarrow for transporting goods. This is an indispensable tool for transporting hay, building materials, firewood and so on.
Question answer
The most durable is the welded base, which will be made from a profile. It’s quite simple to do – cut two pieces of pipe. They should be slightly longer than the width of the base. Don't forget about the clearance between the structure and the wheel. To prevent dirt from sticking and interfering with movement, make a gap of three centimeters.
Yes, sure. To do this, it is necessary to critically examine the condition of the cart itself. The interior may remain unchanged. You can place a variety of garden tools or boxes with cargo here. You can change the frame - make it more durable, install high sides. A couple of profile pipes can be welded along the frame. Install limiters at the top, L-shaped clamps along the bottom. As a result, we will get an improved cart for moving a variety of equipment.
Making a trailer with your own hands
After studying all the design options, when making a homemade trailer for a walk-behind tractor, the simplest options are most often used. A dumping device is certainly more difficult to make, but its functionality is an order of magnitude higher.
Work on creating a tow hitch for a walk-behind tractor with your own hands begins with a drawing. Thanks to this, you can determine the amount of materials needed and select complex components that require the development of more accurate diagrams.
Frame assembly
The reliability of the frame is determined by the durability and strength that the towbar will have. This should be taken into account when creating a project for a future trailer hitch. Thus, the following materials can be used in the manufacture of a trailer frame:
- Angle and rectangular pipe.
- The front and rear crossbars can be made from a corner measuring 25x25 mm.
- For spars, a 60x30 mm pipe would be an excellent choice.
- To connect all the elements, it is necessary to make five additional crossbars forming a lattice frame.
- Four vertical posts are attached to the longitudinal pipes of this lattice in the corners.
Making a one-piece trailer is quite simple. Some homestead owners decide to make more complex devices. In such a situation, all subsequent actions depend on the choice of a specific type of trailer:
- On a dump trailer, the tailgate must be hinged.
- If you plan to manufacture a trailer with folding sides, then all three sides, except the front one, must have such a design.
- The frames of the folding elements should be made separately from the general frame. For simple models they can be its common elements.
Frame covering
This is one of the easiest steps in creating a tow hitch. However, some nuances are present and must be taken into account. To carry out work on framing the frame, it is worth choosing those materials that cannot increase the cost of the tow hitch:
- Wood is the most affordable material, but not the most practical due to its low resistance to moisture. In order for the boards to last as long as possible, it is imperative to treat them with special compounds and constantly monitor the integrity of the coating.
- Plastic lacks the main drawback of wood, but at the same time has poor resistance to mechanical damage.
- Metal sheets must first be treated with anti-corrosion compounds and are the most durable, but also quite expensive material.
Chassis
This design element can be taken from an old vehicle, such as a garden wheelbarrow. An additional pipe is required to attach it. The hub can be pressed, and its rear part can be bored and strengthened on the axle
At the same time, it is extremely important to ensure that there are no distortions
For mounting wheels, pins are the best option. They will provide a fairly reliable and long-lasting connection. To strengthen structures, bolted connections can be used. The final stage of work on the manufacture of the chassis will be the fastening of the caps.
After creating the towbar, all that remains is to make the hitch. This is a separate element, which is also very responsible. The simplest way to connect a walk-behind tractor to a trailer is a “pipe-in-pipe” assembly. A short piece of pipe is attached to one end of the pre-bent pipe in a vertical position.
At the opposite end of the main element (curved pipe), a second section is welded, and a king pin must be attached to it, which will act as a connecting element. This robust design is easy to manufacture and highly reliable.
Garden plot decor
The simplest and most popular use of a decorative cart in the garden is to use it as a flower bed. There is enough space inside the cart to accommodate several boxes of flowers or vegetables. Instead of boxes, you can use a wooden barrel with climbing plants planted in it. Such a composition together with the cart will look quite harmonious.
An interesting design solution would be to tilt the cart towards the ground and continue planting flowers. The result will be a kind of flower waterfall that can smoothly flow into an alpine slide.
In addition to flowers, a cart can accommodate many things. These can be various garden sculptures, figurines or dolls - a little imagination and now you have a finished work of art in front of you.
Material selection
When making it yourself, available materials are often used, and there is no question of choice. However, in case of purchasing the necessary components, the following options are available:
- Wood - allows you to get by with a minimum number of tools. The cutting is done with a hacksaw, the fastening is done with bolts and angles. However, the tree is not resistant to adverse weather conditions, and after a few seasons the joints will become loose, begin to rot and break.
Ferrous metal - a garden cart made with your own hands from this material will be durable and inexpensive. Although the work will require more tools, in particular, a welding machine and an angle grinder.
Stainless steel or galvanized steel is the most durable material that is not exposed to moisture. Such a cart will cost more than others and will require tools similar to the previous version, but it will last for many years and may even be inherited by children or grandchildren.
The choice of manufacturing material depends on financial capabilities, but it is highly not recommended to give preference to wood, due to its fragility.
Usage
For correct and efficient operation of the apilift, it is recommended to adhere to several rules:
- Before starting work, check the lift for compliance with technical requirements - use it lightly, paying attention to the tightness of the screws and nuts, the roller system, the tightness of the bolts and the fit of the tubes, washers, and the complete fit of the fasteners into the working grooves.
- When transporting heavy hives, it is important to check the reliability of the fastenings and fixations. It is better to lighten the hive from unnecessary load, moving elements of the box, so as not to frighten the insects. If the cables break, the bees may become aggressive from stress and some of them will die.
- During transportation, it is important to work in protective clothing, with a fine mesh and a sprayer, in order to protect yourself from insect attacks in the event of an emergency fall of the hive.
- It is important to pay attention to the installation of small parts - the technical performance of the entire mobile installation depends on them.
Which model to choose
Before you start making a garden wheelbarrow yourself, you need to accurately determine its preferred design and dimensions. Garden devices for moving loads usually have from 1 to 4 wheels. One-wheeled wheelbarrows are distinguished by their mobility; they can be easily moved along narrow paths between beds without damaging the plants. However, transporting very heavy loads on them is still not very convenient. Although, if you don’t plan to frequently move heavy building materials, sand, crushed stone or brick around your garden plot, then a one-wheeled wheelbarrow is an ideal option.
Two-wheeled carts are more stable than single-wheeled designs, but require a wider path to move them. A three-wheeled or four-wheeled homemade wheelbarrow for a summer residence is a very stable device; it does not tip over and does not require special effort or skill when moving large loads. However, she is not very mobile, especially in cramped circumstances.
Four wheel
Knowing the main features of each type of garden wheelbarrow, you can choose the optimal model for working on your garden plot.
Making a one-wheeled car from different materials
If you do not plan to move very heavy loads, then wood may be suitable for making a one-wheeled wheelbarrow. Strictly according to the dimensions defined in the drawing, you need to make a frame from two wooden blocks 3–5 cm thick, 120–140 cm long. The bars need to be connected in such a way that a structure similar to the letter “A” is formed. The distance between the spaced ends of the bars should be equal to the width of the person’s shoulders, since these will be the handles by which the cart will be rolled.
Algorithm of actions for making a wooden one-wheeled wheelbarrow:
- Use the boards to form a box into which the transported cargo will be placed.
- Securely fasten the box on top of the frame, and from below, at the junction of the bars, insert the axle on which the wheel is attached.
- To ensure that the wheelbarrow has stability when installed for loading and unloading operations, supports are attached to the bottom of the frame at the level of the edge of the box closest to the handles. The size of the supports is determined so that the body of the installed structure is parallel to the ground surface.
Note! To give the structure durability, hard wood species such as oak, elm, and maple should be used. It is better to avoid coniferous trees
To move heavier loads, you can make a one-wheeled wheelbarrow from metal using the same principle as from wood. A frame in the shape of the letter “A” is welded from a metal pipe, and the body is attached to it on top. It can be made from a metal sheet or by cutting an iron barrel. For a metal wheelbarrow, it is better to choose a powerful wheel with a larger diameter. 2 supports are welded along the frame frame opposite the wheel, on which the structure rests during loading and unloading.
Note! When making a metal structure, all connections must be made by welding
Cars with two wheels or more
A metal homemade product on two wheels will help you move massive loads without much effort; it is better to avoid wood in such structures. Weld a rectangular frame of the required size from metal pipes. On one side, in the lower part of the supporting structure, place an axle on which 2 wheels are placed, and on the other side, a metal stand. Weld handles to the edge of the rectangular frame where the wheels are located, and place the body on top of the frame.
If desired, instead of a metal stand at the bottom of the frame opposite the handles, you can make an axle on which the wheel will be mounted, then you will get a three-wheeled structure. If you install 2 wheels on this axle, you will get a four-wheel model.
Note! For convenience, it is worth putting pieces of a thick rubber hose of a suitable diameter on the metal handles. For easy installation, the hose pieces should be preheated
For gardening work in the country or on a personal plot, a do-it-yourself wheelbarrow can be an ideal option if you don’t want to spend money on a ready-made device and have free time and a desire to show your design abilities.
vote
Article Rating
Blueprints
The pictures show drawings for a standard version of the trolley, with a load capacity of up to 150 kg. Using them, you can easily assemble a simple lift from available and inexpensive materials yourself.
If you need to change the dimensions of the lift, then, guided by the drawings, you need to add centimeters proportionally on each side and along the length. The indicated dimensions will provide a maximum load of up to 150 kg; additional fasteners will make the cart heavier.
Main design elements
In general terms, the design of various models of trolleys does not differ significantly and consists of the following main parts:
- Frame - a corner, square or round profile is used for it. The last two options can withstand more significant loads. You don’t have to weld the frame; in this case, the wheels and handle are attached directly to the body.
Body - in the factory version, this is a stamped element on which there are no welds. When you decide to make a cart with your own hands, you will need to cut pieces of sheet metal and weld them together. To improve the joining, a metal corner is applied to the ends.
Wheels – the most convenient to use are chambered varieties. They allow you to move the wheelbarrow around the site with maximum ease. Wheels from a bicycle, moped or even a motorcycle will do. You can also purchase ready-made copies created specifically for wheelbarrows.
Handle – the most common options are in the shape of the letter “P”, “T” or “H”. A good grip is provided by the handle with the letters “P” and “H”.
"Is the game worth the candle"
Indeed, is it worth making a wheelbarrow with your own hands, in principle? In most cases, the answer is no, and we see them being purchased at the store. Of course, it doesn’t make sense to purchase everything you need and spend a lot of time repeating the factory version, since the factory product will be cheaper. However, there are a number of circumstances under which people take up work:
- a non-standard design is required for special cargo or delivery conditions;
- Suitable parts and materials are available;
- I have the desire and time to build a cart myself.
Maybe it will be more convenient for you to purchase a ready-made car and modify it at your discretion. In any case, I wish you good luck in fulfilling your plans. When the homemade product has served its purpose, it can be painted again, filled with flowers and placed in an “eternal parking lot.”
Step-by-step production of a trolley
To make a garden cart at home, you need to prepare the following parts and tools:
- The main material is plastic, wood, sheet iron.
- Fastening mechanisms.
- Wheel pairs.
- Wheel mounting axles.
- Auxiliary accessories: handle, guide structures, stop.
You should also stock up on ready-made drawings, but the design of the device will depend on the chosen model. The entire construction process can be divided into several stages:
- Selecting dimensions and creating a drawing.
- Arrangement of frame installation.
- Chassis installation.
- Handle attachment.
- Arrangement of the main building.
Each stage is performed sequentially, and with reference to the instruction diagram. As a master class, it is worth considering the instructions for creating a wooden cart for gardening.
Dimensions and drawing for trolley
Its stability in further operation depends on the size and shape of the trolley. The wheelbarrow has standard dimensions with the following parameters:
- The diameter should not exceed 60 cm.
- The maximum length of the frame installation is 100-110 cm.
- The height of the body is in the range of 55-60 cm.
Arrangement of frame installation
Previously, wooden blanks are subjected to special treatment: impregnated with antipyretic, antiseptic and antifungal solutions. This step will significantly extend the life of the structure, increase resistance to moisture, and protect against pests. The surfaces can also be further sanded using sandpaper. To fasten the frame, the bars are connected at the joints, using screws and metal corners to further strengthen the installation.
If it is planned to make a frame from metal pipes, you should use a grinder to cut parts and welding to connect the frame. Before further assembly, it is best to coat the product with water-based paint to prevent possible corrosion.
Chassis installation
Rails for bearings are mounted on the lower surface of the future trolley. The rack for one wheel is located along the vertical axis, centering the weight.
For 2 or 4 wheels, parallel wooden strips are used on which the fittings are attached. You can also use a ready-made axle from an old cart. At the same stage, the wheels are attached and the wheelbarrow is tested for troubleshooting.
Handle installation
According to the advice of experts, the handle should be made of a strong iron rod. Experts advise using a bicycle handlebar or a mount from an old scooter. In the technology of the fastening mechanism, the choice remains with the master: to make the handle fixed or foldable on hinges.
Arrangement of the main building
The body is made of durable material that is sufficiently resistant to moisture and mechanical damage. This material is most often a metal sheet. To work, you will need to prepare sheet iron, welding and a grinder.
According to preliminary calculations, metal blanks are cut out, the sharp edges are scalded or ground off. The housing is secured using screws and metal rivets. It is desirable that the case be as sealed as possible, especially if bulk cargo is intended to be transported.
Peculiarities
To make a tool cart, you will have to correctly estimate the dimensions of the future structure and draw up its drawings. Without drawing up drawings there is almost no point in getting to work. The fact is that the slightest mistake can result in serious consequences. It is also necessary to take into account that such a mobile vehicle with a tool can only be manufactured by a person who has welding skills . For installation, metal sheets with a thickness of 1 or 2 mm are mainly used - this depends on the size of the product and the number of tools required by the master for his work profile.
The cart is a metal cabinet with several drawers and a work table, which also serves as the top lid of the cabinet. Tool boxes are cut from sheet metal of the same (or different) sizes.
When marking, it is necessary to take into account the sides (side walls of future boxes), which are obtained by bending the edges of metal sheets cut to make boxes. The height of the sides is determined in advance - before marking the parts.
Usually two to four boxes are prepared. More of them are unlikely to be needed.
What types of carts are there?
A wheelbarrow is distinguished from a cart by the number of wheels. A design with one wheel is called a wheelbarrow; if there are more than one wheels, we are dealing with a cart.
One-wheeled “equipment” is indispensable for the garden. Vehicle maneuverability is good for narrow stitches.
It is reasonable to have both types on the farm; the wheelbarrow is not stable, one wheel requires tension when moving. It is more convenient to carry loads on two or four-wheeled structures.
Advice: a wheelbarrow is made for certain purposes, those jobs that require the presence of such wheeled vehicles. For example, for applying fertilizers.
Another reason to get both a wheelbarrow and a cart is to use it for different purposes. If manure is first removed from the livestock farm, then it cannot be used to transport crops from the garden or vegetable garden. Therefore, making yourself an assistant is the right decision.
Metal and wood are the main materials used in the manufacture of carts, as they have the necessary strength characteristics.
Carts differ from each other in the number of wheels and dimensions. You can make it yourself:
- one-wheeled cart;
- two-wheeled cart;
- a trolley in the form of a platform on four wheels;
- folding cart.
Make it yourself or buy it
The very first question that should be asked in our situation is whether it is worth “reinventing the wheel”? Is it better to buy a ready-made tool?
First, go to the first online construction store that will give you a Google search and look at the prices. Of course, buying at retail is more expensive than making it yourself, but not so much as to completely discard this option.
After comparing prices and assessing your own efforts that will be spent on making your own cart, you can come to a certain conclusion - your own cart will come out inexpensively if you don’t need to buy material for manufacturing, and you have everything on your farm, and you are asking the only question how to assemble it from what is there. Otherwise, the work will be unprofitable.
In the same store, the price of wheels ranges from 400 to 5000 rubles.
However, if you are a crafter at heart and get satisfaction from this kind of manual activity, then why not give it a try.
Assembling a durable assistant
If you plan to use a wheelbarrow to transport various heavy loads, building materials, large items, it should be made with 4 wheels. This design is usually made of metal elements. To compile it, the contractor must have a welding machine and tools for a mechanic. The trolley frame is made up of pipes and pieces. They are welded together onto one platform.
The handle and wheels are welded to the frame. Experts recommend equipping it with tires, which increases the load capacity and simplifies the movement process. Each wheel is welded to the frame separately. The container is mounted on the platform. Various cargoes are loaded into it for transportation. For these purposes, use an old or new pallet. The device for loading and transporting materials is preferably fixed on the platform.
The operation is performed by welding or fastening. The first option is suitable for carts that are not planned to be disassembled soon. The bolted connection allows you to change the container if necessary for transportation.
Originally posted 2018-03-28 15:13:01.
Device and principle of operation
The main parts of a hive lift are:
- Frames . The first frame is motionless, therefore it acts as the skeleton of the structure, and the second one moves parallel to the first and provides reliable support for the load. The frames are made of metal profile pipes with a square cross-section. The load capacity and wear resistance of the finished trolley depend on their thickness.
- Carriage . It bears the weight of the hive, so the load on it is colossal. On the last transverse stops of the carriage, side clamps are fixed, holding the hive in one position. The central stop is needed to fix the torso - the element of the winch that ensures the lifting and lowering of the load.
- Forks . These are elements in the form of strong corners that are placed in the carriage and perform the function of lifting the hives. A load is placed on them.
- Bearings . The design contains 6 bearings, 4 of which are on the bracket, and 2 on the wheels. Thanks to them, the cart is easy to control and moves smoothly.
- Lever arm . Allows you to raise the hive to a considerable height from the ground. The cart needs to be brought to the load, the grip width can be adjusted using a screw and a bracket, and then the hives must be lifted off the ground with a lever and transported to the desired location.
- Wheels with bracket . This component of the trolley is single and acts as a welded guide, but can be removed during disassembly and transportation. The bracket is attached to the frame by tightening two through bolts in the lower and upper parts of the structure, and then fixed with a wing and helps securely fix the hive. Wheels on bearings are needed to move the entire apilift. They should be wide, and also have a strong single base, inflation chambers and a grooved tire for easy slipping.
An apilift differs from a simple trolley precisely in the presence of clamps and a system of levers for push-ups.
The operating principle of this device is simple:
- The side clamps of the structure securely fix the hive.
- The lever handle lifts the load from ground level to a certain height.
- The lift on wheels rolls to the desired location.
- The load is also lowered to the ground using a lever handle.
A design with this operating principle looks like this:
Advantages
- Light weight of the device.
- The cart folds up and takes up little space when stored.
- Easy to control and smooth running.
- Wheels do not damage the floor.
- Carts do not rust.
- Affordable price.
trolley FHC 70a is available in various modifications , which differ in size and load capacity. Such carts are popular in supermarkets (see here), in warehouses, and are also purchased by ordinary people for this purpose? to go to the store with them. Models of this type are also suitable for work in the country, along with garden carts.
The narrow profile of the special equipment allows it to be maneuvered in any narrow space. It easily fits in the trunk of a car. The cart is stable and can stand on its own, which is convenient if you have to travel with it on public transport.
This model has comfortable handles that can be adjusted in height. This allows both tall and short people to operate the cart. Such a cart can carry from one to three hundred kilograms.
The two-wheeled folding trolley FHC 70a has an attractive appearance. You can attach a bag or goods purchased from a store to it. Regardless of the weight of the load on the cart, it will not become harder to roll it.
If you need a snow blower for your home, then our site will be useful to you. Here are articles about buying a snow blower and how to make one yourself.
For example, you can make a gasoline snow blower yourself from a chainsaw. Detailed instructions are in this article.
You can also assemble an electric snow blower yourself. About this - here.
Carrying out a wooden cart
A garden cart can be made from wood in the simplest way. This work process does not require the use of complex modern equipment such as welding machines or metal cutting saws. The wood is processed with the necessary tools, but it is worth keeping in mind that the strength of this cart will still be inferior to metal.
The frame for the wooden basket should be made of thick folding boards according to the drawing in the form of a rectangle. The size of the strips for a homemade frame is at least 70x70 mm, otherwise you can only transport hay and leaves in a wheelbarrow. The frame is made from an old bicycle or from beams. Bicycle screws are tightened, you can strengthen the frame structure with metal corners.
If there are antiseptic compounds for wood, all harvested wood is treated - then the home wheelbarrow will last longer to resist decay and dampness. There are bearings on the bottom of the frame - one or two, depending on the number of wheels. It is best to make a wooden basket with two wheels , which provides support for horizontal installation. If you have a ready-made axle on which you can put wheels from an old cart or moped, then a beam with bearings is not required.
A wheelbarrow made of wood on one wheel will be unstable - this work requires high carpentry skills. Defects in wheel mountings must be corrected at an early stage. The trolley handle must withstand a large load when steering. It is advisable to make it out of metal, even if the wheelbarrow itself is made of wood. A long steel stick can be used as a metal handle. It is better to attach the handle in the form of a loop.
This design will allow you to use it reliably; a garden wheelbarrow with a hinged handle will take up less space. Actually, the luggage container may well be a removable version - for example, in the form of an old bathtub for transporting liquid or bulk cargo. The wooden wheelbarrow is good and provides fastenings for various containers for transporting goods.