The use of essential oils for therapeutic purposes has been practiced for over 5,000 years. Aromatherapy can be a method of disease prevention. Some people use natural extracts to keep their rooms smelling good. For those who are not sure whether they will like this method of aromatization (many prefer aerosol fresheners or aroma sticks), it is better to learn how to make an aroma lamp at home. This way you don’t have to spend money on expensive equipment.
How to use an aroma lamp
A simple device can be powered by a candle or electricity. The main purpose of the aroma lamp is to heat the oil so that the molecules responsible for the aroma are constantly released into the air. The device should not boil oily liquid. Using an aroma lamp is very simple: you need to pour odorless base oil or water into a special bowl, add a few drops of essential extracts. If you are using an electric diffuser, then simply plug in the device. Classic aroma lamps work from tablet candles. It is enough to place a lit candle under the bowl and enjoy the aroma that appears.
How to make an aroma lamp at home
Making an aroma lamp for essential oils with your own hands from scrap materials is quite simple. But only if we are not talking about devices operating from the network. Everything you need can be found in the kitchen.
- From tin cans.
For the simplest model, a regular tin can will do. It is better to choose low decorative tin boxes that will become an excellent interior decoration. An arched hole must be made at the bottom of the jar to make it convenient to place a lit candle. You can also cut out stars, smiley faces, and hearts on the walls of the tin. This move will provide access to more oxygen to maintain the candle flame. Essential oil can be poured directly onto the lid of the jar. A more aesthetic option: cut off the top of the tin and form a bowl from it.
- Made from clay.
Such an aroma diffuser will look aesthetically pleasing, but to make it you will have to purchase special self-hardening polymer clay. Even people who have never seen a pottery wheel will be able to work with such material. It is necessary to form a tray from clay (it will protect the table or shelf from wax drips), as well as a bowl for oil. Metal knitting needles can serve as a support for the bowl, although thick columns can be fashioned from the same clay. Leave the product to dry in the open air (the exact time should be indicated on the packaging). After complete drying, you can sand the lamp with sandpaper and paint it with non-flammable paints. The advantage of a clay aroma lamp: a longer and more lasting aroma. The oil permeates the clay, as a result the smell can be felt even when the candle is extinguished.
- From a glass jar.
You can make an aroma lamp at home from a low glass jar. You will also need a metal spoon, an elastic band or a tourniquet. Since the air for burning the candle will flow through the neck, you cannot cover it with a bowl. An old spoon will serve as a container for essential oil. It is necessary to carefully bend the cutlery at the base back, at an angle of 90 degrees. To make it more convenient, you can heat the metal with a lighter. The groove of the spoon should be parallel to the ground to prevent the essential oil from leaking out. Cool the cutlery and tie it by the handle to the wall of the glass jar with an elastic band or cotton cord. The head of the spoon should be positioned directly above the candle, a few centimeters from the neck of the jar. The gap should be enough to allow the spark plug to be inserted and removed without problems. To decorate the aroma lamp, you can wrap the jar with wide colored ribbons. However, you need to take into account that such decor is flammable: any careless movement and ribbons will catch fire from the candle.
- From orange.
One orange is enough to make an aroma lamp. It is necessary to cut off the top part of the fruit (about 20%), carefully scrape out the pulp and white veins with a spoon. Cut out circles and stars in most of the walls. Dry the workpiece in the oven or in the open sun. Pour paraffin oil into the larger part, insert the wick and leave for several hours to harden. Turn the top over and use it as a bowl. The cutouts in the peel will ensure proper air flow for the candle to burn.
- From a lamp.
It is recommended not to throw Ilyich light bulbs in the trash, but to hand them over for recycling. But if there is a burnt-out incandescent lamp left at home, you can turn it into an art object. You need to carefully bite off the metal circle at the base with pliers and pull out the entire contents with narrow tongs. For the aroma lamp you only need a glass flask. Next, you need to make a stand from a metal rod: wrap a thick wire so as to form a horizontal stand and a vertical stand, about three times as high as the light bulb. Bend the end of the vertical part like a hook. Inside the lamp itself, insert a paper clip twisted into an “omega” W shape. Drip aroma oil into the lamp and hang it on the stand. Place a lit candle below.
- Electric aroma lamp.
It is recommended to make such a device from serviceable heating plates of low power (some craftsmen take them out of yogurt makers). It is necessary to place the plate between ceramic or clay tiles, and connect the wires to the network through an adapter. The plate will heat the tile soaked in essential oil. As a result, the room will smell nice. But making such a connection with your own hands is recommended only for people familiar with electrics.
From clay
Exclusive works are created from it and become interior decorations.
Before work, prepare tools and materials:
Before making the product, foil is spread out and modeling is done on it. To wet your hands, place a bowl of water nearby.
The vessel is made from a whole piece of clay in the following sequence.
1. A ball is rolled out of clay.
2. A depression is made and the hole begins to expand from the inside.
3. Vessel formation continues.
4. A hole is cut out on the side through which a candle is placed inside.
5. The butter cup is molded separately.
6. A relief design or pattern is applied with a special knife, which, in its absence, is replaced with a toothpick.
7. The product is dried first in air and then in the oven.
8. The aroma lamp is covered with paint. An exception is the oil cup so that the heated aromatic mixture does not come into contact with the painted surface.
9. Place a candle inside the vessel, pour water with a few drops of essential oil into the bowl.
Safety precautions
Before using an aroma lamp, it is recommended to study information about the influence of essential oils and the principle of their action. Some people cannot tolerate even the “lightest” scents. Aroma diffusers with automatic spraying are safer. Expensive models have an auto-shut-off function and control the fullness of the bowl. But devices that are powered by a candle require constant supervision. A candle aroma lamp at home can become a source of fire. It is forbidden to leave a working device unattended, especially in rooms where there are animals and children.
It is dangerous to place a candle on a flammable surface. It is better to place a heat-resistant plate underneath that will not melt from drops of hot paraffin or wax. It is also worth making sure that there is nothing flammable around the aroma lamp.
Purpose of smells
Smells are important in our lives. They remind you of the past. The smell of home plays a huge role in psycho-emotional support for the whole family. You wouldn’t mind if your spouse, when leaving on a business trip, takes the smell of home with him and remembers you. Or, after 10 years, a grown child will walk through the streets and suddenly hear a familiar smell and remember his native land.
The aroma lamp performs the following functions:
- disinfection, air purification.
- relaxation and mood creation.
- air freshener, humidifier.
- prevention and treatment of respiratory diseases, dermatological, colds.
- increasing immunity.
- relieving stressful conditions.
An aroma lamp purchased in a store that offers various fragrances and air fresheners has an insincere smell, has no personality and can only mask an unpleasant background. For other options for home or office perfumes, where you can feel the exclusive design and perfectly selected perfume composition, you will have to pay a considerable amount of money.
An aroma lamp made from improvised materials at home is not only a pleasant and useful thing for the home, but also saves money.
Selection of essential oils
Most often, people practice aromatherapy for the purpose of healing. For example, peppermint essential oil invigorates (partly due to its high menthol content). Other mixtures that may help:
- for stress and anxiety: lavender, cedar, lemon, bergamot, orange, valerian;
- activation of brain activity: tea tree, ylang-ylang, patchouli;
- to improve sleep quality: lavender, incense;
- for air purification: cinnamon, pine, lemon;
- to relieve fatigue: lemon, geranium;
- to strengthen the immune system: eucalyptus, oregano, thyme.
But still, you should not replace prescribed medications by inhaling the vapors of essential oils. It is better to prepare an aromatherapy product based on your own preferences. Even numerous enthusiastic comments should not be a reason to buy. It is better to choose what you like by smell. Otherwise, instead of getting better, a person will get a headache.
Manufacturing instructions:
- Take a large orange. Cut the fruit into 2 equal halves exactly in the middle. Using a knife or gentle movements with your fingers, remove all the pulp. Try not to leave any pieces inside.
- At the top of the hemisphere, draw a star with a pencil. Then we cut it out with a knife. The inner walls of the orange should be lubricated with essential oil. The lamp-lamp is almost ready. Next, light the candle. Then cover it with half an orange. The star should be located on top. Remember that the workpiece must be large enough. Otherwise, the candle flame may set it on fire.
Dr. an option is an aroma lamp in the form of a jar.
How to choose essential oils
It is recommended to avoid cheap, uncertified oils. A price that is too low may indicate that the product is expired or made from a substitute. In laboratories they have learned to synthesize fragrant substances. They have the same aroma as natural oils, but are unlikely to provide any health benefits. Although, if the aroma lamp is needed only as an air freshener, synthetic mixtures are also suitable.
It is also recommended to check expiration dates before purchasing. The product loses its rich odor within 16-18 months. It is recommended to store essential oils in the refrigerator for no more than 6 months after opening the package. A properly made aroma lamp with well-selected oils will definitely have a positive effect on health.
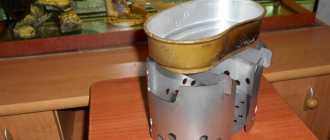
Using a tin can
The simplest aroma lamp is made from a tin can.
To work you will need:
- construction knife;
- small candle;
- essential oil;
- beer can.
The manufacture of the product is carried out in the following sequence.
1. Water is poured into an empty jar and frozen. This is done to make the container more rigid. The container is cut into strips 2 cm thick.
2. After defrosting, the water is drained and the jar is bent. The container takes the shape of a flashlight.
3. The stripes straighten out. The aroma lamp is ready.
4. The bottom of the jar is used to place oil and water. A candle is inserted inside the device.