Birthday is always a fun holiday!
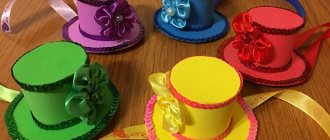
A holiday of joy and laughter, balloons, delicious cake and, of course, colorful party hats. In this article, we are ready to offer you several simple master classes on making caps for birthday celebrations, as well as options for decorating ready-made caps. Why buy standard and boring caps in the store if you can make them yourself.
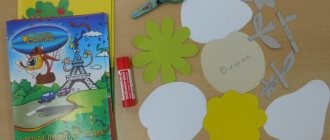
In order to make hats for a birthday celebration or other fun party, you will need thick decorative paper or plain paper, or thin cardboard will also work. You will also need scissors, a pencil, glue and a cap stencil (we attach the stencil below).
How to make a cap?
First you need to print a stencil of the cap and transfer it to paper or cardboard. Then carefully cut out. If you don’t plan any more decoration, then feel free to start gluing.
Attach a pompom made of thread and ties to the top of the cap. So, we figured out how to make the simplest cap. Now let's look at what options for decorating a birthday cap you can make with your own hands from scrap materials.
Selection rules
To choose the right workwear for a chef, you need to follow some recommendations. For example, we must not forget about the presence of a headdress. Kitchen staff with long hair must have it removed. Using a disposable cap has become very convenient. The length of outerwear should reach the knee. The sleeves are equipped with buttons or Velcro. All fasteners on suits must be hidden, and the presence of buttons is unacceptable. Patch pockets are located at the bottom.
To adjust the size, the uniform has elastic bands or special tightening cuffs. You can use an antimicrobial composition to treat uniforms. It also requires daily washing, so you should not choose particularly light fabrics. When choosing shoes, you need to check that the soles do not slip. Having a hard sock will help protect your foot from possible damage, for example, if a heavy object falls from above.
In the next video you will find a complete overview of the chef's uniform.
How to decorate a hat with New Year's tinsel?
One of the options for a very impressive decoration of a holiday cap is the use of New Year's tinsel and decorative adhesive paper.
Cut out the necessary elements for decoration from adhesive paper. These can be circles, squares, triangles, stars, flowers or stripes. Glue the decorative elements to the paper cap. Decorate the base of the cap with New Year's tinsel, glue it with glue or double-sided tape.
Also make a pompom from New Year's tinsel and fix it on the tip of the cap.
Paper headdress for herringbone costume
In recent years, the Christmas tree costume has become very popular at children's parties. If, as a rule, there are no special problems with making a dress, then a headdress forces parents to work hard. In fact, everything is done extremely simply.
To work you will need a large sheet of paper, green tinsel and very small Christmas tree decorations. You need to make a regular bag out of paper. Then it needs to be cut so that the wide part fits the diameter of the child's head. Now the decoration (tinsel) comes into play. You need to carefully wrap it around the entire paper cap. Then the carnival headdress, which by this point will already resemble a Christmas tree, is decorated with small toys. It is necessary to choose only plastic products for decoration, but in no case glass toys.
The herringbone hat is a great addition to the “green beauty” costume.
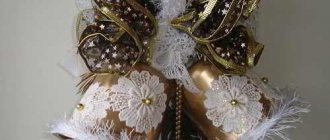
How to decorate a cap with multi-colored ribbons?
Drape the paper blank for the cap with a beautiful fabric and secure the edges with hot glue.
Decorate the base of the festive cap with an assembly of satin ribbons. Make a pompom from a small piece of tulle. Ready-made caps can be decorated with decorative elements: hairpins, beads, butterflies, etc. This version of holiday hats is perfect for a girls' party.
Master class “Magician’s Hat”
Raisa Tyugashova
Master class “The Wizard’s Hat”
To do this we needed the following:
colored cardboard, scissors, stapler, thread and needle, corrugated paper, corrugated napkin, pencil, plate (to draw a circle)
.
Take a bright contrasting thread with a needle and sew the cardboard together to form a cylinder.
This is how tall our hat .
Then, on the back side of the corrugated napkin, we draw a circle, that is, we trace the cylinder along the contour.
Stepping back from the contour we draw an outer circle, it looks like a ring.
We cut out a circle from a napkin along the outer contour, making cuts to the inner contour at the same time.
Then we fasten the bottom of the cap with a stapler so that it is slightly “recessed” inside the cylinder.
hat with corrugated paper , also using a stapler.
We also draw the inner circle and cut it out with notches from the small circle inward.
You will get a wheel like this.
We secure the brim of the hat with a stapler , bending the notches inside the cylinder.
hat at the top and bottom with corrugated paper .
A few ribbons, a few stars and something else. Everything is at the discretion of the master !
The wizard's hat should look something like this.
My granddaughter and I spent our holidays usefully. The hat is ready , let our Wizard enjoy the new thing !
Photo report from the “Wake up the Wizard” circle. Plasticineography Children of our circle The purpose of the circle: 1. Development of the child’s creative and communication abilities through self-expression through production. Competition “The most original hat” Our kindergarten often holds various competitions in which children and parents take an active part. In our senior group.
Notes on traffic rules “The Magic Hat” To form in children ideas about transport, its classification, and components. Learn to name road signs and understand their significance.
Abstract on GCD in the senior group “In Search of the Wizard” ANO DO “Childhood Planet Lada” D/s No. 204 “Bell” Summary on GCD “In Search of the Wizard”. For older children. Completed by: teacher.
Master class with children of the preparatory group “Hat for the little Autumn Princess” Description: master class is intended for children of preparatory age for school, teachers, enthusiastic people Purpose: made.
Direct educational activity “Tricks of the Wizard” DIRECT EDUCATIONAL ACTIVITY TOPIC “Tricks of the Wizard” Purpose of educational activity: Development of cognitive processes.
Scenario “Funny Hat” (jury of 3-4 kindergarten employees) Conditions: all children participating in the entertainment wear hats made together with their parents. Criteria. A hat for Cloud in half an hour. Master class For summer fun, we needed a costume for Cloud. There was a dark blue dress, but what should I put on my head? An old one caught my eye. Hat for the autumn ball Good evening, dear teachers! Today I want to give you a master class on making a hat. I work in a kindergarten and we have to. Hat for the “Hat Parade” in kindergarten Hello! I would like to share photos of our hat, which we made especially for hat day in kindergarten. This is a new experience for us.
Source
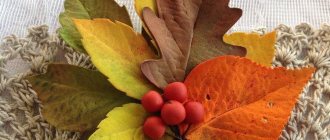
How to decorate a cap with flowers?
Yes, yes, you can even decorate holiday hats with flowers. This option would be very appropriate for a summer birthday party outdoors.
Drape the blank for the cap with decorative paper or a beautiful fabric. Make a pom pom from a small bouquet of summer wildflowers. Decorate the base of the cap with flowers, either artificial or real.
Description
Is there a more famous attribute of the chef's profession than a cap?
Doctors also wear a white jacket, and waiters, barmaids and even dishwashers wear an apron or apron. A rolling pin and a ladle can be in the hands of any housewife. But, seeing a man in a tall white hat with a fluffy pleated top, we immediately understand that this is a cook. The history of the chef's hat, according to some sources, goes back...
several thousand years! In ancient Assyria (long before the beginning of our era), the court chef was such an important person that it became him to wear a crown, not gold, like the monarch’s, but made of cloth. Such a high position at court, excellent maintenance and honors given, it seems, were explained by the trivial reluctance of the rulers to be poisoned
By the way, in ancient China the equivalent of a chef’s hat was generally one with the crown, because the supreme ruler bore the honorary title of chef, and the first ministers were his deputies “for salt” and “for porridge.” Oh, what a pity that the times when cooks were held in such esteem have sunk into oblivion!
During the heyday of European civilizations, the situation changed greatly. Even though some monarchs did not hesitate to appoint life-kochs as advisers, visit the kitchen and even cook soup with their own hands, for the most part they still treated cooks much less reverently than the rulers of Mesopotamia. They say that Henry VIII (1491-1547), having once discovered a hair in his plate, simply ordered the alleged source of pollution to be removed from the owner’s shoulders. After which the kitchen staff at the Tudor court somehow immediately came to the conclusion that they urgently needed special headdresses.
Either this horrific story was simply made up by haters trying to tarnish the name of a good ruler (who married some six times and executed two of his wives in order to acquire another life partner), or human memory is simply too short... In any case, the next one The story tells that in 1727, another English king, George II, saw a real louse in his soup! You can imagine what happened here, what happened!.. in short, the scandal ended with the entire kitchen staff being shaved bald, and then forced to wear hats.
Perhaps the first two stories can be classified as myths. As well as the version about the relationship between chef's hats and monastic hoods. But it is known that at the turn of the eighteenth and nineteenth centuries in various European countries, professional cooks were already definitely working in hats. In Scotland it was similar to the traditional berets there, in France - currents, in Spain - scarves that bullfighters tie. A wide variety of colors were allowed.
The history of the chef's hat, documented in written sources, is associated with the name of Marie-Antoine Carême (1784-1833), better known in Russia as Antonin Carême. Yes, yes, the greatest reformer in the field of cooking managed to restore order in this matter! A lover of improving, structuring and organizing everything, Karem decided that whoever has the tallest hat will be the most important in the kitchen. The height of this “cook of kings and king of cooks”’s own “crown” was 45 centimeters. The frame structure was achieved using thick paper and whalebone.
One of the final touches to the picture we are familiar with was made by another genius of French cooking, Georges Auguste Escoffier (1846-1935), a great admirer of Careme and a successful successor of his work. It was he who decreed that the clothes of the kitchen staff should be white for hygienic reasons. In any case, the image of a cook familiar to every child developed in Europe approximately after the Second World War.
With the exception of the conspicuous chef's hats, the styles of hats worn by all other employees these days depend either on their individual preferences or on the uniform rules of that particular establishment. But in the old days, imagine, it was believed that they indicate a person’s character! A tall and especially fluffy cap with a pommel pushed back was worn by a sharp and domineering chef, and the top at an angle revealed even a tyrant and tyrant. The disproportionately tall chef's hat on the short owner suggested to others that this was an upstart and an intriguer.
It is said that in Karem's time the chef's hat had a hundred folds, and this symbolized the 100 possible ways of preparing an egg. It's hard not to notice that the number of folds has decreased significantly these days, even among top TV chefs. And this, you know, makes you think about some of the trends in modern cooking!
1 860
How to decorate a cap with fabric?
Paper party hats don't have a reputation for being a long-lasting party accessory. Caps often tear and lose their attractive appearance.
If you drape the holiday cap blank with beautiful fabrics, the cap will not only have a neat and festive look, but will also be more resistant to damage.
Decorate the top of the caps with multi-colored fluffy pompoms made from the most ordinary knitting threads.
Basic pattern
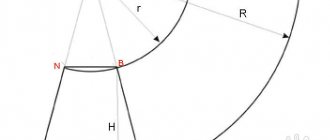
For a soft New Year's cap, you need a pattern or template according to which even a beginner can make a New Year's hat. The dimensions of the template depend on the circumference of the head. For a child, the pattern needs to be reduced so that the hat does not fall off the head.
To create a pattern, plain paper is used. A triangle is drawn on it. Conventionally, three sides are signed: the lower left corner is designated as A, the opposite lower right corner is signed as B, and the top of the figure is designated as C.
In complex patterns, the top is divided into two parts, but you can do without this. The letters will help you understand which edges of the cut fabric need to be sewn together.
The length of each part for an adult is average. The bottom is chosen to be at least 55-60 cm: the average head circumference of an adult, if necessary, is adjusted using decorative elements that are sewn on at the end. The height is chosen to be no more than 40 cm. The pattern is cut out, after which it can be used to create two identical parts.
Fabric requirement
The cut parts need to be fastened. To do this you will need simple threads and a needle. It is not necessary to use a sewing machine for such a simple job. To sew different new hats, one pattern is used, but different materials.
Will you try to make the same cap?
Not really
It is better to choose a thick fabric with a minimum amount of stretchy materials for a holiday accessory - when worn, the hat will not stretch, and its ends will not gather into unsightly folds. If a product is sewn from felt, the allowance is minimal - the material is dense and does not need to shrink.
There is no need for a pompom pattern or a piece of fox or hare fur. They are cut to the shape of the part of the base to which they will be sewn. Parts are cut out with a seam allowance - you cannot cut the fabric end-to-end according to the pattern, or the pattern itself initially takes the seam into account. If you take into account the basic and simple rules, a beginner will get a good New Year's hat.
How to update old birthday party hats?
If you already have party hats that were left over from your last party, then there is an opportunity to give them a second life.
Glue decorative paper, lively eyes, a bright pompom to them and now you have a character for a Monsters, Inc. themed party. Decorate your hats with sparkling sequins and you have the perfect holiday accessory for organizing a glamorous party.
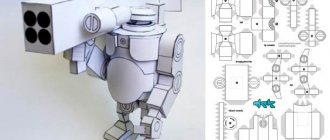
Hatter from a fairy tale
Many other headdresses for masquerades are also prepared based on the cylindrical shape. For the tall and expressive hat of the Hatter, line all the prepared cardboard with vertical lines every 3 cm. Make cuts along them 5 cm from the bottom. These will be the field mounts.
After connecting the top along the marked strips, cut all the strips in half and bend them inward. Cut out two identical circles. One will serve for the volume of the hat, and the other will cover it. For the fields, prepare an oval shape. At the same time, you need to prepare the fabric for decoration. Once assembled, the hat will be difficult to decorate.
Insert the cylinder into the fields and glue it together. Attach the first circle to the concave strips in the upper part, and stick the second circle on top. To make the brim slightly raised, you need cardboard
Progress
To determine the size of the base, you should measure the volume of the head of the person for whom it is actually intended. Based on the data obtained, we make a base out of cardboard, leaving 1-1.5 centimeters for gluing. You will need to take twice as much parchment paper as the length of the base, because it will need to be collected later. You need to make folds at the very base of the parchment paper and glue it with tape to the base so that it occupies half of it. After this, folds should be formed at the other end of the paper, but there is no need to glue them yet. The base needs to be glued so that a ring comes out. After this, carefully, without deforming or bending the folds, place the free end of the paper into the cardboard base and glue it. The gaps remaining on the sides are also carefully folded inward, and then glued to the base. Gently straighten the parchment paper, thus giving the cap a beautiful, rounded shape. After this, the chef's hat is completely ready.
Progress