A fountain is a natural or artificially created phenomenon of extraordinary beauty in which water flows upward or to the side. Today there are many varieties of decorative indoor fountains that can decorate any interior, many techniques for their manufacture, and all kinds of materials are used. They can decorate the yard, garden, room, and also be used as a gift, holiday decoration, crafts for school or kindergarten. In the latter cases, it does not have to be a monumental structure with flowing water. You can make a beautiful fountain with your own hands at home from scrap materials. Let's look at a few of the most common ideas.
Operating principle of Heron's bottle fountain
To assemble a fountain at home from bottles, you need to familiarize yourself with the principle of its operation and the features of the device. The basis in this case is the hydropneumatic mechanism, where the pushing of water upward by a jet occurs due to the work of air and the liquid itself.
In addition, gravity plays an important role here, creating the required pressure in the fountain system.
- Bowl , which can be conventionally designated as the starting place from where water begins its movement through the system. It is an open reservoir that resembles a bowl or plate in appearance. From this bowl, the liquid is directed through a thin tube into an empty container located at the very bottom of the fountain.
- The lower reservoir (empty) , it is necessary to create pressure from the liquid flowing from the bowl, which compresses the air in it. As a result, the water is pushed upward in a stream. In addition, liquid collects in this empty container, creating the very necessary pressure. The water remains here until the next recharge of the system.
- The upper reservoir , which is filled with water when charged. This is the liquid that comes out in the form of a thin stream. The ejection process is carried out using compressed air - the pressure that appears in the lower container. Entering the upper reservoir through a thin tube, the air pushes out water from there. And it, in the form of a fountain, again enters the bowl, from which it flows into the lower container.
A self-made fountain from bottles is not endless; it needs to be recharged periodically.
There is nothing difficult or complicated here - the full container (lower) is installed in place of the empty tank, which is located on top, and the empty one is installed in place of the full one. To start Heron's fountain, just add a little liquid into the upper bowl.
Stylistic design
There are several design options applicable to decorative fountains:
- Classic option. The installation can be made in the form of an asymmetrical bowl made of ceramic, plaster or stone with a stream of water falling in the shape of a bell or jet.
- Fountain in English style. In such designs, the bowl has a non-standard shape and is necessarily supplemented with stucco.
- The design is in the form of a sculpture with gilding or decorated with bronze elements, made according to all the rules of such colorful styles as Baroque or Rococo.
- Installation in eco-style. This fountain is made in the form of a natural waterfall, giving it the most natural look. An installation that is a container buried in the ground complete with a nozzle disguised with stones, associated with a rock from which streams of water fall down, can best cope with this role.
- Country style fountain. A structure made from an ordinary wooden barrel or cart will be an excellent decoration for a personal garden.
- As part of the Provence style, you can use romantic sculptures made in the form of angels or sophisticated girls. Moreover, the sculpture can be specially made slightly flaky or cracked, which will give it a special flavor.
Home mini fountain
How to make a fountain without pumps and generators, using the simplest materials at hand:
- self-tapping screws;
- drill;
- plastic tubes of different diameters (this point is especially important, as you can learn from the article on the eternal fountain);
- sealant or glue;
- ordinary plastic bottles - 2 or 3 pcs.
The diagram shows the structure of the future design, in which it is important to maintain the distance and length of the tubes inside the vessel. Such a fountain will work on the principle of squeezing out water and air by the liquid’s own weight.
Note! The tightness must also be 100%.
airy joy
Today it is difficult to imagine a celebration without decoration with balloons, be it a wedding or a children's birthday. Balls are used to make beautiful arches, figures, entire compositions and, of course, fountains!
We think about the color and shape of the future composition in advance. Here you can give free rein to your imagination, taking into account the theme of the upcoming holiday. For example, if it is a child's birthday, you can even use children's shaped balloons.
The composition should resemble jets of water gushing upward. To do this, we tie ribbons to the inflated balls and place them on the central string, one below the other at 2/3 of the height. It is advisable to avoid chaos and disorder, but it all depends on the design you come up with. The main thing is to achieve a feeling of lightness and swiftness.
Next, we tie the resulting structure to a previously prepared load. You can use a small ball filled with water as a weighting agent. If the figure turns out to be large, then prepare several of these balls. The main thing is that the weight holds the composition well.
Related article: Do-it-yourself mosaic panels for the kitchen and bathroom with photos
Methods for fastening balls together:
As the base of the fountain, tie round or long thin balloons by the tails, and tie thin balloons with helium on a string inside to create the impression of drops flying up.
- helium-filled balloons tied with their own ribbons.
- make a string of the desired shape and tie the balls by the tails.
Attach the balls to the string using weaving. An example is garlands from which you can make a fountain.
Scheme of assembling a fountain from 3 vessels
Cut one bottle in half. The upper part with the neck will serve as a reservoir for the fountain (bowl).
It should be remembered that there will be plastic tubes inside the structure (a dropper or a cocktail straw will do). To do this, holes of the required diameter are made in the covers, and the tube is cut to the required length).
- Connect the bottom and middle bottles together using glue in the neck area (glue the caps together by first gluing them to the neck).
- The reservoir (bowl) for the fountain is glued to the bottom of the second container, and a hole is made in the lid and bottom (respectively) for the tubes. All joints are sealed.
- Next, the same amount of water is poured into the upper bowl as is included in the second bottle. Water will flow to the bottom. To return it to the center of the fountain, just turn the structure over.
When all the liquid is in the central reservoir, all that remains is to contemplate a living fountain, without external power sources. To do this, a little liquid is added to the upper bowl, which starts the following cycle:
- water from the upper bowl enters the lower bottle, pushing air into the second container;
- due to the pressure of the air masses, in the second bottle the water is forced to look for an outlet, which is the tube;
- water enters the tube, rises up and a fountain is formed.
This process is not endless until the water in the second bottle runs out. Next, you can repeat everything - turn the container over, add a little water into the bowl and that’s it!
Child's world
To more clearly study the principle of operation of communicating vessels according to the school curriculum, you can make a model of a fountain using simple and affordable materials. From thick plywood or several planks, the thickness of which should be one centimeter, put together a stand in the shape of a bench, having a height of about ten centimeters. On one of the corners of the stand it is necessary to strengthen four identical slats with a height of about thirty centimeters. A platform must be nailed to the upper ends of these posts. The platform is cut out of a piece of plywood. In its middle we need to cut out a round hole with a jigsaw into which we will install a water container. You will also need to drill a hole in the stand at the same level as the platform hole. The container can be made from an ordinary tin can. You need to punch a hole in its bottom and solder a small copper, aluminum or plastic tube into it, the end of which is inserted into the hole in the platform.
A fountain that works itself from plastic bottles
The classic design of Heron's fountain is described in 7th grade physics textbooks and consists of 3 containers of water, located one above the other and connected by three tubes.
For a home experiment, empty plastic bottles of mineral water or soda are perfect.
The first tube comes out of the top bowl and goes down to the very bottom of the structure. The second, which is attached separately from the first, comes out of the lower container, enters the middle one and reaches almost to the very top. The third tube comes from the bottom of the middle bowl and enters the top bowl.
- By default, all the liquid is in the middle container. In order for the fountain to start working, you need to add a little water to the upper bowl - then the liquid will automatically flow through the first tube into the lower container until it is completely filled.
- At this time, the air pressure will increase, which will be transmitted through the second tube to the middle tank.
- At the same time, pressure will also be applied to the water, as a result of which it will begin to rise through the third tube into the upper bowl and flow upward. By completing this standard physics assignment, you will be able to replicate the experience of the great Greek mathematician and inventor Heron of Alexandria.
- Another important point that you definitely need to pay attention to is the tightness of the connections. For this reason, after completing assembly, fill the entry points of the tubes in the covers with hot glue or sealant.
If you don't have sealant on hand, you can use regular plasticine as an alternative, but keep in mind that leakage is possible in this case.
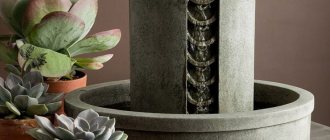
Stylish exoticism in the interior of the bedroom
A small tabletop fountain can be made from a flower pot with a diameter of approximately 25 cm.
To work you will need:
- durable container;
- pump;
- translucent balls or pebbles;
- aquarium plants;
- paints for painting on ceramics or glass.
A flower pot is used for the base of the fountain. To give the structure a stylish look, the container is painted with special waterproof paints. To circulate the liquid, install a pump, make a hole and bring the tube up.
The bottom of the fountain is decorated with decorative balls, shells or pebbles. After filling the system with water, aquarium plants are placed inside. They give the design an exotic look and uniqueness. A simple design creation scheme opens up wide opportunities for beginning craftsmen.
What tools and materials will be needed
To assemble a homemade fountain from bottles and straws, you need to prepare the following consumables and tools:
- plastic containers (for drinks, carbonated water, yoghurt);
- cocktail straws/flexible hose;
- hot melt adhesive/sealant;
- drill/nail (for making holes);
- fragments from a thick ballpoint pen/connectors from a dropper (if a flexible hose is used);
- screw-type fasteners;
- electric drill;
- pliers;
- sharp knife;
- scissors;
- marker;
- sandpaper.
How to make Heron's fountain from plastic bottles with your own hands
There are several options for making the Heron fountain, both from one bottle and from 2-3. Each of them has its own design features that should be taken into account in order for the system to function for a long time and efficiently.
How to make Heron's fountain from one bottle
You can assemble a fountain from a PET bottle using the following technology:
- Make a hole in the plastic container cap by drilling it with an electric drill or by using a hot nail. The main thing is that the straw or tube fits into it tightly enough.
- Fill the container with water, but not to the top.
- Insert the plug into the neck, into the hole made - a tube, the lower end of which should be in the water, reaching the very bottom.
- In order for a fountain made with your own hands from a bottle and a plastic tube to start functioning, it is necessary to compress the air inside the container. A pump used to inflate balls is perfect for these purposes.
- In the absence of a pump, you can use the following method: blow through the straw as hard as you can. To avoid injury to the lips, its end should not have any jagged or sharp points. When using a glass element, the end can be melted using a paraffin candle or burner. If it is a metal straw, then you need to file down its end with a fine file.
A fountain from one bottle will operate as long as it contains compressed air. In an attempt to expand, it forces liquid out of the container.
The first version of the fountain operates provided there is a sufficient amount of compressed air inside the tank. Taking this into account, you can prolong the effect if you manage to pump air periodically.
You need to make another hole in the cork through which to install an additional plastic tube/straw.
There is no need to immerse it in water. You need to bend its upper end and blow into it, or pump air using a pump with a valve; an aquarium compressor will do. The operation of the fountain from a plastic bottle will continue in this case until the liquid runs out.
How to make a fountain from two bottles
This fountain model from 2 plastic bottles, which can also be easily assembled with your own hands, is made according to the following scheme:
- Prepare two containers and drill 2 holes in the plugs for the tubes. The second reservoir should contain 2 short straws.
- Connect 2 bottles using a rubber tube and place them at different heights.
- If you blow into the straw of the first bottle, the process of water moving from it into the second plastic container will begin. Even if you stop blowing, the liquid will still flow. The main thing here is that one hole is located at a certain distance from the other, this height difference is preserved.
- If you try to plug the outlet tube of the second container with your finger, you can feel the air pressure. This is called a Heron compressor. If you connect a hose and an aquarium sprayer, then this kind of purge will function until the liquid from the first tank ends up in the second. In order for such a compressor to work for a very long time, and not just for one hour, you will need a larger container and a thin tube.
- Interestingly, the fountain is actually the design of the ancient engineer Ctesebeus. He and Heron of Alexandria, a mathematician and mechanic, invented many original devices, including a two-cylinder single-action spray, an automatic mechanism for opening doors in the temple.
Fountain of Heron made of 3 bottles
A fountain made from three plastic bottles works quite efficiently, silently, and helps refresh the water in the aquarium, as well as increase the humidity level in the room. The algorithm for performing the work is as follows:
- It is necessary to cut one plastic container in half, where its upper part (with the neck) will act as a reservoir for the fountain.
- The next step is making holes in the lids. Cocktail tubes/straws and a dropper will pass through them.
- It is necessary to dock the lower and middle containers by gluing the plugs together, they are pre-attached to the neck.
- The bowl, where the fountain itself will flow directly, is glued to the bottom of the second plastic tank. Be sure to make holes of a suitable diameter in the plug and bottom. All connecting areas must be well sealed.
- Fill the top container with liquid equal to the volume of the second bottle. It will flow to the bottom. You can return the water to the center of the fountain by simply turning the system over.
Once all the water is in the central reservoir, the unique device will begin to operate without requiring additional power sources. Anyone can make a fountain from a bottle and tube if you follow a certain sequence of actions. By adding liquid to the upper container, they help start the next cycle:
- water from the upper reservoir enters the lower one, causing air to escape into the second bottle;
- due to the existing air pressure in the second reservoir, the liquid is forced to find a way out, and this is a plastic tube;
- the liquid enters the straw, goes up and a functioning fountain appears.
Thanks to the fountain in the room, you can increase the level of comfort in it, the microclimate will become much better, the amount of dry air will decrease, the humidity will be in the optimal range, 40-60%. This is especially important for human health, indoor crops and pets. This device will allow you to maintain air humidity during the heating season, when it is 22%.
Such a humidifier, assembled from plastic containers, will help clean the air from dust particles and effectively soften it. A fountain made from plastic bottles will also be useful for fish in an aquarium.
On the topic: methodological developments, presentations and notes
Development of a lesson on native (Bashkir) literature in grade 5 “Asikmәk” and presentation for the lesson.
Presentation for the lesson “Class of millions Class of billions. Reading and writing multi-digit numbers" 4th grade ("Schools of Russia" M.
Open lesson and presentation “Three fundamentals in music” For the music lesson 2nd grade 1st quarter (final lesson) (for the program “Music (for four-year elementary school)” by L.V. Shkolyar and.
From the presentation, children will learn which path a letter takes from the sender to the recipient. The Ant and the Wise Turtle will help children recognize this.
Lesson topic: Word and sentence. Russian language lesson 2nd grade. Educational complex "Primary school of the 21st century" lesson 19. Presentation for the lesson for the Smart interactive whiteboard, completed.
The presentation contains a lot of material about the importance of presentations in elementary school lessons, recommendations for using them during the educational process, as well as for creating them. The presentation has slides.
The slide presentation corresponds to the topic and content of the lesson.
Source
How to make water flow without outside interference
If you attended school physics lessons, you should already have an idea of what force is easier to make something move. Of course, we are talking about gravity or, in other words, the force of gravity.
To activate it, the item must be raised to a certain height and released. The same thing happens with water. If the tank with it is raised above the ground and the cap is opened, it will flow out after some time.
Gravity will be the initial engine that will launch our fountain.
Go ahead:
- We now attach a tube to our hypothetical container that will go down - there we will direct the water strictly to a certain point.
- If this tube at the bottom is bent upward, then water will begin to fly out of it with pressure. This is, in principle, the simplest structure of a fountain.
- The higher the water tank rises, and the wider the diameter of the pipe, the stronger the pressure will be. Pressure in this case is expressed in the height of the water column.
- In a similar way, you can organize a fountain for your dacha if there is some source from which the main container will be constantly replenished.
- For example, you can use a stream. In this case, in addition to supply, you should also worry about drainage.
Since streams will not be found in every area, and even the terrain features may not correspond, it is not worth considering this method of constructing a fountain.
But you can also use other sources to fill the tank - the same summer water supply. However, somewhere far away, water is also pumped into it by pumping equipment.
So how can you make a constantly running fountain without a pump?
For this, gravity alone is not enough. The solution to the problem lies in its combined action with pressure. The ancient fountain of Heron works on this principle.
Necessary equipment
Designing fountains involves selecting the required equipment and future location. Much depends on the area of the site, the relief textures, and other features (garden fountain: cascading, jet, etc.).
Whatever type of object is planned, several basic details will be required for its construction:
- water tank;
- nozzle;
- fountain pump.
To construct the structure, you can purchase a ready-made container. It can be plastic, metal, stone. It is also possible to build a reservoir directly on the ground.
Next, you need to decide on the power of the pump and how the jet forms a pattern. The type of nozzles used and the height to which the water will rise will depend on the desired picture.
The pump can be surface or submersible. In the first case, it is located outside the boundaries of the reservoir, which makes access easier if repairs are required. In the second case, the equipment is installed under water.
It is also necessary to take into account the planned performance of the device:
- to create jets about 50 cm high, a pump that pumps up to 850 liters per hour will be sufficient;
- in order for the water to rise up to 100 cm, the productivity must be 2 thousand liters;
- a pump pumping 3-5 thousand liters per hour will create jets with a height of 1.5 to 2 m;
- the most powerful equipment (8 thousand liters per hour) raises water up to 3 m in height.
Other technical elements include a filtration system. It clears the water of small debris and prevents it from blooming. The fountain lamp is already a decorative object.
Heron's fountain - recirculation system without electricity
Heron of Alexandria was a Greek mechanic and mathematician who lived in the second half of the 1st century AD. This scientist is placed on a par with the most brilliant inventors of mankind in its entire history.
The engineer's inventions include: the first automatic doors, a self-loading crossbow, a steam turbine, the first odometer and much, much more.
This inventor was noted for the creation of many devices that work with water. The famous fountain without a pump also belongs to them.
Ways to humidify the air in an apartment
There are many methods and devices for air humidification. Household appliances that increase the humidity in the air in the house are beautiful and effective, but very expensive. There are traditional methods for humidifying indoor air. Most of them come down to the fact that water should evaporate naturally. These can be open containers of water or a damp cloth. However, for this method of moisturizing to bring noticeable results, you need to regularly wet the fabric and add water to the container. The amount of liquid evaporated will be small, which means it is necessary to hang more than one piece of fabric and place more than one container with water. Should you turn your room into an exhibition of water vessels and wet pieces of fabric? I suggest using a model of Heron's fountain to humidify the air.
Scheme and principle of operation of the Heron Fountain
The classic Heron fountain consists of three containers connected to each other in a certain sequence by tubes. Below is a diagram of the interaction of these vessels.
- The first container (No. 1) can be open - it is often made that way.
- A tube from it leads into a hermetically sealed vessel (No. 2). It reaches almost to the bottom.
- Another tube originates from the lid of this vessel. It shouldn’t touch the water, that’s why it’s shortened. The tube extends to the next sealed vessel (No. 3), ending exactly under the stopper.
- Another tube also practically reaches the bottom of the third vessel. Its second end goes out and is a pipe from which the stream will hit.
It all works according to the following principle:
- The third vessel (the second hermetically sealed flask or No. 3) must be completely filled with water. This can be done in advance, before sealing it.
- Then a little water is poured into the open container (No. 1).
- This water begins to flow into the first closed bottle (No. 2), resulting in a closed circuit.
- Water flows downward under the influence of gravity. This causes air pressure to increase in the vessel, which is transmitted through the chain to the third container (No. 3), squeezing water out of it. As a result, it is emptied and water flows into the closed flask number one (No. 2).
- It is easy to understand that as soon as the water in the last container runs out, the fountain will stop working. This is an important flaw of the famous scientist, which does not allow him to create an eternal device.
But the issue can be resolved. In order to obtain an improved Heron fountain, the design needs, oddly enough, to be simplified.
- We get rid of the third container, which, in fact, is completely unnecessary. The circuit will consist of one sealed and one open container and two pieces of tubes of different diameters.
- To maintain stable pressure in the system, it is necessary that the drain tube be slightly larger in diameter than the outlet through which the jet will flow.
- So, the containers are connected by tubes. Along the short one, which does not reach the water, the water will flow down from the bowl. Along a long, reaching almost to the bottom, the liquid will rise back, again replenishing the water level in the bowl. As a result, the chain is completely closed.
- To start Heron's eternal fountain, pour water into the bottle to completely cover the long tube. Then we pour some water into the bowl, and the device starts working.
- If nothing happens, then the air lock must be removed from the system. To do this, you can suck in air from the outlet pipe of the fountain.
- Heron's Fountain from two bottles can be assembled as a first test before attempting to build something more serious.
- Everything is extremely simple. It is even proposed to make a perpetual motion machine using this principle. To do this, a turbine is located along the flow of water, which is driven by the liquid.
In fact, the scheme can be further simplified. The photo shows a perpetual motion machine invented by Robert Boyle.
The cone-shaped vessel at the base is connected to a hose. If you create a pressure difference in it by drawing out air in the same way as drivers do when draining gasoline from a car tank, the water will begin to rise above its level in the vessel.
The circuit is also closed, and the fountain will run indefinitely.
Stationary or submersible?
A fountain in a country house, in a pond or by itself, technically in general can be implemented in two ways: stationary or mobile with a submersible pump. The design of a stationary fountain can be very diverse: a classic multi-tiered bowl with a cascade of nymphs (see below), pos. 1 in Fig, also a classic nymph pose. 2, modernist laconic bowl combined with sculpture, pos. 3, something primitively rough, pos. 4, mobile (oscillating, rotating) spout, from technogenic-futuristic to rustic, pos. 5 and 6.
Stationary fountains
But all of them, and many technically similar options, have one thing in common - the fountain spout is in the form of a sculpture, in the order of routine maintenance of the fountain, it is non-removable and non-removable. Therefore, for a stationary fountain you need a coastal pumping station, pipelines for supplying water to the spout and pumping it out of the bowl. In general, a stationary fountain is an expensive and complex structure. Nowadays even fountains in squares are made with submersible pumps right in the thicket.
Construction of a wooden fountain
In the vast majority of cases, the own fountain on the site is made submersible and mobile. The weight and dimensions of its electro-hydraulic system allow it to be placed both in a pond and in the thicket of a separate garden fountain. The diagram of the mobile fountain is shown in Fig. on right:
- Mobile fountain diagram
The water intake consists of a filter 1, a supply regulator 1a and a flexible supply pipeline 1 b. In a pond, it is placed in shallow water, this sharply slows down the siltation of the reservoir with an acceptable frequency of filter cleaning.
- Horizontal submersible pump 2 is placed deeper, but not in the pit itself, on a stone or gravel bed.
- The pump outlet is a telescopic pipe 3 for depth adjustment, ending with a diffuser 4. Together they form the fountain spout.
This scheme is very flexible, because the supply pipeline can be up to 10 meters or more in length. If, for example, you first build a fountain in the garden and then dig a pond, then the filter is simply transferred to the pond, the supply pipe is extended, and the outlet from the fountain bowl is discharged into the pond through another pipe. Both pipelines can be flexible, and there is no need to bury them; they can be laid in a shallow trench, because The fountain is emptied in winter.
How to make Heron's fountain: what can be improved
They say that there is no limit to perfection, and almost any thing can be modernized ad infinitum - this is not entirely true, but nevertheless, the possibility of improving any product is almost always available. The Fountain of Heron is no exception in this regard - there are many things that can be modernized in it.
The very first thing is to increase the flow of water. We have already said above that it depends on the distance between the upper and lower containers - you yourself understand that it may not be possible to increase this distance to infinity (or at least until the necessary moment).
There is one trick here - if you correctly pair two such systems of containers and tubes, then at least the height of the jet will double. In general, you will need not one, but two bottles full of water and two equally empty ones, connected to each other by tubes in series - a full, empty, then full again and again empty jar. Full cans on top, empty cans on the bottom – it won’t work any other way.
In general, despite the fact that in general Heron’s fountain is a very well-thought-out product, there is still room for its improvement and, apparently, there is no limit to this place. To conclude the topic, it remains to add that according to the principle described above, it is possible to produce quite a lot of different systems, ranging from small experimental models of fountains to huge working models.
With the latter, however, the problem of recharging arises, which is very, very difficult to solve without a pump or other ingenious modern devices.
Decoration of the structure
It is not so important where the homemade fountain will be located:
- country house;
- garden plot;
- apartment or house.
It should still look attractive. In its original form, this design looks very unsightly. Therefore, it is advisable to take care of decoration.
If the fountain is planned to be installed on a site (as happens most often), a small recess needs to be made in the planned location. About thirty centimeters will be enough
It is important to level the bottom of the hole so that a couple of eggplants can be installed there. The recess itself at the end can be covered with pebbles or similar decorative material. On the contrary, you can lay out a pile of stones above the elevation, and place a decorative fountain bowl on it
You need to try to direct the flow of water correctly - so that it flows directly onto the hill. It will look much more impressive this way
On the contrary, you can lay out a pile of stones above the elevation, and place a decorative fountain bowl on it. You need to try to direct the flow of water correctly - so that it flows directly onto the hill. It will look much more impressive this way.
To add variety to the design, you can create a backlight for the water. To do this you need to use LED lamps. You can even have different colors.
In the end, you can completely make your task easier and choose special decorative tanks that simply do not need to be hidden from prying eyes. Otherwise, everything depends on the imagination of the master.