It has long been no secret to anyone that a wide variety of objects can be folded from an ordinary sheet of paper. Who among us did not make a paper airplane or a simple flower as a child? Remember how diligently we folded the piece of paper, and then enchantingly rejoiced at our creation. And even though the corners were not entirely even, and the lines were slightly not parallel. We invite you to return to the world of childhood and once again plunge into the magical world. This time we'll do something unusual: the choice fell on a bottle. Yes, yes, a sheet will make a paper bottle, which, according to most, can only be made from glass or ceramics. Let's surprise the world?! Like many others, the bottle will be born from a square-shaped sheet. Let's prepare the sheet for further work, for which we will make several auxiliary bends. Attention - not all bends must be made over the entire length or width of the sheet. Otherwise, the craft will turn out angular with distorted shapes. Fold the sheet in half horizontally and just mark the inflection line on the right. We return the sheet to its original position. In a similar way, by folding the bottom part up, we divide the lower right half of the edge of the sheet in half. Let's repeat the folding procedure so that the edge of the sheet is divided into eight equal segments.
Fold a strip one-eighth wide of the sheet up and carefully iron it along the fold line. Fold the top of the sheet down so that the edges of the sheet meet. Let's straighten the workpiece. Let's fold the top half of the sheet horizontally in half; the very first mark on the right edge, made when folding the whole sheet, will help us with this.
Let's straighten the workpiece. By alternately folding the sheet in half vertically, we divide the bottom strip into eight equal parts. And then we will divide each of them in half, marking the cents of each of the eight parts with risks. Based on the risks made and the inflection line of the bottom strip, we will bend the lower right corner back. We fold all adjacent elements of the bottom strip in pairs so that a convex diagonal fold is formed, and the middle marks coincide when folded. Starting from the folded corner of the sheet, we sequentially fold the entire lower part along the resulting fold lines. We'll get the bottom. The paper bottle is already beginning to take on familiar shapes. Let's straighten the paper blank to its original shape. Place the sheet so that the bend line dividing it in half is vertical. We will work with the left half of the sheet. Consistently folding the sheet in half horizontally, and then dividing the resulting parts into halves, we will arrive at the required result - we will divide the left half of the workpiece into thirty-two equal horizontal parts. Please note that we iron the kinks only to the central vertical line. Next, let's move on to the most important stage - folding the neck of the bottle. In this part of the work you need to be extremely careful. Using a concave fold, place the fourth strip on top of the third. Fold the right side of the sheet back. Based on the drawing, we will make a zigzag fold, in which part of the third strip will open slightly, and the sheet will bend vertically twice in different directions. We continue to fold the strips in pairs, gradually forming a neck. If everything is done correctly, the bottle will have an elegant neck. All that remains is to secure the additions made. To do this, bend a narrow strip outward at the top of the neck.
Using the previously described method, we will form the bottom of our vessel.
The wonderful art of origami has miraculously transformed an ordinary leaf into a voluminous paper bottle.
Environmental problems are very acute today. Many people care about them, which is why green business, based on the principles of ecology, wins compared to other types of business. In this regard, the topic of ecology becomes a driver for many entrepreneurs. On our list of business ideas
There have already been stories of creating “green” businesses. Among them are a smart window that generates electricity, an eco-friendly taxi for one passenger, eco-friendly shoes and many others.
English company Green Bottle ( Green bottle
) from Suffolk is responsible for the invention of the eco-friendly paper milk bottle as an alternative to traditional glass and plastic bottles.
This bottle is made from recyclable materials. And in the case of direct disposal, it will not linger in the soil for a long time; the decomposition process will take only 5 weeks, which is very short compared to glass and plastic bottles. The process of their decomposition takes up to 500 years.
Martin Myerscough
) came up with eco-friendly
paper milk bottles
thanks to his little son. He once brought home from school a jug made using the papier-mâché technique. After some thought, Martin decided that the price of paper bottles and the speed of their production were quite competitive and could compete with plastic and glass bottles.
In addition, Martin was lucky; local investors invested 4 and a half million dollars to bring his business idea to life. Such a risky step demonstrates the viability of Martin Myerscough's business idea.
Today, Martin's eco-friendly paper bottle company plans to expand internationally. Thus, in its country of Great Britain, the Green Bottle company has achieved recognition and enormous success - approximately 15 million Green Bottle paper bottles are used by the British every day.
The famous British newspaper Guardian even wrote in one of its articles that Martin’s invention - paper bottles - was perhaps the most effective answer to the so-called “waste crisis” that has become so acute in the UK in recent years.
©www.site – portal of business ideas
23.06.2011
Earn up to 200,000 rubles. per month while having fun!
Trend 2022. Intellectual business in the field of entertainment. Minimum investment. No additional deductions or payments. Turnkey training.
There is a restaurant in Helsinki where food is prepared from food that is almost past its expiration date. Almost missing products are delivered to the establishment free of charge by Finnish grocery chains.
The words “sustainable” and “sustainability” in the Western business environment today are commonly used to replace “eco-friendly” and “environmentally friendly”. Why is this necessary, and what types of businesses strive to call themselves sustainable?
The method of seismic exploration of the seabed using air guns should be decommissioned and forgotten. Scientists state: human activity in the sea is making it too noisy...
Scientists from Peru have created a way to generate electricity from the soil of indoor plants. An experimental version of the Plantalamparas LED lamp is capable of providing light for two hours.
No matter how they fight the drought in California! Even a local radio station called Water Lover's Station, whose songs are related only to the theme of water, is forcing Californians to conserve water.
In the Chinese city of Guiyang, there is a tea shop that only employs deaf employees. Only one cashier has no hearing problems.
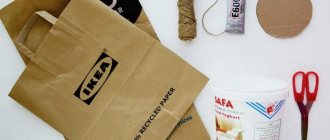
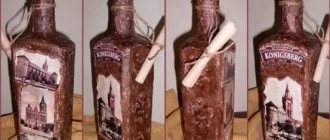
Toilet paper, oddly enough, is perfect for decoupage. Due to its low density, the paper is well saturated with glue and adheres well to most materials. In addition, it can easily be used to form voluminous folds, contours, and images. The paper can be painted in any color, decorated with rhinestones, beads, polymer clay, etc.: all elements will hold firmly. How to use toilet paper for decoupage - read the article.
Toilet paper is perfect for decoupaging a New Year's bottle: lightweight paper will create interesting folds and will adhere firmly to the surface of the bottle. This type of decoupage is easy to do with your own hands; it does not require serious financial or time expenditure. In order to decorate the bottle, we will need white paint or decorative primer, silver pigment, PVA, a napkin with a New Year's design (for example, a winter forest, Santa Claus in a sleigh, etc.), synthetic brushes (flat and round), scissors , foam sponge.
To make a New Year's bottle using toilet paper, you need:
- Prepare the container: remove all labels and glue, degrease the glass with a special product, alcohol wipe or nail polish remover.
- Using a brush or sponge, tightly cover the surface with primer or paint in several layers. A new layer must be applied only after the previous one has completely dried.
- Glue the napkin, first rounding its corners with scissors. The applique must be glued dry, distributing the glue from the center to the edges of the design. When fixing the napkin with glue, you need to carefully ensure that air bubbles do not accumulate under the application and that the edges of the picture do not curl.
- Cut a strip of toilet paper half the height of the bottle.
- Cover the surface of the bottle free of the design with glue and, starting from the top of the neck, glue a strip of paper, forming folds with your fingers.
- After the paper has dried, paint it to match the background of the napkin.
- Apply silver pigment to the protruding areas of the folds with your finger.
- Cover the entire surface of the finished product with a finishing varnish-fixer.
This master class is suitable for decorating a bottle in any theme: using toilet paper, you can decorate a bottle in a marine theme (folds are great for simulating waves), imitate textiles on a flask, etc. In any case, volumetric elements will look impressive and unusual.
What you need for decoration
So where to start? You should choose accessories for decoration based on the size, shape and presence of inscriptions on the “experimental”. First, treat the bottle with alcohol or nail polish remover.
Afterwards you will need acrylic paints, napkins with beautiful patterns and various ribbons, beads, even cereals will do. Stock up on PVA glue in advance. To fix the work, you need acrylic varnish.
DIY champagne decoration for a wedding with satin ribbons
Decorating a bottle with ribbons is the simplest and most affordable way that does not require special skills or high costs . Despite this simplicity of the decor, the result will be spectacular and bright if you carefully follow all the steps in the master class for decorating a champagne bottle with satin ribbons.
What you will need for work:
- ribbon: blue and golden brocade;
- heat gun;
- a bottle of champagne;
- scissors;
- additional decor: beads, lace.
The colors shown are taken as an example. They can be replaced with other shades that suit the wedding design, but it is better to use no more than 2-3 colors
Step by step execution:
- Try the blue satin ribbon on the neck of the bottle and cut it to the desired length. Apply glue and attach around the throat, placing the right end of the decorative item over the left.
- The second tape will be longer, as the bottle begins to expand towards the bottom. Cut the required length and glue it in the same way, slightly covering the edge of the first tape. Attach 2 more ribbons in the same way.
- The fifth and sixth row will be made of brocade ribbon. The technique is absolutely the same.
- Glue a layer of brocade ribbon to the very bottom of the bottle, wrapping the champagne crosswise. Cover the remaining space between the top and bottom of the bottle with a blue piece of paper - its ends should connect to the back of the champagne.
- The joint is unlikely to be neat, so you need to cut off the blue tape (about 10 cm). Coat the edge with glue and push it under the very bottom layer, press. Then stretch it upward and glue it, covering the joints.
- Add additional decorations to the front of the bottle, arranging them in a random pattern.
The wedding champagne made from ribbons is ready - you need to wait until the glue has completely dried and you can bring the “bull” to the holiday.
Champagne in blue and gold with peacock feather
Decor of bottles with salt
You will need fine salt and crayons (you can use paints) of different colors. Salt is repainted in a certain color using crayons. In this way a mixture of different colors is obtained. Next, salt is poured into the bottle one by one.
It is important not to move the bottle or allow the colors to mix. It turns out to be a rainbow-colored piece of the room’s interior.
Making a basket from ribbons
The final master class presents you with an interesting idea for creating a wonderful basket or bag using satin ribbons.
By using the snow-white material of satin ribbons for your work, you will get unique wedding accessories created by yourself. Required kit for work:
- oval soap;
- satin ribbon (seven meters long and one wide);
- sewing pins (about forty pieces);
- wire, thirty centimeters long;
- decorative elements in the form of sequins, beads, kanzashi flower.
First of all, you need to mark out the soap using a pen or pin. At the same time, make an indent of one and a half centimeters from the edge. The distance between the holes should be approximately 0.8 cm. Insert prepared pins of different colors into these holes, leaving a gap of one centimeter.
You should have between fifteen and twenty pins on both sides.
Take a ribbon of a suitable shade and secure its tip with a needle. After this, you can start working and weaving. The ribbon is drawn from the bottom up, by sequentially yarn over the pins of the top row.
After finishing the braiding, continue working in a circle. The direction of movement is from left to right. In this way, make step-by-step turns around one of the pins by running and tightening the tape along the inside. And so on, sequentially move from one pin to another. Photos demonstrate the process of such weaving. Make a similar weave with three to four rows along the top and bottom parts. When finished, secure the tape to a knot and cut it. Secure the remaining tip with a pin.
Next, make a handle for the basket or bag. To do this, the wire is braided with ribbons in any way convenient for you. This can be macrame or “loop-to-loop” or another option. Having made the weaving, the wire is bent with your own hands in the shape of an arc and fixed on the basket.
All that remains is to decorate such a basket at your discretion with any available material at your disposal or make a flower arrangement for it or decor from ribbons in the kanzashi style.
Eggshell decor
The shell is often used in decoration; it creates irregularities and adds sophistication to a seemingly ordinary shell. You can glue it with PVA glue, but you shouldn’t be sorry, otherwise the whole picture will deteriorate and the shells will fall off. It is better to use hot glue or construction adhesive. Unusual shimmers are created with a brush and pearlescent paint.
Materials and tools
To work with tapes, you will need a set of simple tools that can be found in every home. If this is your first experience in decorating bottles, then it is better to start with simple design solutions to get the hang of it. To work you will need:
- Sharp scissors.
- Glue that adheres well to glass. It's better to use "Moment".
- Braid, lace, scraps of fabric.
- Accessories: beads, beads, buttons, cabochons.
- Tweezers for creating miniature elements.
- Ribbons.
The basic material also has a number of variations:
- Satin. Most commonly used due to its pliability and elegant aesthetic appearance.
- Silk. Thinner and more slippery material.
- Satin. They have a denser structure, and the fiber pattern is visible to the naked eye.
- Jacquard. Decorated with original drawings.
- Organza ribbons. The material is translucent and airy.
- Cotton. They hold their shape well, so they are suitable for creating three-dimensional compositions.
Each of the above types is used by needlewomen to decorate bottles, but the most popular material is satin. It combines the optimal ratio of quality and price.
Complex compositions made from combined materials look original. For example, cotton flowers surrounded by satin petals or the same background.
Unusual items at work
A metal pendant will create an interesting pattern. After dipping the pendant in paint, lay out a spiral on the bottle. Then they slowly pull out the iron and get a pattern that resembles a tree. You can do this twice, for example, white and pink, and then draw tree branches, draw a bullfinch or another bird.
They use old wires, electrical tape, and broken balloons. All this is decorated. Mini-pictures are made from wire, electrical tape is used as recycled material, and bottles are covered with rubber from balls, creating amazing surfaces.
Note!
- DIY furniture decor - 145 photos of exclusive and modern design ideas
- DIY pot decor step by step: simple decorations and decor options for pots made from different materials
The main feature here is the acrylic coating. This must be done carefully, fixing with varnish. Then the works will become beautiful, regardless of what they are made of.
Decoupage of bottles with toilet paper: master class (video)
Decoupage a bottle with toilet paper is an affordable way to decorate glass containers with your own hands, which absolutely anyone can do. This technique makes it possible to obtain interesting, original three-dimensional elements and opens up wide possibilities for decoration in various themes. Try it and you will be convinced of the simplicity and effectiveness of this decoupage!
It has long been no secret to anyone that a wide variety of objects can be folded from an ordinary sheet of paper. Who among us did not make a paper airplane or a simple flower as a child? Remember how diligently we folded the piece of paper, and then enchantingly rejoiced at our creation. And even though the corners were not entirely even, and the lines were slightly not parallel. We invite you to return to the world of childhood and once again plunge into the magical world of origami. This time we'll do something unusual: the choice fell on a bottle. Yes, yes, a sheet will make a paper bottle, which, according to most, can only be made from glass or ceramics. Let's surprise the world?! Like many other crafts, the bottle will be born from a square-shaped sheet. Let's prepare the sheet for further work, for which we will make several auxiliary bends. Attention - not all bends must be made over the entire length or width of the sheet. Otherwise, the craft will turn out angular with distorted shapes. Fold the sheet in half horizontally and just mark the inflection line on the right. We return the sheet to its original position. In a similar way, by folding the bottom part up, we divide the lower right half of the edge of the sheet in half. Let's repeat the folding procedure so that the edge of the sheet is divided into eight equal segments.
Fold a strip one-eighth wide of the sheet up and carefully iron it along the fold line. Fold the top of the sheet down so that the edges of the sheet meet. Let's straighten the workpiece. Let's fold the top half of the sheet horizontally in half; the very first mark on the right edge, made when folding the whole sheet, will help us with this. Let's straighten the workpiece. By alternately folding the sheet in half vertically, we divide the bottom strip into eight equal parts. And then we will divide each of them in half, marking the cents of each of the eight parts with risks. Based on the risks made and the inflection line of the bottom strip, we will bend the lower right corner back.
We fold all adjacent elements of the bottom strip in pairs so that a convex diagonal fold is formed, and the middle marks coincide when folded.
Starting from the folded corner of the sheet, we sequentially fold the entire lower part along the resulting fold lines. We'll get the bottom. The paper bottle is already beginning to take on familiar shapes.
Let's straighten the paper blank to its original shape. Place the sheet so that the bend line dividing it in half is vertical. We will work with the left half of the sheet. Consistently folding the sheet in half horizontally, and then dividing the resulting parts into halves, we will arrive at the required result - we will divide the left half of the workpiece into thirty-two equal horizontal parts. Please note that we iron the kinks only to the central vertical line.
Next, let's move on to the most important stage - folding the neck of the bottle. In this part of the work you need to be extremely careful. Using a concave fold, place the fourth strip on top of the third. Fold the right side of the sheet back. Based on the drawing, we will make a zigzag fold, in which part of the third strip will open slightly, and the sheet will bend vertically twice in different directions. We continue to fold the strips in pairs, gradually forming a neck.
If everything is done correctly, the bottle will have an elegant neck. All that remains is to secure the additions made. To do this, bend a narrow strip outward at the top of the neck. Using the previously described method, we will form the bottom of our vessel. The wonderful art of origami has miraculously transformed an ordinary leaf into a voluminous paper bottle. Watch the video on how to make a paper bottle
Decoration with ribbons and beads
Apply acrylic paints (with a sponge or brush) to the prepared glass and wait until dry. Bows, flowers, etc. are made from ribbons. Beads are painted and glued. If you want to add an antique look, you should paint the entire beaded bottle a dark color and make an accent with white, silver or gold.
Another way is to wrap ribbons around the bottle and sprinkle beads on the glued areas. You can teach your child how to decorate bottles with ribbons; it’s a simple and quick way that doesn’t require much effort.
Recommendations for decorating bottles with ribbons
Decorating wedding champagne is easy to do with your own hands. The main thing is to know some nuances and strictly follow the step-by-step master classes. The design should be festive and bright - satin ribbons are best suited for this.
You shouldn’t limit yourself to just ribbons; you can add colored feathers, rhinestones, artificial flowers and lace, beads and beads to them
General rules on how to decorate champagne for a wedding with your own ribbons:
- Any such decoration begins with the ribbon being attached to the surface of the bottle using bias tape. You should start from the neck or just below its level.
- There is no need to immediately cut a certain number of pieces, since their length will vary depending on the bends of the bottle shape.
- The bottom edge of the last glued tape is hidden under the edge of the previous tape. Thus, the decoration is built over the entire surface, to the very bottom.
- The decorative element does not have to be located at an angle. You can wrap the bottle crosswise and hide the imperfections with thin lace.
- The neck can be left open, or you can wrap it completely.
- Only transparent glue is used. You should coat it carefully so that after drying you do not find unsightly stains.
If the decor with ribbons will only partially cover the bottle, then you need to remove the labels in advance . To do this carefully, the bottles need to be briefly immersed in warm water - the glue and paper will soften and be easily removed.
Cereals on a bottle
Are you used to storing cereals in containers, but what about storing them outside? For example, peas are glued onto hot glue using a stencil (it can be a shell, a spiral, or clear lines).
Then they tear up napkins and glue them, creating unevenness. All this is covered with acrylic paints and the process is completed with acrylic varnish. This is important, if you do not varnish, after a while the paint will fade and the grain will begin to fall off.
Gift wrapping bottle from sweater sleeves
If you have an old sweater or an unnecessary knitted cardigan, don’t rush to throw it away! Sleeves of knitted items can be turned into cozy, warm bottle gift wraps that are very suitable for the winter holidays.
Take an unnecessary knitted item in which the sleeves are still in decent condition. Wash the sweater, cut off any pills with a special machine, if there are any. Place the bottle in the sleeve so that the cuff is level with the neck. Cut the sleeve below the bottom of the bottle by a couple of cm. Make sure that the knitting does not unravel; it is advisable to pick up the yarn and sew it up with thread. The bottom for such a knitted cover can be cut out of thick fabric and sewn, or you can simply gather the edge of the cut sleeve with threads and pull it in the middle. At the neck with cuffs, tie a ribbon, braid, and decorate with beads or buttons. You can knit such gift wrapping yourself.
Gift for a friend for the New Year
Giving a decorated bottle is a good move if you don’t want to spend money on gifts. Last year you drank champagne together, and this year the bottle pleases with its beauty on the shelf. The bottle needs to be painted with acrylic paints.
The necessary parts are cut out from the napkins (or carefully torn off with your hands): Santa, Christmas tree, etc. Glue the parts cut from the napkin using PVA glue with a brush (you can add a little water if the glue is thick). The finished decoration of a champagne bottle will evoke positive feelings in a friend.
How is bottle ribbon decoration made?
For work you will need
Scissors, utility knife, soldering iron, large needle
Two bottles of champagne of different sizes
Ribbons of dark color, golden, white, colored
PVA glue, liquid nails, textile glue
Hat, flowers, hearts, beads, sparkles, rhinestones
Weaving starts from the neck; due to its expansion, it is the most difficult to arrange neatly. The ribbons are cut into small pieces, each subsequent fragment overlapping the top one. They should fit tightly, neatly, slightly stretched.
Decorating bottles with ribbons
Wedding bottle decor
Each underlying segment will be slightly longer than the previous one - due to the expansion of the neck of the container. It is most convenient to work with tape 2-2.5 centimeters. The next turn is measured directly on the bottle and carefully cut off with a small margin, which goes under the next fragment, as in the photo.
Attention: It is difficult to accurately indicate the length of tape that is used for bottle decor. The thinner the braid, the greater the consumption. Most often, with a standard width, at least 5 m of satin bobbin is required. But keep in mind that 2-3 colors are used.
Beautiful decor of glass bottles with ribbons
Decor of bottles with inscriptions
The question immediately arises: what and how to make inscriptions from? The same fantasy still helps out. Cut the napkins along the entire length, 2 cm wide, using a wet towel, twist them into a spiral and put the inscription on the bottle. Other options are beads, matches, threads. Instead of a regular, boring postcard, use a bottle and “write” a congratulation on it.
After the work has been done, the decor of the bottle with the inscription “New Year” and a gadget in the form of a miniature bottle (which can be made from putty), a Santa doll or a spruce twig will really surprise you.
How to make boutonnieres from ribbons
The next master class will introduce you to the option of creating another necessary wedding item, such as a boutonniere. Such delightful decorations can be used to decorate not only clothes, but also bags.
So, in order to make boutonnieres for a wedding, cut ribbons of suitable shades into 5 by 5 cm squares with your own hands. After this, from the prepared fragments, you need to cut out elements in the shape of drops. In total, to create a boutonniere flower, prepare 18 such details. Take these petals, scorch them with a flame from a candle or lighter and gently stretch them.
Each flower consists of four layers. In this case, three layers are made up of five blanks, and another layer of three. To assemble the first tier of the boutonniere, string the petal onto a thread. After this, pull and secure the thread. Then the next petal is strung, which is also tightened and fixed. Thus, continue to make similar layers with your hands. The lower tier is additionally fixed with glue, so you can be sure that the boutonniere is securely attached.
The master class continues with the creation of the next tiers, which are fixed on the flower one after another. As a result, you should end up with a flower that looks like a kind of cup. To make one boutonniere, prepare three similar flowers.
After all the fragments are prepared, you can proceed to assembly. Take a flower and from the side, using glue, attach another one to it. Before you assemble, think about what your boutonniere should look like. The third flower is glued to the first and second.
Place a drop of glue in the middle of the boutonniere and use cotton wool to spread it over the flower cavities. At the final stage, you can add additional decor in the form of foliage, rhinestones, and beads. Also, for such a boutonniere, you need to make a base in the shape of a circle, using, for example, plastic. This blank is covered with fabric made of satin materials to match the product. On top of such a base, a prepared boutonniere is attached, made with your own hands in the kanzashi style. All that remains is to attach this accessory to the surface of your clothing or bag and admire the work done.
Vase made from a decorated bottle
An ordinary photo of the decor of a dead bottle is not impressive, but an unusual vase with fresh flowers is. And the whole secret is that the bottle is a vase. The main thing is to find a bottle with a wide neck.
If you don’t like ordinary vases from the store, then start decorating yourself. What inspires you? Maybe you won’t have any ideas, but once you start working, the process will begin and inspiration will appear, the main thing is to start.
If you are a seasoned designer, but have run out of ideas for a long time, take a closer look at ordinary pasta. They really do hide a secret. Come up with your own ornaments and don’t be afraid to make mistakes. Masters look for old things no one needs, trinkets, and find such uses for them, why are you worse?
Now you can not only give your master classes, but also record a video of decorating bottles.
Types of decoupage
There are five types of decoupage. Let's look below at what they are and their manufacturing techniques.
Classical
This type of decoupage is very simple. The main task is to carefully cut out the image and stick it to the surface. Carefully pay attention to dimpled and bulging areas and smooth them out as you go, trying to avoid tearing.
The surface can be coated with colored or craquelure varnish in advance. Craquelure is a crack in the paint layer in a piece of painting or any other paint coating.
Direct decoupage uses the technique of gluing a picture to the outside of an object.
Decopatch
For a decorative patch you need: a set of pieces of paper. The technique consists of gluing the surface with materials that are in demand according to the idea and recreating one continuous coating.
Decopatch is a combination of decoupage and patchwork. Patchwork is a technique of sewing things from pieces of fabric. The flaps are connected into oversized blocks according to the area of geometric shapes.
Many pieces of paper create a patchwork quilt effect and the end result is a completely filled surface.
At the end we get a brilliant mosaic.
Reverse technique
For transparent glass objects, reverse decoupage is often used. In order to sell a product with such decoration, the following requirements must be met:
- Find the desired picture;
- Paste the design on the other side of the product with the front side facing the glass;
- Make a craquelure;
- Add background;
- Apply topcoat.
The main feature of this species is its unusualness. Not everyone will think of applying a design to the opposite side and end up with visually the same decoupage as when performing other techniques.
Volume
Decoupage with volume contains “raised” components of the illustration, which become more voluminous due to the mass for modeling. A similar result can be achieved by gluing identical parts onto each other in multiple layers.
A relief surface can be created using paste, gel, shells, fabric, 3D map and putty.
Art
Smoky, also known as artistic decoupage, unconditionally imitates painting. Through colorful material and variational maneuvers in art, the boundary between the picture and the surface around the drawing is erased. There is shading and finishing of details. At the end there is a transparent haze.
You may need skills or a master class from a specialist.
Photos of bottle decor
How to pack a bottle into a man's shirt sleeve
In the same way, you can use not only knitted sweater sleeves, but also men's shirts with cuffs!
In combination with a tie or bow tie, such an extravagant packaging of the bottle will definitely remain in the memory for a long time. An ideal solution for a gift to your beloved man or colleagues, and a bow tie or tie can also be an additional (or main) gift. And it’s even easier to make such packaging than from a sweater, since in this case you don’t need to worry about the knitting not unraveling. The process is exactly the same. Find an unwanted shirt that is clean and has sleeves intact. Place the bottle in the sleeve, preferably so that the cuff completely covers the neck of the bottle. Cut the sleeve just below the bottom line, sew a fabric bottom or simply sew the edges. You can simply cut the cuff with a button and fasten it around the bottle.