Best friends of seedlings and flowers
Wooden skewers are convenient for loosening the soil in flower pots. This needs to be done regularly. This allows more nutrients to reach the roots. The seedlings grow strong, the flowers do not get sick and bloom profusely. Skewers can serve as a good support for a weak flower.
I also saw that skewers are used to protect plants from inquisitive dogs and cats. They are used to build a kind of palisade. Walking on it is uncomfortable, and pets quickly forget about their bad habit. The sticks themselves do not interfere with the seedlings.
Skewers instead of matches
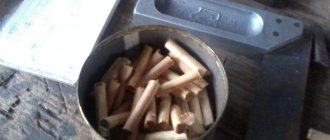
I use the oven very often: I bake biscuits, make pizza, all sorts of casseroles. And since I have a gas oven, I used to have to buy matches for it. But then I figured out to turn on the stove, light the skewer and transfer the flame to the oven. I have electric ignition upstairs.
The skewer is long and won't burn your hands.
I set the stove on fire, extinguished the stick, cut off the tip, and put it back on the table. One skewer is enough for a month. It replaces a dozen matchboxes in which half of the matches do not light. It’s convenient and there’s no savings.
Finger-licking kebabs
All my relatives and friends call chicken skewers on skewers, as well as baked vegetables, my signature dish. They fly off the table instantly. I found the recipe in a notebook. I don’t remember whether I copied it from some magazine, or from a television program.
We recommend: Step towards civilization: find out what you can throw in a plastic container and what you can’t
The kebabs are prepared very quickly and easily.
To make them melt in your mouth, you need to follow the recipe exactly:
- Let's prepare the ingredients: here it's not for everyone, you can take skinless chicken breast (fillet) - 2 pcs., 4 tbsp. spoons of sour cream, 1 tbsp. spoon of tomato paste, 1 teaspoon each of ground coriander, smoked paprika, 0.5 teaspoon of ground allspice, 2 teaspoons of coarse salt, 5 tbsp. spoons of vegetable oil. Or you can cook just vegetables - it will be an excellent side dish. Baked vegetables are healthy, and especially delicious on skewers.
- Mix vegetables and all spices, add a little oil. Add sour cream (or mayonnaise - depending on your preference) and soy sauce.
- Cut the breast into pieces 5 by 5 cm.
- Mix the chicken and vegetables with the marinade and wrap the bowl in cling film.
- Let marinate in the refrigerator for an hour (no longer!).
- Turn on the oven to preheat for 15 minutes. Soak 7-9 skewers in cold water and carefully thread the vegetables onto the skewers.
- Thread the kebabs onto skewers and bake for 20 minutes at 180 degrees. Then we increase the temperature to maximum. Cook for another 7-10 minutes. Alternatively, you can bake in foil for the first 20 minutes. The kebabs turn out very juicy, with a crispy golden crust.
Chinese chopsticks in Russian
I burned myself several times on the toaster oven. The toast pops up too close. Touching hot metal is a piece of cake. Especially in the morning, when I have not yet recovered from sleep. Skewers helped solve the problem.
Now when I need to get a piece of toast out of the toaster maker, I arm myself with two skewers. I fold them between my fingers like Chinese chopsticks. I take the toast without fear of getting burned.
Making a souvenir gazebo from wooden sticks
I present a step-by-step tutorial on how to create a gazebo.
We will need tools: A sharp knife, building materials (toothpicks and two types of wooden sticks: three and two mm in diameter), PVA glue, a board (on which you can cut sticks) and a pencil. As well as a sheet of paper and a ruler for creating a drawing. In the process, tweezers, a needle file and sandpaper may be useful.
So let's get started!
Step 1. First, draw on paper a drawing of the foundation of the future structure. The bold line is the boundary of future walls.
Step 2. Glue the first crown along the thick line of the base. Below I will show how the sticks are cut out (starting from step 13), if anyone needs to see this in more detail.
Step 3. Cut out and glue the second crown of the foundation on top. The sticks can be arranged end-to-end with cuts, or alternated with bevels. At first I didn’t pay attention to the alternation, but in vain. The first crowns would have looked more beautiful.
Step 4. Measure and cut out the first floor stick. It is thinner than other logs...
Step 5... and hides behind the next crown (made of the same thin sticks).
In other words, for the third crown we take thinner sticks and use the remaining free thickness as a stand on which the floor sticks will rest.
You can do it differently. Simply put the floor instead of the third crown, and the fourth crown will be laid on top. This method is much simpler than the first.
Step 6. In this way we lay the entire floor, adjusting the sticks to length and laying them one next to the other. The ends of the sex sticks will not be visible from the outside (Laying diagram 1).
Step 7. We continue to lay the crowns. We bring the total height to at least 6 crowns. We need this for the next step.
Step 8. Cut out 7 sticks of the same length. These will be the supporting sticks of our structure. Choose their length depending on the height you want to get the gazebo. The sticks will eventually support the ceiling. I took the length of the supports to be about 7 cm.
Step 9. Before gluing the sticks in place, you need to make a ring to hold them in place. To do this, we assemble a new ring inside our gazebo, right on the floor. It should be located inside the outer rims and follow the contours of the octagon. In the following photos (step 11) you can see this retaining ring and it will be clear how to make it. You just need to pay attention that when gluing it you need to be careful with the glue. Because if you pour too much of it, then after drying the ring will not be removed from the assembly site.
Step 10. So, remove the dried ring and in its place carefully glue the sticks to the base of the structure in the corners. We specially placed 6 crowns to make it easier to align the sticks. This is a difficult point, so be careful to ensure that the vertical sticks are parallel to each other and, if possible, perpendicular to the base. Let the glue dry for a couple of minutes, but not completely.
Step 11. Place the fixing ring on the vertical sticks. Thanks to the fact that we did not let them dry completely, we can move them from side to side. We adjust the ring in place. Since it completely follows the contour of the gazebo, as if being the internal contour of the walls, there should be no problems with alignment.
Step 12. Now you can separate the gazebo from the paper on which we began to assemble it. You need to carefully cut the paper base along the contour of the structure with a knife. Then, it is most effective to remove the remaining paper from the bottom of the tree with a file or sandpaper.
Step 13. Now I will show you how to measure, cut and glue pieces of sticks for construction. Perhaps this should have been shown earlier. So, we are getting ready to lay the next stick. We will glue it to this free space.
Step 14. Measure the required length and make a mark with a pencil in the place where you need to cut.
Step 15. Then, on a working board that you don’t mind, cut it in the designated place with a knife at a certain angle. The more accurate the angle, the neater the entire structure will look later. Don't be afraid to practice. If you can't cut it the first time, take another stick and try again. I cut it - tried it on, cut it - tried it on. And so on until the result satisfies you.
Step 16. After the stick is cut and adjusted into place, apply glue. There's a lot of him in the photo. In fact, much less is needed for gluing. I apply so much because the glue still becomes transparent after drying and I don’t want to wait for a small amount of glue to dry (when there is less glue, it takes time for the part to stick. Otherwise, it can be accidentally moved out of place during installation other sticks). And when there is as much of it as in the photo, it grabs everything firmly within a couple of minutes, abundantly filling all the cavities.
Step 17. And now the stick is put in place. I remove the remaining glue with a stick or remove it with my fingers.
Step 18. It's time to think about where visitors will sit. We make 5 identical supports. We glue them separately from each other - these will be the bases for the bench.
Step 19. Then glue them into place in the gazebo. It would be possible to limit ourselves to supports in the form of the letter G, but for ease of work I took the P shape.
Step 20. Measure and glue the sticks for the bench seat. I already mentioned above that you shouldn’t be lazy when trying on. If the stick doesn't fit, set it aside or throw it away. Take and measure a new one. The result of an incorrectly cut stick may not be visible at first, but later it will be very noticeable. In the center of the photo, right in the middle of the bench, you can see the result of a poorly fitted stick. She stands out from the friendly ranks. And this can’t be fixed - the glue has dried out. I deliberately left this crooked stick and did not cut out a new one in order to clearly show what could happen if I didn’t measure it seven times before gluing it. The discrepancy in this case is inside the gazebo and will not be so visible.
Step 21. Build the tabletop. Draw a circle on paper and cut out sticks to fit it. For strength, you can glue two transverse sticks. A big problem can be glue that gets under the sticks and sticks them to the paper. Therefore, carefully apply it on top and try not to get it on the paper.
Step 22. While the tabletop is drying, we assemble such a base for it. It consists of 4 glued sticks of the same length and a reinforced base.
Step 23. Assemble the tabletop and base, then glue the entire table in the center of the gazebo.
In principle, at this stage you can stop and skip to assembling the roof. But I still decided to give a couple of steps for those who like it more complicated. We create lattice windows in the gazebo. For those who find this difficult, you can skip these steps and just leave the openings without decorative grilles.
Step 24. So, we have 6 windows in the gazebo and 2 narrow high ones at the entrance. We will close six big ones. Measure the first window (either left or rightmost), which goes immediately after the narrow one. Cut the sticks according to the dimensions of the window. Then glue them together, and inside, glue thinner sticks diagonally (at an angle of about 45 degrees). I took regular toothpicks. The result is visible in the photo above.
Step 25. Now cut and glue the perpendicular sticks as in the photo. Let the structure dry. Then we will return to this first window. Let's take care of the roof for now.
Step 26 I first wanted to make a complex polygonal roof. However, then he changed his mind. For the first time, let it be simpler. Since I changed my mind about making a complex roof after I had glued the first sticks necessary for it, I did not tear them off so as not to spoil the gazebo. They won't be visible. In the photo, these unnecessary elements are painted red. You do not need to glue them while creating the gazebo. We will glue the other sticks we need - they will be the basis of our roof. We also glue the support structure in the middle of the gazebo (painted green in the photo), placing its supports on the stick beams on the entrance and opposite sides.
Step 27 Now let's create the ceiling. We measure the width of the gazebo and slip sticks under the roof beam to form the ceiling. We glue them together and the roof beams. The photo shows the glue that has not yet dried. Don’t be afraid, there won’t be a trace left of him later.
Step 28. At one and the second end of the roof we glue one stick, which will set the angle of the roof. We seal the remaining triangular windows with thin sticks. In the photo, a couple are already glued into place.
Step 29. After we have assembled the ceiling, we begin to assemble the roof. During this step, the side holes in the roof should be closed. Otherwise, it will be very difficult to insert sticks to close them - the roof will get in the way.
Step 30. Let's return to our windows. Having glued the first one, we assemble and glue the second and third in its likeness. There are three of them in the photo now. Then you need to assemble the other three and glue everything into place.
Step 31. If you do not glue the windows with decorative grilles, then in this photo all that remains is to assemble the roof completely, and the gazebo will be ready. This is roughly what it should look like at this stage.
Step 32. For those who decided to create all 6 windows, this photo shows what the building will look like with all the windows glued together.
Step 33. I decided to go even further. I will have a small tower on the roof. It will decorate a monotonous roof. This turret is easy to assemble - look at the photo. This is the foundation.
Step 34. We lay the sticks parallel to the roof on the constructed base and get a roof for the small tower.
Step 35 That's it! The gazebo is ready. You can varnish it if you want. I decided to paint the first crowns with black paint to hide the traces of incorrect joining at the initial stage of assembly.
Picking stick
After using the garlic press and egg slicer, I always went to wash the dishes with great reluctance. Something always gets stuck in the holes. I tried picking out garlic and eggs with a knife or fork. Inconvenient. But a wooden skewer is just the thing! You can also use it to clean a grater.
We recommend: How and what to properly clean gold at home
The skewer also came to the rescue when making repairs and cleaning the grout on the tiles. Overall, this is a great picker for all tight holes and crevices.
Camper
You will need: ice cream sticks, wooden skewers, 4 mm thick cardboard or plywood, glue gun, furniture hinges, white paint, stationery knife, ruler, scissors, pencil, compass, wallpaper, napkin made from sticks, decorative elements - lace, flowers, satin ribbon…
Master Class
Cut a rectangle of cardboard or plywood measuring 24x9.3 cm. This will be the base of the house.
Cut out 2 rectangles measuring 15x8.5 cm from cardboard. It is worth noting that the height of these rectangles should be equal to the length of the sticks. Cut a window in the center of one of the rectangles.
Glue the rectangles to the base to form the walls of the house, then measure the width between them. Cut a rectangle equal to the width between the walls, 8.5 cm high.
Round the top of the rectangle as shown in the image and make the second piece in the same way. Glue the first piece between the walls. Make a door hole in the second blank, then glue it.
Make a frame for the window by gluing skewers crosswise. Cover the house with popsicle sticks.
Cut a rectangle out of cardboard the same size as the window. Cut it in half and cut the top corners in a semicircle to create shutters. Cover the shutters with sticks, glue on furniture hinges, then attach to the window.
Form a window sill from sticks, then glue it on. Cover the door with sticks, glue on a furniture hinge, then attach it. Glue the sticks to the base of the house as a fence.
Cut 4 wheels from plywood or cardboard, then glue 2 wheels on opposite sides onto 2 skewers. Glue skewers with wheels under the base of the house. Make a ladder out of sticks and glue it on. Wallpaper the inside of the house.
Glue lace as curtains. Cut it out of cardboard and glue it onto the roof. Glue the stick napkin onto the roof.
Paint the house with white paint and wait until it dries. Decorate the house to your taste, decorating it with flowers, ribbon and lace. The house on wheels is ready! I recommend watching this video!
Removing hair from the bathroom drain
If water begins to linger in the drain or an unpleasant odor appears, it means that hair has gotten inside. “Mole” does not dissolve them, it’s been tested. There are two options: disassemble the siphon and clean it, inhaling not the best aromas, or use a cleaner. There are special tubes that catch the hair and it is easily pulled out. I found a better way. I take a skewer and use a knife to make small notches on it. I put it in the drain. I take out my hair. The drain is clean.
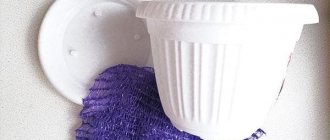
Master class: Basket of skewers
Author: Fedorova Elena
Author's blog
I took a yogurt box because I liked the size (25*20), but you can take any container you need.
We take corrugated cardboard, from under previously purchased equipment or something else. We cut out the bottom and 4 sides of the desired height. The height of my basket is 12 cm.
We buy barbecue skewers in the store (wooden or bamboo (they are cheap)) and use wire cutters (I borrowed the tool from my husband) to cut the sticks to the required length. I needed a little more than a pack.
Make flagella out of napkins. It’s better to be thicker. Divide the napkin into 3 parts. Then the handle looks more interesting.
And then around, close to each other, we glue the prepared sticks with PVA glue. I forgot to take a photo, but I think it’s clear. When you finish all the gluing, we frame the sharp ends of the sticks from the top and bottom using napkin flagella. This will give the basket neatness and Of course, safety, otherwise you can get scratched on the sharp tips. I glued 5 threads of napkins along the top edge, and 3 threads along the bottom edge.
It’s clearer here.
I used thick wire for the handle. I made the handle thick and therefore cut off 2 wires.
Inside the basket, along the contour, I glued rolls of toilet paper to better form the bouquet. I really liked this idea in my last basket. The flowers stand and do not fall apart in different directions.
Wrap the handle with napkin strands, very tightly.
The handle was attached with silicone glue, but also reinforced with wire, because the basket turned out to be quite weighty.
As a result, we got this product. For beauty, I added gold paint (acrylic) to the yellow napkins and covered the entire basket with acrylic varnish. In my opinion it didn’t turn out bad…..But of course you can be the judge.
And then I filled the basket with the contents that I had prepared. I put coffee in the center and lined the entire inside with green crepe paper. So that the paper would not fly off and the untreated middle would not be visible, I glued the ends to 2-sided tape. It holds up great.
And then she filled the basket with candy roses.
We received this sweet basket.
And then I decided to attach a butterfly to the handle, which I made a long time ago. I glued it with 2-sided tape.
But here we have a gift. The teacher gasped when her son gave her this gift. And I was very pleased with it.
Even closer.
Well, one more time.
Thanks to all the guests who came to visit me. You're always welcome. I would be grateful and grateful if you rate the work. See you again and MK! I wish everyone all the best.
Fairytale bouquet
On March 8th I made a bouquet of sweets for my daughter. She had been hinting for a long time that she wanted to get one. It's fashionable now. Bouquets are made from anything: sausages, pistachios, drinks, nuts, fresh fruits and dried fruits. They are given to men, grandmothers, and teachers. True, the pleasure will cost a tidy sum (if you make a bouquet to order). For work alone they ask for 700 rubles or more. I decided to try to make a bouquet with my own hands. Moreover, the filling is held on skewers, of which I have a ton.
- I took wrapping paper, tape, and scissors.
- I bought all sorts of candy bars.
- I glued the skewers to the sweets. You can attach it to 2-3 pieces at once so that the sweets stick.
- I wound the skewers at the bottom to make a bouquet.
- She wrapped everything in wrapping paper.
It turned out cheap and very beautiful. My daughter was delighted. Housewives often underestimate the capabilities of skewers. They can be used not only for barbecue. They help me with various household chores. Someone will say “a trifle, not worth attention.” But if you think about it, it’s these little things that make up everyday life.
Popsicle stick craft ideas
So...what are popsicle sticks made from?
A lot of interesting, creative, beautiful and even practical things! The frame is decorated with shells from the sea
and additional elements. You can make not only a photo frame in this style, but also just a beautiful panel on the wall. It will be sophisticated and cute, adding a cozy touch to the environment.
Pano to the kitchen. Very original.
Who would have thought that such waste material could be used to make a cool bird feeder?
! This is what she looks like. If you use a lot of sticks, then the walls will be dense and the grains will not fall between them. Bird feeders can be built either miniature or of any size.
You can also do the same to develop the child’s motor skills and memory.
A children's toy train must run on something! With a child of 2-3 years old you can easily assemble these rails for a toy railway
. I think that it will be very interesting and safe for a child to create such crafts.
For girls a little older, you can already suggest creating a cute box
! And decorate it with flowers using the quilling technique. The lid is removable. And you can store anything inside!
Paper flowers can be glued to the lid using glue, preferably liquid, since pva is unlikely to hold it. Or with double-sided tape.
Casket - chest
. An original miniature craft for children's first decorations or miniature toys for a child.
Lamp!
Yes, yes, a real lamp for the home! How to make it? Watch the master class HERE!
Original decor of a vase made from delicious ice cream sticks.
Vase for fruits or berries
. You can make it large enough and use it in the kitchen.
Fences made from ice cream sticks
- they can be made so different! For children to play on the farm, you can create interesting fences like these to enclose the courtyard of the house.
Bookmarks
can also be quite original!
Popsicle stick houses
They can also be different: large, miniature or medium. They can be painted, decorated in decoupage style, glued on with some interesting things, or made for dolls or birds.
Decorative pendant for flowers and flowerpots
. It's a small thing, but it's nice! The comfort of the home consists of such miniature, beautiful, cute crafts.
Photo frames!
Every child can make them THEMSELVES! Offer decor options and the child will be busy with interesting things. And making them is quite simple.