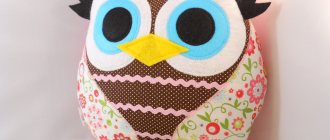
If you want to charge yourself and your loved ones with positivity and smiles, be sure to sew a decorative pillow - a smiley face is a popular print that your family will surely love. Online stores provide a wide selection of similar textile products, but it is much more pleasant to build your own creation yourself. The process will become especially exciting if you ask your child for help.
Remember that emotions are important - and creating them is much more fun than buying them!
How to make it yourself
The shape of the product can be any: round or square, oval or rectangular. You can add creativity and sew additional pockets, eyes, and removable elements.
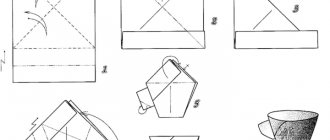
Pattern of the “Smiley with Glasses” pillow.
Pattern of the “Teasing Smiley” pillow.
Pattern of the “Offended Smiley” pillow.
Pattern of the “Satisfied Smile” pillow.
Pattern of the “Evil Smile” pillow.
Sewing a pillow - a smiley face is not a big problem, for this you will need:
- fleece or felt, several multi-colored pieces;
- good glue;
- scissors;
- a plate or dish on which you can make a shape (we are considering a round one);
- crayons or markers;
- needle and thread of the desired color.
Not only a teenager who constantly uses so-called “emojis,” but also a fully grown adult will want to try to make a smiley pillow with their own hands.
Work algorithm
So, we have the necessary parts, now let’s figure out the sewing process.
Funny and positive soft pillows will decorate and diversify the interior of the same children's room, or can be given as gifts, or even made to order.
- Fold the yellow fabric neatly and evenly in half. Place and fix the dish, outline it with chalk.
- It is important to indent no more than 1 - 1.5 cm from the circle of fabric and draw a dotted line. This is the seam allowance. The two parts must be fastened together and cut along the line.
- You need to carefully sew on both sides using a sewing machine, or you can do it by hand. Do not forget about the indentation that is needed to create an opening - to fill the pillow.
- The smiley face turns inside out. It's time to show your imagination - design a product, come up with an emotion, or look for ideas on the Internet. To begin with, you should put a drawing on paper, cut them out and attach them. If you are happy with everything, you can cut out the same blanks from fabric and glue them to the surface of the pillow.
Convey your mood, emotions and feelings through stylish Emoji pillows.
Choose a contrasting color of fabric for details - traditional black looks good on yellow. After gluing, you need to fill the product with filler - padding polyester or another, at your discretion. Fold the edges inward and seal the notch.
You don’t have to immediately run to the store - you can sew such a cute pillow yourself.
To create a beautiful and unusual design for your mouth and eyebrows, you can use laces; your eyes will be more expressive if you paint them with acrylic paints. If desired, the smiley face can be embroidered with beads, beads or sequins - let this be your feature. A patch pocket wouldn't be amiss.
Who would refuse such an adorable pillow? Everyone will love this gift.
Pillow with legs and arms
There are many interesting master classes for creating an original pillow - with arms and legs that will lift your spirits.
An option for making a smiley face pillow with your own hands using linen fabric and acrylic paints on the fabric.
For sewing you will need:
- linen fabric in a bright yellow shade;
- paints, preferably acrylic, to paint the pillow;
- filler.
A pillow painted with acrylic looks prettier and neater.
The best filler is holofiber, synthetic type. It is dense, thanks to polyester balls, holds its shape well and is elastic.
Holofiber is expensive, so padding polyester is suitable. Additional decorative elements: black laces to highlight the eyebrows and mouth, needle and thread, if possible, sew on a sewing machine. You will need non-woven fabric to give the pillow its shape and elasticity. You will need an iron.
To make the smiley pillow look even cooler, you can add arms and legs dangling from the laces.
Let's move on to the step-by-step process
- Preparing the pattern
We take a pre-prepared shape - a round plate, tray, disk or just a compass and draw a circle on thick paper of the required size - the shape of a pillow and cut it out. We also make templates for eyes, mouth, eyebrows. You can make eyes - hearts, a kiss, a tongue, rosy cheeks (for this you need red felt), glasses.
- Making the base of the pillow
We fold a piece of yellow fabric exactly in half, apply a round pattern, trace it with chalk or soap and cut it out along the contour. From the drawn circle we make a gap of 1 cm and draw a dotted line - seam allowance. We sew both sides, not forgetting about the indent for the opening to fill the pillow.
- Let's add some emotion to the indifferent yellow circle
We turn the resulting case inside out and begin turning it into an emoji according to your idea. To do this, we take a pattern of the eyes and mouth, first apply it to the base to see if everything is in proportion and looks good, then we outline everything in the same way with chalk or soap on black fabric and cut it out. We do the same with additional elements as desired - hearts, kisses, glasses, blush (two small red ovals). We decide which side will be the front one and sew or glue the “features” onto the “face” itself - it’s better to sew it in order to avoid an unpleasant smell or accidental stains and drips from the glue.
ATTENTION! If you ask yourself the question: “How to make a smiley pillow with your own hands,” you can look up ideas on the Internet, or come up with one yourself. This is a creative and exciting process, during which you can easily realize whatever comes into your head. Only the shapes of the pattern and the colors of the fabrics will change, the mechanism will remain the same.
- Turning the “face” into a pillow
The last stage is filling the pillow. With the selected material, we stuff the product from the inside through the gap left when sewing the two circles together, compacting the filler tightly, carefully distributing it along all edges of the pillow, making sure that there are no gaps or lumps left anywhere. After filling it evenly, fold the edges of the remaining gap inward and seal it.
If you want to go further and make a decorative pillow even more interesting, or turn it into a toy, you can add arms and legs - they will look more organic on small, angular-shaped items with cool facial expressions.
To do this you will need: - laces of the desired color. - fabric, in the main color. - patterns in the form of mittens for the hand and foot (or shoe) - for the leg, proportional to the size of the pillow.
We repeat the same manipulations: apply the patterns to the fabric, outline with chalk/soap, cut and sew, leaving a slot for filling. Then we turn it right side out so that the seams are on the inside and stuff it with the same filling. We insert the cord into the hole and sew it firmly, trying to make the seams as invisible as possible, sew the other end of the cord to the pillow.
Instructions for implementation
Using sharp scissors, cut out the base of the pillow - a circle or rectangle from yellow fabric. Experts recommend using a round shape if the work is done on a sewing machine; when sewing by hand, it is better to use a rectangle as a basis. Using an iron, glue the interlining to the fabric - this will help not only improve the shape, but also compact the pillow. On the fabric, draw a face, eyes, with a pencil or crayons, paint it with bright acrylic paints. The original option is to supplement the emoticon with creative inscriptions.
In order for the toy to better hold its shape, non-woven fabric is used.
It is glued to the fabric with an iron and gives density.
Even a beginner can cope with this stage.
Fold the cut fabric for the toy (pillow) in half and draw an emotional face on one half.
To draw a smiley face you don’t need to know how to draw and even a child can do it.
When the smiley is drawn, you need to wait until the paint dries and bake it with an iron.
The drawn parts must dry completely, then they must be sealed with an iron. Separately cut out blanks for the hands and feet of the smiley from material of a contrasting color, sew them together, leaving an opening for the filler. Attach the arms and legs to the prepared and sewn pillow base and fill it with filling. You can make legs that are not voluminous, but simply from lace.
While the paint is drying, you can prepare the arms and legs for the toy.
We sew the parts together and sew on the lace.
All that remains is to sew the base of the toy, sew the arms and legs of the future smiley onto it and fill it with filler.
So that the toy can be hung somewhere, you can add a loop.
Soft toy smiley hand sewn.
The best gift is one made with your own hands. It expresses love and puts a piece of the soul into it, so it is important to think through every detail.
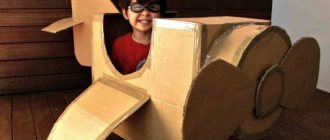
Carnival costumes made from scrap materials: a stylish look for pennies
Waiting for the holiday is so exciting and magical - it’s like a miracle. And the preparation process allows you to make this time even more intriguing, especially since most interesting ideas are easy to implement even with your own hands. What is needed for this, and how to make a carnival costume from scrap materials?
Where to begin?
Initially, it is important to decide which of the heroes is closest to the child and whose image the child would like to try on for himself. You can buy a ready-made suit or take it as a basis, adding interesting details to the look. The child’s help will also come in handy in this matter - he will express his wishes and ideas.
As practice shows, a homemade suit with your own hands from scrap materials does not have to be expensive - it can easily be made from scrap materials. This work will not take much time, but it is surprisingly interesting and will allow you to have fun with your child. And the finished image will be complemented by beautiful makeup, which will successfully replace any mask.
Tiger cub
Even the little ones want to be full participants in the holiday. But a costume for a baby should not only be beautiful, but also practical. It’s quite easy to create the image of a Tiger Cub - you should sew black strips of fabric onto rompers or a light-colored jumpsuit. They can also be cut out of paper and then pasted in any order.
Ears are easily attached to a knitted hat, which can be made voluminous using synthetic padding. The long, soft tail should be small in size so that it does not interfere with the baby's crawling or walking.
Medusa Gorgon
This costume is best suited for an event like Halloween, because this mythical heroine is capable of turning everything she looks at into stone. Moreover, it is quite simple to make it. The base is sewn from black fabric - two fabric rectangles are cut out and sewn together. There is only clearance for the head. You can leave the Gorgon Medusa costume with a loose robe or belt it with a plain ribbon.
The hair is braided into braids, into which thick wire is inserted. With the help of makeup, a frightening appearance is created on the face.
Cowboy and Indian
The basis of the Cowboy costume is a plaid shirt, a scarf around the neck, a hat and regular jeans. A wide belt that holds the weapon will complete the look. A simple vest is sewn from artificial leather; a regular T-shirt will do as a pattern. You can also attach leather patches to your pants. The image will be complemented by stubble painted using face painting.
An Indian costume made from scrap materials will look great paired with a cowboy. It is easy to make from available options - an old wide T-shirt, belted with a thin braid, is best suited for this purpose. A headband is put on the head, allowing you to pick up the hair - it harmonizes perfectly with the large feathers. Fringe is attached to the shoes, as well as to the sleeve cuffs.
And, of course, the Indian will need a bow and arrows, because it is impossible to do without good weapons. And if you rehearse the image well, then everyone will be captivated by the chosen outfit.
Plastic bottles
When looking for how to make a costume from scrap materials, you should pay attention to plastic bottles. This is an inexpensive and practical material that can easily be found in any home. To do this, you need to cut off the bottom of the bottle - they will decorate the outfit and are suitable for making homemade accessories.
Mermaid
The bottle needs to be cut: first, the neck is cut off, then the bottom - the remaining part is divided into 3 parts. Plastic strips are gathered on a thick cord - they turn into a stylish and charming skirt.
The top part of the Mermaid costume can be easily made from a regular T-shirt. Bottle bottoms are used to cover it. All that remains is to make a crown, for which the upper part of the product is perfect.
Not only bottles, but also an analogue of a fishing net are well suited for this look. It can be wrapped around the body, creating an imitation of a dress or a mermaid tail.
Flower Princess
To make this costume you will need thick wire - the frame is made from it. Using fabric, a kind of petticoat is created - using fabric. This is where the work ends and all that remains is to show your imagination - the resulting outfit can easily be decorated with any decorative elements.
Astronaut
If girls dream of dresses and beauty, then boys want to be brave heroes like the Cosmonaut. You can make a masquerade costume from plastic bottles using scrap materials and for them - it will take less than an hour, and the image will be bright and original. Two bottles are joined together using tape and then painted black, blue or grey. Wide elastic bands are attached to them, thanks to which the product can be worn like a backpack.
Using pieces of fabric in red, yellow and orange shades attached to the neck, an imitation of fire is created.
Accessories
Not only New Year's costumes are created from scrap materials from plastic bottles, but also stylish, original accessories. For almost any character from fairy tales and cartoons, you can choose stylish details from this simple and cheap material.
Leaves
Why not come to the autumn festival, in a costume that is made of leaves, which means it is ideal for this celebration. It is quite easy to make - an old dress can easily be transformed into a new one using elements that nature itself gave. It's time to go to the garden, where you can easily find everything you need.
It is enough just to collect a sufficient amount of beautiful opal foliage, alternating red, yellow and even green shades. The leaves are easily glued using double-sided tape or glue.
It is very easy to make a dress voluminous - for this you will need a spray bottle with plain water. A little moisture and after drying the leaves will seem to curl. Or, on the contrary, you can straighten them - a piece of cotton fabric and a hot iron will help you easily cope with this task.
Leaves glued to a dress can very quickly lose all the beauty of their appearance. That is why it is necessary to start creating such an outfit immediately before the matinee - no earlier than 3-4 hours. And most importantly, it is worth regularly refreshing the product with cool water, in a minimal amount, so that the fabric does not become damp.
Packages
The bags can be used to make a very simple outfit that will suit the rain look perfectly. For this purpose, you can use ordinary blue bags, which are easy to inflate - you get a lush and spectacular dress. The product can be cut into fringes - and they will add originality to the image.
Newspapers
The dress can be made from newspapers, magazines, colored paper. This is quite easy to do; a regular sheet is folded into a tall cone, which is attached to the skirt. This is a standard option for creating a dress, which is similar to making an outfit from leaves or other scrap materials.
Boxes
A few boxes attached to the main costume make it easy to transform it into a dinosaur look. A little double-sided tape will help with this issue.
A stylish cowboy will definitely need a horse - so why not make one from a long stick and a small box. And the neck of the bottle is used directly for the muzzle.
An alien costume made from scrap materials is an image for those who value originality and non-standard solutions. After all, it is unknown what this hero should actually look like, so you can design it in any style. From a large box you can make a huge body, decorated with funny designs, and put a mask on your face. A hoop with protruding horns or antennas will complement the look.
Costume made from improvised materials
The ability to sew is always useful - especially if you need to create costumes for children from scrap materials for matinees. Moreover, in this case, significant skills and knowledge are not required - a little diligence and the perfect outfit will be ready within a few hours.
Before you start creating a product, you should carefully look around the house. Perhaps somewhere in the bins there is an old grandmother’s brooch or an unusual necklace? Then it can become the basis of the chosen appearance. For example, you can easily make a traditional gypsy outfit from several colorful scarves and large beads.
You can become a luxurious queen, conquering everyone at the party, with the help of non-standard jewelry. Such products can decorate even the simplest dress.
Rain and Christmas toys
On the eve of matinees in schools and kindergartens, you can use simple ideas. Carnival costumes from scrap materials are easily created using combinations of various rain showers, miniature bells, bows or even balls intended for decorating a Christmas tree.
A girl can be turned into a charming Christmas tree, especially by making a skirt from tulle strips. For this purpose, scraps of any fabric of a suitable shade are suitable - you will need to cut them into equal pieces, and then secure them with a wide elastic band.
Witch
Why not become a charming witch or even Baba Yaga? Not all girls give preference exclusively to positive characters - the dark side can be quite attractive. This is a good idea for any occasion - someone has to be naughty at the event!
Do you have a dark skirt or dress in your wardrobe? Or perhaps dark jeans combined with a pullover in a matching shade? They will be an excellent basis for such an outfit. A charming real witch's cap, a cloak, striped stockings, a glamorous witch's set - with a little effort you can become the most charming negative heroine at the party.
Butterfly
Why are butterflies beautiful? Because they are the brightest and most charming creatures. This look is well suited for any holiday, because its owner is surprisingly sweet and spontaneous.
First you need to make the wings. To do this, you will need two small hangers or strong wire, which can easily be shaped into any shape. Fabric is stretched over it - knitwear or tulle are excellent for this purpose.
The wings are attached using wide rubber bands. Or you can put on a belt for your child, which will allow you to fix the product on your back. It is important to color the fabric, because butterflies are so bright - you can use almost any color of the rainbow for decoration.
To complete the look, you should take care of creating charming horns. They easily attach to a hoop or hairband. For small antennas, a regular ballpoint pen paste is suitable, to which large beads or multi-colored pompoms are attached. If you have different colors of thread, you can easily make colorful pompoms. This is a great idea - almost any children's costume looks much more interesting with them.
Carlson
Carlson, who lives on the roof, is probably every kid’s dream to meet. After all, this is a world of joy and adventure, and therefore you certainly won’t be bored.
Wide pants can be made from dad's shorts - comfortable and practical suspenders will help secure them at the desired height.
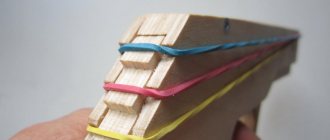
You can use any tones and shades for your outfit, because the more colorful, the more interesting. The propeller can be made from ordinary cardboard or an old box. Old disks, which will become the basis of the product, are also suitable for this purpose. More blush and red hair, and in the hands of a huge jar of jam - and recognizing the chosen character will not be the slightest difficulty.
Angel
It’s quite easy to become a cute angel - you can buy ready-made wings or make them yourself. The principle is the same as in the case of the butterfly outfit. Only in this case, bright decorations are not required - on the contrary, plain white fabrics will be the optimal solution.
A simple light dress, loose hair - and the look is ready. Nothing superfluous, no additional details – only tenderness and purity.
Using a regular hoop it is easy to make an original halo. A wire circle is attached to it, which is wrapped in yellow cloth or fur.