Cute, pretty, adorable, affectionate - all this is about a minion. After all, this is exactly how this word is translated from French. And indeed, it’s hard to call these nimble little yellow men from the animated film “Despicable Me” any other way. Their childlike spontaneity and unusual appearance captivated millions of viewers, especially the youngest. And it’s not surprising that when it comes to homemade children’s creativity, the little one asks to make a minion with his own hands. Fortunately, there can be a huge number of materials and options for such crafts. Perhaps we will try to bring a few of them to life.
Balloon minion
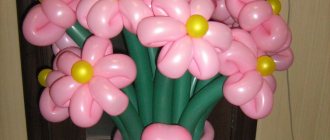
Perhaps one of the simplest craft options is to make a minion out of balloons. Yes, yes, from ordinary balloons. You can, for example, take a yellow balloon, inflate it to medium size and simply decorate it while looking at the portrait of the minion. It’s enough to even stick an eye on the yellow ball and it will be clear who you wanted to portray. A slightly more complicated option is a minion made up of several groups of balloons. You will need four black balls for shoes, 7-8 blue balls for pants, 10-12 balls for the yellow body and several long narrow balls for arms and eyes. All that remains is to connect the balls correctly and your favorite character is ready. This air minion will look original at a children's party or in a children's room.
Master class with a photo of a paper minion
Step 1. Cut out a rectangle with sides 6 and 9 cm from yellow double-sided cardboard.
Step 2. Prepare a rectangle with sides 6 and 3 cm from blue colored paper. Next, fold it in half. Draw the outlines of the minion's pants on it, cut along the marked line. Having opened the detail, we get denim pants for our craft.
Step 3. Take the yellow part - the blank and glue the resulting blue pants onto it. Carefully smooth out the glued parts. This is how we dressed our friend.
Also read: Cardboard Minions
Step 4. Any self-respecting minion has pockets on his pants. Let's make them for our baby too. Cut out a small square from blue colored paper; this will be your future pocket. Glue it on your pants. If you wish, you can make two small pockets, placing them on both sides of the pants.
Step 5. Everything turns out great. It's time to make the minion eyes and a blindfold. To do this, cut out a narrow strip from black paper that will be a bandage, and from a white sheet - large oval eyes. First glue the headband onto the toy and then the eyes onto it.
Step 6. To add uniqueness and emotion to the yellow minion, draw pupils and a wide smile with a felt-tip pen.
Your favorite cartoon character is ready and now it can be used to decorate a children's room. Make a minion out of plain paper
very simple, you can also try making yellow and purple crafts with your own hands. Give a bookmark minion to your close friends for a lasting memory.
How to make a Minion out of paper. Cartoon Minions are popular toys. As part of one project, I decided to make a Minion out of paper. But as sometimes happens, a color printer full of ink broke down in the electronic part. I had to be smart and prepare Minion templates for printing on colored paper. YES! The wizard invites you to assemble a Minion by printing blanks on a black and white printer - only three sheets of blue, yellow and white. A master class for assembling a Minion is presented with detailed instructions and an assembly diagram. Video and detailed photos. Minion templates are free and available for download.
Beaded woven minion
An option for girls is a beaded minion. This job is suitable for those who are diligent and, as they say, good-eyed. To create a classic minion from beads, it is better to take Czech beads No. 10. Colors: yellow, blue, white, black and a little brown. Then you need a thread of a suitable color, a crochet hook, a needle, and you can use an orange cap from a Kinder surprise as a base. A minion knitting pattern is easy to find on the Internet. You can first knit a base from knitting threads and cover them with beads, or immediately weave a minion from beads. By the way, remember, at one time keychains made of beads were popular, but a modern version could be just a keychain made of beads in the form of a minion.
Crochet minion bob. Step by step with photo
Let's crochet minion Bob with a crochet hook. So, let's begin.
We begin to knit the body; for this we knit 3 air loops and close them into a ring. Next we knit 11 rows with an increase according to the pattern.
Circular diagram 1
Next, after knitting 11 rows, we knit 21 rows without adding. Then we start knitting again according to the pattern, but now we decrease it, there should be 3 loops left on the hook, we knit them together.
- Now let's start knitting the handle, I cast on 9 chain stitches, and continued knitting without adding, for ease of knitting I took a pencil, we knit 23 rows.
We knit fingers, the minion has 3 of them. We knit 3 fingers from 1 chain loop and knit 3 rows.
We fold the fingers and crochet a row, connecting all the fingers together, knitting a brush 2 rows. Now add 3 loops evenly and knit 2 more rows. We connect the hand and arm together.
Let's start knitting pants. We collect 4 air loops and close them into a ring, then again knit in a circular pattern 1.
Now we knit a jumpsuit with 14 single stitches, unfold the knitting, knit 6 rows, close the loop. We also knit the same way on the other side.
We knit belt loops. We tie 30 chain loops on both sides, adding 4 single crochets on the last outer loops.
We knit an eye. Take a black thread from 1 chain stitch and knit 5. Next, 1 row with brown thread, then 3 rows with white thread. We knit 2 rows with grey.
- We knit a rope from glasses with black thread, 20 chain stitches, 2 rows of single crochets.
- We connect glasses and knitting for glasses.
- Using a regular thin sewing thread, we knit the minion’s mouth with a “back needle” stitch.
- I also knitted a pocket for his overalls.
Minion Bob is ready!!!
Children's paper minion craft
For the smallest dolls, a craft option is suitable: a paper minion. What will you need? Let's take colored paper in the colors we need, scissors, glue, and a pen. Ask your child to cut out a large rectangle from yellow paper, a smaller rectangle from blue paper (for pants), and make eyes from black and white paper. All that remains is to fasten everything with glue and the minion is ready. A slightly more complicated option is a minion based on a cardboard tube. A toilet paper roll will do. The inside of the tube needs to be filled with newspaper, and the top should be pasted over in accordance with the cartoon character. For reliability, the cardboard minion can be opened with varnish to preserve it longer. But this work is best done by adults.
Related article: DIY sliding bath screen
Green zucchini craft
If you don’t find large yellow vegetables on sale, don’t worry, you can make minions from zucchini (photo below in the article) from green vegetables by cutting them out. To do this you will need a small sharp knife and a marker.
To make the craft stand vertically, cut off the bottom of the zucchini to create a flat surface. Don’t throw away the cut out circle; we will still need it when designing the character’s only eye. First of all, think over the image of the hero and draw his outlines on the green peel of the vegetable.
How to make a minion from tires for your summer cottage
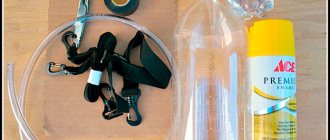
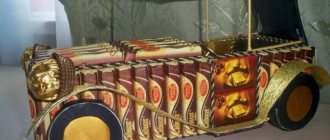
Let's not forget about preserving nature and recycling - recycling old things. So, minions can be made from old tires. We will need about 5 tires of different sizes, blue, yellow, black and white paints, special glue, and degreaser. The tires need to be washed well, dirt removed, wiped with a degreaser so that the paint adheres better, and laid in the right order, lubricated with glue. After that, paint it in the desired colors, you can open it with varnish for reliability. This minion will look great in the garden or in the courtyard of a country house.
By the way, another idea is to make a flowerpot from the top tire and plant some plants there. Here's a minion's hair and a bright idea for a flower bed in your garden. More ideas for tire crafts for the garden.
Tools for work
Carving, or carving vegetables or fruits, is an art that has gained extraordinary popularity all over the world. Therefore, many companies produce sets of special knives for carving.
Such products are much more convenient to use than ordinary kitchen knives. Thanks to the different shapes of the blades, you can remove a thin layer of peel, cut lines or make indentations in vegetables. If you like to make crafts from the gifts of fields and gardens, then buy special knives to help you, then the work will turn out to be of higher quality and more varied.
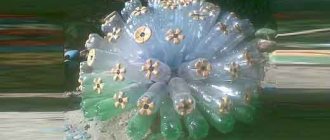
Minion made from plastic bottles for the garden
From the same series of trash art you can make a minion from plastic bottles. The most basic option: take a regular plastic bottle of the size you need and paint it with paints; acrylic or gouache will do. A slightly more complicated option is to play with the convex parts of his cute yellow body. For example, cut out eyes from a plastic bottle and stick them on the bottle, and also cut out plastic handles. You can put a film from a cassette tape into the hole of the bottle - there will be something like hair. These minions can be displayed in the courtyard of your house, used to decorate a flower bed, or make a kind of fence in your country house.
More ideas for garden crafts made from plastic bottles. And here’s another way - you no longer need to cut off the top of the bottle, let it remain the “cap” of your country figurine:
Glass bottle minions
One of the options for this craft is a minion made from glass rather than plastic bottles. In this case, you can not only paint it yellow and blue, but also use beads or any other small free-flowing objects to fill the transparent glass bottle from the inside. By the way, you can take pieces of multi-colored paper to fill. If you use cereals, they will be perfect for kitchen decor:
Minions from a freon bottle
Another idea that is implemented in the same way as the previous one is the use of freon cylinders or large volume five-liter or even 20-liter bottles for crafts. In this case, the minions turn out to be large, bright and noticeable from afar. And it is done in exactly the same way - using yellow and blue paint and suitable available materials. This is what you get:
Article on the topic: Silk-screen wallpaper: photos in the interior for the living room, reviews, what it is, how to glue it for kitchen walls, can it be painted, video
Tools and materials Time: 4 hours • Difficulty: 5/10
- banana yellow and denim blue felting wool;
- some natural wool in black, white, brown, walnut brown and gray;
- yellow and black yarn;
- multi-needles with heavy weight felting handle;
- thin needles for felting;
- felting sponge/foam;
- gypsy needles;
- water-soluble fabric marker;
- cotton wool;
- scissors.
Do you like the cartoons "Despicable Me" and "Minions"? If your answer is yes, you will undoubtedly love this charming toy, and after studying the master class, you will be surprised at how easy it is to make this felt minion with your own hands!
The finished craft measures approximately 10 cm in height and about 6-7 cm in width. To make it, we initially twisted yellow wool into a sculptural core with cotton wool inside. These actions significantly saved us wool consumption.
If desired, add a rattle or musical mechanism inside the minion, especially if you are making it as a toy for a child.
You can even change its size and design to turn it into a larger doll or make it less positive (evil, for example).
You can also adapt this minion's shape to create other characters from the famous cartoon: Stuart, Kevin, Bob, a colony of friendly minions, a minion girl, etc.
Step-by-step description with photos
Let's get to work quickly, because the kids are already waiting and can't wait for their mother to make such a cute felt minion for them with her own hands.
Materials and tools:
Please note that not all needed items are in the photo. Please select materials according to the above list.
Notes:
- When you work with a felting needle, stick the needle straight into the object, do not bend it or insert it at an angle, otherwise you risk breaking it.
- Use heavy weight Multi-needles for quick felting, and use fine needles to fine-tune your work.
- The drawn outlines and detail elements in the photo will guide you where and how to apply the felt.
- Unless otherwise directed, pluck the fur in pieces rather than cutting it off.
Step 1: Make the Base
Roll the roll of yellow yarn into a tight flat tablet or shape it into an egg shape about 9cm high and 6cm wide. To do this, pull the wool from the skein (always pull the wool, do not cut unless instructed to do so), lay out the fibers and separate them into several groups. Roll out the fibers into thin layers.
Roll cotton wool into a ball of any size. If desired, bring a rattle or musical mechanism. Cover it evenly with a thin layer of wool horizontally and vertically. Add more wool if necessary.
Using the Multi-needle, form a nice oblong ball onto the foam backing. If necessary, add another layer of wool to cover and enhance the piece being formed during the felting process.
Well, you have made the body of a minion out of felt with your own hands. See, there is nothing complicated about this! All that remains is to dress it.
Step 2: Create the Base for the Jumpsuit
Use a water-soluble marker to outline the denim overalls on the yellow body. The suit takes up approximately half the minion's height. It will be slightly higher at the front with the chest pocket than at the back.
Separate a small amount of wool 10 cm long from a blue denim skein and divide it into 2 equal parts. String them on foam or roll them by hand into thin strips.
Push the stripes onto the figure according to the belt markings.
Pierce the belt with a fine felting needle until the fibers are fused to the yellow base.
Repeat attaching the belt strip on the other side.
Next, take 15 cm of denim wool to make overalls. Fold the ends and tuck them under the wool along the straps of the overalls.
Secure the fur to the body with several needle punctures. Make sure that the fibers are fused into the body and form a nice, even felt layer.
Step 3: Make the Eyes
Make two circles with a diameter of 1.5 cm from white wool. Place them on your face at a distance of about 6 mm from each other.
To make irises, add some nut-colored wool to the center of the white circles. Outline them with dark brown wool. To create highlights, add a little white to the iris.
Step 4: Make your hair
Along the top of the head, draw two parallel lines about 2 cm long and 0.6 cm apart.
Take a gypsy needle and insert black yarn into it. Tie off the end.
Insert the needle from the back of the head and out the end of the line. Pull the yarn into the wool tightly until the knot enters the head.
It is normal for there to be an obvious hole where the node was pierced. Cover it with a small piece of yellow wool.
Next, along the drawn lines, form identical loops about 2 cm long on the minion’s head. This will be the hair.
After you sew the last loop, insert the needle into the back of the head, tie a knot and pull to hide the knot in the layers of the head. Cut the thread as close as possible. Cover the knot mark with yellow wool and punctures.
Cut the loops in the middle on both sides with scissors. Trim your hair so that it is even and neat.
The hair is almost ready. Make several punctures with a thin needle in the central part of the hair.
- If black yarn is visible in the center of the yellow part, cover it with yellow wool to the indicated coordinates.
Step 5: Make Glasses and Mouth
From a skein of gray wool, separate two small identical strands about 7.5 cm long. Just as you did for the straps of the overalls, repeat the steps for the frames of the glasses. Fold the loose ends of the wool tubes and tuck them under everything else.
Bring both ends of the tubes together to form a ring. Make several punctures at the ends.
- Repeat for the other ring.
- Place both rings next to each other and bring them together by wrapping a little wool and felt around them to join.
- Place the glasses on the minion's head, piercing them over the eyes in the right places.
- Add extra details to your denim overalls for added realism.
- Using the same method as you did for the smiling mouth, punch in a line to form the side pocket.
- To further define the outline, add a thin black line to the pocket.
- Repeat the same for the other side.
- Next create the front pocket and buttons by adding a small amount of black wool into the lines.
Next you need to make a smile. To do this, build a continuous line in the shape of an arc on one side of the face until this dent line forms a smile.
Step 6: Improve the Jumpsuit
Step 7: Make the arms and legs
The felt minion with your own hands is almost ready. Finally, all you have to do is make the arms and legs.
Take 2 identical strands of yellow wool and roll them into a rod shape about 5 cm. Round one end of this rod and leave the other free. Please note that the length of the piece does not include the length of the wool.
You have one pen ready. Repeat the same for the other hand.
From blue denim wool, construct two identical pieces in the shape of short cylinders.
Make thick oval-shaped shoes from black wool. Make several punctures on the pieces so that they resemble shoes.
Place your legs on your body. Add some denim wool to keep the legs securely attached to the body.
- Then attach the boots.
- Place both hands close to your body, just under the straps.
A funny do-it-yourself felt minion is ready! We hope you enjoyed our master class? And if you still have questions, be sure to write to us in the comments, and we will be happy to answer them.
For Halloween: pumpkin and zucchini minion
How about a pumpkin and squash minion? When preparing zucchini caviar at home, give your child one small zucchini, even if it has some flaws. Give your child paints and let him create a craft. A slightly more complicated option is to cut out pants, eyes and hands from paper or fabric and glue parts of the hero onto the zucchini. A minion on a pumpkin will look even funnier and funnier. There is no need to paint it - I attached the blue pants and eyes and the craft is ready. If you don’t want to bother with paper or fabric, you can make the minion parts from plasticine and simply attach it to the vegetable. By the way, a minion on a lemon looks beautiful and interesting; you can make several cartoon characters. More pumpkin craft ideas for Halloween.
Drawing minions: tips and step-by-step diagrams
Minion is a popular character; your child will probably be interested in drawing him more than once. Set an example!
riversaid.clan.su
Take 2 pieces of paper and draw a minion step by step, commenting, and let the young artist repeat all your actions on his piece of paper.
riversaid.clan.su
While drawing, be sure to talk with your child, let him tell you why he likes this or that hero, what actions he considers right/wrong.
If the first time something doesn’t turn out exactly as you would like, focus not on the final result, but on the drawing process. Ask a little artist how to convey on paper the mood of a minion, his character, and individual traits. By what means? Color, shape, proportions, eye size, smile - these points are worth paying attention to so that the character turns out to be truly similar.
skazkisameli.ru
A palm minion will suit the smallest artists. Help your child trace his palm, and then explain how to finish drawing the character. Along with drawing, you can practice counting: count your eyes and fingers.
www.youtube.com
How to draw a minion with markers: video
Markers are convenient to take with you on a walk or road trip. You can distract your child by drawing if you have to sit in line for a long time. Watch the video on how to quickly and easily draw a minion with felt-tip pens.
How to draw a minion with paints: video
Painting with paints requires more perseverance and accuracy; not everyone succeeds, but it’s worth a try anyway. For a young artist, this is a new experience, skills in handling new tools and materials, new means of expression. The task of parents is to provide a comfortable workplace. In order not to be nervous that the child will get something dirty, change him into work clothes or protect him with an apron, cover the table with paper or stretch.
How to draw a minion on rocks
Be sure to try drawing minions with children on smooth stones. First they need to be thoroughly washed with soap, dried and primed with white acrylic paint. Next, outline the main lines with a simple pencil and invite your child to color.
www.pinterest.ru
Thin stroke lines can be made with a marker after the paints have completely dried. To make the image bright and durable, coat the finished stones with matte or glossy acrylic varnish.
crafta.ua
“Stone” minions will decorate flower pots, and the smallest one can always be put in your pocket so that it is nearby.
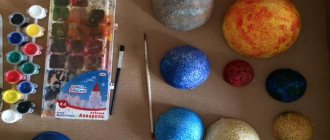
Edible egg minion - idea for Easter
You can also make a minion from eggs. There is an option - this is a dyed egg. You will need: food coloring, boiled egg, vinegar. Boil the egg and paint it as usual with food coloring: half the egg is blue, the other half is yellow. Using a brush we draw the eyes. Dip in vinegar to seal the result. Or take a raw egg, carefully make holes with a needle, and allow the egg to flow out. Then we carefully draw a minion on the fragile shell. It is also advisable to open such a craft with varnish. More photos of Easter decor.
How to make a minion from kinder surprises
Of course, there is always the option of making a minion from Kinder surprises. Take a classic brown cap or buy your child a plastic egg and then use it for crafts. You can decorate the egg with a felt-tip pen and glue on eyes, which are sold in any craft store. These minions can be hung on the Christmas tree as decoration. Or make something like a kind of children's medallion.
Fleece minion
Good day, dear masters!))) Many people ask how I make a Minion, so it was decided to film the stages of work. I hope that this material will be useful to you)))
I use fleece as the main material:
1. This is how I lay out the pattern on the fleece and cut out the parts for the Minion’s body.
2. I cut out the sign, gloves and boots from leather or leatherette.
3. I prepare the panties (one piece at a time).
4. “I’m doing my hair”: I pull the floss threads from the wrong side, tie a knot there and pull them to the front side. I “assemble” the finished parts, turn them inside out and stuff them with padding polyester.
5. Eye for Minion: a round doll with a diameter of 18mm, after sewing it on, I leave a little space for stuffing it with padding polyester, and then I sew on the eyelid. It is advisable to cut the glasses strap on the bias - it stretches better.
6. Next, I sew on the arms and legs and dress our handsome boy in jeans and boots.
It seems like I noted all the most important things. I came up with the pattern myself, and I’m very happy to share this mini master class with you!! If you have any questions, write))
Source
DIY minion toy for birthday
If you are going to a birthday party for a lover of the cartoon characters from the cartoon “Despicable Me”, then you can make a gift with your own hands. Minion toy Minion is very easy to prepare with your own hands. Of course, it will take a little time and imagination, and, of course, skills. Can you knit? Great, the minion can be knitted or crocheted.
Can you sew? Great, you can sew a minion from soft plush fabric. Got some pieces left over from old jeans? Sew a denim minion. You can weave a minion, mold it, bake it, draw it, and in the end, invent your own minion.
And here is a ready-made pattern for a “Minion” felt pincushion. You just need to cut out the parts, attach them with a pin to the felt, transfer and sew the scraps together:
Halloween horror stories
On the night of October 31st, an ancient holiday originating in Ireland is celebrated. At first it was popular only in America, but after World War II it returned to European territory. In Russia it is not celebrated so widely, since we have an Orthodox country, but the tradition of celebration relates more to a cheerful carnival, which is loved by young people. For this fun holiday, many clubs and restaurants decorate their premises with pumpkins or zucchini, the insides of which are cut out and lights are inserted.
Mostly they cut out horror stories with sharp fangs, but you can also make a funny face for a character.
To carve a minion for All Saints' Day, you need to try and get rid of all the pulp, and since the zucchini is quite thin, it is harder to work with it than with a thick-walled pumpkin.
Minion pillow - simple and bright
A decorative minion pillow would be a cool and useful gift. The simplest option is to buy a small pillow with a white base, take fabric paints and simply decorate the pillow as a yellow man. You can sew a pillow yourself, take a yellow pillowcase as a basis, fill it with a special filler, and then do as your imagination pleases. Play with the shape of the pillow, its design and quality. There will probably be a minion applique in the store; it can also be used as a basis for creating a decorative pillow.
Related article: How to make a headboard for a bed with your own hands
Elastic bands and weaving minion figurine
You can create a funny one-eyed man using rubber bands and a weaving machine. At the same time, it will look as if it were alive. This type of creativity has gained particular popularity in our time. This type of activity does not involve any special expenses, and many people like crafts made from rubber bands. They can be a small gift or a great souvenir for family and friends. Materials for work are sold in every store. These are ordinary rubber bands for money. They are typically sold in packs of 50 or 100 pieces.
Anyone can weave a cute craft . To do this, you just need to have a little basic knowledge and weaving skills, as well as a hook and pattern. This minion craft can be worn as a keychain or in the form of a ring.
A little imagination and time, as well as desire, will help you create an interesting and original craft with your own hands.
Originally posted 2018-03-19 08:59:03.
Minions in fashion design
Minions have really become a part of our lives. Many would envy such popularity. T-shirts with minions, pants, jackets with their image, and the minion hat is even more popular.
DIY minion hat
For a child, making such a hat with your own hands will not be very difficult. A simple option: buy a regular yellow hat, sew black threads on it - this will be the hair and eyes of the minion. A more complicated option is a knitted minion hat. Well, here you will have to show all your creative skills and abilities, find a suitable scheme and go ahead. The hat can be knitted or crocheted. You can even knit a whole set: a hat and scarf with the image of a minion.
A hat in the minion style can also be made using applique. To begin with, you need to draw the details of the minion on paper, then carefully transfer it to the fabric, cut out all the details, sew them, and only then you can sew them on the hat. You can use felt for applique; pieces of it can be bought at craft stores. And the simplest idea is to make such a hat from a yellow construction helmet. All you need to do is attach the eyes and the strap - and it's ready.
Minion costume for child
And if you want to make not only a hat for your baby, but also an entire carnival costume, then you will have to try hard. But in fact, sewing a minion costume is much easier than sewing the same Cinderella or Bunny. It is enough to find a suitable bright yellow fabric, sew on a blue jumpsuit, and add the hat we talked about above. The character is recognizable, so your child will definitely not be confused with anyone.
We crochet another version of Minion with a step-by-step description
Let's try to crochet funny characters. Using thin threads, you can make a miniature amigurumi figurine, and thick yarn will make a large soft toy.
For work we will need:
- yellow and blue cotton yarn;
- some white and black threads;
- crochet hook;
- filler;
- needle, scissors.
We knit the body of the toy. We cast on 2 air loops and knit 6 double crochets in the first row. In the second row we make increases in every first loop, in the third - in every second, until there are 42 loops in the row. We knit another 28 rows without increases or decreases, and then we begin to decrease the loops in the reverse order. At the same time we knit a blue jumpsuit. To do this, we begin to knit a circle, as for the body, on both sides of which we knit a rectangular chest and back. We fold the workpiece in half, connect its halves with braids and embroider a badge on the chest, as in the photo below. You can additionally knit and sew a pocket.
The knitting pattern for the handles can be arbitrary. We cast on a chain of 6 VPs with yellow yarn, connect it into a ring and knit in a circle until the required size is reached. The length of the arms should be proportional to the body. We knit gloves at the ends with black yarn. Similarly, we make short legs in black or dark gray boots. You don’t have to stuff the arms, but put a little stuffing in the boots or lightly weight them so that the figure can stand.
We make glasses from one or two eyepieces. We knit a small circle with white thread, which we tie with one row of single crochets with gray yarn. We embroider the pupils or decorate them with beads, beads, and small buttons. We connect the eyepieces of the glasses with a chain of air loops, tied with one row of single crochets.
We connect all the parts: we put the overalls on the toy and secure it with several stitches along the contour, sew the arms and legs symmetrically. A wire frame can be inserted into the arms and legs so that the toy better holds its shape and can change the position of the limbs. It is best to pre-tie the upper part of the legs with blue yarn to discreetly connect them to the legs of the overalls.
For assembly, it is best to use thin sewing threads of a suitable color. After assembling the main parts, we sew on the glasses for Minion, having previously secured them with tailor’s pins. We make a hairstyle from several black threads in two folds, securing them with a double knot on the top of the figure. We embroider a smile and additionally decorate the toy at our discretion. The crochet minion is ready!
DIY Minion craft - photo
In fact, the question “how to make a minion with your own hands?” depends solely on your imagination and the imagination of the child. After all, you don’t always need to repeat your favorite character exactly; it can be your exclusive minion - in the colors you like, from the material you want to use and with which you want to work. It could be natural materials, or even an ordinary construction set, ball plasticine or ordinary colored cardboard, an old grandmother’s sweater, or dad’s favorite shirt that he has been wearing for 20 years, or whatever! So, happy crafting!
And even more great ideas for such crafts for your inspiration:
How to crochet “Minion” | WomaNew.ru – cutting and sewing lessons
All children of any age love to play with toys. From about 2-3 years old, children begin to watch cartoons and their favorite characters appear, which they then begin to beg from their mothers or fathers. Unfortunately, it is not always possible to buy a toy. And you don’t need to spend a lot of money on purchasing your favorite character if you can make any cartoon character with your own hands. For example, crochet.
Other master classes on crochet here.
To knit a minion you will need:
· Yarn in yellow, blue and black · Hook · Synthetic padding for stuffing · Round eye for soft toys · Polymer glue.
How to bind a minion.
Let's start knitting. Take yellow yarn and make a loop (amigurumi ring). Then we tie the ring with 6 single crochets (SC) and close the row with a connecting stitch. Next, we cast on 1 runway (lifting air loop) and knit 2 sc in each column of the bottom row. And we knit three more rows of sc, making even increases in each row. We knit the next row with sc without increasing.
Next we knit 7 rows of sc without increasing or decreasing in a spiral, without connecting the rows. In the eighth row we make places for inserting the handles of the toy in the same way as we leave places for tying in “fingers” on gloves or mitts. That is, at a certain distance, having knitted several sc from the beginning, we cast on 3 ch, retreat 3 columns of the bottom row and knit further in columns to the next mark.
Next we knit 7 more rows of sc with yellow yarn.
Then we take blue yarn and knit 3 rows of sc. Next we knit a row of sc, decreasing through 1 stitch of the bottom row. In the 5th “blue” row we make the same places for inserting the legs, knitting in the same way as for the handles.
At this stage, we fill the toy with padding polyester.
We complete the knitting and return to the handles, namely we knit them with sc in the places left during knitting. We knit an RLS handle of a certain length and insert a beaded wire folded in half. This way the handle will be movable.
Next we take black yarn and knit gloves.
- Next, we knit the legs of the minion in the same way as the arms, first with blue, then black yarn.
Now let's turn the minion's pants into overalls, like in the cartoon. To do this, we knit blue yarn in the middle of the panties and knit an SC apron, turning the knitting over. We make suspenders from a chain of air loops. Instead of a mouth, glue a piece of black yarn, and do the hair in the same way.
This is the minion we ended up with.
A child of any age will love this toy. One skein of yellow yarn will produce about 5 (if not more) different minions. Therefore, by spending a small amount of money, you can give your baby a whole collection of your favorite characters.