Very easy to make, homemade scoops from empty drink containers that can be used for various household needs.
Greetings to all DIYers!
Today I want to touch on the topic of making homemade scoops from scrap materials (plastic and cardboard drink containers), which can be used for various household needs. Moreover, I will show three of these scoops, very easy to make.
In general, I must say that initially I made all these scoops to sweep away shavings from the work table, which I use at home for minor repairs or making homemade items.
So, in the warm season, I do all my homemade products in my workshop in the barn, where I use this very convenient, large homemade scoop to sweep away shavings (mostly wood).
However, in the cold and frosty winter, I have to go home, where I work at a small folding table. Of course, full-fledged woodworking cannot be carried out on it, but, nevertheless, small operations, for example, drilling holes, sawing small workpieces, etc., are quite possible.
And here, naturally, the problem of chip removal arises. In such conditions, it is best to remove shavings using a small dustpan and a brush, or a wide brush. So a few years ago, I started making small homemade scoops.
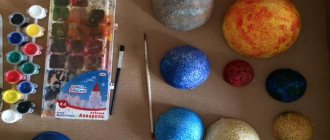
To make them, I used approximately the following accessories:
Robot made from cardboard boxes
If you don’t throw away cardboard boxes, but collect them in sufficient quantities, you can give your child the idea of making a wonderful robot with his own hands. For work, prepare the following materials:
- three cardboard boxes of different sizes;
- figured packaging from some spare part;
- two round foil muffin tins;
- chenille wire;
- two cardboard rolls of food foil;
- two bases from a New Year's cracker;
- two reels of tape;
- two CDs.
Let's start assembling the new product. First of all, the boxes should be turned inside out to remove various inscriptions from sight. You don’t have to turn them inside out, but then you’ll have to cover the boxes with colored paper or foil. We connect the smallest box - the head - to the largest - the body using a reel of tape - the neck. You can use glue, or you can work with double-sided tape.
Now we attach pants to the robot - we glue a medium-sized box to the body.
We tie the arms - rolls of food foil - and the legs - the bases of New Year's crackers - with ropes. In the middle, we glue a figured package onto the chest for volume, and decorate the panties with two disks.
We cut two circles on the front side of the head and insert them into the holes of the muffin tin - these are our eyes. We make the mouth and signal antennas on the top of the head from twisted wire.
We cut the remaining tape spool in half and glue it on the sides of the head - these are the ears of our toy.
The design will not be very stable, so you can put the robot in children's boots or boots.
If the baby wants, he can decorate his new friend with an applique and even take it to kindergarten the next day to show off to his peers.
Basic Rules
- Prepare your workplace, cover it with oilcloth or newspapers.
- Carefully read the foam manufacturer's instructions.
- You cannot make a figure from polyurethane foam outdoors at sub-zero air temperatures.
- When working, use rubber gloves, as polyurethane foam is a toxic material.
- The frame of the figurine must be heavy so that it does not get blown away by the wind. Sand, pebbles or earth are used as weighting materials.
- Polyurethane foam completely hardens in 10 hours, it is sticky - so if you are working with it for the first time, purchase acetone or a solvent.
- The finished figurine must be completely coated with clear furniture varnish. Thanks to this, the figure will be resistant to any weather conditions.
New Year costume
If you have large boxes, you can use them to make a fancy dress for your child. In this case, immediately glue the head box to the body box. Cut a square hole on the head so that the baby can look through it.
Make a hole inside for your son's head. And make the robot’s arms and legs from flexible ventilation pipes, choosing the desired diameter.
Thread holder.
Are you tired of balls of thread tangling with each other and getting stuck in knots? The solution is simple - we make a device from bottles of any size to hold the threads in one place . At the same time, the balls will rub less, get tangled and get stuck. You can make a holder that can be attached to a chair or armchair. We cut the bottle closer to the neck, leaving a part that needs to be cut in the form of a rectangle to the bottom, after which we make a hole in the resulting tail according to the size of the lid and put it on.
Tip: The device can be hung by making holes on opposite edges and threading a thread through them.
Robot made from plastic bottles
You can make a robot from the simplest material – plastic bottles. For the craft, prepare:
- an opaque cola bottle;
- a toy bucket from a set of children's dishes;
- two forks;
- three caps from plastic bottles;
- two wheels from a toy car connected by a chassis.
We make two holes on the bottom sides of the bottle, through which we thread the chassis and screw on the wheels. We bend two forks - these are the arms - and attach them to the body from the back with bolts. We put a bucket on the head, to which we attach two larger lids - these are the eyes, and one smaller one in the middle - this is the mouth. We decorate the robot as your imagination dictates.
Cute pig
In order to make a cute pig, you will need to prepare:
- Five liter plastic bottles;
- Acrylic paint;
- Varnish;
- Scissors;
- Dish sponge;
- Marker.
Related article: Modeling a baby from cold porcelain
First, we take the bottle and remove all unnecessary parts from it, such as rims and handles.
Now we mark with a marker and cut out an oblong hole almost from the bottom to the throat, and above it on the back side, we make another wider hole. From scraps we make ears and a tail for a piglet.
Now you need to paint our animal in any color you like. We paint in two or three layers, and when the paint dries, it is necessary to varnish the product. Such a pig can be very useful in the garden and can be used as a flowerbed for growing flowers.
From bottles and tape
If the previous design seemed too complicated to make, you can use a simpler method. Secure three 1.5-liter plastic bottles with tape without removing the caps - this is the body of the robot. To each outermost bottle, attach another bottle of the same type with adhesive tape to the cork - you get legs.
Cut the next bottle in half, and tape the half that is without a cork in the middle bottle - this is the head. Decorate your head with two plugs - eyes.
Hands can be made from half-liter bottles by cutting them into segments and connecting them together.
Cut out palms from two more bottles and attach them to your arms. The craft is ready!
Equipment for different stages
At each stage, a specific unit is used, which is most often part of the production line.
Washing
If sorting plastic waste is entirely a human endeavor, then you cannot do without special equipment for washing caps.
In the sink, the process of cleaning the lids from dirt and foreign objects (paper, metals, films) takes place.
Washing units may be different.
For example, it could be a friction washer, where washing occurs by friction.
There are others, for example, flotation. They are suitable for heavy plastics, including lids, because the screw is located at the bottom, where heavy types of raw materials successfully settle.
After washing, the lids are fed into drying compartments , where they undergo one or two stages of thermal drying, and then enter a centrifuge.
Crusher
This is a device for grinding various polymer waste.
It is in it that the already clean and dry multi-colored caps turn into light, small flakes.
Today there are automated lines that combine two functions at once - washing and crushing, which significantly speeds up the production process and also makes it more economical.
There is a detailed article on crushers and shredders for plastic on our website.
Agglomerator
Equipment for agglomeration (forming small plastic granules) is the most expensive, so many enterprises are in no hurry to purchase it, but instead successfully set up the sale of flex.
However, it is these devices that make it possible to obtain higher quality and more in demand , and therefore more expensive raw materials, which are called, appropriately, agglomerate.
We talked more about agglomerators in a separate article.
Robot made from caps
A robot made from plastic caps would be quite interesting. Thanks to the elastic band that holds all the elements together, his arms and legs will move. We offer a detailed master class on making a transformer from 22 caps:
- For each leg you will need 4 caps. In the first two we make a hole with a hot awl in the middle, in the third - in the bottom, but closer to the edge, and in the fourth we make two holes at once - in the center and on the side.
- We thread a needle into the elastic on one side and tighten a tight knot on the other.
- We thread two covers with a central hole, then there is a cover with a shifted center and a cover with a hole in the side. We tie the elastic band into a knot.
- Using the same scheme, we assemble the second leg.
- To make a hand, we make holes in the center of three lids, and on the side in the fourth.
- First, we pull the needle and elastic into the lid with the side hole, then alternately with the central ones. Tighten the elastic band onto the knot.
- For the head we will need one lid and one cap from a toothpaste tube. For the body - five caps. In two of them we make holes in the center, in the other two - two symmetrical holes on the sides, and in the fifth - three holes in the center and on the sides.
- We tighten the head cap, the toothpaste cap and the cap with three holes with an elastic band. They are followed by a cap with two holes and a cap with one hole. We thread the two remaining caps - the shoulders - with an elastic band into the side holes on the body.
- We make one side hole in the outer lids of the hands. We pass the elastic through it, then through the shoulder and the lid with three holes. Next is the second shoulder cover and the outermost cover of the second arm.
- We pass an elastic band through the side hole in the leg, then it passes through the side holes of the lower lid of the body, through the side hole in the second leg and is pulled together.
In principle, our transforming robot is ready. All that remains is to add his eyes. You can make holes in the head cap, an applique, or attach them from plasticine. The robot will need a grenade launcher. A ballpoint pen cap is perfect for this. It can be attached to your arm, placed behind your back or placed on your shoulder.
For seedlings
The first thing that comes to mind when you need plastic to find a second life is, of course, its use for seedlings. The bottle is perfect for this, because its use leaves a minimum of waste.
We cut the container into two parts approximately 5-7 cm above the bottom and get two garden tools at once: a glass and a neck with a stopper.
Use a needle or awl to make several holes in the cup and fill it with soil and use it for seedlings. You can plant any greens like this - dill, parsley, mint. You can grow onions on the balcony. It’s also so convenient to grow peppers, tomatoes and eggplants from seeds.
The neck can be adapted as a greenhouse for particularly demanding plants, such as roses, currants, cherries, which need warmth and humidity more than others.
We cover the fragile cutting with its neck and sprinkle a little earth around it for stability. You can water around the structure - the plant will absorb the necessary moisture and will not give away heat that is precious for growth. When the first leaves appear, unscrew the plug to allow the seedling to breathe. When the branches hit the walls, you can remove the homemade greenhouse until next year.
In addition, PET bottles will serve as excellent protection for seedlings from hail and heavy rain.
Robot made from cans
A beautiful robot is made from tin cans. You need to insert one can into another. Make arms and legs from metal caps that cover half-liter glass bottles with drinks. Having drilled a hole in the center of each cap, they need to be pulled together with wire, securing the ends. Bolt two similar caps to the front of the robot body.
Cut a hole on the top can - the mouth, screw two bolts - the eyes. And make the ears from circles of foil, securing them to the sides so that they stick out in different directions.
Don’t forget to take a photo of your work step by step and post it on your social network page. Let your visitors envy your skills, and maybe even learn from your extraordinary experience.
Container for small items
We poke a hole in the cork, push the wire through a loop and bend it from below, thereby fixing its position. We cut out a window at the top, slightly wider than your clenched fist. Such a container can be hung in the kitchen and stored in it for cereals, pasta, or kitchen towels.
What animals can be made?
You can make absolutely any animal - a hare, a bear, a frog, a swan from plastic bottles, everything will look original and cute on your site.
The technology for making the animal's body is almost identical for each animal. But in cutting out wings, ears and tails, you will have to be creative, strain your memory, or look for different animals in children's books.
The volume of bottles required for making animals (hare, cat or pig) depends on what size you want to make them. For large crafts you will need large bottles of 5 and 6 liters, for small ones 2-liter bottles are also suitable.
We make a palm tree from plastic bottles with our own hands in this article.
And here read about planting and caring for dicentra.