Often the toilet in a typical apartment is more than modest in size. Communications - pipes and riser are located along the wall behind the toilet. During the repair process, they are hidden inside the box, but access to taps and meters must be ensured.
You can install a technical hatch, but a much more practical solution would be to use the free space behind the toilet to the maximum. How to make a toilet cabinet with your own hands? We'll look at it in detail in our article.
DIY toilet cabinet
What to consider when choosing
In order to answer this question, you need to consider the design of the cabinet and its components.
The coating can be semi-matte, matte or glossy. This protects this piece of furniture under daily stress. The application technology will ensure uniform distribution of the selected layer and the desired shade over the surfaces of the panels. The coating should protect the cabinet from moisture and daily stress.
The internal structure may contain the following elements:
- mirrors, cabinets with built-in mirror surfaces;
- attached type cabinets;
- cabinets, shelves, bookcases;
- boxes for a basket with dirty laundry, for another part of the furniture.
The inside of a cabinet can contain many elements. The materials chosen for the manufacture of these structures must be durable, moisture-resistant, and environmentally safe. The fittings should not be susceptible to corrosion or deformation.
Creative mirror design
To make a mirror look more original, it is not at all necessary to make an unusual frame.
Let's prepare the following:
- mirror;
- glass cutter;
- sticky paper;
- spray paint in gold color;
- metal ruler;
- varnish;
- scotch;
- protractor;
- sandpaper;
- marker;
- knife;
- gloves;
- protective glasses.
First, wipe the mirror and place it on a stable work surface.
We apply the protractor to the corner of the square and make notches. We repeat the same on each of them. We wear goggles and gloves for protection. Apply a ruler and draw along the line with a glass cutter.
Lightly press on the piece of mirror to break it off. We repeat this with each corner.
We wipe the surface of the mirror with detergents and a napkin.
Glue adhesive paper to the front of the mirror. We make markings on it, as shown in the photo. Using a special knife that does not leave marks on the mirror, we cut out the strips.
Carefully sand the edges of the mirror.
Apply spray paint to the surface and leave it until dry. After this we apply varnish. We remove the adhesive paper from the mirror, wipe it and install it in the room that best suits the style.
Purpose and types of bathroom cabinets
There are several types of bathroom cabinets according to their purpose:
- Linen. Useful for storing towels, bathrobes and similar items;
- Under the sink. The cabinet allows you not only to hide the not very attractive pipes under the sink, but also to use this area to your advantage. There you can place cleaning and detergents, washing powders, and other household chemicals;
- Under the bath. The principle is the same, only it is equipped from the edge of the bathtub to the floor;
- For washing machine. Even modern models are difficult to fit into the overall design. Therefore, it is often hidden with special cabinets. It can be installed under the countertop and become a harmonious extension of the sink. Separate sections with or without doors that house equipment are also not uncommon.
Requirements for bathroom furniture
Bathroom furniture should be selected taking into account the area and design style. You need to think about the location of cabinets and shelves, decide on the arrangement of necessary things and cabinets.
- Water resistance. For the furnishings, items made from materials that do not deteriorate from exposure to moisture are suitable.
- Multifunctionality. Items should not only highlight the design, but also be always at hand.
- Ease of removing dirt, drops, stains. Bathroom furniture should have no protruding parts or cracks that become clogged with dust.
- Health safety. The materials from which the items are made must not emit any harmful substances.
- Ease of use. You cannot install pull-out furniture in narrow bathtubs.
- Practicality. Under floor furniture with legs, it is easy to clean and remove water. For the same purpose, it is advisable not to move objects close to the walls.
Bathroom furniture looks beautiful when combined with the overall style.
Installing a sink above a washing machine
Whatever lily sink you choose for your restroom, several rules are mandatory in any case:
Parts of the sink - in particular the drain pipes - should not come into contact with the washing machine. The point here is not only the risk of short circuiting, but also vibration - from constant shaking, the pipes can simply “loose”.
The washbasin must protrude slightly forward above the machine. This reduces the likelihood of accidental water entering the surface of the latter.
All wires of the washing machine must be in perfect order - in good condition, with strong insulation. Do not forget that even with the most careful installation there is still a risk of water getting on them.
And finally, before installing the washing machine, you need to read the instructions for it in order to finally understand whether the unit can be installed in close proximity to water appliances.
How to install a sink above a washing machine
To install a sink over a washing machine, you don’t have to resort to the help of specialists - you can do it yourself, there’s nothing complicated here. Installation proceeds as follows.
First of all, brackets are attached to the wall, on which the sink “sits”. Most often they come complete with plumbing fixtures; if not, it’s okay - you can buy them at any hardware store.
Before drilling the wall and screwing in the fasteners, figure out “roughly” whether the washbasin will fit comfortably. In other words, place it a few centimeters above the washing machine and see if this height suits you. If the faucet for the bathtub and sink will be shared, make sure that it rotates freely between them and that the water will not flow onto the floor or along the walls, but evenly into the bowls.
The edge adjacent to the wall must be sealed with a special agent.
Rules for installing a water lily sink siphon
- The siphon is attached before the sink itself is fixed above the washing machine.
- The flexible drain tube is attached directly to the siphon of the “washer”, and on top this structure is strengthened with a “clamp” - this way you don’t have to be afraid that the connection will accidentally break.
- And only after this the drain hose is inserted into the sewer pipe.
It is important to remind once again that parts of the sink should not come into contact with the surface of the washing machine - constant vibration will disrupt the strength of the connections. In addition, after installing the sink above the washing machine, before use, check whether the siphons and pipes are securely fastened, and whether water is leaking from somewhere
Peculiarities
Country furniture carries the same functional load as the items in your apartment. You just have to take into account one important nuance: it must be not only functional, but also practical, since it will be used outdoors. It is this feature that determines the choice of materials for construction - they should not be afraid of water, sun and cold. Let's try to figure out which of the existing materials best meet these requirements.
The upholstered furniture that is in our apartments is undoubtedly more comfortable than solid wooden or metal structures. But placing such products outdoors is impractical. To sit comfortably on a country bench or sofa, simply prepare soft bases or pillows that can be easily removed into the house.
Types of cabinet designs
The bathroom uses different furniture, which differ in size, purpose, installation method and other parameters.
Standard options
Most often, cabinets have a standard rectangular or square shape.
In most cases, such models are hung above the sink to store personal hygiene products. They are small and are rarely used for storing household chemicals and things.
Corner systems
Such structures are installed in the corner of the room and placed above the bathtub, toilet, washing machine or in empty corners. They save space, and their large depth allows you to store many different things in them. The disadvantages include the inability to install drawers, so corner systems only have shelves. Such furniture is equipped with hinged doors, installed on the floor or fixed on the wall.
With horizontal placement
They have a small height and a large width. Basically, they are installed high from the floor, so they do not interfere with free movement in the bathroom. Such models are most often equipped with doors that open upward, which makes their use more convenient.
Wardrobes
They are installed mainly in bedrooms and corridors. They are large, so they are not suitable for a small room. In a large bathroom closet you can hide a variety of items (towels, bathrobes, household chemicals, a drawer for dirty clothes). Sliding doors do not take up free space - you can install a mirror on them and equip it with lighting.
Built-in structures
Often there are niches or recesses in the bathroom walls that can be adapted for installing built-in cabinets. The main problem is the difficulty of selecting the finished product according to the given dimensions, so it will have to be made to order. It is impossible to rearrange it, and transporting it to a new apartment is irrational. In built-in structures you can hide a washing machine or make shelves and drawers for storing various items.
Hanging wall
All designs that are mounted on the wall save space. They are placed above the existing plumbing fixtures or washing machine in the bathroom. They come in different shapes, sizes and colors, which allows you to choose them to suit your bathroom interior.
Column cabinets
People call such structures “pencil cases,” but their correct name is column cabinets. They are used in small rooms, because... They have a small width and depth, but a large height. It is not necessary that the height of the pencil case be up to the ceiling: it can be level with the bathtub or washbasin. The presence of a large number of drawers and shelves allows you to store different items separately.
Floor furniture
These models are installed directly on the bathroom floor. Cabinets are large in size, so before purchasing them, you need to know where they will be installed. If the bathroom space allows it, this model can store all household chemicals, cosmetics and necessary bath accessories.
The lack of contact with the floor protects the material from direct interaction with water, so its service life is increased.
Storage system
- Shelves: straight or corner. Needed to supply bathing products and cosmetics.
- Cabinets with shelves or with drawers (some with a built-in sink). They usually store supplies of cleaning products for the bath and toilet.
- Cabinets: floor or hanging. Items that are rarely used are hidden in closets.
- Mirror . An accessory that is often placed above the washbasin. It is attached to the wall or to the cabinet door. With this product, if the lighting level is sufficient, there is no need to install an additional lamp.
Making a frame for a sanitary cabinet
The frame of the sanitary cabinet is made according to the drawing.
- First, guide profiles (PN 27×27) are installed along the floor and ceiling;
- Then four (for a corner cabinet) or six vertical racks (PS) are installed at the corners of the frame. Two joining profiles are placed in the outer corners of the cabinet;
- Two racks are placed where the cabinet doors are installed. Wooden blocks are inserted into these racks to install doors;
- According to the size of the doors (hatch), cross members from the PS profile are installed. This creates a frame for the doors;
- To strengthen the structure and transverse fastening of plasterboard sheets, cross members are made in the frame structure from the PS profile.
How to connect profiles read: How to connect profiles for drywall. How to install corners in plasterboard structures, read Corners in plasterboard structures.
Important to note! Since the dimensions of plumbing cabinets are usually small, many craftsmen change technology and replace rack profiles (PS 50×50) with ceiling profiles (PP 60×27) and instead of racks they use guide ceiling profiles PNP (27×28), and crossbars are made from ceiling PP profile (60×27). Example in the photo
This does not provide much savings, but in home construction it is important to obtain a durable structure. It's easy to explain
Bathroom renovation is done as a last resort and for the sanitary cabinet they use the leftover materials left over from the renovation and therefore you can find the most intricate designs of sanitary cabinets.
Form
Rectangular is the most common option, which is installed in a vertical or horizontal position.
Square - visually makes the room more proportional. This is a good choice for narrow and rectangular spaces.
Oval - like rectangular, installed in a vertical or horizontal position. Unlike the rectangular model, it has rounded corners, giving the interior a harmonious appearance.
Round - visually increases the volume of the room. Like the oval model, a round mirror makes the room more harmonious.
Figured - has an original shape (wavy, heart, cat, butterfly, sun, moon). Such a mirror will become a bright decorative accent that can transform the interior of the bathroom.
Important: to decorate the interior with an exclusive mirror, use mirror tiles - square, triangular, radius. These fragments, often decorated with bevels, are used to create a uniquely shaped mirror.
General technology for assembling cabinets from furniture panels
If the drawing of a cabinet made from furniture panels is drawn up in accordance with the dimensions of the blanks, then a minimum of cutting parts will be required. For these purposes, it is best to use an electric jigsaw with a wood saw. After cutting, the edges need to be sanded.
Then they move on to processing the surfaces of the parts. The first coating with varnish and enamel is carried out before assembling the cabinet from furniture panels with your own hands. All parts are thoroughly dried, if necessary - under a press or with the lamellas secured with clamps. If the prerequisites for warping and cracking of the canvas are visible, the parts are either re-glued and dried under a press, or replaced.
How to assemble a cabinet from a furniture panel with your own hands step by step
Unlike furniture made from laminated chipboard, confirmats (euroscrews) are almost never used when assembling a cabinet from furniture panels. The main fasteners are self-tapping screws for twisting the workpieces. As well as furniture dowels for invisible connection of parts with simultaneous gluing.
Housing assembly
They start by calculating the distances between the holes on the sides of the cabinet for fastening horizontal parts (shelves, bottom, roof). Then carefully drill out according to the markings for installation of fasteners.
- If these are self-tapping screws, then from the front side of the sidewalls, use a drill with a diameter of 3-4 mm all the way through.
- If these are furniture dowels, then you need blind holes for them with a 7-8mm drill on the inside of the sides.
After control assembly of the cabinet body from furniture panels, it is necessary to check the geometry of the product
This is important if you plan to install drawers, as well as hanging or sliding facades in the cabinet body
Then proceed to the final varnish coating of the product body.
Installation of internal filling
After final assembly of the cabinet body (gluing it onto furniture dowels and allowing it to dry completely), they proceed to installing the internal filling.
According to the drawings, in wardrobes made from furniture panels, flanges are screwed onto 4x20 self-tapping screws for installing rods with hangers, and various storage systems. The drawers are pre-assembled and then installed on the selected guides.
Kitchen cabinets made from furniture panels are complemented by removable shelves, dish dryers, and pull-out baskets.
If necessary, the back wall is nailed with small nails.
After installing/hanging the cabinet from furniture panels in the planned location, they proceed to hanging and adjusting the facades.
Hanging and adjusting facades
The process of installing doors on a cabinet made of furniture board is largely determined by the type of opening and fittings chosen. Often the hinged doors of wooden furniture are installed on card or heel hinges. But most often, standard four-hinged hinges are used with a preliminary insertion of the hinge on the back side of the facade.
Edge processing
For gluing you will need a clamping clamp, an iron, trim tape, a grout block and a sharp mounting knife. It is very difficult to work alone, call an assistant or use a clamp. The fact is that when pasting you will have to do several jobs at the same time, and you only have two hands.
Trimming furniture tape
Iron
Clamp
Grout block
If you do not have an assistant, then operations are performed according to this algorithm.
Step 1. Prepare any object to which the part to be finished will be secured with a clamp. This could be a drawer from a nightstand, an overturned stool, a small table, etc.
The box we will use to secure the shelf
Step 2. Using a clamp, secure the part to the object being held.
Place the shelf close to the drawer
Tighten the clamp
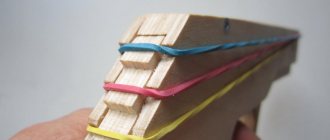
Step 3. Cut the edge tape, leaving approximately one centimeter on each side.
An adhesive base is applied to the edge
Cutting the tape
Step 4. Turn on the iron and set the heat control to medium heat.
We put two gloves on the left hand
Step 5. Use a brush or brush to remove dust from the end of the part. Place the trimming tape on the part with a margin of length, press it with a heated iron and heat it along the entire length. Hold the iron with your right hand, and constantly adjust the position of the tape with your left. It should lie strictly in the middle of the end of the pencil case part.
Glue the tape with a hot iron
Step 6. After the band has been heated once, return the iron back and use a gloved hand to press the hot band firmly against the edge. The fact is that it is very difficult to achieve a perfectly even cut, and the flat sole of the iron cannot heat up and press the tape in the recesses. This is done with a gloved hand.
Step 7. Release the part, turn it over and stick the tape on the other side in the same way.
Glue the tape to the opposite end
Glue the next tape
Step 8. Using a sharp knife, carefully cut off the protruding parts of the tape, do not allow burrs, do not rush.
Trim off the excess
Step 9. Cover the two remaining ends of the part, cut off the excess tape.
Cut off the protruding tape along the long side
Step 10. Use fine sandpaper to clean the sharp edges of the cut of the trim strip; the edge should have a semicircular shape. This will reduce the likelihood of scuffing during use of the bathroom case.
All that remains is to clean up the edge
Before assembly, you need to paste over all the ends of the furniture.
Check the quality, pay special attention to the front surfaces
Tape glued to the ends
The ends of all parts are processed
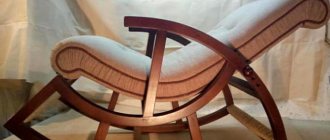
How to make a cabinet behind the toilet with your own hands?
Strict adherence to the algorithm will allow you to obtain a beautiful, high-quality and durable design.
Project development. At the first stage, it is necessary to design the structure on paper and create a drawing. To do this, you need to decide on the design of the cabinet, choose its shape and take measurements. Correctly taken measurements are of great importance. First of all, the back wall of the future structure is measured: top, middle and bottom. Next, measurements are made of the “front part” and the height of the proposed cabinet
During the design process, it is important to determine the number and size of internal shelves. Choosing materials for the cabinet behind the toilet. Furniture for the toilet can be made of plasterboard, plywood, natural wood or laminated chipboard. What material to choose is a purely individual matter.
But it is important to remember that when choosing a building material, the main criterion should not be price, but practicality and durability. The material must be moisture resistant and durable. The best solution would be noble wood treated with clear varnish. Preparing tools for installation. After creating the design of the cabinet behind the toilet, you should get all the necessary tools, fastening materials, fittings and other elements to assemble the structure. So, you will definitely need:
What material to choose is a purely individual matter.
But it is important to remember that when choosing a building material, the main criterion should not be price, but practicality and durability. The material must be moisture resistant and durable
The best solution would be noble wood treated with clear varnish. Preparing tools for installation. After creating the design of the cabinet behind the toilet, you should get all the necessary tools, fastening materials, fittings and other elements to assemble the structure. So, you will definitely need:
- level;
- tape measure (electronic rangefinder);
- screwdriver;
- hammer;
- jigsaw;
- screwdriver;
- electric drill.
- Assembling a cabinet in the toilet. The installation of the structure is carried out strictly according to a pre-developed drawing. Following a certain algorithm step by step will greatly simplify the assembly process.
To make a closet in the toilet with your own hands, you need to follow the following steps.
- At the first stage, the bars are cut to size and attached to the walls using screws and an electric drill. Sawing wood and other materials can be done either independently if you have the appropriate skills, or ordered from any construction company.
- At the second stage, the blanks for shelves and doors are cut. The prepared shelves are installed on bars and secured with fasteners. When using wood materials, it is recommended to treat the surface of the structure with a special antiseptic, which can be purchased at any hardware store.
- At the third stage, markings are made on the door blanks on the hinges, which are subsequently screwed on. Many people use piano hinges because they are more durable and can withstand heavy loads.
- At the fourth stage, the cabinet is finished at individual discretion. To make the design aesthetically attractive and fit into the interior of the toilet room, you can cover the surface with self-adhesive wallpaper or laminated paper. Alternatively, the wooden structure can be varnished to imitate wood or painted in a bright, rich color.
- At the fifth stage, handles are installed and, if desired, the cabinet facades are decorated. Construction stores sell various decorative decorations that will give your toilet cabinet an original appearance.
On our website you can find many design solutions and assembly diagrams on how to make a cabinet in the toilet behind the toilet. Furniture in the toilet room, made with high quality by yourself, will delight you for many years.
Coating
How to make the surface of a manufactured cabinet or other piece of furniture waterproof and waterproof?
I used acrylic latex based rubber water dispersion paint The name is “Rezel+”, the manufacturer is the Sevastopol LLC “Accent”, the price is about 120 rubles per kilogram.
Inexpensive rubber paint made in Sevastopol.
What attracted her?
- Wear resistance. The coating can be cleaned with any detergents, except abrasive ones;
- Absolutely waterproof. Suffice it to say that this paint is recommended by the manufacturer as a roof sealant;
- No odors (composition: water-based acrylic latex);
- Dries one layer in just one hour.
To apply the paint I used a regular soft brush. The painting was done in four layers, with each layer applied perpendicular to the previous one.
If you use a roller or sprayer, the coating will be smoother.
Waterproofing paint isn't the only coating that can withstand splashes and high humidity. For another project (my daughter's changing table) I used alkyd urethane yacht varnish. It emphasizes the texture of the top layer of veneer, which has a very pleasant effect on the appearance of the product.
Yacht varnish is a coating designed for constant contact with water.
There are several subtleties to applying varnish.
- After applying the first (priming) layer with a brush or roller and drying it completely, all furniture surfaces are sanded again. The varnish lifts wood fibers on the surface of the veneer and makes it rough to the touch. Sanding will allow you to get a smooth finish without applying dozens of layers of varnish;
The raised pile made the surface rough.
- Subsequent varnishing is performed in one go. The varnish is not applied with a brush or roller, but is poured onto a horizontal plane and evenly distributed over it with a wide steel spatula . This method of varnishing will allow you to obtain the coveted smooth glassy surface with a minimum number of flaws;
This coating method is often used when varnishing parquet.
- The next surface of a cabinet, cabinet or other product is varnished in the same way after drying the previous wall. Drying at room temperature takes at least two days, so you have to be patient.
Making a shelf with your own hands
When all the necessary tools are in place, you can get to work.
If wood or MDF sheets are chosen as the material, you will need to follow the following procedure:
- make marks with a pencil along the edges of the slats;
- Glue blocks of equal size to the areas of the marks;
- draw additional marks in the center of each block, drill holes in them;
- assemble the structure using screws for the previously made holes;
- cover the finished structure with a varnish base for its presentable appearance;
- make special holes in the wall, fix dowels in them;
- mount the assembled shelf on the installed mounts in the wall.
The homemade shelf is ready! This option is great for any bathroom.
Placement nuances depending on the type of product
Finding a place to hang a mirror in the bathroom is rarely a problem. Usually there are few options. The main areas for placement are:
- Mirrors above the washbasin are the most logical solution for the convenience of hygiene procedures and makeup application.
- A cabinet with a mirror allows you to organize your space. At the same time it serves as a storage place for hygiene products, cosmetics, and detergents. If you install a mirror above the sink with hidden shelves, there will be no need for additional furniture.
- Built into a wall or niche. Pros: saving space without sacrificing comfort. The location always looks advantageous, but may require additional costs. In addition, if the canvas breaks or gets tired, it will be much more difficult to change it than just attached to the wall. The recommended depth for such an arrangement of built-in products (including wall tiles) is 6–8 mm.
- Full height. The product can be free-standing, attached to a wall or door. It expands the space, looks impressive, and gives you the opportunity to see yourself from head to toe. When choosing at what height to hang a mirror in the bathroom, you should keep in mind that a product that is too large (up to the ceiling) is not always convenient. And it’s more difficult to keep it clean. It is better if its height is level with the top border of the door frame.
When looking for a place to install a mirror in the bathroom, you need to consider what objects will fall into the reflection zone. It is highly undesirable to hang it opposite another canvas. Otherwise, mutual multiple reflection will create the effect of an endless corridor.
Above the washbasinCabinet with mirrorMounted into the wallFull height
Options for placing a washing machine in the kitchen
In the kitchen, the washing machine is placed so that it fits organically into the interior and does not interfere with the use of the room for its intended purpose.
When choosing a place for equipment, they give preference to the space next to the kitchen sink. This simplifies connecting the device to communications.
We list the options for installing the machine in the kitchen.
Under the table top
The easiest option is to install the machine in a niche under the kitchen countertop. This arrangement allows you to conveniently use the equipment. However, the noise from a working centrifuge may disturb household members.
The open arrangement of household appliances is typical for the high-tech design direction. But only if all the devices are designed in the same style.
Behind masking doors or curtains
If the machine does not fit into the kitchen design, you can hide it by hanging it on the door niche. This option will reduce the noise level, but will require more space. The unit itself should be smaller in size.
Important! If you decide to hide the washing machine behind doors, make sure that they open completely and that the countertop does not block access to the detergent compartment. Otherwise, it will be inconvenient to use the device. If there is not enough space to install a full door, but you need to hide the washing machine, use a masking textile curtain of a suitable color
If there is not enough space to install a full door, but you need to hide the washing machine, use a masking textile curtain of a suitable color.
Embedding
Embedding a washing machine is the most compact placement option. With this method, the device is placed in a cabinet, and the door is hung on the body of the machine itself.
A significant disadvantage of this option is the higher price of built-in washing machines.
Installation in a cabinet
Another functional placement option, suitable for large kitchens. In this case, the equipment is installed in a special kitchen cabinet, possibly together with a drying apparatus.
Such installation and connection require special skills, so it is better to entrust them to a specialist.
Causes of wear
Sometimes, after several years of service, we notice that the mirror does not reflect well and some spots appear. Turning the canvas over, it turns out that the coating has been torn off from the back side. It's called amalgam.
This coating can come off for various reasons. And these are not necessarily the consequences of scratches and mechanical stress. Amalgam also begins to slip if normal air circulation on the inside is disrupted. If you see transparent spots on the reflective side, you should think about gluing the mirror correctly or choosing a different place for it.
The production of mirrors is technologically quite complex. To create a reflective surface, a thin layer of metal, supplemented with special additives, is applied to the reverse side. Metal microparticles are gradually applied to the surface, often in several layers.
It will not be possible to achieve the same effect at home without special industrial equipment. Therefore, if your antique mirror in a wooden frame has worn out and lost some of its reflective properties due to peeling amalgam, partial restoration will be required.
No one is stopping you from giving the product to a special company, where they will do professional restoration. But it is very expensive and not every city has such specialists. The cost of the service sometimes exceeds the price of the mirror itself. First, you should try to perform the procedure yourself, at home.
Practice clearly shows that it is possible to restore a surface using available materials, and the result often exceeds expectations.
Subtleties of choosing a cabinet
Before purchasing a bathroom cabinet or creating it yourself, you need to take into account the conditions in which it will be used:
- High humidity. If a material is chosen that does not tolerate moisture well, it must be additionally coated with protective water-repellent agents, otherwise its service life will be short.
- Temperature surges. In the bathroom there is often not only humid, but also hot air, which is replaced by cool air.
Placement
The main difference between built-in cabinets is that they do not have their own frame. The role of the sidewalls and rear panel is performed by the walls of the niche. There are also semi-built-in designs that have 1 side panel.
The following installation methods are available:
along the wall; in a niche where exact adherence to dimensions is important (so that shelves and drawers fit into the prepared area without distortion); in a corner where the space is often empty (installing a cabinet here allows you to effectively and efficiently use the bathroom space).
The method of opening doors is also important, which can be:
- Swing. Mounted on special furniture hinges. They take up a lot of space when opened. They need to be adjusted and lubricated periodically.
- Sliding. They are afraid of distortions: when opening, the doors move to the side and hide one behind the other. The rollers used must be moisture resistant.
- Foldable. They can be in the form of an “accordion” or a “book”. They don't like jerks. They move only on the upper rollers. There are small hinges between the sashes.
Size and color
You can purchase a ready-made cabinet of the required size, make it yourself, or have it made to order. The depth of wall-mounted furniture is from 15 cm. This is not enough for storing household chemicals or towels, but it is enough for hygiene products.
The height of floor-standing models is limited only by the height of the room. The minimum width of pencil cases is 20 cm. They are placed either individually or in pairs, for example, on both sides of the washbasin.
There is a large selection of color combinations for bathroom furniture. To do this, it is necessary to observe the color scheme of both the cabinets themselves and other interior items.
Additional features
The purpose of any closet is to store various things.
It may have the following content:
- Laundry basket. It is a separate compartment where it is convenient to store dirty laundry from prying eyes.
- Folding towel rail. After the towel is dried, the structure is folded and hidden behind the door.
- Backlight. It is created near the mirror built into the door and makes it more convenient to apply makeup or remove it before bed.
- Heated mirrors. Helps get rid of high humidity, which accumulates on the mirror and appears in the form of water droplets, impairing visibility.
What things is it needed for?
When buying or creating a cabinet with your own hands, you must immediately decide what things it will be used to store. The smaller the shelf, the more weight it can support. For example, if the length of a shelf is 0.5 m and it can support 50 kg, then with a length of 1 m it will only support 10 kg.
There are a number of rules that will help you store things correctly:
- Any fabric items (towels, clothes) are stored on the middle shelves, because... the steam rises up and when it cools down, it falls down, so in the middle the textile will have the least risk of becoming damp.
- Household chemicals are kept on the lower shelves: if the container leaks, the detergents will not get on other things.
- The top shelves are used to store things that are rarely used.
- Cosmetics and hygiene products are placed at such a level that they are visible and convenient to take.
↑ Combined bathroom
Interior of a combined bathroom in a monochrome white and gray palette
Pay attention to the design of the heated towel rail - it is also a spacious shelf. The mirrored facade of the furniture hides the internal storage shelves
In this case, every millimeter is used to the maximum functionally.
White and blue interior. For decoration, background tiles of two colors and mosaics in a similar range were used. The cabinet fronts also echo the tone of the room. A single palette of materials allows you to combine all zones and a small area does not look cluttered.
Modern classics in the bathroom space. A large framed mirror opposite the glass enclosure of the cabin creates the effect of the absence of walls. The neoclassical cabinet with shelves is custom-made and allows you to store the necessary bath accessories without exposing the part that is better to hide.
White ceramics on the walls imitate brickwork and are combined with the wooden texture of the floor. Such materials often coexist in a modern interior and look organically in the same area. As additional lighting, spotlights are built into the bottom of the wall cabinet. For storing things, there is not only furniture, but also several niche shelves recessed into the wall.
An interior that combines classic furniture and textiles, modern finishes and plumbing, as well as vintage-style details. Lighting is provided by several sources: the main one and an additional one above the mirror. During the day, the room is filled with natural light through the window opening, thus reducing energy consumption in the apartment.
Monochrome finish in white and gray tones. Due to light shades, lighting and window openings, the area looks spacious, despite its actual dimensions. The surface of the tile shines with a pearly sheen, thereby expanding the visual boundaries of the walls.
Selection of materials
You can find a huge number of different materials on the market today, but not all of them are suitable for assembling bathroom furniture. The most important point for this room is, of course, moisture resistance. The material must not only be resistant to constantly humid air, but also impervious to direct contact with water. Thus, the main things bathroom furniture is made from are wood with appropriate impregnation, plastic and glass.
Plastic is easy to process, but it is fragile, quite soft and not always aesthetically pleasing. It should be used not for the frame of the structure, but for auxiliary elements. Glass is also very fragile and heavy. In addition, fixing glass is also relatively more difficult than other materials. It is better to use it for shelves or doors.
The wood that can be used for the frame and all structural parts can be in the following form:
The tabletop deserves special attention. The materials for its manufacture are boards, chipboards, plastic or stone. This is the most functional element, so it must be provided with reliable fastening and have high strength.
You select the thickness of the materials based on your drawing. It is necessary to take into account that for the supporting frame of an organizer or cabinet it is better to choose plywood from 15 mm, laminated chipboard – from 20 mm. On the contrary, it is better to make shelves, doors and drawers from thin sheets (5-10 mm) to reduce the weight of the structure.
You can cut the blanks yourself or order them from a workshop. To prepare yourself, you will need a jigsaw. When working with laminated chipboard, it is better to glue the laminating layer with tape and run a cutter along the cutting line. Then it will be possible to avoid its splitting.
Plywood, veneer, solid wood
The ability of wood to “play” with changes in humidity and temperature is known to everyone. Also, to make bathroom furniture, you should not use wood species that are prone to rotting and fungus formation - for example, pine, birch and, accordingly, pine and birch plywood. But oak performs quite well under conditions of humidity changes. With proper surface treatment and impregnation with surface-protecting compounds, of course.
In the premium segment category you can find many pieces of finished bathroom furniture made of solid wood and with veneer inserts. But it is intended for fairly spacious bathrooms, where there are no problems with ventilation and humidity is not so critical.
With shelf
In the bathroom, it is important to have toothbrushes and cosmetics on hand. But a wall-hung washbasin or tulip design does not allow them to be placed. If you don't have a floor stand, a shelf under the mirror will do.
It must withstand the weight of cans and bottles, so high-quality fasteners are used during installation.
Several shelves on the side of the mirror will allow you to keep things in order.
pros
- Capacity and ease of storage. A mirror-cabinet allows you to rationally distribute on its shelves all the little things that are so necessary in the bathroom: shampoos, shower gels, cosmetics, washing powders and much more. If desired, you can even place a water heater in it.
- Drawers and hooks are great additions that save bathroom space.
- Easy to assemble. All the necessary parts are included in the kit, and detailed instructions will simplify the task.
- Versatility. A wall-mounted mirrored cabinet, for example, can easily serve as a bedside table.
- Economical. If you use LED strip or spotlights as lighting, then due to the reflective property of the mirror in the bathroom it will be much lighter. You don't even need any other lighting fixtures.
- Functionality. A variety of cabinet door options (hinged, folding, blinds, etc.) allow you to choose what will be truly optimal for your bathroom.
- An ideal combination with any interior style.