Based on modern conditions, we can say with confidence that tuning headlights with your own hands is a fairly common occurrence among domestic car owners.
And this is not surprising, since such changes lead to improved protection of the vehicle itself, plus they help decorate the car with new elements.
A wide range of modernized optics also contributes to tuning taillights with your own hands. As they say, there will be plenty to choose from.
The only negative is that when purchasing a finished product you will have to pay a decent amount. Therefore, in this situation, men prefer to do something on their own, because, among other things, this is an excellent solution for protecting headlights from scratches and other mechanical influences.
Tinting
This headlight tuning is great for those who want to do it themselves . In this case, you will need to buy inexpensive consumables, prepare a tool and set aside several hours to complete all the work.
Tinting (or tinting) the optics allows you to give the headlights a new shade, which looks unusual and stylish, especially at night. You will need:
Headlight tinting
- A special dye in aerosol form, which is intended for car headlights made of a certain material (glass or plastic);
- degreasing agent;
- masking tape;
- polishing cloths;
- tools for dismantling optics.
How to cook
First of all, the car enthusiast needs to remove the headlights from the car. Next, these parts should be thoroughly cleaned of dirt, washed and dried, and the surfaces to be treated should be degreased.
Segments of optics that cannot be tinted should be protected with tape. In addition, during preparation for the procedure, it is recommended to immerse the paint container in hot water for about five minutes so that the paint composition becomes more flexible.
The paint should be sprayed onto the prepared surface of the optics from a distance of about 30 cm. Having applied the first layer, you need to wait until it dries completely, and only then repeat the procedure. Otherwise, you risk the appearance of drips that will have to be removed with a solvent and starting all over again.
Headlight tinting
The final stage is polishing, which is performed with special napkins, which will provide the headlights with shine and gloss.
Introduction.
A few words about powerful LEDs and lumens.
The above circuits use only high-power LEDs, which are produced by such manufacturers as Philips-Lumileds, Cree, Seoul Semiconductor. High-power LEDs are rapidly improving. New models of high-power LEDs, which were the most advanced LEDs six months ago, now look dim. An even brighter generation of LEDs may soon appear on the market. Therefore, we cannot recommend a specific LED model. The electronic circuits are independent of the type of LEDs used, as long as they have the typical forward voltage of a white LED.
To calculate the luminous efficiency of the circuits presented on this page, you only need to know the power of the LEDs. The LED specification specifies how many lumens per watt it produces.
To assemble the brightest headlight, you need to pay attention to:
- electronic circuit - the more power it produces, the better;
- LEDs - the more lumens per watt, the better;
- optics, reflectors, lenses - their efficiency should tend to 100%.
Circuit 1 is the simplest LED headlight power circuit.
| Name | Meaning | Alternative meaning |
| D1 | 1N4007 | 1N5818 |
| D2 | 1N4007 | 1N5818 |
| D3 | 1N4007 | 1N5818 |
| D4 | 1N4007 | 1N5818 |
| LED1 | White high-power LED (Luxeon, Cree...) | |
A dynamo, a bridge rectifier and one powerful LED is all you need for a dynamo powered LED headlight!
How it works. The alternating current from the dynamo generator passes through a full-wave rectifier and powers a single high-power headlight LED. The LED current is strictly limited by the dynamo generator to 500..600 mA. You can see for yourself that the LED will shine. Schottky diodes (1N5818) minimize circuit losses. This circuit works for both bottle dynamos and hub dynamos. It produces just over 1.5 W of power.
The above circuit has one problem - the light flickers at low speeds, especially if the power comes from a hub dynamo. This shortcoming can be easily dealt with:
Scheme 2 - reducing flicker at low speed.
| Name | Meaning | Alternative meaning |
| D1 | 1N4007 | 1N5818 |
| D2 | 1N4007 | 1N5818 |
| D3 | 1N4007 | 1N5818 |
| D4 | 1N4007 | 1N5818 |
| C1 | 1,000 .. 10,000uF @ min.4V | |
| LED1 | White high-power LED (Luxeon, Cree...) | |
The smoothing capacitor reduces flicker at low speed and gives a slight increase in brightness. The larger the capacitance of capacitor C1, the less flicker. C1 requires at least 4V, and the capacity is not limited. Therefore, the only small limiting factors are cost and capacitor size. The circuits work with both hub dynamos and bottle dynamos. Hub dynamos require a larger capacitor to reduce flicker more effectively.
Some tips:
Capacitor C1 can be installed inside the headlight housing, where it must be properly connected to the LED. If the LED is disconnected from the circuit, the capacitor is charged to a fairly high voltage (up to 100 V when driving fast). This is not only life-threatening, but reconnecting the LED causes excessive current, which can even ruin the LED. This is true for most of the diagrams on this page.
Methods for restoring headlight reflectors
It is possible to return the mirror surface to headlight reflectors. There are special tools for this:
- metallized tape, which is usually used for gluing foil joints;
- self-adhesive with a mirror coating like Oracal (Oracal);
- aluminum foil, which must be glued to the reflector with glue;
- special paint for headlight reflectors.
The main thing is to wash, remove rust, and degrease before restoring the mirror surface.
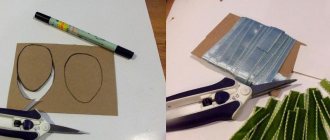
Method for restoring stickers of foil, film, tape:
- Prepare materials, scissors, screwdriver, knife.
- Clean the surface to be restored and degrease.
- Cut the tape to the required length, first stick it on smoother surfaces, and use your fingers to expel the air.
- Cut tape for the concave surface and stick it on.
If you choose foil gluing, you will need epoxy glue. Glue the foil onto this glue. The drying time of the glue is long.
The disadvantage of using glue is that when the light bulb in the headlight heats up, the release of harmful substances from the glue begins, which fogs the headlight glass. After about 3 months the glass becomes dull.
Painting the headlight reflector
This method is easier and more convenient. No need to fuss with glue. You need to buy spray paint in a can in the color white chrome. You also need to buy aerosol varnish in a can.
- Degrease the surface, dry it, apply one coat of varnish by spraying.
- Let the varnish dry. Shake the paint can and apply the chrome mirror paint evenly.
- Wait about ten minutes and spray the second coat.
- Allow to dry completely.
There is also a way to create a mirror look using silver powder.
The operating procedure is as follows:
- Degrease the reflector. Apply one coat of black nail polish.
- Let dry.
- Take the powder with your finger, it’s called silver powder, and rub it into the painted surface.
- Rub in until the black varnish is visible.
Maybe there are some other ways to restore the shine of the reflector and headlights, please share in the comments. Thank you for reading the article.
Glowing bottom
We immediately warn you that tuning the light for the bottom of the car is illegal, since the changes are not provided for by the manufacturing plants and car designs. But this does not stop many car enthusiasts, so it’s up to you to make such an upgrade or not.
Previously, “lower” tuning was done using neons, but it was quite unprofitable and tuners switched to LED backlighting, which is much easier to install and consumes much less electricity.
- Waterproof LED strip.
- Soldering iron and everything needed for soldering.
We measure the size of the bottom and cut the tape to the desired size. It's good if you get 4 pieces. After which contacts are soldered to each piece. Then we install them on the bottom of the car using clamps, so it will hold much stronger than if you glue it with glue.
Route the wiring through the holes, connect to the dimensions, or make a separate power button.
The procedure for illuminating the bottom, like the others, does not require special knowledge; even a novice car enthusiast can cope with it. The main thing is not to catch the eye of a traffic police officer with such tuning.
In conclusion, we note that light tuning is an inexpensive and effective way to distinguish yourself. You can implement it on your car in a short time, so don’t be afraid to experiment, and the result will be excellent.
Currently, LED optics are one of the most popular types of flashlights. LED and high-quality headlights for a car allow you to improve the luminous flux and are an integral element in the case of tuning. In this article we will talk about the advantages of these headlights and how to install diode bulbs in the headlights.
Settings
If it is not possible to set up the system at a car service center, you can do it yourself. To do this, you will need a flat area with a wall or a solid fence opposite it. This is a prerequisite for any adjustment option.
Low beam
In this case, it is easier to use a universal method, which is almost the same for all cars. Only the distance from the wall to the car can differ; most often it is 7.5 meters , but some models are placed 5 meters away; it is better to clarify this point separately in order to correctly adjust the light. Next you need to prepare the markup.
- The car is driven close to a wall or fence, then marks are made on the surface clearly in the middle of the low beam headlights and opposite them. These will be the main guidelines.
- Then you can drive the car away and start drawing. Two more marks are placed 5 cm below the center of the headlights and connected by a horizontal line. Vertical lines are also drawn through the points to provide a clear reference point.
- The central axis of the machine is determined and also marked on the wall. The end result should look something like the diagram below.
Then you can start setting up. It is important that at least half a tank of gasoline is filled in the car, and that a person is sitting in the driver’s seat or there is a load approximately equal in weight to the driver. The easiest way to adjust headlights near a wall is this:
- The car is located at a distance of 5 or 7.5 meters, and the center line should coincide with the middle of the hood. It is important to position the car correctly.
- The hood is opened and a screwdriver or other tool is prepared for adjustment. The light is turned on and one headlight is covered with cardboard or any other opaque element.
- The upper edge of the light flux (it is clearly visible) should be located along the line. If it is displaced, adjustment is made with the corresponding screw that regulates the light in the vertical plane.
- Adjustment in the horizontal plane must be done so that the place where the luminous flux begins to rise is at the vertical mark opposite the headlight.
The second method is in many ways similar to the first, but in this case you will need to place the machine at a distance of 10 meters from the wall. In this case, the horizontal line is drawn 12 cm below the center. Some argue that increasing the distance allows for greater tuning accuracy, so if you have the space, you can try this option.
Before adjusting the light, do not forget to set the headlight range control to zero.
Video: A visual example of setting up the headlight.
High beam
The high beam headlights do not have clear lines, they distribute the light evenly, so the adjustment will be much easier. The preparation process is almost the same as with low beam, the main guideline will be a horizontal line 5 cm below the center of the headlights and vertical lines opposite the bulbs.
Malfunctions with turn signals and their elimination
As a rule, few problematic situations arise in this direction; most likely, this is ensured by the extremely simple and uncomplicated design of the devices. In extreme cases, it is not difficult to replace the turn signal yourself. But still, it is useful to know about some malfunctions, especially since the breakdown can be eliminated yourself.
So, what breakdowns most often occur in light indicators:
1. The filament in the incandescent lamp burns out. 2. The contacts in the switch and breaker burn out. 3. The winding or resistor burns out. 4. Fasteners become loose. 5. Wires and devices oxidize.
As for burnt-out lamps, resistors and windings, they will have to be replaced with new ones. In relation to burnt contacts, clean them with a file or treat them with medium-sized sandpaper and blow them with air. Oxidation of wires and other places is combated by thoroughly cleaning them and installing them in place with reliable fastening.
In many cases, it is quite affordable to repair breakdowns on your own, provided you have minimal knowledge of certain skills, however, this is what our website is dedicated to, here even those who have never tried to repair any component in a car on their own will find a lot of important and useful information for themselves .
Self-recovery
Yes, factory technology is the most complex. But it is also the most effective. Alas, in home or garage conditions, chemical metallization or vacuum deposition looks like unattainable tasks.
Please note that by doing the restoration of the headlight reflector purely with your own hands, you will be able to achieve an average result in terms of brightness and quality of the glow. You should not count on a return to factory standards.
Therefore, think about whether it is worth investing time and effort into restoration, or whether it is easier and more profitable to simply purchase a new reflector, or completely change the headlights.
Regardless of how you decide to restore the optics, first you will have to get to the reflector. To do this, the headlight must be disassembled.
There are 2 options here:
- Walk along the seam repeatedly, applying hot air to the headlight through a hair dryer. The melting point of the sealant is about 75 degrees and above;
- Use the oven and place the headlight in it for 20 minutes at 100 degrees Celsius.
If you act carefully, you won't ruin anything. As a last resort, in St. Petersburg, Moscow, Volgograd and many other cities you can buy new optics. Both at showrooms and through stores.
After disassembling the headlight, remove any remaining old sealant.
The use of cleaning products containing alcohol is strongly discouraged.
After cleaning the surfaces, dry everything thoroughly and prepare for assembly.
To restore the coating, you can use 4 methods suitable for garage conditions.
Metallized tape
To give the reflector a mirror effect, you can use special metallized tape.
Scotch foil is sold in all hardware stores and costs literally several tens of rubles. The adhesive layer withstands different temperatures well, and the aluminum film is wear-resistant.
The task is to form segments from several strips to the desired shape of the reflector, then remove the protective film and carefully glue everything. Before applying tape, be sure to degrease the surface.
The method gives a long-lasting effect, costs little and is easy to implement.
The downside is that after pasting, seams and irregularities remain, and this can significantly affect the efficiency of the reflector.
Metal foil
It is not uncommon to restore a headlight reflector using aluminum foil. This is due to the fact that the material has excellent reflective properties.
Additionally, you will need to use a small amount of epoxy.
To get an even layer and a smooth surface, it is better to first make a pattern from paper, and then duplicate it using aluminum. A thin layer of epoxy resin is applied to the reflector, and foil is applied on top.
The big plus is that this coating remains resistant to any temperature.
But there is also a downside. There is no air between the plastic base of the reflector and the foil, which is why drying takes a very long time. The glue, which then dries, cannot be removed. Therefore, it is impossible to restore the same reflector again.
When tape foil appeared, this method was almost completely abandoned.
Chrome paint
If previously it was possible to use silver paint, now white chrome paint is in demand.
This is currently the most popular method for restoring reflectors. There is no need to cut or glue anything.
It is enough to take a can of white chrome, degrease the surface first, and then spray the paint evenly. The tone should be even and neat. Then the headlight only needs to be dried, following the recommendations of the chrome paint manufacturer.
The advantages include the ability to obtain a perfectly flat and smooth surface. You can also apply metallic tape first and then a layer of paint on top. This will only increase the effect of light reflection.
But the disadvantage of paint is that it does not withstand elevated temperatures well. If possible, use paint that has good heat-resistant properties.
Mirror film
If paint for reflectors is not suitable for one reason or another, you can use mirror film.
This is a special self-adhesive material produced by Oracal. A very famous manufacturer among motorists. Moreover, films of the 351 and 352 series perform best. Their advantage is that they are able to withstand temperature changes ranging from -40 to 120 degrees Celsius.
The motorist's task is to create a template from paper, from which the necessary element for pasting the reflector is then cut out. Pasting occurs using a hair dryer. It is important to try to prevent bubbles and kinks from forming. Joints and edges can be further treated with chrome paint.
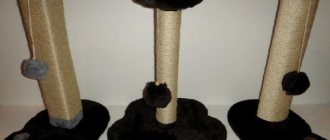
LED strip running lights
To implement such technical requirements in practice, we will assemble DRLs from LEDs with our own hands, using a 5050 type tape with a density of 60 pieces/meter. To get this brightness, you need to cut about 24 LEDs, that's 8 sections.
You can glue the tape around the perimeter of the headlight onto the existing adhesive coating. A more reliable option is to use a cable channel and secure it with epoxy glue, this will be more reliable. As a result, you will get a structure like this:
Do-it-yourself flexible DRLs are made using the same principle.
To ensure that the tape lasts as long as possible, stabilize the voltage at 12 volts. When the engine is running, the voltage in the on-board network can reach values of more than 14 volts. The easiest way is to use a linear stabilizer ROLL or L7812.
Automation options
It is quite possible to install an automatic switch and switch that will be responsible for the low beam with your own hands. But first you need to decide which method of implementing the scheme suits you best than the others.
There are 3 current options available:
- switching on when ignition is activated;
- Automatic switching on of the optics after starting the engine;
- using a special light sensor.
Each low beam automation scheme can be implemented in a garage. But if you do not have the necessary skills, doubt your capabilities, or simply want to get a guaranteed result, seek help from specialists.
Light sensor
On many foreign-made cars, the factory equipment already includes a special device that automatically turns the car's optics on and off. They work in tandem with a light sensor.
The device responds to changes in lighting levels. If the sensor detects darkening, the headlights turn on. When the car is on a bright section of the road, it automatically turns off. In many countries this function is very useful and convenient. But not quite suitable for the Russian Federation.
It's all about the requirement to constantly, day and night, drive with low beams or daytime running lights on. Therefore, in this situation, the operation of the sensor has to be adjusted.
Turning the low beam on and off should become a habit for drivers in the absence of an automation system. If you forget about the lighting before you start driving, you may be fined. If the automatic shutdown does not work or is simply absent, the turned on headlights on a parked car will drain the battery by the morning.
Drivers who cannot train themselves to turn lights on and off as needed are best off using an automation tool. One of them is considered a special sensor.
Motorists are offered the option of making the device themselves, or purchasing a branded device. Here we definitely need to stick to the second option. The following recognized companies offer automatic headlight switching and switching devices:
Most devices are based on a light sensor. And this, as you already remember, does not comply with the traffic rules in force in the Russian Federation. This is not a problem, since some devices are reconfigurable, allowing you to adapt them to slightly different work.
Light sensor
There is no need to describe in detail the nuances of installing a device with a light sensor. Each manufacturer completes its products with detailed instructions. They may differ from each other in the installation method. But in reality there is nothing complicated here.
Experienced drivers advise installing the light sensor not outside, but towards the interior, in the area of the rear view mirror, where it is usually located on cars with factory-made sensors.
Among the options presented, installing a sensor is considered the least practical and rational way to automate the switching on and off of optics. Yes, in certain situations the device greatly simplifies driving, since the driver does not have to be distracted by switches.
But at the same time, light sensors do not always adequately respond to the traffic situation. Some road sections can cause the controller to go crazy as dark areas quickly give way to light areas, and this happens constantly. As a result, the headlights turn on and off. It is unlikely that the traffic police will like this. And the driver himself will experience serious discomfort from such light and music.
Ignition
A good option for turning on the low beam automatically on a car involves using the ignition. The idea is for the headlights to turn on after the ignition is turned on.
To implement the circuit, you first need to connect the lighting fixtures to a power source. Since some devices are connected regardless of the position of the ignition switch, and others only after ignition, you need to choose the right source. The most preferable solution is a button to activate the stove.
Video “Independent installation of a diode strip in the optics of a VAZ 2110 car”
Using the example of VAZ 2110 headlights, you can familiarize yourself with the process of installing an LED strip in the car’s optics (the author of the video is Vyacheslav Shitov).
Together, lighting and signaling devices located on the outside of the vehicle create a lighting system designed to perform important functions. Headlights provide visibility of the road surface, roadsides, and objects located on the road and in its immediate vicinity. Turn signals are necessary to warn traffic participants about the presence of other vehicles on the roadway, their size, direction of movement, maneuvers being performed and their ownership.
Car shops and salvage yards are not always places where a motorist can easily find the necessary optics, so it is extremely useful to have information on how you can fix some breakdowns on your own. It should be noted that self-repair of headlights is available to almost every motorist, but, unfortunately, not everyone succeeds in doing it as needed.
This is exactly what our website is dedicated to, where every car enthusiast who decides to repair his vehicle on his own will be able to find useful information, in particular regarding the repair of automobile lighting devices.
Impact on optics
Iron can still be welded and straightened, puttied and tinted, although this costs a lot of money. But car optics are the most vulnerable to travel errors. Oncoming or overtaking vehicles scatter the fine gravel of the destroyed pavement with their wheels. First of all, the glass of the headlights of VAZ and Moskvich classics bursts and cracks appear on the plexiglass of block illuminators of foreign and domestic cars.
If the cracks and chips are minimal, then it remains possible to save the headlights and not throw away a lot of money on the purchase of new lighting fixtures. There are different ways to polish your headlights yourself. Although the restoration will cost a pretty penny. And so on until the next travels around our native expanses.
And even if you drive only on priority roads in the Russian Federation, after a few years the headlights still become dim, the beam illuminating the road at night scatters, and does not even catch the side of the road if it is not separated from the asphalt by a solid white stripe. Everything comes from low-quality materials from automakers, especially Chinese auto giants rushing to Europe and overseas.
On the other hand, modern lighting devices (lamps) in headlights get very hot when the lights are turned on and are minimally cooled by radiator-air cooling. Then so many Kelvins splash out from halogen lamps, gas-discharge xenons and bi-xenons that they are enough to melt metal.
The polishing of metal lenses also “floats away” from this incredible heat. The headlights shine less brightly, the luminous flux becomes worse and worse, and the transparent housing of the plastic headlights becomes cloudy.
Over time, you can’t help but think: how can you polish headlights at home? Wipe it, don’t wipe it, it’s not mine, and these old-fashioned methods can’t restore transparency.
Either professional restorative polishing is required, or the motorist himself must obtain the knowledge and skills for garage headlight maintenance. You will also need to purchase the best headlight polishing products.
How does the LED optics control system work?
In principle, there is nothing complicated about the operation of the LED optics control system. Of course, if you decide to install a complex adaptive system in your car that can be used without fog lights, as well as daytime, high and low beams, the question is a little different. To create such a system, you must have certain knowledge in the field of diode optics control devices.
Multi-colored LEDs for cars
In short, any LED optics control system functions as follows:
- Adaptive optics can adjust the light flux not only depending on the speed at which the car is moving. If the car is equipped with surveillance cameras installed at the rear and front, this will allow the light beam to be adjusted correctly so as not to cause inconvenience to oncoming drivers.
- The control unit allows you to capture the oncoming light beam and, accordingly, turn off the necessary LED sections that can blind the car owner.