A faulty spark plug leads to a loss of power in the car. If the engine operates for a long time with an inoperative part connected to it, the power unit may be damaged, which will affect the functioning of all vehicle systems. Therefore, it is important to monitor the performance of these elements. To check the spark plugs, just contact a car service center that has the necessary equipment. But you can do without extra costs, since even a beginner can make a device for checking spark plugs with his own hands.
How to make a spark plug tester » Inventions and homemade products
Making a simple ignition tester with your own hands
One of the most common breakdowns in gasoline cars is ignition problems. In this article we will tell you how you can easily and simply make a portable ignition tester for your car using available materials. We need:
- syringe (20 cubes)
- the wire
- spark plug (any old or unwanted one will do)
We cut off the thread of the candle in a circle. We will use it as a connector for connecting the ignition module or high-voltage wires.
You should end up with something similar to this: you need to cut the threads, but leave the insulator intact.
We take the syringe and cut off its nose. We also remove the piston. We make a hole strictly in the center and insert our candle there. It is best to make the hole using a soldering iron. This is what the picture should ideally look like:
After this, glue the candle to the syringe using thermal or superglue. We make a hole in the center of the piston, insert a wire into it and also secure it. On the other side, we attach a crocodile clip to the wire. We will hook it to ground.
We insert the piston into the syringe and get a fairly simple spark gap. In addition, we also change the distance to the spark. When checking, it will not matter to us whether the car has a common ignition module or a separate one. We hook the crocodile to ground, remove the high-voltage wire from the car and put it on the tester. If everything is good, then we will see a spark inside the syringe.
zen.yandex.ru
How to check spark plugs for spark without a device? 100% method!
The engine has stalled and refuses to start... the picture is very sad. But don’t despair: one of the most common reasons is a simple lack of spark due to faulty spark plugs. Replacing spark plugs takes a maximum of 20 minutes, after which you can safely drive on. Therefore, you need to know how to check their functionality. Location of candles. May experienced drivers forgive me, but I cannot help but mention where the spark plugs are located. It is unlikely that anyone will look for them in the glove compartment or trunk, but still... The spark plugs are located in the spark plug wells in the engine cylinder heads. Roughly speaking, we find the engine, determine where the cylinders are. After that, on top of each of them we find a candle well. Attention, the wells may be under a decorative casing. After the spark plugs are found, you need to unscrew them. To do this, we use a spark plug wrench (on some cars, the spark plugs are heavily “recessed” into the wells, so it will be difficult to access with a regular wrench; you will need a special one). Next, we check the spark plug for serviceability. Using the old-fashioned method, we do it this way: we insert the spark plug base into the tip of the high-voltage wire and lean the spark plug against any large unpainted (!) part of the engine (which is called “ground”). In this case, you need to ask someone to “turn the starter.” If the spark plug is working properly, a blue spark will be visible running between the electrodes. You can only touch the spark plug insulator with your hands! A short-term electric shock of several thousand volts is practically safe for health, but extremely unpleasant. As an alternative to this method (or if it is inconvenient to lean the spark plug against ground due to the design features of the engine), you can use a multimeter to check the spark plugs for a short circuit. The testing algorithm is exactly the same: one multimeter wire to the base, the second to the spark plug thread. https://zen.yandex.ru/media/vladimirskiy_tyazhelovoz/
Homemade car spark plug tester
Hi all! Almost every car driver has encountered a problem when it was necessary to check the ignition system, namely the car's spark plug. We can do this ourselves, without the help of a car service specialist.
First you need to remove all the spark plugs from the cylinder head. Then you should look at them carefully to see if there is any soot residue. If there is soot, you should take a piece of fine sandpaper and remove it. The second thing you need to pay attention to is the play between these two electrodes; it should be 0.7-0.9 mm. If it is smaller, you need to bend the side electrode a little, and if there is more play, you need to bend it a little. Additionally, we must check the spark plug to see if it produces a spark. You can do this by tying four plugs together with a wire, insulating it and connecting the high voltage wires, turning the engine with the starter, watching for a spark. The problem is that it requires two people. You need to spin the engine using the starter and see if there is a spark from the spark plug. Today I will show you how to make a simple spark plug tester. For testing we will need a small alligator clip with a wire, another large alligator clip, a piezoelectric lighter element and a spark plug. First you need to solder it all correctly, and then insulate it. Spark leakage must be avoided. If you're in a tough situation where you don't have the tools but you do have a piezo lighter, you can also test the spark plug this way. This is all. Thank you for your attention. Be careful and drive safely! Bye bye! https://crazyinvent.com/
Making a homemade spark plug tester
Every car enthusiast has more than once encountered such a problem that it is very urgent to check the car’s ignition system, namely the spark in the spark plugs. It is very easy to do this yourself, without seeking help from specialists who work in service centers.
How to do this - watch the video:
[media=https://www.youtube.com/watch?v=Q11-euJBv4s]
To create a tester you will need:
- candle; — crocodile with wiring; - big crocodile; - piezoelectric element from a lighter; - soldering iron; - electrical tape4 - glue gun.
The first step is to remove the spark plug from the cylinder head and carefully inspect it. Be sure to pay attention to the presence of carbon deposits on it and its quantity. If carbon deposits are present, it can be removed with a small piece of sandpaper, thoroughly cleaning everything. But remember that you need to use the finest sandpaper.
What else we pay attention to during inspection is the gap between the two outer electrodes. It should be 0.7 - 0.9 mm. If the gap is slightly smaller, then in this case the side electrode should be slightly bent to the required distance. And if it turns out to be larger, bend it a little.
In addition, you need to remember that you should check the spark plug itself to see if it produces a spark. There are several ways to check this. For example, tie four spark plugs together with wire, which is grounded to the ground of the car. After this, connect the ends of the high-voltage wires. And then crank the engine with the starter and watch for the spark. The disadvantage of this method is that it requires two people. one will crank the engine with the starter. And the second one is to watch for the spark.
Therefore, we offer a simpler option for checking the spark plug.
We solder the wire from the small crocodile to the piezoelectric element, which in turn is soldered to the large crocodile. The soldering areas are carefully insulated using electrical tape. This is necessary so that the spark does not break through anywhere. You can also fill the insulation areas with hot glue.
Once the structure is assembled, you can proceed to testing. Crocodiles are attached to different ends of the candle and the piezoelectric element is pressed. You can immediately see whether the spark plug produces a spark.
Delivery of new homemade products to the post office
Receive a selection of new homemade products by email. No spam, only useful ideas!
*By filling out the form you agree to the processing of personal data
Become the author of the site, publish your own articles, descriptions of homemade products and pay for the text. Read more here.
Why doesn't the candle work?
In addition to electrical reasons - breakage and breakdown, failure or unstable operation of the spark plug can be caused by trivial things. For example, an incorrect gap. We look at the car's operating manual, take the correct feeler gauge to determine the gap and bend or straighten the contact. Another reason is carbon deposits. Carbon deposits, especially black, greasy ones, can be caused by low-quality fuel, improper adjustment of the engine power system - old drivers talk about this phenomenon as “overfilling”. Or, in the worst case, wear of the oil scraper rings. Which is fraught with engine disassembly and repair. The spark plug is cleaned of carbon deposits using various mechanical and chemical methods. The simplest thing is to remove carbon deposits with a metal brush and rags, and additionally clean the electrodes with sandpaper. If the spark plug is clean and the gap is set correctly, we check for electrical problems.
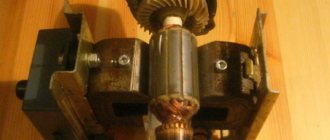
Do-it-yourself spark plug test stand
Hello to all DIY lovers.
In this article I will tell you how to make a stand for checking spark plugs with your own hands. This stand will help determine the condition of the spark plug, as well as look at its operation under pressure. It will be useful for those who independently maintain their car and also carry out minor repairs. Before reading the article, I suggest watching a video with a detailed process of assembling a stand for checking spark plugs, as well as testing it in real conditions.
In order to make a stand for checking spark plugs with your own hands, you will need:
* Car portable compressor running on 12 V * Switch with wiring from a Zhiguli car * Ignition coil with armored wire * Two toggle switches * Computer fan with three leads * Variable resistor * Soldering iron, flux, solder * Small piece of hose * High pressure chamber with thread for a spark plug * Sheet of metal 2 mm thick * Welding machine * Spray paint * Welding mask, gaiter * Safety glasses, headphones, gloves * Angle grinder, cutting wheel * Electric drill
Step one.
The main part of the stand is the high-pressure chamber.
It was ordered from a turner, but if you wish, you can make it yourself if you have a metal lathe. This camera is made from a round metal blank, a hole is machined in it and a mirror is inserted at an angle of 45 degrees, threads are cut on the body and on the lid. The lid contains plexiglass with a thickness of about 4 mm, for a tight fit there is a rubber ring inside the lid, and also on the body itself there is a ring, but of a larger diameter, which ensures the greatest sealing.
A hole is drilled on the body itself and a thread is cut for the spark plug, and a bleed valve is welded 180 degrees relative to this hole, the role of which is played by a nipple; it is designed to relieve pressure in the chamber before unscrewing the spark plug.
Also on the body itself there is a fitting for connecting the hose to the compressor; two holes are drilled on the same side and threaded for installation on a stand.
Step two.
Next we assemble the electrical part.
We connect the parts according to the diagram, after which we check the circuit in operation by connecting the 12 volt power supply.
When the power is connected, the fan starts spinning and the ignition coil produces a spark, and using a variable resistor you can change the frequency of the spark, that is, simulate engine speed.
After checking, we solder the wires securely using a soldering iron and solder, for better soldering we use flux, then we insulate the bare wires. Step three.
We cut out parts of the housing from a sheet 2 mm thick using an angle grinder; there are no special requirements here, the main thing is that all the parts of the stand fit inside the housing.
When working with an angle grinder, be careful and wear safety glasses, gloves and headphones.
Then, using a welding machine, we weld the body from sheets of metal.
When working with a welding machine, do not forget to use a welding mask and leggings.
Next, we install all the parts inside the housing, screw the ignition coil to the bottom, and the switch to the wall, and also screw the compressor. To remove air, drill holes in a circle in the side wall and install a fan.
To regulate the speed of rotation, we screw a variable resistor onto the top cover into pre-drilled holes, as well as two toggle switches, one for turning on the compressor, the other for turning on the ignition coil and fan. We also screw the high-pressure chamber onto the top cover using two bolts, and connect the hose from the compressor to its fitting. From the housing we take out the wires for connecting the power supply and the armored wire with a socket.
Step four.
The final stage is painting the finished stand using a can of paint.
We turn on the compressor start toggle switch and see that the spark has increased, approximately under these conditions the spark plug works in the engine.
If there is a spark breakdown in the body, then the spark plug can be considered unusable.
That's all for me, thank you all for your attention and creative success. Delivery of new homemade products by mail Receive a selection of new homemade products by mail. No spam, only useful ideas!
*By filling out the form you agree to the processing of personal data
Become the author of the site, publish your own articles, descriptions of homemade products and pay for the text. Read more here.
Spark plug tester
Each spark plug has a specific lifespan, although with our extreme operating conditions, this lifespan may vary. Although you can simply replace the candles in advance, it happens that the candles cost a tidy sum. For this occasion, there are devices for checking and adjusting candles. I’ll tell you about such a tester now. When purchasing new spark plugs, stores usually tested them and showed how they produced a spark, but this was the case with new spark plugs. I haven't seen new spark plugs that don't work. But when you have old spark plugs on your hands, and for example, there is a misfire error in a certain cylinder. You can do this using the old-fashioned method, using a “spark”. Quite a dangerous method, especially when the high-voltage cable pierces you and you are wearing slates. After one of these tests, my finger still twitched for a long time, since the ignition coil can generate up to 25-30 kV voltage. In general, not a pleasant action. So, to check the operation and adjust the gap, such a device exists. Box with 2 sockets for installing a candle and a power supply.
Power supply with Euro plug. A long wire of 1.5 meters to connect the device to the electrical network.
The block has its own serial number
Power supply characteristics. Power supply is 220V, but the output is 12V and 1.5A. There is no indication of connection to the network. The tester itself is a plastic box with 3 operation indicators, 2 holes for installing a spark plug, as well as a voltage regulator.
It is not necessary to test 2 candles at once; you can try one at a time. Apparently the spark plugs were installed from different cars, with different sizes.
The meaning of verification. We install the spark plug(s), connect the power supply to the network and use the voltage regulator to check the spark. The regulator has divisions up to 6000V. In this case, when the tester is turned on, the indicator located next to the regulator, as well as next to the installed spark plug, lights up. After switching on, the indicators light red. Don't pay attention to the wire on the right side, I use it to measure voltage and more on that below.
And after the voltage starts to be supplied, the indicators light up green. Well, a spark will be visible on the candles.
I'll probably move on to tests. It became interesting how much the stated voltage that is indicated on the regulator corresponds to the actual one. Connect to a kilovoltmeter. 1000v
2000v
To the maximum. The sound is like a stun gun and there is a smell of ozone.
Well, after the tests you can see what's inside. It is easy to disassemble, there are 4 screws at the bottom of the box, so we unscrew them. On the top cover there are holes for installing spark plugs and one of the contacts.
Tester board
in more detail
To summarize, we can say that it is quite an interesting and visual device for checking spark plugs, as well as adjusting them. Most spark plugs from modern cars are suitable. The voltage is slightly too high, which may be even better for testing. And don't forget about the safety of electric shock.
At the time of sale, you can slightly reduce the price with coupon
L1515K
to $19.36
The product was provided for writing a review by the store. The review was published in accordance with clause 18 of the Site Rules.
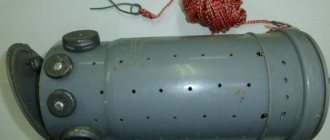
Factory product
Factory made tester.
The factory device for testing spark plugs under pressure has the following main components:
- a pistol-shaped body equipped with a special tip that acts as a probe;
- indicator light;
- a plastic cap containing a core inside connected to a wire;
- There is a small generator located inside the device, its purpose is to diagnose the performance of the SZ.
When checking the serviceability of the SZ using the device described above, there is no need to start the engine - this allows you to save fuel mixture consumption.
The performance of the SZ is checked in this way:
- inspect the SZ, if there are external defects (carbon formation, damage to the integrity of the spark plug body, damage to the contacts), replace the products with new ones;
- disconnect the high-voltage wire, install the plastic cap of the measuring device in its place;
- rest the tip of the “gun” against the cylinder head;
- Press the button of the measuring device several times, while watching the indicator light; the presence of flashes on it indicates the serviceability of the diagnosed SZ.
Please note: the absence of sparking during diagnostics indicates a malfunction of the tested spark plug.
The main drawback of the device is the measurement error; it is impossible to judge by the presence of a spark that the spark plug is 100% serviceable: the pressure created by the “gun” differs from the pressure parameter acting inside the engine. The generated spark may not have enough power to ensure normal operating characteristics of the power unit.
Homemade tester for checking the ignition system
In gasoline cars there is often a need to check the ignition system; I suggest making a very simple tester for the ignition system. For these purposes, we only need a 20 cc medical syringe and a piece of ordinary wire.
We also need an old spark plug; we need to cut the threads around it (with a grinder).
We will use it as a connector for connecting high-voltage wires or the ignition module.
The result should be something like this, a cut candle with a whole ceramic insulator but with a cut metal thread.
Next, take a 20 cc syringe, bite off the spout, we don’t need it,
remove the piston. You need to make a hole in the center of the syringe and insert a candle there. It is best to make a hole with a regular soldering iron; we expand the hole with a soldering iron so that the candle completely fits into the syringe. The candle should fit into the syringe.
The candle needs to be glued to the syringe with simple hot glue. We drill a hole in the center of the syringe piston; we will need to insert a piece of ordinary wire into it.
We insert the wires into the drilled hole and glue it with hot glue.
We attach a crocodile to the opposite end of the wire, which we will connect to the ground of the car.
We insert the piston back into the syringe, you get this kind of spark gap with a variable distance for the spark.
And in order to prevent the markings on the syringe from being erased, we wrap the syringe with several layers of tape.
Well, now the tester is in action... it doesn’t matter whether we test a system with a common ignition module or with separate ignition coils for each cylinder.
In my case, this is a common ignition module, from which wires go to each spark plug separately. We connect the wire from the tester somewhere to ground, remove the high-voltage wire from the spark plug (which we will test) and put it on the spark plug that we cut and installed in our homemade tester.
This way we can observe a spark inside the tester. Manually we can increase the spark gap and look at the maximum distance the spark strikes. So, we start the car with three spark plugs, move the syringe plunger and look at the spark. A spark is visible in the syringe; move the syringe as far as possible until the spark disappears.
In my case, the spark began to disappear more than 3 centimeters, the norm is considered to be at least one to two centimeters. In this way, all cylinders are checked and a broken wire or faulty ignition coil is very easily identified.
With such a simple homemade product you can easily determine the malfunction of the ignition system, thank you all and have a smooth road.
How to make a simple spark plug tester
To quickly identify faulty spark plugs, you can make a device that is very simple and inexpensive to manufacture. With its help, used and defective spark plugs are calculated, which do not produce a spark and must be replaced.
Materials:
- Battery-powered electric lighter for a gas stove, can be purchased on Ali - https://ali.pub/47r2ev;
- large and small alligator clip;
- 2 M4 screws with nuts;
- 2 AA batteries for the lighter;
- a piece of stranded wire.
Assembling a spark plug tester
The device is made on the basis of any kitchen electric lighter. When purchasing it, you may mistakenly take a gas lighter. You need one that does not burn, but only generates a spark for ignition and is powered by batteries. The lighter body is disassembled. You need to remove the metal rod coming out of it; it will no longer be needed. The wires connected to it are disconnected. There are 2 holes made in the upper front half of the body. A large clamp is screwed through them onto the screws. It must be positioned in the same way that the removed rod was secured.
A wire from a lighter coil is connected to the crocodile. It will also require drilling or burning a thin hole in the housing. The second wire needs to be brought out from the side. For this, a separate hole is drilled. To make it wear out less, it should be protected from fracture with heat shrink. A small clip is attached to the end of the wire. Most likely, the length of the existing wiring will not be enough, then before installing the heat shrink and clamp, you will have to extend it with a small section of 15 cm.
The device body is assembled and 2 batteries are installed in it. For aesthetics, you can cut the insulator removed from the large clamp lengthwise. The resulting segment is glued to the bare crocodile handle, screwed to the body.
To test a candle, it is clamped in a large crocodile on the threaded part. A small clip is placed on the contact tip. After pressing the button, the high-voltage converter delivers a discharge to the spark plug. If it is working, then a striking spark should appear in its gap between the side and central electrodes. A spark plug that is not working will not have a spark.
Result
When testing with this device, it will be possible to reject only those spark plugs that are damaged, punctured, and unable to generate a spark. At the same time, some of the spark plugs tested on the tester will still not be able to work in the engine under high pressure conditions. But using the device will make it possible to weed out guaranteed worn-out spark plugs, which is very useful.
Watch the video
Arrester for 20..30 kV
The assembly sequence is shown below. It is practically no different from what was made for the spark gap from a bottleneck. Only the sizes of all the parts are larger.
Then all that remains is to assemble the arrester.
The spark gap works well with a spark length of up to 10 mm (in a housing made of 40 mm pipe) and up to 15 mm (in a housing made of 50 mm pipe), which corresponds to voltages above 30 kV.
With discharge energies of up to 10 J, the discharger lasts for several thousand pulses, after which it must be opened and the inside of the housing cleaned.
With a discharge energy of 120 J, the discharger lasts for several tens of pulses (closer to a hundred), after which it needs to be cleaned.
How to check spark plugs for functionality » Inventions and homemade products
5 Ways to Check Spark Plugs
Hello dear readers! In continuation of the previous topic “Determining what’s wrong with the engine based on the condition of the spark plugs,” I would like to consider another interesting and useful topic, namely, I propose to consider 5 simple and effective ways to check spark plugs for performance.
Checking the performance of the spark plugs should be done when your car begins to operate unstably (drop in power, interruptions in operation, unstable idling, increased fuel consumption).
So, let's begin…
5 Ways to Check Spark Plugs
Disconnecting wires
This is the simplest method that anyone can do and will be able to give a fairly accurate answer to the question about the performance of the spark plugs.
The first thing you need to do is remember how your engine sounds, then disconnect the high-voltage wires from each spark plug one by one (disconnect the wire from the spark plug, listen to how the engine behaved, put the wire back on). If the sound does not change when you disconnect the wire, then there is definitely something wrong with this spark plug.
Spark test
It’s also a very good method and quite simple.
To check the spark, you need to unscrew the spark plug, connect it to the wire and bring it to the cylinder head cover. When starting the engine, a spark should appear on the working spark plug, and it should be quite noticeable.
Gun
In some auto supply stores you can find a device that looks like a pistol. It's called a spark plug tester.
To check a spark plug with a gun, you need to insert the spark plug into a special socket, cover it with a cap on top, and pull the trigger. If the electrodes produce a spark, the device indicator lights up, and this means that the spark plug is working.
Piezoelectric test
Those who like to do everything with their own hands will also find an option. Even if you’re not an amateur, the pistol is nowhere to be found in stores.
I offer an option on how you can create a tester for candles with your own hands from improvised materials. An alternative to a pistol can be made from an ordinary piezo lighter.
To do this, you need to disassemble the lighter, take the piezo module itself, after which the wire coming from the piezo module is extended and attached to the tip of the spark plug. The piezo module block itself must be pressed against the candle body and the button pressed on it. If the spark does not jump through, then the spark plug needs to be changed.
Checking with a multimeter
And finally, let’s decide how you can check car spark plugs with a multimeter.
The answer may disappoint you, but not at all. That is, you cannot find out whether it is working or not using a multimeter, but you can determine the presence of a short circuit inside the spark plug. Attach one end of the multimeter lead to the spark plug input and the other to the thread. The resulting discharge should pass from one contact to another at a distance of about four millimeters.
How to notice a malfunction
There are a number of signs that allow you to notice a faulty spark plug even before checking it. The main sign of a problem is the inability to start the power unit due to lack of ignition in the system. Increased fuel consumption when the engine is running is also a reason to suspect a malfunction. To compensate for the loss of cylinder power, more fuel has to be used.
Spark plug
Other signs of faulty spark plugs include the following:
- The presence of outbreaks caused by improper operation of spark plugs, which is accompanied by interruptions in the functioning of the power unit.
- Stopping the engine after turning off the starter.
- Catalyst failure. The spark produced by the spark plugs ignites the fuel supplied to the cylinder. If this element does not operate correctly, excess fuel enters the catalyst and is then oxidized.
- Difficulties with starting the engine in the cold season.
- The presence of mechanical defects on the surface of the element.
- Presence of black deposits.
All the signs listed above allow us to suspect spark plugs as the main culprit of the malfunction. These elements must be checked under pressure using special instruments that are available in car services. However, there are several methods for testing spark plugs without pressure.