Neon lighting in a room is an unusual solution that provides uniform light of high brightness and is suitable for both vintage and modern interiors. It is important to choose the appropriate option and understand all the installation features in order to do everything correctly and ensure the safety of the system.
Neon lighting makes the room unusual.
Necessary materials for DIY creation
Today the market offers everything you need to create a neon sign yourself. The required materials and tools are listed below:
- aluminum pipe (preferably rectangular);
- aluminum profile;
- liquid welding;
- primer;
- sandpaper;
- dye;
- hacksaw for metal;
- side cutters;
- connectors for flexible neon;
- flexible neon.
In fact, everything is not as complicated as it might seem at first glance. Initially, you need to decide what the sign will look like. That is, create its layout. The best way to do this is to assemble a model from thick wire, which is secured with strong wire to hold its shape.
In the future, for the convenience of creating a neon sign in practice, the layout can be transferred to paper. The most difficult task in the process of organizing a sign is to bend the profile pipe so that it does not break or become wrinkled.
However, even if there are no obvious flaws in the bending of the pipe, it is still recommended to perform spot welding where the pipe intersects. This provides the sign with an additional level of durability. It is quite acceptable to use chemical welding (cold).
Frame assembly
Installation of a frame for a suspended ceiling is carried out in two ways and depends on whether the open or closed type of structure is used in each specific case. Option #1. Open design. It is the simplest option and can be easily done with your own hands. In this situation, there are two installation options:
- embedding;
- making holes;
- hanging a lamp under the ceiling surface. The weight of the lamp that is suspended should not exceed 10 kg.
This is because the frame and plasterboard sheathing will not be able to support more weight.
In this case, the frame itself is mounted using standard technology, which we will consider using the example of assembling a ceiling device with a niche. Option #2. Hidden design option. This method is somewhat difficult to do with your own hands. But if you follow the installation steps, even such a design will be quite feasible. Here the frame is installed according to the following scheme:
Installing the main profile
- first of all, you need to retreat 10 cm from the ceiling;
- then, using a level (laser or water level), we draw a horizontal line along the entire perimeter of the room;
- Along the marking line, we attach the starting profile to the wall using dowels. The fastening step must be 50 cm;
- Next, you need to insert the main ceiling profile into the starting profile. Its fastening is carried out using spacers (suspensions);
- for this profile you need to make a fastening step of 40 cm;
The result is a first base level, which at this stage should be covered with sheets of plasterboard. Using this scheme, we build an open type of structure. But you need to remember to do one thing - wire the central lighting. Usually it is played by a chandelier or small spotlights. Now you can start building a niche for lighting:
- draw the niche markings on the first level;
- we retreat 4-6 cm and attach the starting profile. This distance is equal to the width of the cornice;
- cut the profile into the required pieces using metal scissors;
- After that, insert the main one into the starting profile. It should be equal in length to the height of the second level. It acts as a suspension;
- on the bottom side, another starting profile should be secured to hangers;
- Then, using the ceiling main profiles, we connect the entire structure.
Assembled niche
Now the niche is ready and you can start covering it with plasterboard sheets.
Safety precautions
Do not forget about such an important aspect as safety precautions when working with chemicals. Although the recipes offered to you in this article will not contain caustic or toxic substances, it is still worth taking some protective measures:
- The container in which you will mix substances should be such that you won’t mind disposing of it later.
- Protect your body by wearing gloves, safety glasses, and a gown or other non-synthetic clothing.
- The workplace must be well ventilated.
- Keep children away from work.
Related article: Crochet summer jumpsuit for girls
Peculiarities
Today there is a wide range of materials for ceiling finishing works. Drywall with built-in lighting fixtures is one of the most popular and relatively budget-friendly ways to give the ceiling a sophisticated look. When using a plasterboard structure, you can experiment with different lighting options, for example, adjust the number of lamps, their configuration, and use only those devices that suit your preferences and taste.
The use of a suspended ceiling has a number of advantages:
- the plasterboard structure will mask all the unevenness and defects of your ceiling;
- There is no need to carry out preparatory work before installing a suspended ceiling;
- under the plasterboard structure it is possible to hide thermal insulation, electrical and sound wiring, and an exhaust compartment;
- large space for design ideas, for example, you can build a multi-level ceiling.
Like the positive aspects, any idea has its drawbacks:
- the use of a suspended ceiling is not recommended for low rooms; its height will be reduced by at least ten centimeters;
- installation of a suspended ceiling is quite simple and quick; you do not need to resort to the services of a work team, but electricity and lighting must be handled by a specialist. Often, incorrect wiring connections cause a short circuit.
Neon selection
In reality, real neon sign lights are quite expensive. A neon lamp is a gas-discharge lamp and consists of a figuratively curved glass tube filled with gas under low pressure. The color of the lamp depends on what gas is in the tube. For example, neon produces a red-orange color, helium produces a white-orange color, and argon produces a lilac color. However, regardless of gas, such lamps are still called neon. To light such a lamp, you need a special low-current and high-voltage transformer of several kilovolts, capable of “knocking out” electrons from gas molecules. The amount of voltage and current also affects the shade of the lamp. Neon transformers are expensive, and making them yourself will require serious calculations and electronic components. Well, blowing shaped glass tubes is a real art that requires remarkable knowledge, training and tools. Thus, making neon lamps at home is almost impossible.
Instead of using real neon lights, an excellent replacement is LED flexible neon. In essence, flexible LED neon is a regular or addressable LED strip in a transparent silicone shell. LED neon is cheap, its glow is as effective as a real neon lamp, and working with LEDs does not require any special skills.
For this project we used Arlight ARL flexible LED neon, which operates on 12V DC, with a cross-section of 8x16mm and a cutting ratio of 10mm. The standard size of flexible neon 8x16 mm is one of the most common, and it is not difficult to find.
In total, we purchased several neon coils of different lengths with different glow colors:
- Yellow, 5 meters.
- Warm white 3000K, 10 meters.
- Blue, 5 meters.
- Cool white 5000K, 5 meters.
- Red, 5 meters.
- Amber, 5 meters.
- Green, 5 meters.
What it is and how it works
Neon lighting in a room is a gas-discharge light source in the form of a tube. If earlier the material used to make the case was glass, now polymer shells are mainly used, which makes the products cheaper and makes them much stronger and more resistant to damage. Neon is pumped inside - an odorless, monatomic inert gas. When current passes through it, it begins to emit light.
Neon light is always orange-red in color; all other shades are also called neon, but other inert gases are used there.
Where can flexible neon be used?
The most common areas include:
- decoration of building facades, architectural monuments;
- design of advertising signs, banners and billboards;
- decoration of parks with illumination of trees and bushes;
- car design (body, interior);
- design of interior spaces of clubs, bars and other establishments.
Using flexible neon.
Types of built-in lighting for suspended ceilings
A suspended ceiling with built-in lighting is a luxurious, pleasant and elegant option to update your interior. All modern types of lamps are used for suspended ceiling structures.
- Spotlight lamp - suitable for illuminating a space at night and for separating or highlighting functional areas. This is one of the most budget-friendly lighting options.
- LED - has a long service life, provides the room with diffused light (uniform, illuminating all objects in the room).
- Classic - these are ordinary chandeliers that do not always fit into an interior with a suspended ceiling.
- Fluorescent lamps are great for economical and long-term use. Such lamps are often installed in non-residential public spaces. The only negative is that they are very sensitive to power surges in the network.
- Fiber optic - this type of lamp will create spectacular lighting for your room. Its cost cannot be called budget; it is quite expensive.
Neon lighting installation
Before starting installation work, it is necessary to draw up a plan for the placement of lamps, transformers, wiring, switches and interior elements. Then perform electrical equipment calculations. For neon lighting, it is better to use special components and wires with silicone insulation.
The neon tubes themselves are attached to lamp holders, which are pre-installed with screws or dowels on the surface of the wall, ceiling, floor, furniture and other interior elements in accordance with the diagram and plan. After they are installed, you need to install convectors - already calculated based on the power and length of the lamps (approximately 10 W per working meter of device length, so one converter is used for 7-8 m).
How to make a light bulb that glows in the dark
- Take our half-liter bottle of Mountain Dew and boldly pour ¾ of the liquid out of it. You can drink it if you don't mind the ingredients. Thus, only a quarter of the soda will remain in the bottle.
- Carefully measure out ¼ tsp. soda Carefully pour it through the neck of the bottle.
- Measure out 3 bottle caps of hydrogen peroxide and pour them one at a time into the bottle.
- Now screw on the lid and shake the mixture. If everything was measured carefully, then turn off the light and watch how our neon liquid glows in the darkness.
This wonderful liquid can be coated with an ordinary incandescent lamp. It is advisable to secure it to give the composition a chance to dry and then connect it to the network. You can coat a fluorescent lamp, a flashlight, and many other objects (for example, an electric guitar, a sign, a mask, Christmas tree decorations) with a neon composition.
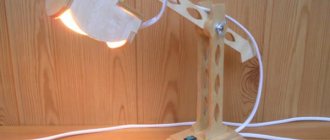
To all brain friends
, good day! Here is a guide on how to create another brain light
, which, however, stands out from everyone else with its “coldness” :).
I collected three of these “cold” homemade products
, each of which glows in its own color, and I believe everyone can do it with their own hands
make one like this for yourself.
For this you need (components are designed for 3 lamps):
- several spare parts from a copper lamp
- three bulbs from 300W light bulbs (small or large, your choice, or a glass bottle or something similar)
- 6 UV LEDs and resistors for them for 9V
- 3 9V batteries
- 3 switches
- textile braided cable
- acids and potassium sulfide for coloring
- thin wires
- distilled water
- glue gun
Step 1: Stand or Case
First you need to separate the bulb bulb, and there are many tutorials
. Be careful and careful during this process, as the glass of the flask is very fragile!
The second photo shows pendants with empty flasks, and the third with painted bases.
Next, we glue a UV LED into the stand, directly under the bulb, and solder the second UV LED in parallel using a braided cable. Leave this cable long enough so that it can be trimmed if necessary.
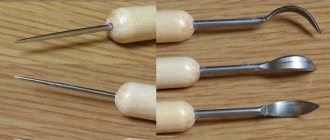
Step 2: Flask Holder
Connecting your brain imagination
We make three flask holders, I made them in the form of spirals.
Then, calling Dremel and Proxxon to help :), we cut the test tube to a length of about 10cm. We drill a hole in the test tube stopper for the second UV LED and glue it in using a glue gun.
At the same time, we “invent” caps for the test tubes, for example, as in the second photo. After that, for every brain teaser
we mount the switches and connect them to the LED circuits (third photo).
Step 3: Filling
Now let's experiment
Thinking through the design
Of course, a car with neon lights looks amazing! And neon interior lighting, when installed correctly, can significantly change the interior of a car. Such lighting looks most advantageous in the dark, as well as on a snowy road in winter.
ADVICE! Think about the color scheme of your lighting in advance. Leading automobile designers, when choosing any type of lighting tuning, recommend choosing it not to match the body, but to contrast it. For example, if you have a blue car, then cherry-colored neon lighting will look much more impressive. Is it difficult to decide on colors? No problem! "Da Vinci's color wheel" can help you.
Additional options
- Halogen lamps. The base of a halogen lamp is filled with iodine and bromine vapor. This distinguishes them from conventional incandescent lamps, in which the spiral is located in a vacuum. The main disadvantage of such lamps is their strong heating up to 250°C. Therefore, the scope of application of halogen lamps is significantly reduced.
- Fluorescent. This lamp consists of a bulb and a base into which two electrodes are soldered.
When an electric current is applied, mercury vapor is converted into ultraviolet radiation, which subsequently turns into visible light.
The main disadvantage of such lamps when installing ceiling lighting is the depth of the socket for the lamp base. Therefore, it becomes necessary to lower the ceiling by 8-10 cm, which is unacceptable in rooms with low ceilings.
Fluorescent lamps are economical and heat transfer is low. This allows you to install such lamps in a suspended ceiling made of polyvinyl chloride.
LED bulbs. The most economical and has the maximum efficiency is the LED lamp. A light-emitting diode is a semiconductor that glows when electric current passes through it. The more LEDs built into a light bulb, the brighter the light.
The only disadvantage of such lamps is their high cost. But it's worth it. All the advantages that an LED lamp has allow you to close your eyes to this only disadvantage.
It is easy to install a spotlight on any suspended or suspended ceiling. To do this, you must first prepare the hole to size. In plasterboard ceilings, this can be done using a grinder with a nozzle of suitable diameter. In tension ones, a sharp stationery knife is enough, and the lamp is installed on a special stand, which is attached to the main ceiling. The built-in lamps are attached to the ceiling using tendrils on a spring.
Spotlights are connected to the network using a copper wire with a cross-section of 2:75 mm2. At the places where the lamp is installed, sockets corresponding to the type of light bulbs selected are connected.
Varieties based on base composition
Glow-in-the-dark pigments are added to polymer and water-based bases. Mixtures may contain different luminous components:
- Luminescent contain a phosphor;
- Phosphorus is added to phosphorescent paints; it is recognizable by its yellowish tint. In a bound state under a film of varnish, phosphorus does not pose a threat.
Eco-friendly fluorescent acrylic paints use water as a base. For painting plastic and PVC, compositions are made based on polyurethane resins that adhere well to the organic surface. They produce heat-resistant polyphenol paints for glass and metal intended for outdoor use.
Eco-friendly fluorescent acrylic paints use water as a base.
Let's get started
You can make such a lighting device with your own hands of any design. But it is better to choose an option with a removable top cover than to give preference to a monolithic design. So, in any case, it will be more convenient to carry out repairs. Here the manufacturing process involves the following steps:
- We make a frame around the perimeter. It is better to make it two-layer. The top layer will be decorative;
- We assemble the electrical system of the lamp according to the diagram;
- make sure that all contacts are properly insulated. In a situation with close water, this is vitally important. To do this, sealed tips should be placed on the ends of the lamps;
Note! Sealed tips can be made from available materials.
- we attach the entire electrical circuit to the plastic cover of the lamp;
- Next, using glue, fix a plexiglass rectangle on the bottom side of the device;
- We put a plastic cover on top on which fluorescent lamps are installed. The cover should be easy to remove so that the device can be repaired.
How to decorate a plasterboard ceiling with backlight photo
LED lighting of a plasterboard ceiling is just an effective design technique. Lighting must be taken care of separately
Ceiling lighting in the bedroom
Drywall is a very versatile material. In kind and skillful hands, it can become a whole work of art. A creative approach is the main thing that guides any builder when choosing this material. In principle, nothing more is needed. Drywall is also a good alternative to any suspended ceiling. By type of implementation, these are classic single-level or multi-layer structures. A suspended ceiling with lighting is a dream come true. The properties of the material allow you to imagine with a variety of shapes.
Chandelier for the kitchen
A chandelier made from ordinary metal tetrahedral graters will look incredibly beautiful.
Vases and candy bowls made from openwork napkins are still fresh in my memory. Now it's time to knit chandeliers.
Fansua Lego offers a strange option; he believes that the best way to store cutlery is a chandelier.
A large cloud is cut out of wood, but the rest and the switch are made of cardboard.
Several globes can make a wonderful cascading chandelier, a great way to illuminate a flight of stairs.
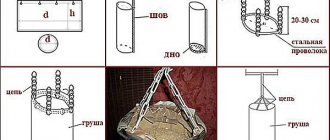
It is common knowledge that fish tend to be attracted to light. And when it is night and you bring light, you will see them swimming towards you. So, if you want to take advantage of this fishing technique, you may want to make this useful glowing fishing light.
The craft is made from waste, except for the waterproof LED strip and adapter. What you need to do is take a PVC pipe and attach an LED strip around it. Get a clear tube that is slightly larger than the PVC pipe you used.
The next step is to place the LED and PVC inside the clear tube. After this, make the pipe waterproof. Place the caps on both ends and be sure to seal them with caulk. Don't forget to make a hole for the wiring. And don't forget to fill the hole with sealant to prevent water from seeping inside the tube.
Catch more fish with this fisherman's prey attraction device! By the way, don't forget to place some weight inside the tube. Water is denser than a tube and LED strip are both lightweight. The weight will allow the pipe to sink into the water. Many thanks to the creator of the video kipkay
Application area
Both lamps and cords consisting of inert gases are used everywhere. They began to be used for:
- production of hidden lighting;
- decorative design of the external area of buildings, architectural structures, monuments and so on;
- lighting of advertising structures;
- decorating unusual interiors in any residential premises and other public places.
Neon lamps used today in home interior design look very organic and presentable. With their help, you can transform any room and add your own special touch to the decoration style. They are indispensable for organizing a picnic in the evening; you can use them to create an extraordinary atmosphere.
In everyday life, such a tape is also very valuable. It is an ideal solution for illuminating the ceiling area, aquarium, as well as any cabinet. You can make sure that when you open the cabinet, the light installed in it using a neon cord automatically turns on.
The tape can also be useful in the kitchen area - if it is noticeably dark when washing dishes or preparing food. You can simply install a neon strip of the required length in the required area. And there are a huge number of such ways to use this tape.
As you can see, the scope of application of such universal lighting devices is quite extensive. This is explained by their advantages, among which it is worth noting high quality and beautiful luminous flux. Only LED strip can compete with them.
These representatives of lamps today provide the brightest luminous flux, which opens up wide areas of application for them. But in order to use them correctly, you need to have a good understanding of the product.