This dashboard can be assembled for any car; it is a universal device. We assembled a dashboard based on an existing one called Venator.
To create it you will need the following components:
- Arduino MEGA controller
- Tablet with Androir operating systems
- Wi-Fi module esp8266
- Power converter from 12 to 5 volts (you can use any car charger for mobile phones).
All car sensors are connected to the Arduino controller. In our case, it was also necessary to install a speed sensor in the gearbox instead of the speedometer drive cable. And also run a wire into the car interior from the ignition switch so that the controller could display the engine speed (this had to be done since the OKE did not have a tachometer installed).
Tuning the interior of the VAZ 2106
All car owners know that tuning the interior means giving it a new look, improving functionality and safety. With its help you can create an individual and unique style.
Interior tuning consists of several stages:
- torpedo tuning;
- instrument panel tuning;
- beard tuning;
- replacement or reupholstery of seats;
- installation of a radio;
- steering wheel tuning;
- tuning the gear knob.
Let's look at each of these points in more detail.
Features of organizing LED lighting
LED light bulb for car
Using LED lighting for a car, you can use diode bulbs with a standard base. This way you can illuminate the instrument buttons on the panel. In a situation where several devices need to be illuminated at once, for high-quality lighting you should use an LED bulb placed in a special socket. This requires a special re-soldering. But you can simply buy it in a store or market.
In addition, to illuminate the car’s dashboard and its alarm system, you can use light bulbs that produce a narrow luminous flux. It can be obtained from a regular light bulb by using a special diffuser (lenses) for lighting. Thus, in the first situation, the lighting will be point-like, and in the second, the luminous flux will fall at a certain angle. When organizing button illumination, you can use light sources with a directional luminous flux. But to illuminate the speedometer and alarm panels, preference should be given to bulbs that provide a large scattering angle. Although this can already be left to the individual choice of the car owner.
Torpedo tuning
The top front panel of a car is called a torpedo. It is a solid metal structure covered with polymer foam and film. It contains an instrument panel, glove compartment, interior heater, air duct deflectors, and a clock.
The front panel is an important element of the interior, which can be tuned in different ways: replace the dashboard completely with a new one, paint it with liquid rubber, cover the smooth surface of the dashboard with leather, film or flock. Before starting tuning work, you need to remove the panel.
Torpedo dismantling
Removing the console occurs as follows:
- After unscrewing the four fastening screws, we remove the storage shelf.
Tuning options for the VAZ 2106 torpedo
There are several options for tuning a torpedo:
- You can replace the standard torpedo with a new one from domestic or imported cars. It is installed entirely with devices. Since the parts in the “classic” are interchangeable, panels from the VAZ 2105, VAZ 2107 are suitable for the “six” ;
- cover the torpedo with liquid rubber. This option is labor-intensive, and such a coating is short-lived and will begin to crack over time. It will need to be updated periodically. The big advantage of this method is its low cost;
- reupholstering the dashboard with vinyl film, flock, automotive leather or leatherette. This method of improvement is the most effective, but scrupulous and time-consuming. To carry out the work, it is necessary to dismantle the torpedo and take measurements from it. It is best to make a pattern from non-woven fabric. Using the pattern, cut out the component parts. Sew all the pattern pieces together with strong threads. It is advisable to work carefully so that folds do not form on the material, which will spoil the appearance. Then treat the surface of the console with hot glue and pull on the cover. And, using a hair dryer, glue the cover.
Video: do-it-yourself reupholstery of a VAZ 2106 torpedo
Required Components
The Mayak lamp is a donor of lighting components.
Lighthouse lamp, rear view.
SMD LEDs are exactly what I was looking for in a lamp. The size is about 3 by 4 mm.
Entire lamp, consumption in “dimensions” mode.
Entire lamp, consumption in stop light mode.
LEDs, 330 Ohm resistors.
Printed circuit board blanks, cut on a lathe.
The boards are marked for installation of components. The black dots between the tracks are where the LEDs are installed.
Marking of “tracks” on the board. Here is the fifth, the inner track is superfluous, I wanted to do a two-color backlight first, but I changed my mind.
Arrangement of LEDs 3 in a cluster.
Alternatively, you can place the LEDs on one track in series, it will be even simpler plus saving one track, but my option is more reliable.
Instrument panel tuning
Modernization of the VAZ 2106 dashboard consists of replacing the backlight and decorative parts of the scales.
Replacing instrument panel scales and arrows
This process is quite simple and you can do it yourself:
- At the start of work, we dismantle the instrument panel panel of the “six”
- We gain access to the sensors and remove all indicator arrows, starting with the tachometer.
- After this we remove the scales.
- To remove the speedometer needle, unscrew the bolts and turn the scale to the left. After this, the instrument needle will drop slightly and begin to oscillate. As soon as it finally freezes, this position must be marked with a marker. All this is necessary so that the speedometer then indicates the correct speed.
Installation of the removed parts is carried out in reverse order. After which the panel is mounted in its original place.
Instrument panel lighting
Many car enthusiasts know that the “six” has weak instrument lighting. When upgrading the panel, you can add LED lighting. Before starting electrical work, be sure to disconnect the negative terminal from the battery.
- Having dismantled the panel, we remove the devices one by one.
- We take each of them apart.
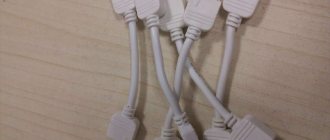
- We glue the links of the LED strip into the body. For small devices, one link of three diodes is enough. For larger ones you will need 2 or 3 links, depending on what lighting intensity you like.
Be sure to wipe the inside of the glass of the devices so that there are no fingerprints left.
Sketch (firmware) for the Arduino Mega controller
You can download the finished sketch in a file using .
unsigned long micros_sp = 0, micros_th = 0; volatile int tz; volatile int sz; volatile int sp; //speedometer impulses volatile int th; //tachometer pulses int analogInput ; //array of analog values int digitalInput; //array of digital values String resultString = ""; //string int i; //cycle counter
void setup(){ for(i=0; i digitalInput =0; } for(i=0; i analogInput =0; } Serial.begin(115200); Serial2.begin(115200); //com port initialization attachInterrupt( 0, speedometr, RISING); //interrupting the speedometer on pulse edges attachInterrupt(1, tahometr, RISING); //interrupting the tachometer on pulse edges } //***************** **************************************** * void loop(){ analogInput = analogRead(0); // B13 voltage analogInput = analogRead(1); // B24 fuel analogInput = analogRead(2); // B21 cooling temperature analogInput = analogRead(8); // analogInput = analogRead(7); // analogInput = analogRead(3); // analogInput = analogRead(4); // analogInput = analogRead(9); // analogInput = analogRead(10); // analogInput = analogRead(11) ; // analogInput = analogRead(12); // analogInput = analogRead(13); // analogInput = analogRead(14); // analogInput = analogRead(15); // analogInput = analogRead(6); //
DigitalInput = digitalRead(4); // ignition // digitalInput = digitalRead(5); // //****************************************************** ********************** digitalInput = digitalRead(53) + // digitalRead(51) * 2; // //****************************************************** ********************** digitalInput = digitalRead(5) + // A14 left turn digitalRead(6) * 2; // A13 right turn //*************************************************** ************************ digitalInput = digitalRead(8) + // A18 near digitalRead(9) * 2; // A17 distant //************************************************ ************************* digitalInput = digitalRead(10) + // A16 PTF front digitalRead(11) * 2; // A15 PTF rear //*************************************************** ************************ digitalInput = digitalRead(23); // A23 check digitalInput = !digitalRead(21); // B 9 — level digitalInput = !digitalRead(31); // A19 — handbrake digitalInput = digitalRead(25); // B 3 pad wear digitalInput = !digitalRead(45); // B10 - fuel lamp digitalInput = !digitalRead(51); // B12 — coolant level digitalInput = !digitalRead(47); // A24 - oil pressure digitalInput = digitalRead(27); // A20 fan lamp digitalInput = !digitalRead(29); // A23 charging digitalInput = digitalRead(33); // A 5 abs digitalInput = digitalRead(35); // A20 srs digitalInput = digitalRead(37); // A 3 belt digitalInput = digitalRead(39); //B 1 door digitalInput = 0;//digitalRead(22); // B 2 p digitalInput = 0;//digitalRead(24); // A22 r digitalInput = 0;//digitalRead(26); // A 7 n digitalInput = 0;//digitalRead(28); // B 6 d digitalInput = 0;//digitalRead(30); // B 5 s digitalInput = digitalRead(41); // A 8 reserve digitalInput = 0;//digitalRead(32); // A 9 reserve digitalInput = digitalRead(43); // A10 reserve digitalInput = 0;//digitalRead(34); // A11 reserve digitalInput = digitalRead(49); // B 4 reserve
ResultString = String(resultString + sp);
resultString = String(resultString + th*10); resultString = String(resultString + ","); for(i=0; i resultString = String(resultString + analogInput ); resultString = String(resultString + ","); } for(i=0; i resultString = String(resultString + digitalInput ); } resultString = String(resultString + ":\n"); // Serial2.print (resultString); Serial.print (resultString); resultString = String(""); tz = tz - 1; sz = sz - 1; if (tz == 0 ){th = 0;} if (sz == 0){sp = 0;} delay(50); } //******************************** *********************************************** void speedometr() { //measure the frequency at the speedometer input using the interrupt sp=(900000.0/(micros() - micros_sp)); micros_sp = micros(); sz = 10; } //************ **************************************** ***** void tahometr(){ //measure the frequency at the tachometer input by interrupt th=(2900000.0/(micros() — micros_th)); micros_th = micros(); tz = 10; }
Beard tuning
The center of the car interior is the console, which is called the beard. It acts as a continuation of the torpedo and attracts the attention of all passengers.
When tuning, you can place in your beard:
- watch;
- radio;
- pocket for small items;
- armrest;
- USB sockets;
- switches;
- backlight
Typically, the beard for “classics” is made from plywood, fiberglass, or from spare parts from foreign cars.
Beard drawings can be found on the Internet or taken measurements from an old console. For the pattern, thick cardboard is used, which holds its shape well. The template is transferred to plywood and, after carefully checking the dimensions, cut out along the contour. Next, the parts are connected with self-tapping screws. The finished frame is covered with leatherette or other material in the color of the upholstery. The material is secured with a furniture stapler and glue.
Glass tinting
Glass tinting is an elementary type of tuning the panel of a Lada Priora. The film is attached to the outside of the glass. You can use film No. 15 or any other depending on the driver’s preference. The main thing is to choose the right shade to make the glass look good. American film, which often has a reddish tint, is not suitable for every interior.
The film is applied as usual - degrease the glass using any dishwashing detergent, Fairy and others will do
We apply the film and cut it, paying special attention to the edges. It is better to cut off the edges so that the film does not start to bubble after installing the glass in place.
Seats
Tuning VAZ 2106 seats can be done in two ways:
- change the upholstery;
- replace the seats by taking them from another car.
Seat reupholstery
To reupholster the upholstery yourself, follow the instructions:
- Remove the seats from the interior. To do this, move the chair back all the way and unscrew the bolts in the runners. Then slide it forward and also remove the bolts. Remove the seats from the interior.
Installing seats from another car
Updated seat upholstery will decorate the interior, but will not make them ergonomic or comfortable. To do this, seats from another car are placed in the “six”. Seats with a distance between the runners of approximately 490 mm are suitable here. Many car owners say that seats from Ford Scorpio, Hyundai Solaris, VAZ 2105, VAZ 2107 fit well into the cabin . But to get a good result, you cannot do without replacing the fasteners.
Replacing seat fastenings
The slides on which the seats in the “six” are located are not located at the same level, so the old fastening requires replacement. To do this you need:
- Move the seat back all the way and unscrew the front bolts. Then move it forward to the dashboard and remove two more screws from the runners.
Adjusting the brightness of the backlight
Most often, to adjust the brightness of the backlight located behind the device, you need to assemble it, but if something does not suit the brightness, the device will need to be disassembled and adjusted again. In order to avoid wasting time on such actions, we advise you to connect the backlight through a variable rheostat, which can be used to control the intensity of the glow by simply turning it up. Naturally, it is best to carry out the adjustment 3 times - during the day, at dusk and at night, to understand whether it is convenient to look at the devices.
Radio tape recorder
No upgrade of the “six” is complete without installing a speaker system or at least a simple radio. A standard place for a radio receiver in the beard of a small-sized “six”. It should be trimmed to standard 1DIN. This can be done with a metal file. Then sand the edges with sandpaper.
Installing a radio
The radio tape recorder is attached to the beard using a metal case. Radio installation steps:
- Having bent all the tabs, use special spatulas to remove the radio from the case.
- The metal base is inserted into the prepared hole.
- We fix it using special tongues.
Cables are included to connect the player. The most commonly used are:
- black - “earth”;
- red and yellow (often wound together) - ignition “+”;
- blue - power for the active antenna;
- white - front left (FL) speaker;
- gray - front right (FR) speaker;
- green - rear left (RL) speaker;
- purple - right rear (RR) speaker.
You can connect the radio to the ignition switch to the free INT terminal. Then it will only work when the engine is running and the ignition is on. This connection scheme will protect forgetful car owners from completely draining the battery.
If you twist the red and yellow wires together, the radio will no longer depend on the ignition. You can listen to music with the ignition off too.
Typically, a connection manual comes with the audio system. Following the instructions and color scheme, installing audio equipment in the “classic” will not be difficult.
Speaker installation
A good place to place the speakers would be the front door panels. If you choose the right size speakers, they will fit here very well. To install, perform the following steps:
- Remove the trim from the doors.
- On the casing we cut a hole for the speaker. A hole of the required size can be made using a template. To do this, trace the speaker on paper. You need to work carefully so as not to miss the size.
- We attach the column and screw it to the casing using the fastening that comes with the kit.
- We carefully lay the wires in the cavity of the doors so that they do not sag or fall out.
- We install the casing in place.
Don't forget to buy new fasteners for the door trim. Often, when removing the casing, the fasteners break.
Additional speakers are placed on the dashboard or on the side pillars of the windshield.
If the car owner changes the entire beard, creating it himself to his own size, then he can place a 2DIN radio in it. A player with a large screen will add charm to the appearance of the car.
Some craftsmen insert speakers instead of air ducts. But from personal experience I know that the standard “six” torpedo does not have side window blowing. In humid and cold weather, windows fog up and freeze. If you remove the air ducts for the windshield, the airflow will worsen even more. Therefore, I do not recommend this installation of speakers.
Video: installing speakers and Shumka
Antenna installation
The “six” did not have a standard antenna installed, but a place for it was provided on models before 1996. Adherents of original spare parts can find their original antenna on the car market. It is attached to the front fender of the car.
To do this, you will need to make a hole in the wing, install the antenna, tighten the bolts and connect the wires to the radio and ground. This installation method is quite complicated and not every car owner will decide to make holes in the body.
The ease of installation is distinguished by the interior active antenna, which is attached to the windshield. It is not exposed to precipitation, does not require additional care, and does not interfere with aerodynamics when the car is moving. When purchasing an interior antenna, please note that the kit should include instructions, fasteners and stencils to simplify installation. There are two ways to install a radio antenna inside the cabin:
- The housing is attached to the glass behind the rear view mirror, and the whiskers are glued in opposite directions at the top of the glass.
- The antenna body is secured to the top of the windshield on the passenger side, and the poles are glued along the edges of the glass at right angles to each other.
Making an optitron
I'm trying to clean the filter at the edge of the scale. The peculiarity of these scales is that they are designed for the use of ordinary light bulbs, so they have an additional layer of dark filter (dots) applied to them, which ensures uniform illumination (closer to the light bulb, darker). A yellow filter is also visible under the white scattering layer. I would leave the yellow one, but removing black and white without affecting the yellow is unrealistic.
This is what it looks like in the light. Despite the white backlight, the numbers are still yellow thanks to the yellow filter, so you will have to remove it, although I didn’t want to.
Illuminated fuel and temperature gauges. I was afraid that there would not be enough three LEDs for the scale, but it turned out to be in vain - the scale is illuminated evenly, the gradient is not noticeable to the eye. Yes! As a result, only 3 tracks remained.
Rear temperature and fuel gauges. The light filter has been partially removed in the right places.
Ready-made temperature and fuel scales.
I remove the light filter on the tachometer. I use nail polish remover and pieces of cotton pads (we take everything from my wife/mother/sister’s arsenal). The technology is as follows: soak the pieces in liquid and apply to the area for a minute. While we are making the next one, the previous one soaks and the coating can be easily removed with a fingernail. Carefully! The front side is very sensitive to solvents, especially alcohol!
Installing tachometer backlight. Hot glue from a “gun” serves as supports and at the same time fasteners. The downside is that in this version the tachometer is not removable.
Finished tachometer scale.
"Combined" lighting. LED tachometer, regular speedometer. The temperature scale and fuel gauge are double backlit. Here the photo does not convey the effect quite correctly.
Speedometer backlight board. The main difficulty, it turned out, was precisely here. Due to the built-in odometer, the speedometer device is very bulky and there is very little space left for illumination. As a result of trimming and pointing, very little remained of the scarf.
Rear speedometer backlight board. I had to restore the path this way
I'm installing the speedometer light. Two lights didn’t fit, so I moved them to the side surface
I turn on the speedometer light and check it. Between the tachometer and speedometer, the common plus and minus are brought out into the T10 socket; a protective diode and a common current-limiting resistor (all from the same lamp) are also installed in it, plugged into the standard socket from under the backlight lamp.
Finished speedometer scale
Complete tidy. Currently in finished condition.
Steering wheel tuning
A comfortable and beautiful steering wheel contributes to comfortable driving. To achieve this, in the “six” you need to update the steering wheel in the following ways:
- install a steering wheel from another VAZ model;
- replace with sports one;
- retighten the steering wheel.
Installing a steering wheel from another VAZ model
The simplicity of the Zhiguli allows you to replace the steering wheel with a steering wheel from other VAZ models. Many car owners believe that it is not worth the work and effort that needs to be put in.
The steering shaft of the chisel is thinner than the classic one, and not by much, that is, it is not very easy to make an adapter for the hub. Plus the steering wheel is higher, normally it won’t engage the turn signal bump stop. In a word, you need to suffer a lot to install it properly. As for me, it’s not worth it, if you really want a normal steering wheel, then you need to go and buy it, the choice is very rich right now, but you need to look at them carefully, there are so many leftists that it’s just terrible.
https://autolada.ru/viewtopic.php?t=26289
Replacing with a sports steering wheel
A sports steering wheel will give the car a beautiful and aggressive look. You just need to know that the “six” is not intended for sudden maneuvers. The sports steering wheel has a smaller diameter and is more difficult to make turns with, so you need to get used to it.
Steering wheel reupholstery
In an auto store you can find braiding on the steering wheel for re-upholstering with your own hands. Such kits include the braid itself made of genuine leather, strong threads for sewing and a special needle.
Video: dismantling the steering wheel
Setting up the ESP-8266
Before connecting the ESP8266 Module to the circuit, it must be flashed and configured in Tcp2uart (tcp to uart) transparent bridge mode so that it transmits the received data from the com port to the tablet via Wi-Fi.
It is better to flash via a USB-UART converter, which must have a 3.3V source output to power the ESP8266. Also, this source must provide the required current of at least 200mA.
The CPIO0 contact determines the operating mode of the module. When the contact is not connected, the module operates in normal mode and executes AT commands. When the contact is closed to ground, the module is switched to firmware update mode. Switching the module to firmware mode requires that the CPIO0 pin be connected to ground when power is supplied to the module. If you close the contact while the module is running, the module will not switch to firmware update mode. Now you need to start Register the COM port of your converter and select the firmware itself fullflash_tcp2uart.bin (). Click Download and wait until the completion process reaches 99%. At this point it will stop and you can turn off the module. Next, you need to supply power to the ESP8266, or directly connect it to the Arduino controller according to the diagram. Once it appears on the power module, run a search for wifi networks on your computer. The ESP8266 network should appear. Connect to it. After this, you need to go to https://192.168.4.1/fsupload in your browser (Enter Name: ESP8266 Password: 0123456789) and download the WEBFiles.bin file to the device (it is in the archive with the firmware). All that remains is to configure the Tcp-Uart bridge. To do this, go to https://192.168.4.1 in your browser. Go to the TCP-UART Settings tab and set the settings as in the screenshot below:
Ready! Now, when the ESP-8266 module is connected to the Arduino, it operates in transparent bridge mode and transmits the necessary data via Wi-Fi.
Result
Mazda's new philosophy compares driving a car to riding a horse. When a certain harmony is achieved, and the car reacts to the driver’s command instantly, like a horse to the movements of the rider. Mazda CX 5 provides a convenient control interface where you can configure and adjust security, communication and navigation systems without being distracted from the road, even on rough terrain. This is a critical control component in today's high-tech automotive world that most of its classmates lack.
At a Mazda dealership, you will be offered innovative options and trim options for the car's interior.
Installing a dashboard on a VAZ-2107 from another car
In some cases, drivers who do not want to bother with the selection of components simply replace the “Seven” dashboard with a similar design originally produced for another car. If you have such a desire, you will need:
Find and buy a new dashboard from a more modern car
Please note: such a rather expensive purchase may cost more than the “seven” itself. For example, a Ferrum torpedo, with a built-in on-board computer, will cost the car owner 20-25 thousand rubles. Update the panel in the area of design visual elements - re-stick the stickers and indicator arrows. Install a newly purchased shield from another vehicle.
Before purchasing a dashboard from another car, you should compare the configuration of the element with the provided connector on the VAZ-2107. In some cases, it may be necessary to adjust some areas of the panel in shape and size.
Dashboard from another VAZ model
The easiest option for changing the panel on the “Seven” is to install a structure designed for another VAZ model. The easiest way to carry out installation and dismantling work is to use a VAZ-2110 torpedo: no problems are expected during the process, and the final result will give the interior a better external image.
With such a replacement, the technician will not have to tinker with electrical wires and connecting devices for a long time: the cables of the two panels are identical and are connected according to similar circuits.
Gazelle dashboard
When replacing the instrument panel on a VAZ-2107, the equally popular Gazelle often becomes the donor. Despite the fact that the manufacturer of these two machines is the same, the work will be more complex. The Gazelle panel has large dimensions and also has a completely different configuration, shape and size. You will also have to tinker with the electrical wiring: you will need a number of adapters, as well as knowledge from the field of electrical engineering.
In such work, you will have to use a jigsaw and a soldering station to resolder the adapters. This is a rather painstaking procedure that should be approached with special care.
Dashboard from a foreign car
Installing a dashboard from a foreign car on a VAZ-2107 is the most complex option, characterized by the greatest efficiency. Before purchasing a device from a third-party car, you should compare the characteristics of the original and new units, taking into account their correspondence to each other. When choosing a panel, you should focus on foreign brands of cars produced in early 1990.
Luggage compartment
The luggage compartment of the Mazda Cx 5 will delight those who like to use their crossover as a cargo carrier. The volume in the new generation reaches 442 liters. And with the rear seats folded down, the volume increases to an impressive 1600 liters. The luggage compartment is decorated not with plastic, but with carpet, which reduces noise.
The tailgate has an electric drive, the button of which is located on the front panel. It is possible to control the opening of the rear door remotely from the key.
Otherwise, they tried to preserve the interior details, for the same reason that they did not completely change the exterior. In Japan, apparently they know the Russian saying: “They don’t seek good from goodness!”
Controls
The central tunnel has remained virtually unchanged. One of the changes is that the gearshift lever is located higher compared to the previous model. Behind it, in a convenient area, there is a multimedia joystick that can be controlled without taking your eyes off the road. The voice control system will help you change the radio, navigation and phone book modes. The square armrest between the front seats has storage for small items and USB ports. The classic “handbrake” has been replaced by a modern electronic parking brake system and the AUTO HOLD function, the buttons of which are located on the central tunnel.
We collect
When everything is ready, we begin to slowly assemble the console. First of all, we install the substrate. Apply sealant to the back side and glue it to the panel.
Then we put the arrows and protective glass in place. After modernization, the instrument panel looks bright and unusual.
LED lighting not only looks unusual and bright, but is also a good addition to the car in terms of economy, which helps save battery power, since LEDs consume 80% less energy than a regular light bulb.
Source