The bubble panel, created with your own hands, is a container made of triplex or high-strength plexiglass. Both materials have similar properties, so either one will make an equally good water bubble panel. In such a reservoir, water or air currents are in constant motion, due to which the impression of a small waterfall is created. This decorative element fits perfectly into any interior. The finished product is quite expensive and beyond the means of many, so a bubble panel made by yourself will not only be a wonderful decoration for the room, but will also save a significant amount of money.
Constructing the structure of an air bubble panel is not difficult. It is enough to make a podium on which the panel itself and the lid will be.
SIP panels are an excellent material for building a private house
Structural Insulated Panel (SIP) are building products made from two OSB (oriented strand) boards, between which a layer of expanded polystyrene is placed. To connect these elements to each other, a one-component polyurethane adhesive is used. The finished panel is attached to a timber beam. Oriented strand boards are made from sawdust about 13–14 cm long and about 0.6 mm thick. Important point. The sawdust is oriented in different directions (this is how the well-known plywood is produced). A resinous special composition is added to them. It glues wood components into one structure.
The SIP panel consists of two OSB boards, between which there is a layer of polystyrene foam.
Expanded polystyrene acts as insulation. This material has high strength and low weight. It does not get wet and is completely hygroscopic. Rodents do not grow in polystyrene foam. In addition, it practically does not deform during long-term use. The connection of SIP products to each other is carried out according to the standard tongue-and-groove pattern. Such panels for building a house are characterized by a whole range of positive properties:
- Insignificant load on the ground due to low specific gravity. Thanks to this, the foundation requirements for structures made from SIP panels are minimal.
- High reliability and durability of the houses being built. The panels we are interested in can easily withstand loads of up to 2 tons in the transverse direction and up to 10 tons in the vertical direction.
- Increased heat and sound protection properties.
- Fire and environmental safety.
It’s easy to build a house from SIP panels with your own hands in a really short time (in 3–3.5 months). A finished residential building, built using the recommended technology, is guaranteed to last at least 75–80 years. Later we will talk in more detail about the rules for constructing such houses.
Materials and tools used for production
OSB-3 is slabs 1-1.2 cm thick.
To make SIP panels with your own hands, you will need the following materials:
- OSB-3 is oriented strand board;
- timber (it will be needed for constructing the frame of the house, and not for making wall slabs);
- one-component adhesive composition based on polyurethane;
- expanded polystyrene or any other thermal insulation material.
OSB-3 is a board with a thickness of 1-1.2 cm. They are made by pressing chips, the dimensions of which do not exceed 1.5 cm in length and 0.6 mm in diameter. The material is mixed with special resins and pressed at high temperatures. The chips are pressed in several layers, with the direction of the fibers in all layers being directly perpendicular to each other. OSB is easy to process; any fasteners are securely fixed in them.
For the manufacture of sandwich panels, it is better to use expanded polystyrene grade C-25-35. This material is made from foamed polystyrene. It contains 95% carbon dioxide. The specific gravity of this material is small, and the cost is quite reasonable.
For the manufacture of sandwich panels, it is better to use expanded polystyrene grade C-25-35
To build your house from homemade sandwich boards, you will need one of the following adhesive compositions:
- Top ur modification 15;
- Kleiberite grade 502.8;
- Macroplast series UR 7228;
- Macroplast UR 7229 series.
The following requirements apply to the adhesive compositions used:
- They must have a sufficient degree of moisture resistance.
- The adhesive can be used in the temperature range from -40°C to +50°C.
- No less important is the harmlessness and non-toxicity of the glue used for humans and the environment.
- The adhesive connection must be quite reliable and durable in order to meet the declared service life of the house.
In addition, the following tools will be useful to you:
To make panels, it is better to prepare a working surface, for example, a table, the dimensions of which are slightly larger than the dimensions of one oriented strand sheet. To apply the adhesive, you can use a sprayer, brush or notched trowel. The most important equipment is the plate pressing machine. Instead, you can use a conventional press or powerful vacuum pumping equipment. You will also need a thermal cutter or thermal knife
These products have a special heating element, which is heated from the electrical network. The product will be needed for cutting thermal insulation material into separate parts.
What do you need to purchase to produce SIP boards yourself?
Do-it-yourself SIP panels are relatively simple to make. True, you will have to wisely select materials for such an operation and stock up on special equipment. The outer layers of the panels are made from OSB-3 boards. It is advisable that they be produced by a reputable company. Then you will be sure that they use environmentally friendly resins. Expanded polystyrene should be grade C-25-35. The glue requires special attention to join all the layers into one. For homemade SIP panels, it is necessary to use compounds that have a long service life, a wide range of operating temperatures (from +50 to –40 ° C) and a high moisture resistance. Recommended adhesive for SIP products:
- Macroplast UR 7229 or 7228;
- Kleiberite;
- AveniR;
- TOP-UR (15–40).
These adhesives do not contain volatile compounds, harmful solvents, plasticizers, or expensive fillers. They are created specifically for SIP panels and are characterized by increased adhesive strength and the required technological viscosity.
To cut SIP panels and melt the insulation, you will need a thermal cutter
Any polyurethane adhesive from the list above provides a moisture- and heat-resistant, as well as elastic connection of the components of SIP products.
You will also need a press used in the manufacture of sandwich panels. If there is none, you can replace it with a vacuum pump. Another essential tool is a thermal cutter (or thermal knife). It is a kind of tubular electric heater mounted on a heat-insulated handle. The thermal knife is necessary for cutting products into pieces of the required size and melting the insulation. Making SIP panels with your own hands should be done on a flat surface (on a table) of a certain length. Its dimensions are always taken large in relation to the geometric parameters of the manufactured products. We will apply glue to the layers of SIP panels either with a notched rubber trowel or using a special sprayer.
Tags
Production of SIP panels from SIP panels selection of SIP panels selection of SIP panels selection of SIP panels production of SIP panels from SIP panels Production of SIP panels SIP panels standard SIP panels Production of SIP For the production of panels Production of SIP manufacturing technology It is possible to produce SIP for making SIP with your own hands special with your own hands with your own hands with your own hands you can with your own hands with your own hands with your own hands
beamsself-constructionvery orientedbuildingsenough betternoscript
We make SIP products with our own hands - simple technology
Place the OSB sheet on the workbench and apply glue to the surface of the board. You should not end up with a continuous layer of composition, but with grooves. Depending on the tool used (trowel, sprayer), the glue consumption for each square meter of sheet is 150–200 g. After applying Macroplast, TOP-UR or another composition, you should wait about 10 minutes, and then carefully place polystyrene foam on the OSB board and carefully level it out. The process cannot be delayed, as the glue polymerizes quite quickly. If this happens, the finished product will be unreliable and weak. Building a house from SIP products of this type will be problematic.
Glue is applied to the surface of the slab, and after 10 minutes polystyrene foam is laid
Now you make glue grooves on the polystyrene foam, place a second oriented strand board on it, and press it. Next, the product is sent under the press. If this is not the case, you should act differently. You need to make 5–7 panels at once according to the described method (each subsequent product is assembled directly on the previous one), and then cover the resulting stack with awning fabric. From the latter it is necessary to make a sealed case. Simply glue the fabric along the edges with Cosmofen or any other quick-setting adhesive.
Take a vacuum pump and use it to pump out the air from under the cover. This action results in about one ton of pressure applied to each square of homemade panels. The technique is called vacuum pressing. The panels are kept in an airless space for approximately 60 minutes. After this, remove the awning fabric and leave the stack of SIP products (in a horizontal position) for 24 hours. After a day, attach a side wooden beam (to one of the sides) to the panel using mounting foam. It provides rigid fastening of SIP slabs to each other during the construction of frame houses. The beam can not be glued, but can be screwed with fasteners of suitable size. The panel is ready for use!
Perform all work wearing safety glasses, gloves, and a long-sleeved robe. The production of panels should be carried out in a well-ventilated and lit room. At home, you can produce SIP products of any size. It is desirable that they correspond to the dimensions of the house specified in the project. The standard dimensions of the panels we are considering are 250 by 125 and 1280 by 125 cm. Such structures are the easiest to work with. They are suitable for any typical construction project for the construction of a private home. When using products with similar dimensions, a minimum of joining seams is obtained, which means that the built house will be truly warm.
Comments4 comments
Andrey:
04/30/2016 at 17:21 Hello. I have some questions. What is the name of the glue in the cans? And how are the vertical posts secured to the floor? And is it possible not to glue the slabs with foam, but first assemble the outer side, for example, then insert the foam and assemble the inner side? Thank you.
Nikolaevich:
05/04/2016 at 08:52 Hello. I’ll answer the last question right away. Of course you can, many do this, especially if there is nowhere to make panels and store them until assembly. Panel frame technology was invented precisely in order to minimize the amount of work directly on the site, which is undoubtedly more convenient. And one more thing: a panel assembled in a workshop (garage, utility room, under a canopy), where after gluing you place it under a load, will be more monolithic. I don’t recommend simply inserting foam plastic between the beams
When gluing polystyrene foam into an externally sheathed frame, use the foam application technology described in the article - this is important. If you simply apply it in strips and not solidly, or insert PSB without foam, then condensation can form on the inside of the OSB, which will not extend the service life of the OSB itself and the wood of the frame
Yes, on the inside, with such an assembly, you can not install the 2nd sheet of OSB, but glue 2 sheets of drywall using the same scheme with the joints shifted, laying between them (and photographing with a tape measure) the electrical wiring and other cables you need. I will not describe the process of gating gypsum boards. Vertical posts are attached to the lower and upper frame beams either with self-tapping screws or nails. For installation accuracy, I recommend using a template made from a 500 mm long board. I don’t consider it necessary to strengthen the connection with corners and (or) stringers if the technology for further assembly, and most importantly, gluing, is not disrupted. There are 2 types of foam packaged in cylinders - both are called polyurethane foam. One, after blowing from the balloon, continues to increase in volume for some time, until primary polymerization, and the second - only during application - it is called polyurethane foam glue. The adhesive ability of foam and glue from the same company is almost the same, so I consider it inappropriate to spend money on more expensive glue. Ensure good fixation of the glued material so that the foam does not repel it. When it has nowhere to expand, it will simply stick together. To fix the gypsum board during gluing, I use boards of appropriate length twisted along a T-shape - several pieces per sheet, which I attach to the beams with screws with a head and remove after 20-25 minutes, during which time the initial polymerization of the foam will take place.
Sergey:
01/02/2017 at 21:25 What about mice, do they love polystyrene foam?
Nikolaevich:
01/12/2017 at 1:47 pm Mice love it no more than any mineral wool, and basalt wool is no exception. And they will definitely prefer cotton wool to him. They don’t eat such things, but make their kublas using these materials. But self-respecting polystyrene foam manufacturers use only high-quality raw materials, which, in addition to fire retardants that make PSB-S self-extinguishing, also contain melamine, which repels mice. There are no mice in the walls or ceilings of any of the 2 dozen houses we built using this technology. They make their way into the premises through loosely closed doors and windows in the fall, but our customers have not recorded any cases of settlement. They were removed using accessible methods, and until the next autumn they did not have this unpleasant neighborhood.
We build a house using frame technology - the first stages of the operation
Residential buildings made of SIP panels are allowed to be installed on pile-screw, strip, and slab foundations. The type of base is selected on site. It is important to consider the condition of the soil here. If there is no groundwater on the site and the ground is flat, make a simple strip foundation. For heaving, swampy soils, pile foundations are more suitable. Below we provide a diagram of how to build a house on a strip foundation:
- Clear the land allocated for building a house from tree roots and debris. Dig a small hole for the foundation (either manually or using heavy construction equipment).
- You make wooden formwork using standard technology and pour concrete mixture into it.
- Place cinder blocks on the manufactured strip base. Reinforce them and then fill them with concrete. It is not necessary to use cinder blocks. They are recommended for cases where a house is being built in swampy areas, in regions with frequent rains and heavy snowfalls. Instead of blocks, you can simply fill the base of the future building with concrete mixture.
- Place a waterproofing layer (usually roofing felt) on the foundation.
- Install the first SIP panel directly onto the waterproofing. The very first product should be clearly aligned with the corner of the equipped foundation. Next, lay the next panels, filling the areas where they join with foam.
The first mounted SIP panel must be clearly aligned with the corner of the foundation.
After completing all these steps, you will receive a full-fledged floor in your home. It will be highly durable. Here it is only important to constantly check the installation level of SIP panels in order to eliminate the risk of deviations of the floor base from the horizontal. One more thing. The ends of the mounted products must be covered with trim boards. The latter are attached to the panels with polyurethane foam. Do not forget also about the need to drill technological holes in the floor. They are needed to organize the sewer and water supply systems. Holes in SIP slabs should be prepared in advance - before installing the finished floor.
Cutting
Before starting such work, it is necessary to check the horizontalness of the product using a building level. When the check is completed, the expert begins cutting the material. First, an incision is made on the finishing layer of metal, after which the insulation is also cut.
For small amounts of work, it is recommended to use electric steel shears. In this case, metal decorative surfaces are cut on both sides. After completing the process, the builder must clean the coating from chips, this also applies to the surface of the locking joints. Marking of parts is carried out using a marker or other non-sharp tools that will not damage the finish. A jigsaw is used to separate wall panels with OSB finish.
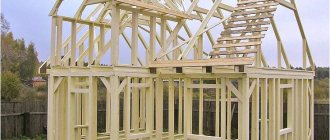
We assemble a residential building - we act carefully, but confidently!
The assembly of a house from SIP panels begins with the construction of load-bearing walls and internal partitions. This must be done clearly according to the drawings and diagrams of the construction project. And then proceed to installing SIP products directly into the finished frame. The panels are attached without voids or gaps. The tightness of the connection guarantees comfort and warmth in the house. All joints must be blown with foam. Use polyurethane compounds for these purposes.
The first stage of building a house from SIP panels - walls and internal partitions
The panels are connected to each other by gluing timber (spray foam is used), which should fit evenly into their grooves. Fixing SIP products to the floors and floor platform is done according to a similar (tongue and groove) pattern. In this case, the function of the spike is performed by trim boards (top and bottom, respectively) of the required sizes. Note. The thickness of the bottom board (often called the installation board) is taken to be at least 2.5 cm (optimally 4 cm).
Connections at the corners are made in the same way. But in such a situation, the installation board is fixed to panels mounted vertically. Fastening the panels at the joints is usually done with wood screws. They provide the necessary strength. Some craftsmen prefer to use nails rather than self-tapping screws (you will need a special nail gun). After assembling the frame, the floors and wooden beams are laid. All that remains is to make the roof. It is also equipped with SIP panels. Experts advise building a mauerlat - this is a special structure for holding the rafter system. After its construction, SIP products are installed on the latter.
At this point, the assembly work can be considered complete. Proceed with laying electrical wiring and other utilities, installing door and window structures. The finishing of panels inside the house is usually carried out with natural wood products. A more budget-friendly option is cladding with plasterboard sheets. The best way to finish the outside is with siding. The roof can be covered with ondulin or metal tiles, which are popular these days. It is allowed to use other roofing materials.
It will take 2-3 people no more than 90-100 days to build a small residential building using SIP slabs. If a building is being built on two floors, the time frame for completing the work will not increase. But in this case, you will have to attract several more assistants to work at height or use special lifting and transport devices. Good luck with your construction!
Assembling the walls of the first floor
The main thing where the instructions for installing SIP panels on the first floor of houses begins is the installation of a guide, a 100 mm beam. It is screwed to the foundation, with anchor bolts, directly through the floor structures where the walls will be placed.
This work must be carried out with the utmost care to ensure that even with errors in cutting wall elements, the general direction of the SIP panels will be respected. The correct installation of the timber is checked according to the instructions for the project and using templates.
Assembly is carried out in the following order:
- The corner of the first floor is being assembled. First, one SIP panel is installed. Securely fixed to the guide bar. The installation accuracy is constantly checked;
- a second SIP panel is mounted at a right angle. The connection with the first one is thoroughly foamed. The accuracy of the angle must be ideal - it will set the direction and be responsible for the accuracy of placement of the remaining SIP structures;
- assembly of house walls - installation of subsequent SIP panels - is carried out using a tongue-and-groove system. The elements are attached to the guide beam and connected to each other with self-tapping screws.
The technology for assembling the first floor from SIP panels is also simple. More control and care will be required, but the work is not difficult. When connecting SIP elements of a house wall at indirect angles, either the instructions for the project or the laid guide beam will help determine the direction and actual dimensions of each structure.
The assembly of the first floor is completed by foaming the perimeter along the top and installing the trim board panels into the technological groove. It gives additional strength to the entire structure of SIP elements and will work as a place for attaching the upper structures.
Recycled wood panels
A cheaper alternative to wood panel finishes is made from recycled wood. Its appearance is no worse than natural materials, but the quality leaves much to be desired. Despite this, the budget option is perfect for a room where warmth and dryness prevail.
In places where there is high humidity or drafts, it is better not to use it, because under such influences the material can dry out and crumble.
Compositions for sealing interpanel joints: criteria for selection and application
Glue for aqua panels is selected in accordance with the manufacturer’s recommendations. The best option is a dry mixture for preparing the Klebespachtel KNAUF universal adhesive. Dry powder for mixing with water, which is sold in packages of various sizes and contains adhesive for aqua panels. It is recommended to buy the composition in small quantities. After a practical check of its properties, the main volume is purchased, thus eliminating the risk of purchasing counterfeit material.
Do you want to buy drywall and other certified materials? Quickly dial the number! And if you haven’t made a choice yet, don’t hesitate to call! Our managers select materials and calculate estimates completely free of charge. If you are a wholesaler, you are doubly lucky! Special conditions for wholesale purchases, free delivery in multiples of trucks throughout the Moscow region, and, if necessary, on the day of order. Waiting for you!
Scope of application of external aquapanels
External Aquapanel Knauf provides unique opportunities for implementing the most complex façade work. Designers use aqua panels to create quite complex curvilinear and volumetric structures. According to experts, all the characteristics declared by the manufacturers are confirmed by practical application.
External aquapanels, which are especially durable, are intended for use in monolithic frame construction. The characteristics of the panels determine their use for the construction of kiosks, pavilions, garden gazebos and sheds operated in difficult climatic conditions, with high air humidity and temperature changes.