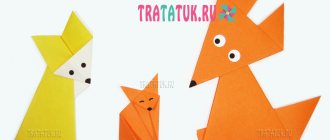
A simple origami rooster for children with step-by-step photo instructions. All actions are easy, accessible for preschool children.
What to prepare for work:
- Colored paper or special paper for origami. In this work, one-sided is used, but double-sided is also possible, just the beak will be the same color as the cockerel itself. Finally, you can color it with felt-tip pens;
- Some red paper or cardboard for the comb;
- White paper for eyes, or moving sticky eyes. Alternatively, eyes can be drawn with a felt-tip pen.
Origami rooster for beginners: paper folding steps
Prepare square paper of any size.
Fold in half, connecting opposite corners. This step is needed to mark a line in the center along which the sides of the paper will need to be aligned.
Open the paper triangle and point the sides inward so that they are along the fold line in the central part of the paper. For convenience, you can bend the sides from the bottom.
Turn the piece over to the other side.
Connect the lower sharp corner with the upper one. Press the fold at the bottom.
Turn the paper over again.
And then fold it in half. From right to left or vice versa from left to right. You will get this, still incomprehensible figure.
We turn it into a cockerel. Gently pull the corner on the right to make an origami rooster tail.
Bend the top first corner, and then redirect a small part of the corner inward to make a beak.
Cut out a scallop of any shape from red paper or cardboard and glue it to the top of the bird, in the area of the double paper. Add paper eyes (or simply draw them with a felt-tip pen), and you’ll get this colorful origami rooster.
Children can show their creative vision and paint the cockerel in various colors, draw patterns, highlighting the wings on the sides and the tail.
Origami cockerel Master class on making an origami cockerel
Our craft today will be made from a square piece of paper. It is this form that is most often used when creating crafts using the origami technique. And we will make a craft - an origami cockerel, shown in this master class.
To make it we will prepare:
- - paper yellow, white, orange, red;
- - scissors with glue;
- - black marker.
First, let's prepare a square blank from which we will make our cockerel. To do this, fold the corner of a yellow sheet of paper.
Then we cut off the excess. On the resulting square we additionally mark transverse folds.
Now we can fold this blank into a double square.
We bend the bottom corner taken from the top layer upward.
On the other side of the workpiece we repeat a similar fold.
For subsequent work, let's rotate our craft a little.
From the upper protruding corner we will make a cockerel's head and beak. To do this, this corner needs to be bent and at the same time bent in another direction.
Cut out the scallop from a small piece of red paper. Glue it between the layers of crafts on top.
We cut out a beard from the same paper. And glue a small orange triangle onto the beak.
Using a black marker, draw eyes on both sides of the craft.
We use scissors to shape the back part, forming the tail of a cockerel.
All that remains is to add the wings, cut them out of orange paper and glue them to the sides. This is the result of an origami cockerel.
How to draw a rooster
Embroidery "Rooster"
Other “Cockerel” crafts from participants in our competitions:
Cockerels sent to the “Winter Magic ” competition:
from plastic dishes:
from plastic bags:
From a plastic bottle, sequins, feathers, hair bands, garland bulbs.
From egg trays:
And I found this cockerel from my mother :). After all, all mothers keep children's crafts :). I don’t know how old he is, I covered this cardboard figure with colored candy foil (there was such a shortage!)
Modular origami rooster: step-by-step master class
Relatively recently, such a type of needlework as modular origami has appeared. A rooster made using the origami technique will appeal to both adults and children. For parents who want to arouse their children's interest in folk art, this is a great opportunity to spend time with their child.
To make a figurine you need:
- White copier paper: 26 sheets;
- Pink copier paper: 23 sheets;
- green paper: 5 sheets;
- yellow paper: 8 sheets;
- scissors;
- PVA glue.
Step by step assembly
Not everyone is familiar with the modular origami technique. The rooster, the assembly diagram of which is provided, will work for both adults and children.
In order to assemble a cockerel, you need 402 white modules, 367 pink, 122 yellow and 67 green.
The origami rooster is assembled from modules from base to top. Consists of 38 rows:
- 1 and 2: 15 white parts each;
- 3: 4 green, 8 yellow and 4 pink, alternating with each other;
- 4: Location as shown in the photo;
- 5: a total of 16 fragments alternating green and pink;
- 6: 4 pink, 8 yellow and 4 green elements alternate as shown in the photo;
- 7: The number of parts decreases. Total 8 pink and 4 yellow;
- 8: 12 pink parts;
- 9: 12 yellow;
- 10:12 green.
From rows 11 to 17 there are pink elements:
- 11: total 15;
- 12: add fragments from opposite ends, 22 in total. This way you will get a breast with a tail, and the origami rooster from the modules will look like a real one;
- 13: 22 parts;
- 14: from the tail side we add additional elements, 32 in total;
- 15: 32 modules;
- 16 and 17: 36 each.
From 18 to 22 of the second row we place white modules:
- 18: place 9 pieces in the middle of the tail;
- 19: attach 8 elements;
- 20: first place 7 parts, then add 4 more;
- 21: again 9 pieces.
- 22: attach 8 elements and, as shown in the photo, assemble the neck. Make two additional rows.
From rows 23 to 24, white parts are used:
- 23 and 24: 18 pieces each;
- 25 and 26: 15 each;
- 27 and 28: 11 each;
- 29: attach 10 parts backwards;
- 30: 10 fragments;
We attach additional modules to the finished rows.
- 18: total 28 pieces;
- 19: add 9 pink fragments on both sides;
- 20: add 8 pink ones on both sides;
- 21: similarly, 7 pieces each.
As shown in the photo, use PVA glue to connect the corners of the parts.
The cockerel's breast is located in front; for this, pink modules are additionally attached: row 19 - 8 pcs., 20 - 7 pcs., 21 - 6 pcs., 22 - 5 pcs.
Additionally there are white modules:
- 23 – 8 pcs., 24 – 7 pcs., 25 – 8 pcs.;
- 24: 1 green, 4 white and 2 yellow fragments are attached;
- 25: 2 white and 2 green, 4 yellow fragments;
- 26 and 27, 28 and 29 rows are similar to 24 and 25;
- 30: For the rooster's neck, add details so that the row consists of 16 elements. 4 yellow and 4 green, 8 white;
- 31: there should be 8 pieces each of yellow and green. We arrange it so that fragments of the same color are one above the other;
- 32: 8 white elements and 4 each green and yellow;
- 33: 8 yellow and green modules each;
- 34: arrange 14 white;
- 35: 14 pink parts, 3 of which are attached as shown in the photo. For the beak, add 2 more, and then 1 more.
The last three rows are assembled from yellow elements:
- 36: 14 each;
- 37: 12 modules and additional 2 green ones for the eyes;
- 38: 14 total.
You need to make a comb for an origami rooster. A ridge is formed from modules in front and behind the head. For every 2 fragments, first attach 1, and then 2 more.
A space has formed between the rooster's back and neck that needs to be closed. To do this, a part is made that consists of 5 rows of white modules: 1 – 9 pcs., 2 – 8 pcs., 3 – 9 pcs., 4 row – 8 pcs., 5 – 9 pcs.
Clay cockerel
Ilyina Elena Sergeevna, 5 years old, Volgodonsk. Club “Brilliant Kid”, teacher Perchikova Irina Leonidovna.
Vociferous cockerel, Red-scarlet comb. In the morning, as soon as the light rises, he sings a song loudly. He has so much to do, he got up early and managed to do everything!
N. Borisova
1. We sculpt a rooster from clay.
2. Paint it white.
3. Paint the rooster and varnish it.
4. Thread the ropes.
DIY paper rooster: options and master classes
The most common rooster made of checkered or lined paper (not to be confused with origami) is familiar to all people, without exception, whose childhood was spent in the Soviet Union.
Of course, many adults today do not even remember how such a funny little thing is made. However, those parents who still retain such knowledge can greatly please their children. After all, today's children grow up surrounded by various gadgets, and not handmade crafts, which has a rather negative impact on the harmonious formation of their inner world.
A cockerel from our childhood
And to make a paper rooster craft with your own hands, take:
- a sheet of paper (colored, checkered, lined - it doesn’t matter);
- scissors.
The process of creating a cockerel “from childhood”:
- cut the paper sheet so that it becomes a square;
- bend all 4 corners of the square to the center;
- turn the workpiece over;
- fold all 4 corners of the square to the center again;
- turn the paper over;
- and fold all 4 corners to the center again;
- turn the square over;
- unfold the two lower opposite corners of the square and smooth them out (these are the future legs of the rooster);
- Carefully grab the two opposite corners located above the cockerel's legs and pull them. The goal is to turn the corners inside out;
- bend one of the sides of the craft so that you get a beak.
That's it, a wonderful do-it-yourself paper rooster, just like in childhood, is ready! Can he compete with a rooster made using the origami technique? Judge for yourself.
DIY paper origami furniture: diagrams, master classes
Origami rooster
How to make a paper rooster using the ancient art of origami?
- Take a sheet of paper (preferably colored)
- Make a 15*15 square from this sheet
- Fold the sheet diagonally so that the bottom right corner meets the top left corner
- Unfold the sheet and fold it diagonally again, but now the bottom left corner should coincide with the top right corner
- Unfold the sheet and place it on the table so that it forms a diamond shape.
- Fold the right corner to the center fold (to create a triangle at the top)
- Do the same with the left corner.
- Fold the resulting triangle upward
At this stage, the workpiece should have the shape of a triangle. Please note that in this case, paper cutting is not used at all; the rooster is obtained just like that.
- Fold the bottom left corner to the center fold
- Fold the lower right corner to the center fold as well.
- Unfold the sheet of paper completely and iron it
- Take the topmost corner of the diamond and connect it to the bottom corner, which was formed from several folds
- Mark a point in the center of the fold of the sheet
- Unfold the sheet and connect the top corner with the resulting point
- Bend the sheet and straighten it again
- Take the right corner and fold it towards the center fold (the triangle should be at the bottom)
Attention: iron only the upper half of this triangle.
- Expand the sheet
- Do the same with the left corner, unfold the sheet again
- Turn over the paper
- Fold the top corner to the center fold
- Unfold it
- Fold the top right side towards the center fold, fold it back
- Do the same with the left side, unfold the sheet
- Take the top corner and connect it to the middle of the bottom right side of the diamond
Attention: make a bend only between two existing lines.
- Unfold the sheet and repeat on the left side
Now comes the fun part, as the paper rooster created using the origami technique is finally starting to take shape. And in order not to make a mistake in the intricacy of lines, which is quite complicated for beginners, watch the attached video.
As it becomes clear, such a rooster is much more difficult to create than a rooster “from a happy childhood.” How else can you make a paper rooster?
Paper cockerel
We suggest not to waste a single second and start creating a beautiful and bright cockerel from origami modules, this master class will help with this.
In order to make a contrasting rooster, you will need to take bright paper in orange, red and yellow colors. The color used was black. Also don't forget the second glue and PVA glue.
We make modules 1/32 in size. In total, we needed about 900 modules, namely 386 modules were used for the body, 150 for the head with a beard and neck, forty modules for each leg, 245 modules were taken for the tail for the rooster.
The first step is to assemble the body for the rooster. To do this, we collect twenty modules in a circle. In the first row we take 8 yellow ones, and the rest are black modules.
Up to the fifth row (inclusive), the number of yellow blanks decreases by 1, the number of black modules increases by 1. In the sixth and seventh rows, add yellow modules (one at a time), remove black ones.
In the eighth row, we first collect five yellow modules (the center of the cockerel), then on each side one brown module and five black ones.
Six corners remain free at the back. We will glue the tail into this place later.
In the next row we collect six yellow ones, one brown module on each side and five black ones. Please note that the last black modules need to be put on only one corner.
How to glue linoleum to the floor - a review of means and methods
At this stage, an orange stripe is added.
It must be entered in the following sequence: in the tenth row there are 5 yellow ones, then one orange module on the sides, then a brown one and four black blanks. In the next layer add one yellow module.
In the 12th row we collect 5 yellow, 2 orange, 1 brown, 3 black modules from each side. Then in the next circle we add one yellow module.
Related article: Try knitting such a beautiful summer dress
In the fourteenth row we put on five yellow ones, then we pass two corners on each side, then two orange ones, then 1 brown and two black modules. We do the same on the other side of the rooster. The wings and abdomen will be assembled separately from each other.
We begin to assemble the abdomen. We alternate the number of yellow modules (six, then five). In the twenty-first row we have four yellow modules, and then their number decreases with each row to one. The belly is already ready.
Now it's time for the wings. In the fifteenth row we collect two orange, one brown and a couple of black modules. In the next two layers we remove one black module.
We will work in pairs, that is, we do one action in two rows. In 16 and 17 we do not take black modules, and in the next two we collect only orange blanks. In rows 22 and 23 there is only one orange module.
Fabric cockerels:
Cockerel made of satin ribbons
Cockerel - ribbon applique
From felt
Cockerel - felt magnet
Felt cockerel
From viscose napkins
Cockerel made of foamiran and chenille wire:
Cockerels sewn from fabric
Master Class
Coffee cockerel
Fragrant toy “Cockerel”
Cockerel made of nylon
Rooster from origami modules: master class with step-by-step photos and videos for beginners
Recently, modular origami has become increasingly popular. Unlike classic origami, a highly complex art that not everyone can master, even a novice needlewoman can perform modular origami.
Its main advantage is that you can make amazing three-dimensional figures and figurines from identical pieces of paper folded in a special way. A rooster made from modules using an interesting origami technique will decorate any apartment and will be an excellent gift.
To help you, we offer a detailed master class with step-by-step photographs.
Rooster from modules: step-by-step photo master class
Necessary materials:
- 6 yellow sheets of A4 format;
- 4 - orange;
- 1 each green, blue and red;
- scissors;
- glue.
Also, for beginners, specialized stores sell ready-made modular origami kits with detailed assembly diagrams and instructions for completing the work. There are also video tutorials.
Making modules
Let's look at how to perform a rooster yourself. We will need a large number of parts. To do this, take a colored sheet of A4 paper, draw it so that it contains 32 identical rectangles. Or bend it in half several times, then the creases will turn out like in the photo below. Carefully cut the sheet along the fold lines with scissors.
Use the following diagram to make the elements.
How to decoupage shoes and other leather products
Multi-colored triangles allow you to assemble models of varying complexity, size and configuration. Please be patient and willing, as it will take several hours to complete the modules. Folding the sample will be faster. We offer the following mk for creating paper elements.
Step-by-step instruction:
- Take a rectangle.
- Bend it lengthwise, as in the picture.
- Fold the resulting figure in half again.
- Unbend it.
- Fold the right side of the part towards the middle to form a triangle.
- Repeat the same operation with the left side of the rectangle.
- Turn it over.
- Bend the ends of the element as in the picture.
- Lift the bottom of the sample up, pressing it well.
- Repeat the procedure on the left side of the product. Then fold the triangle so that it is voluminous. The module is ready. The Golden Cockerel will consist of them.
Rooster Assembly
Decide on the model you are going to make. Simple instances are faster and easier to do yourself. Having learned how to make parts, proceed to directly assembling the sample. The proposed master class will tell you how to make a rooster with your own hands using modular technology.
To work you will need 347 multi-colored triangles:
- 4 red;
- 19 blue;
- 31 green;
- 101 orange;
- 192 yellow.
Step by step description:
- Make the required number of elements. It will take a couple of hours to fold. All new autumn crafts for kindergarten and school
- Take two parts and place them side by side.
- They are connected to each other by a third element by nesting into each other.
- Assemble the body of the rooster from yellow modules: first row of 29; second - 28; third – 27; fourth – 26; fifth 25.
- Connect the parts in the form of a circle. Turn it inside out.
- Pick up the wings, tail and neck of the cockerel. The sixth row consists of 31 parts: Wing: 2 orange, 1 yellow, 1 green, 1 blue, 1 green, 1 yellow, 2 orange modules. Second wing: do the same on the opposite side. Fix the first and last orange module on one corner of the triangle. Neck: made of 7 yellow. Tail: 6 yellow. This will leave free ends between the wings and the neck, as shown by the handle in the photo below.
- View from above. The handle points to the neck of the origami rooster.
- Continue folding the wing. With each subsequent row, the number of triangles will decrease, and the edges will have one free corner. Origami rooster can be made in any color.
- Having finished the wings, start creating the neck:
One at a time, place 6 orange modules on top of each other and 1 yellow one for the beak. - Make a comb from 5 red triangles.
- This is what an origami paper rooster will look like.
- Fold five multi-colored stripes: two green and orange, each consisting of 13 elements, and one blue, each consisting of 15 segments.
Place the strips on the body of the betta. Glue the necessary parts with PVA - this will make the structure stronger. For beginners, we recommend watching a video describing the technique of performing the work. - Follow the step-by-step master class and get a beautiful modular origami rooster.
The proposed model is simple and does not require many elements. This was my first time making a rooster using the origami technique, so this kind of handicraft can be done by anyone.
Small human figurine: simple description and diagram
For each detail of the man, you can use paper of different colors, for example, make the top yellow and the pants blue. But to simplify the task, it is better to use one-color material. You don't need a pencil to create a man.
- So, the square material is bent in half, then the side corners of the figure are bent.
- A zipper fold should be made at the bottom of the sheet. The corner is lowered at the top. Then the figure turns over.
- The corner is slightly bent. You don't need to bend it too much, just lightly mark the fold line.
- After this, you need to carefully flatten the “pockets” of the resulting shape, bending the resulting triangle.
- One half of the product is bent back.
- The corner is pulled up, part of the paper is pulled out. The elongated figure is an almost finished man.
- After pulling the figure up, only the “nose” of the triangle should remain visible.
- The corner bends inward, and the man’s head rises up.
- The remaining upper corners bend inward on each side.
Carnival costumes:
“Cockerel”
Costume “Cockerel – 2017″
New Year's costume "Cockerel"
See also:
DIY Christmas trees
DIY Santa Clauses
In order not to forget the address of the page and share with friends, add it to your social networks: Do you want to know news about competitions or master classes?
Tags: New Year's crafts
Attention! It is better to write urgent questions in the comments on the website (form at the bottom of the page) or, better yet, directly by email. There are no notifications about comments from the VKontakte form! This form is more for feedback. 
Discussion: 2 comments
- Albina Nikolaevna:
January 22, 2022 at 4:53 pmThank you very much for the work done, it is huge, the section of cockerels shocked me with its power and the imagination of what materials he, the future owner of the year, made of, but I didn’t wet myself, now the monkey is still living in his last weeks, but the cockerel will come to us at the end of February, it was done , all beautiful and original in their own way. I give preference to a cockerel made of nylon, after all, this is a painfully familiar material to me, although I haven’t been working with it lately, as my hands hurt from torsion. The original solution of stretching a beaded cockerel onto a wire was an original solution, I admired this miracle for a long time. Larisa, what have readers already voted for? If there is no place where this can be done, write.
Answer
Larisa:
January 22, 2022 at 5:19 pm
Hello, Albina Nikolaevna! Yes, I too, when I saw this nylon rooster, I immediately remembered you :). This time they decided without a vote; it usually attracted only a few people. But whoever wants can leave their reviews under the works and vote with “likes”, this can also affect the results of the competition