How to make a phone case from an old case
Replacing the inner liner
If the bumper is transparent, you can change the inner liner. If it was not there, add it. To do this, you will need to select any photo or picture and print it. Then cut along the desired contour and paste it in place of the old image. It will turn out very original.
Decor with stripes of different colors
Striped decor will help transform even the most boring design. You can buy decorative tape, with or without glitter, at craft stores. The transparent bumper is glued on the inside. The colored cover is decorated on the outside.
Fabric decor
To transform an old cover, fabric cuttings will come to the rescue. They should be glued to the product and the appearance will improve.
Herbarium
Using dried flowers will create a unique style. You will need any dried flowers, glue and clear varnish. First you need to lay out the elements on the bumper to form the future picture. Then each flower or leaf is coated with glue and leaned against the product. This must be done with all elements. Finally, the painting is coated with clear varnish. It is important to wait until the product is completely dry. Ready.
Colored varnish
Decorating with varnish can transform the appearance of a product, even if you simply add colorful dots.
You can also draw lines or zigzags.
Paints
Paint patterns will allow you to create masterpieces, if used skillfully. If you take several colors, you can create gradient paintings or depict outer space. A regular dishwashing sponge will help. You need to dip it in paints of different colors and make any fantasies come true. It is very convenient to use paint in a can. But the cost is quite high if you need several colors. At the end of the work, you will need to coat the product with a clear varnish for durability.
Contour painting
Painting with acrylic contours for glass allows you to create very original models. They come in different colors.
Before you start, you should try making a couple of strokes on paper to get used to the paint.
You will need to treat the product with an alcohol wipe and then start creating. You can use a stencil.
While working, periodically, you need to clean the outline with a pin for better drawing.
The result is a convex surface. You can additionally glue beads or rhinestones.
Sticker of little things
An old bumper will appear in a new light if you decorate it with various decorative elements. These can be beads, rhinestones, sequins and lace. They need to be glued to the product. It turns out very cute.
You can watch a video where several decoration methods are combined. First, the bumper is covered with paint, then rhinestones are glued to it.
All these methods will give new life to an old case. It will last for a long time.
We disassemble the mold and make the second part of the cover
Once the leather cover is dry, you can remove it from the mold. Take a moment to admire your results, then take another piece of leather and get ready to cut out the back of the case.
Trimming the back of the case is quite simple, I used a breadboard to get a rough idea of what size the back of the case should be, adding 10mm to each side so I had enough room for gluing and mistakes.
From a plastic bottle
You can create a transparent bumper yourself. You need a bottle and glue.
- The plastic bottle is crushed;
- the outline of the phone is cut out;
- the part is placed on a gadget protected by paper;
- The edges need to be passed with a glue gun.
The unique model is ready. On the left it remains transparent, and on the right it is varnished. You can even make a gift for your family for any occasion.
Apply topcoat and polish
As I mentioned earlier, I'm still not as good at finishing leather as I'd like to be, so if you have your own finishing option that you'd like to try, I suggest you check it out and do some research/experimentation so you can find something that really works well for you. If so, don't forget to share it here in the comments or write your own article on LeatherThoughts!
For this project I chose a simple olive oil finish. The olive oil will protect the leather and also give the surface a nice dark brown color that will really bring out the stamped patterns! To apply the oil, I used cotton balls, rubbing several layers of oil into the surface of the skin until I achieved an even finish. Be careful when applying an oil finish as it can make the leather look damp and ruin your project. After applying the oil, I switched to a piece of clean cotton cloth and then quickly rubbed the entire case down to add a shine to the surface of the leather for a high quality finished look.
How to make a phone case from cardboard
This solution will be useful as a temporary solution. Helpful at a themed photo shoot, for example.
You will need thick cardboard, super glue, a paper knife and a pencil.
- The phone is outlined;
- then it is cut out with a paper knife;
- you will need to cut all the necessary holes;
- Next we work with the side panels;
- you need to cut strips the same width as the phone;
- then holes are left in them for buttons and inputs;
- The strips are glued around the perimeter of the phone with super glue. In the photo the arrows point to this.
The finished product is coated with paint. You can cover it with decorative paper and elements.
Tools
- Table Saw – This project requires some wood as you will need to make a wooden replica of your phone and a wooden frame to press and hold the skin on top of the mockup. You will need some way to cut the wood, a table saw is my choice, but a bandsaw, jigsaw, circular saw or even a handsaw can get the job done with similar results.
- Drill and drill bits
- Kreg Pocket Hole Jig – This is an awesome little tool! I used it to assemble the frame needed to stretch the leather over the wooden phone mockup. Self-tapping screws hold the wood together tightly and allow you to adjust the frame to the desired size. Below is a link to an analogue of this tool.
- Manual frezer
- Jigsaw
- Clamps
- Knife
- An edge cutter and a slicker are two tools designed to finish the edges of leather (think about your leather goods, have you ever noticed shiny, polished edges? Here are the tools that do that.) The edge cutter cuts straight edges after cutting the leather, and the slicker polishes them until smooth surface. Please note that the slicker is used in combination with Gum Tragacanth, which helps the leather fibers bond together.
DIY phone case
This case will come in handy when watching videos. You can use different materials. The main thing is that they are stable and durable.
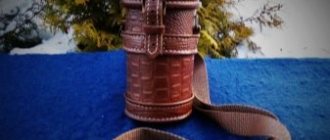
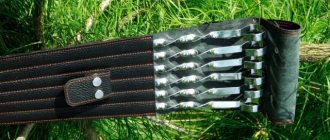
Leather
You will need leather, a special hole punch or awl, and threads.
- you will need to measure the phone parameters;
- you need 2 such parts;
- now you need to take a large sheet of leather;
- place both finished parts side by side on the sheet;
- now leave 1 cm between them;
- trace and cut;
- pierce holes for flashing with a hole punch;
- sew the parts to the sheet.
You can use a ready-made item.
From a book cover or notepad
Its dimensions must match the phone. Otherwise, you will have to cut the phone parameters. Additionally, you need a pencil, a stationery knife, cardboard, and rubber bands for attaching the gadget.
- You will need to tear out the paper block;
- one of the covers must be divided in half by a line;
- along this line you need it to bend;
- At the same time, cut out a piece from cardboard with the same size as the phone;
- glue the elastic bands so that the adhesive side is on the back side;
- Glue the prepared part onto the outer part of the book cover;
- Now you need to decorate the cover with fabric or beautiful paper.
Materials
- Leather – For this project I'm using 6 oz vegetable tanned leather (you can find out how much that is in mm on the Leather Infographic page), which I use for almost every project I do.
- E6000 Glue – There are specific adhesives for leather work, but I have found that E6000 does a fantastic job of gluing leather together, and the nice thing is that you can buy it at many hobby stores and home improvement stores or auto shops for half the price of leather glue. skin. E6000 is a flexible adhesive, which means it will flex with the skin. (This is silicone glue. In Russia, its analogue is Don Deal adhesive-sealant or any other, you can buy it at a car store. - approx. transl.)
- Leather Finishing Chemistry – Although I've dabbled with leather for a while, I still consider myself a newbie when it comes to things like finishing. For this project I use olive oil to protect the skin. If you do a little research on the use of oil when finishing leather, you will come across two opposing opinions: some people think that there is nothing better than oil, others think that you should stay away from it. Personally, I like oil finishes on the skin, they are easy to apply and look good. If you notice that the leather product is losing its original appearance, then simply apply a little more oil. *Update: After some great posts in the comments below my articles, I've learned that oils like Neatsfoot Oil are much better for finishing leather as they don't go rancid like olive or vegetable oils.
- Gum Tragacanth – This substance is used to treat the edges of the skin. Some people say that you can use water or even saliva instead, but you won't get the same professional-grade results. A bottle of this stuff will cost you about $10 and will last you for years.
- Tokonole is a Japanese end finishing product. It is used in the same way as tragacanth, but smells nicer.
- Phone – You will need whatever phone you are making a case for. For this project I used my Samsung Galaxy S5.
How to quickly make a case from a balloon
This method will greatly help the owner of the gadget in cloudy weather. Or if you need to go to a pond, but there is no waterproof cover. It will take very little time to manufacture and its cost is very low.
All you need is a balloon.
- You need to inflate the balloon, but do not tie it;
- now the phone is placed on it with the back cover;
- press the ball very slowly;
- the air gradually comes out and the phone is covered with protection.
Express case is ready.
Glue and clamp again
I used E6000 glue to attach the front of the case to the back. There are specialty adhesives for bonding leather, but I've found that E6000 does a great job of creating strong, flexible, and long-lasting bonds (plus it's cheaper than specialty leather adhesives and has a much wider range of uses).
TIP : E6000 is difficult to control in the original tube. To make it more manageable, squeeze the amount of glue you think you'll need for your project into the tip of a plastic bag, then seal the bag after removing as much air as possible. Then use scissors to cut off a tiny piece of the tip of the bag. This essentially creates a pastry bag for the glue, allowing you to easily and precisely apply the glue exactly where you need it.
Once the glue is in place, place the design back into the case and then put the back of the case back in place. Next, place the leather cover assembly you just created back into the mold and clamp it again the same way you did when you initially molded the leather. Securing the case in place will ensure that the adhesive thoroughly holds the front and back of the case together.
Allow the glue to cure for about 2 hours before removing to ensure better adhesion.
You might ask, shouldn’t you be sewing?
Good question! Sewing is definitely a good way to ensure a strong bond between two pieces of leather. I actually worked on this project with the intention of sewing both sides together, but when I started experimenting with E6000 glue and realized how strongly it stuck to the leather, I decided to just let the glue hold the case pieces together. If you still feel the need to sew, you can certainly do it.
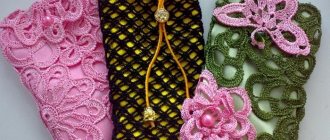
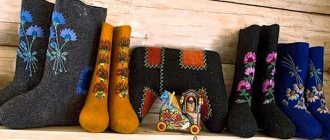
How to sew a phone case with your own hands from felt
This material comes in a variety of colors. You can give free rein to your imagination and create anything you want. It is possible to make a closed bumper with or without pockets. In addition, the felt is very pleasant to the touch. Will keep you warm in cold weather.
Closed case
You will need felt of different colors. Threads, scissors and glue.
- you need to circle the phone along the contour, retreating 1 cm from the edge;
- make two such parts;
- now you need to stitch them on 3 sides;
- leave the upper part unsewn;
Decor. You need to cut out small balloons and a house. Glue them one by one.
You can come up with your own decor. Examples in pictures.
With pockets
Here you will need to cut out three parts. Two of them are the same length and width. The third piece should be the same width, but shorter. Like on a picture.
The parts need to be sewn all together.
You can complicate the task a little. Cut out more details. Two of them are different colors, but the same size. Two pieces are the same width, but each is shorter. All of them must be sewn together.
These are the funny covers you can make from this cozy material.
Tools and materials
You won't need a lot of materials for this project, but you will need a few tools, specifically some standard woodworking tools such as a hand router and a jigsaw. You will also need a few leather finishing tools such as an edge cutter and a slicker, but if you don't have them feel free, I have included links below to tutorials where you can learn how to make them yourself, I will also provide links to aliexpress. if you prefer to buy them.
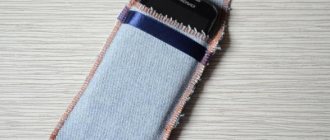
DIY phone case made of fabric
To make such a thing, you should choose dense fabrics. They are more durable.
Old jeans
Denim is perfect. You just need to cut out a couple of parts and sew them together.
This product can be decorated with beads or lace. Inserts made of contrasting fabric look great.
Various fabrics
Some people create covers from several different fabrics. It turns out cute.
- Here you need to cut out 2 parts the same size as the phone, retreating 1 cm from the edge;
- You will also need 2 parts to close the phone;
- they are all stitched together;
- then the cover is sewn to the case itself.
The cozy model can be used.
We process the ends
This is one of those steps that really impacts the quality of your final project. Finishing the edges makes the whole project look better, even if it's not a pretty piece.
Step by step guide to finishing edges:
- If you are working with an edge that has two layers of leather joined together, trim the edges so they are even. (You already did this in the previous step.)
- Use an edge saw to trim the edges of the leather, making sure to cut on both sides.
- Lightly sand the edges using 220-grit sandpaper to remove any rough spots or edges caused by the edger.
- Apply Gum Tragacanth evenly along the edges of the skin. Be careful not to apply Gum Tragacanth to the surface of the leather as it will act like a varnish and will not allow the finish to pass through.
- Let Gum Tragacanth dry slightly; it will become slightly sticky.
- Finish the edges of your project quickly with a slicker. Gum Tragacanth will penetrate the leather fibers and help fuse them into a polished edge.
- Apply more Gum Tragacanth if necessary and continue polishing until you have a nice polished edge.
Leather mobile phone case
This type of cover is popular among the male population. It looks stylish and brutal. Even working with leather is easier for men. After all, you will need to pierce the holes with an awl or a hole punch for leather products.
You will need leather, a hole punch, and threads.
- You will need to trace the outline of the phone on the skin;
- You need to cut 1 cm more;
- You need to make 2 parts;
- On one of them it is worth cutting out a circle for the camera;
- now is the time to pierce the holes for the firmware;
- You will need to sew the parts on 3 sides with thread.
The case is ready.
We put a stamp
While the wet leather is pressed into the mold, you can add some branding to decorate the outside of your leather phone case. The mold design allows easy access to the front of the case so you can stamp or finish the leather in any way you like. TIP: If you want to stamp designs on leather, I suggest waiting a few hours until some of the water in the leather evaporates. If the skin is too wet, the stamps will not leave clear marks.
Instead of using the traditional stamping method with a tool and hammer, I decided to use clamping pressure to place a larger stamp on the soft surface of the leather. This technique gives excellent results and allows you to add truly intricate decoration to your skin with minimal effort. Plus, if you have access to a 3D printer, you can create your own stamps to personalize your work.
Popular colors for cases
Abstract patterns, mixing the brightest colors and wooden or even metal products are all in trend for the second year. Nowadays, bamboo covers have also become increasingly common, which are not even decorated with additional elements. You can also make a similar accessory, but use cardboard, a transparent case, or even more exotic options as the base.
Accessories should not only have trendy colors, but also match the image being created. Select covers to match the image you create, focusing on following the basic rules of style.
Felt
For a smartphone case made with your own hands from felt, you need the felt itself, drawing supplies, glue, needle, and thread.
First you need to take the gadget and place its back side on the material. Draw a circle in detail and create 2 blanks. Please note that the blanks must have an allowance, as they will be sewn together later.
After the blanks are cut, they must be sewn together with a regular seam. If desired, you can apply a design or pattern to the phone case. You can also cut out anything from felt, such as flowers.
Painting a silicone bumper (detailed instructions)
Anyone who has a glamorous, bright silicone bumper for their phone eventually faces the problem of soiling it, which can no longer be eliminated by any cleaning products.
2. Information on the Internet about painting silicone is extremely scarce, and all advice boils down to one thing - buy a new one.
3. Buying a new bumper is not our method; a decision was made to reincarnate it in a different color.
4. For this we need. hair dye (black). I took the cheapest one for 50 rubles.
You can buy such a case on Ali for about the same money.
5. Dump out the contents of the box with instructions. We leave the necessary bags (we won’t need the balm after coloring, though.)
6. Prepare a packaging bag - one piece.
7. Don't forget about personal protective equipment.
8. Squeeze out the cracking paste and mix by squeezing the bag.
9. Place the bumper in the bag.
10. Mix and wrap.
11. After some time, a reaction occurs, the bag turns black and warms up a little. I let it sit for about two hours (to be sure), stirring periodically for a more uniform coloring of small parts and holes.
12. We extract the test subject.
13. Rinse in running water. When all the nasty stuff is washed off, wash it again with soap.
14. Wipe and enjoy the result.
15. Issue price - 50 rubles. The advantages of the method are that the silicone is impregnated, it can be washed, scratched, and wrinkled; the paint does not fall off or fade. Disadvantages - not noticed yet. Z.Y. Using the same method, I painted bright (but already darkened) straps on children’s watches. All the best!
Source
Useful tips
Before you start making a smartphone case with your own hands, you need to consider the following points:
- Use only safe materials in your work (liquids without toxic vapors and solid materials that do not cause allergies and comply with sanitary and hygienic standards).
- Do not give children very small, sharp or loose objects.
- A homemade case should not injure the skin of your hands and face or contain sharp or cutting elements.
- The case should not block the speakers and phone camera.
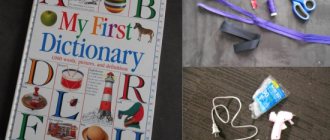
Accessory with liquid inside
Making a water cover with glitter inside is very easy.
- You need to prepare: a transparent silicone case; glitter and confetti; waterproof glue; oil (sesame, refined vegetable, flaxseed).
- Carefully make a slit in the silicone and pour confetti and glitter inside.
- Add oil.
- Seal the slot with glue and place a weight on top to secure it.
- Wait about 30 minutes for it to harden.
Master class on making a water, gradient and edible case:
Recommendations
When choosing a method for making a case for your phone, first of all you need to be guided by the requirements that the phone case must fulfill.
If you choose a simple, beautiful case, it will not fully protect your phone. After some time it will break or stretch. After that you will have to buy another one of the same kind.
A book case provides the best protection. It protects the phone on both sides, preventing it from cracking or dust or sand getting into the speaker. Moreover, it has a very convenient smartphone location that allows you to watch movies.
Paper
All you need is a sheet of paper, a glue stick and scissors. Initially, you need to make markings according to the size of the phone. Then cut out the desired stencil from paper. Please note that on one side an allowance must be allowed. This is done so that when gluing the seam is on the outside. Next, simply fold the cut out stencil in half, glue the seam, wait until it dries, and you can use it. Such smartphone cases are only suitable if you urgently need to provide minimal protection for your smartphone. In fact, a paper case will not protect your smartphone from various influences.
Gotovchenko!
Thank you for taking the time to read my tutorial on wet molding a phone case. I hope you enjoyed the information presented in it and that it may have sparked an idea or two for you. This is a really good project because the process is very simple and the results look very professional. Additionally, this technique can be taken much further to create more complex shapes or to create larger items such as bags or even leather armor components if that's what you're into.
Author of the master class – Matt
Translation LeatherThoughts
Metal design
In the coming season, metallic shine will be relevant again. This means that it’s time to make a fashionable design for your smartphone.
Let's prepare the following:
- sticky paper;
- scissors;
- Printer;
- case.
To begin, use the editor to create a template of the required shape and print it on adhesive paper.
We cut out the circles and glue them to the case in a chaotic manner.
If you choose a different design, then repeat the same steps.
You can make a stylish, metallic design using special tape.
Choose your favorite color and cut off several equal-sized pieces.
We glue them to the phone one by one, forming a geometric style.
This accessory will complement your fashionable look.
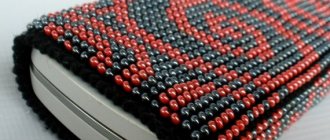
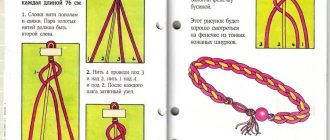
Beads
Beads presuppose the presence of a case and the open question “how to paint a smartphone case.” To decorate it with beads, you need to literally cover it with this material.
You need to apply glue to the old case, and then carefully apply the beads. It is very small and very easy to lose. To create an even pattern, it is recommended to trim the beads with a ruler. With its help, the decoration of your phone will be as smooth as possible.
This work is very painstaking, and it will take a lot of time to decorate the entire phone in this way. Moreover, after the beads are glued, you need to be as careful as possible with the phone. Any careless movement may cause the entire decoration to fall off.