How to give chocolate in a beautiful and original way?
Chocolate is far from a banal, but a very pleasant and tasty gift for any occasion. You can give chocolate to both a friend and your boss, the main thing is to present it correctly. You can choose any chocolate as a gift: black, milk, white, with additives, domestic, foreign, handmade, a bar of 100, 200 and even 500 grams.
A modern way to “decorate” a chocolate bar is to make a chocolate bowl. This is a special wrapper, glued together with your own hands, decorated to taste. The good thing is that this decor for delicacies can be made for any holiday: New Year, Birthday, professional date (teacher’s, educator’s or doctor’s day).
IMPORTANT: You can purchase decorations for a chocolate card at any store that sells creative materials.
There are several types of chocolate bowls:
- Chocolate box packaging is intended only to serve as a beautiful packaging for a chocolate bar.
- Chocolate girl with congratulations - inside each card there are poems or congratulatory words.
- Chocolate box with tea - in this card you can also put several tea bags (pockets are made for this) or coffee sticks.
- Chocolate maker with money - on one side there is a special pocket for bills
IMPORTANT: The chocolate bar must be presented solemnly, inserting it into the “chocolate box” packaging and trying not to damage the decor in any way.
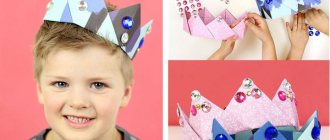
Chocolate maker - a way to decorate chocolate for a gift
Master class on New Year's decoration of chocolate for a gift
There can never be too many sweets for the New Year, especially if they are beautifully decorated and simply attract with their sparkling appearance. If you want to surprise your friends while spending a minimum of money, this option is suitable for you. An ordinary chocolate bar is hidden inside such a gift, and on top it is decorated with New Year's elements. In general, the gift will make an impression much more than if you simply place a sweet present under the Christmas tree.
What you need to prepare to decorate the chocolate bar:
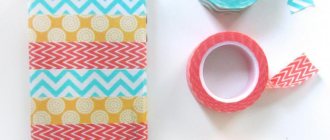
- thin blue paper;
- double sided tape;
- scissors;
- hot glue;
- bright snowflakes in the form of sequins (either made of light clay and molds, or printouts cut out of thick paper);
- circles made of glitter foamiran;
- inscription;
- themed tape with a New Year's design.
How to decorate a chocolate bar for New Year's
Take plain blue paper for work. Selected decorative elements will look great against its background. Choose a chocolate bar.
Place double-sided tape on one side and start tearing off the strip.
Having eliminated the strip, press the edge of the blue paper to this place, smooth it out and begin wrapping it directly onto the chocolate package, preferably tightly. Press down along the edge with your fingers so that the new package follows the curve of the main bar.
Glue the edge of the paper and get ready to line the top.
The sides above and below should also be hidden; press the paper in these places.
Next, lower the top and bottom parts and glue them together so that you get a regular block.
If necessary, use scissors to trim off the excess, that is, the chocolate should be neatly packed in blue paper.
Take a beautiful tape with a suitable design, for example, with snowflakes, with knitted motifs and so on. Stick 2-3 stripes, pointing them in different directions.
Use any snowflakes you cut yourself from paper, or sequins or cabochons to fill your gift.
Stick snowflakes randomly.
Cut out rounds of different sizes from glitter foamiran of different colors and prepare the inscription “Happy New Year”.
Complete the scattering of snowflakes with glitter rounds and attach an inscription.
A delicious, desirable chocolate bar was hidden inside a bright wrapper. You have received a unique handmade gift for the New Year.
Chocolate surprise card with pockets for tea: ideas, templates, photos
A postcard with chocolate and tea (or coffee) is a pleasant and very appropriate gift for any occasion. This is a sign of attention that indicates your sympathy or respect. Choosing chocolate and tea should be based on a person’s preferences. The tea should be packaged in a beautiful foil or paper wrapper and placed in special pockets inside the chocolate bowl.
How to do:
- Thick cardboard should be used as the basis for the chocolate postcard.
- It must be cut according to the template (rectangle measuring 22 by 7 cm)
- Looking at the template, bend the cardboard correctly to make a card
- You also need to cut tea pockets from cardboard measuring 8 by 14 cm (look at the template).
- All templates must be glued together (pockets inside the card)
- Then decorate the card to your liking (you can use wrapping or designer paper, lace, ribbons, beads).
Stage No. 1
Stage No. 2
Stage No. 3
Stage No. 4
Ready-made chocolate bowl with pockets for tea
Chocolate for a girl
For a girl, you can choose milk chocolate with fruit filling
,
caramel
or
biscuit crumbs
.
All girls, without exception, love romantic gifts. It’s worth thinking about how to present a chocolate bar beautifully, so that the wrapper is sure to be “tastier” than the contents. To do this, you can make a neat cardboard box in delicate colors, resembling a chocolate bar in shape and size, insert a living flower into the box (for example, an exquisite rose or an amazingly beautiful daisy) and put a chocolate bar inside. And the final touch is a beautiful congratulation with a mention of the sweet life that awaits you ahead. The gift will be very impressive and unforgettable.
Beautiful glitter paper, delicate white ribbon and three pearls
It will come in handy!
Find out 10 ways to beautifully and unusually wrap a gift with your own hands
Chocolate card scrapbooking: ideas, templates, photos
A chocolate maker is, first of all, a postcard, which means it must contain congratulations and pleasant words. Chocolate in such a card is just an unexpected and tasty addition.
Adviсe:
- Cut out a card template from thick cardboard
- Make a pocket for chocolate (and tea or coffee)
- Between the pockets or on the other side (opposite the chocolate bar) of the postcard, glue poems printed on paper and cut out.
- You can also use clippings from magazines and phrases carved from wood (sold in handicraft stores).
- Decorate the outside of the chocolate bowl with lace, ribbons, pictures and cutouts.
Chocolate girl with congratulations (option No. 1)
Chocolate girl with congratulations (option No. 2)
Chocolate girl with congratulations (option No. 3)
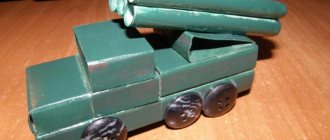
To please a man
It is better for men to give hard (non-porous) dark chocolate
.
If a man likes chocolate with nuts
, then let the nuts be large and whole.
An interesting idea for how to give a chocolate bar in an original way would be to wear a chocolate bar in a shirt with a tie and a jacket. Everything is done simply and quickly from cardboard or corrugated paper in the desired colors. We put the chocolate in a jacket or sweater, with or without buttons, and a memorable gift is ready.
Chocolate card for March 8: ideas, templates, photos
A chocolate card for March 8th can be given to your mother, grandmother, sister, girlfriend, teacher, colleague, or classmate. This chocolate bowl should be decorated in a special way.
It is recommended to use as decoration:
- Artificial flowers
- Half beads and rhinestones
- Magazine clippings
- Decoupage
- Satin ribbons
- Lace
- Serpentine
- Sequins
- Designer paper
- Wrapping paper
Options for decorating chocolate bowls for March 8th:
Chocolate girl on March 8 (option No. 1)
Chocolate girl on March 8 (option No. 2)
Chocolate girl on March 8 (option No. 3)
How to decorate a chocolate bar - choosing materials for decoration
To decorate a chocolate bar, you can use various materials, everything is limited only by a flight of fancy.
How to decorate sweet gifts:
- Sackcloth. Rough material goes well with satin ribbons, paper flowers, and mother-of-pearl beads.
- Satin, velvet, velor, newspapers with foreign text. You can complement the decor with beads, stones, and artificial flowers.
- Photos or a child's drawing are an original way to pack sweets for a loved one.
- Transparent jars are suitable for packaging small chocolates or sweets. Decorate the neck with ribbons. Attach a small card to a decorative rope.
For New Year's decor, you can use small cones, pine and spruce branches.
Chocolate card for the New Year: ideas, templates, photos
For the New Year, you can give such a card instead of the usual card, the main thing is to decorate it thematically. You can make all kinds of three-dimensional decor using what you find in the store (holiday wrapping paper, cut-outs and stickers). Use a large amount of glitter, streamers, foil, broken glass (for example, from old Christmas tree decorations).
IMPORTANT: Decor in the form of cinnamon sticks, dried orange slices, snowflakes, Christmas trees and Santa Claus figures looks very stylish.
Design ideas:
Chocolate bar with a Christmas tree
New Year's chocolate bowl with tea bags
Volumetric New Year's decor for a chocolate bowl
No. 7. Decorate with flowers
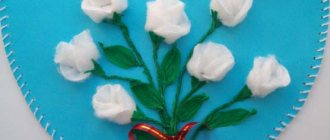
Have you already tried everything and want something completely unusual? Use flowers. Lavender, rose buds, viola petals (pansies) will make the tile completely non-standard. The main thing is to choose edible inflorescences, such as clover, violet, chrysanthemum, lilac, jasmine.
Lilies, tulips, lilies of the valley, snowdrops, daffodils, and carnations cannot be used. They are poisonous. Therefore, when selecting buds, it is better to use suggestions from a candy store or double-check yourself in a reference book.
As you can see, there are many options. But each of them can be used in dozens of ways. So don't limit yourself and develop your inner creative nature.
Birthday chocolate card: ideas, templates, photos
You should definitely include an additional banknote in your chocolate maker for your birthday. Thus, the chocolate box will replace the envelope postcard.
Chocolate girls for birthday:
Chocolate girl with congratulations
Chocolate maker with voluminous decor
Chocolate maker with “fragrant” decor
Corrugated paper chocolate packaging
You can pack the chocolate in either gift paper or corrugated paper. The method described above will do.
Or a strip is prepared from corrugated paper, which is 2 cm wider in width than the height of the chocolate bar. First, along the long edge, the paper must be carefully folded by 1 cm. Lightly stretch the fold with your fingers in different directions at the same time. This will form waves.
The tiles are wrapped in packaging, and there are 1 cm indentations on each side along the edges. The wavy edge does not require any processing. If desired, you can only slightly glue it to completely cover the chocolate bar. An even cut along the edge of corrugated paper also looks beautiful.
Depending on the occasion, you can add a relevant decoration: a spruce branch on New Year’s Day (put it under the ribbon), a Valentine’s card on Valentine’s Day, etc.
Chocolate card for Teacher's Day, September 1: ideas, templates, photos
It is simply impossible to congratulate all the teachers at school with luxurious gifts, so a chocolate maker will be very relevant. You can decorate each one according to the subject given by the individual teacher.
Chocolate options:
With voluminous flowers
On Teacher's Day
Chocolate maker for the teacher
No. 3. Drawing with chocolate
A good option when there is no time for shopping. Each master’s palette contains at least: dark brown, light brown, white and pink shades. All that remains is to choose the combination and pattern.
Although you can limit yourself to creating streaks with a toothpick. Also, the surface of the tile can be decorated with three-dimensional figures, previously cast in a different form, with ordinary chocolate chips.
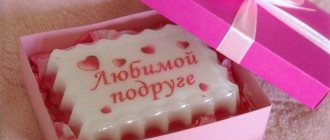
Chocolate card for February 14: ideas, templates, photos
If you want to please and surprise your “other half” at the same time, try to make a chocolate bowl for her with your own hands. You can put any surprise in this card: a membership to the gym or a cosmetic procedure, tickets to a movie or circus, money, a declaration of love, a Valentine's card.
IMPORTANT: In this case, chocolate will only be a pleasant addition to the main gift.
Options for chocolate bowls for lovers:
Stylish chocolate maker for February 14
Stylish chocolate maker for Valentine's Day
No. 1. Selecting a new form
If classic rectangular tiles already seem boring to you, welcome to your local pastry store. True, choosing from the modern assortment can be difficult.
Shapes of tiles, surface patterns - chocolatiers offer hundreds of options for decorating chocolate. And if you have unique wishes, hire a specialist and order a form of your own design.
Chocolate card for a kindergarten teacher: ideas, templates, photos
Some parents and children prefer to congratulate their kindergarten teacher on every holiday. To diversify your gift ideas from the usual box of chocolates and a jar of coffee, you can try making a chocolate maker with your own hands.
Ideas for chocolate makers:
Chocolate maker as a gift
Chocolate girl to teacher
No. 5. We use nuts
I love decorating homemade chocolate with whole hazelnuts. Cashews, peanuts, pecans, macadamia nuts, walnuts, pine nuts - they differ not only in taste. Each has a characteristic shape, texture, color. They can be combined to create walnut panels on tiles. Plus, every nut helps make your masterpiece a little healthier.
Similarly, you can make fitness-style chocolate using seeds. You can safely add sesame, sunflower, hemp, pumpkin.
Chocolate card for a wedding: ideas, templates, photos
You can replace the usual gift envelope for newlyweds with a chocolate box. In addition to the fact that this postcard holds money, you can also optionally place congratulations, poems and a nice bonus - a chocolate bar!
Ideas for wedding chocolates:
Chocolate girl for a wedding
Chocolate girl for newlyweds
How to pack chocolate in gift paper
The other way is much simpler. To decorate the chocolate bar you will need gift paper. Well-chosen color and pattern are the key to success.
For a standard chocolate bar you will need A4 sheet size paper. Place the gift in the center and move it lower by 1-1.5 cm. Fold the bottom edge up and wrap the chocolate bar.
Carefully fold the bottom corners of the paper and secure them with tape. Then fold both sides of the wrapper and also secure with tape.
Now fold the remaining top edge of the paper and secure it in this position. All that remains is to decorate the gift.
Chocolate card for anniversary: ideas, templates, photos
Surprise the hero of the day with an unusual souvenir and postcard that will be not only beautiful, but also delicious! The birthday boy will definitely remember this card and accept it with pleasure!
Chocolate options:
Beautiful chocolate bowl as a gift for the hero of the day
Chocolate maker as a gift for a woman
No. 6. Add berries and fruits
Fresh fruits will only spoil the tiles. But nothing prevents you from adding freeze-dried supplements. Most popular with clients:
- strawberry;
- raspberries;
- cherry;
- figs;
- quince;
- lemon;
- orange.
Effective results are guaranteed. Especially if you combine several inclusion options at the same time.
Chocolate card for a doctor: ideas, templates, photos
For your professional holiday, you can prepare chocolate cards not only for doctors (you can put money or a gift card with a certain amount inside), but also for nurses (put a few bags of tea and coffee inside).
Chocolate option:
Chocolate maker as a gift
With chocolate to your beloved grandmother
A soft, porous chocolate bar without large nuts is good for grandma.
. Elderly people will definitely appreciate beautiful gift wrapping, because it is an additional sign of attention. And older people value the attention of their loved ones very much. Therefore, you need to think in advance about how to beautifully decorate a chocolate bar as a gift. A small beautiful fabric bag made from a piece of beautiful brocade or organza is very suitable for decorating a gift. The bag can be decorated with embroidery, lace or beads. The goodies should be placed inside and tied on top with a lush bow made of satin ribbon or an original twisted cord. And the warm wishes of children and grandchildren will make the grandmother the happiest.
Creating a layout
At the first stage, you need to decide on sweets.
Usually, Bird's Milk candies are used for shockboxes. These candies are rectangular in shape, which makes it easy to create a template for the future chocolate box. These candies also have two wrappers. When you remove the paper wrapper, the candy remains in the foil. Thanks to this, the candy is protected from any impact.
Next, you decide on the size and shape of the shockbox, that is, the number of candies and their location. Most often, shockboxes are made for 4, 6, 8, 9, 12, 16 candies. Here we will create a box of 8 chocolates in Photoshop.
Even if you do not know all the functions and capabilities of Photoshop, you can create a wonderful layout for the shockbox. Here it is enough to know the principles of working with shapes and be able to insert pictures and texts.
But if suddenly you don’t know how to work with the Photoshop program at all, then you can easily learn this thanks to the Photoshop courses for needlewomen and home craftsmen (abbreviated FRDM) from the Academy of Graphics and Design. They explain in an accessible form the basic principles of working in Photoshop.
In the classes you will learn numerous techniques that will help you create wonderful cards, collages, stamps, seals, patterns and much more. The course already has over 5,000 positive reviews and you can access it via this link:
>>> GET ACCESS TO THE PHOTOSHOP COURSE
The box will consist of two parts:
- an inner box with sides where we will put candy;
- external, where the internal box of candies will slide in (similar to a matchbox).
Having placed the candies on the table in two lines of 4 candies, measure the width (A), length (B) and height (C). We add 2 millimeters to these measurements so that the candies easily fit into the finished box. Since our box will have sides, we need to take this into account when creating the template (side width D).
The template for both the inner and outer box for 8 Bird's Milk candies is placed entirely on an A4 sheet.
In Photoshop, using the Rectangle tool, we begin to create a template.
Inner box template
First, draw the base of box 1. Width of rectangle 1 = A+2D+2mm, length – B+2D+2mm.
Next, draw rectangles 2 and 3. The width of rectangles 2 = C + 2mm, length = the length of rectangle 1 (i.e. B + 2D + 2mm). Width of rectangles 3 = width of rectangle 1, length = C+2mm.
Then draw rectangles 4 and 5. Width of rectangle 4 = D, length = length of rectangle 2. Width of rectangle 5 = width of rectangle 3, length = D.
The width of the rectangles is 6 = the width of the rectangles is 2, and the length = B+2mm. The dimensions of rectangles 7 are the same as those of rectangles 3. The side of figures 8, which is adjacent to rectangles 4, is equal to D, and the opposite side of figure 8 should be slightly smaller. This is done to make it easier to assemble the box. The other two sides should be equal to or slightly less than the width of the rectangles 6.
For the remaining figures, one side, which is adjacent to the already drawn figures, corresponds to the size of these figures. The opposite side should be slightly smaller for ease of assembly. And the other two sides can be arbitrary.
On rectangles 5 and 7 we draw stripes for the slot at a distance equal to D from the edge of the rectangles. Figures 8 will be inserted into these slots during assembly.
The inner box template is ready.
Outer box template
To create a template for the outer box, you need to draw two rectangles 1* and 2*. The height of these rectangles is equal to the height of rectangle 1 of the inner box. The width of these rectangles is 1-2mm greater than the width of rectangles 1 and 2 of the inner box, respectively. If you make rectangles 1* and 2* equal to rectangles 1 and 2 respectively, then you will not be able to insert one box into the other.
The remaining figure has one side that is adjacent to rectangle 1*, equal to the height of this rectangle. The opposite side needs to be drawn a little smaller. And the width of this figure should be less than the width of figure 2* by a couple of millimeters. So that when assembled you get a neat box.
Candy wrapper template
To create a wrapper template, you can simply remove the factory wrapper from the candy and measure its dimensions, but you can also create your own. You just need to take into account the size of the candy itself.
When creating a template for the wrapper with your own dimensions, base it on the dimensions of the candy. The width of the template is obtained from the sum of the width and height of the candy, multiplied by two, plus the width of the area for gluing; the height of the template should not exceed the length of the candy.
Design of box and wrapper layout
After creating the templates, you can start designing them.
Here you can give free rein to your imagination and use absolutely any pictures, photographs, texts. To find them, you can use any search engine, or you can use your own photographs and texts.
You can even make a collage, taking a frame from a movie, and instead of the hero, insert a photo of the person for whom you are making this shockbox. This technique was described in detail at FRDM 9.
The main thing when designing layouts is to do everything in the same style and choose high-quality images.
Using the same template and inserting different design elements, background images, photographs, texts, you can create layouts for shockboxes for any holidays or events.
Design is created for the inner and outer boxes, as well as for the wrappers. When creating a layout for wrappers, you need to take into account the number of candies in the shockbox. If you write wishes on wrappers, then you will need to change the inscription for each candy. But you can make one design for all the candies. When preparing wrappers for printing, they all need to be placed on one A4 sheet.