Many people are not averse to getting an electric skateboard - it is compact and fast, and it’s a pleasure to ride around on it. However, how many people can afford such a toy? After all, the cost of a new electric device starts from 25 thousand rubles. And it’s not a fact that you’ll like the budget model. What if you try to build such a device on your own? What do we need for this? Yes, in principle, nothing supernatural: a frantic desire, little hands from the right place, components and a certain amount for their acquisition, and most importantly - knowledge, which we will talk about later.
- Selection of materials
- Wheels
- Deca
- Electric motor
- Battery
- Engine assembly
- Engine and wheels
- Fixing the electric motor
How to make an electric skate with your own hands
An electric skateboard is a modified and modernized skateboard that is powered by a small electric motor.
It’s convenient to use such a board – it’s compact, fast, and a pleasure to ride. Both children and adults can do this. The cost of a new electric skate today starts from 25,000 rubles, but you can make a moving board yourself. And this electric homemade product will be able to compete with the new skateboard of famous brands. If only you had the desire and some skill, you can make anything your own! electric skate
Selection of materials
Making an electric skateboard is an inexpensive project that requires little financial investment. In essence, this is simply upgrading an old board or assembling a new one from familiar items: base, wheels, engine, etc.
You can choose any design for the future board. Externally, a skateboard with an engine is no different from conventional boards, but can reach a speed of 30 km/h and has reliable brakes, which sometimes come in handy.
skateboarding
It is important to pay special attention to the wheels of the product - they should be of medium hardness and large diameter, have plastic bushings that are ideal for mounting the wheels on the axle.
Wheels are also sold at skateboard parts stores.
wheels with plastic bushings
Platform
It is advisable to take a longboard as a platform - a long skateboard. It is more stable, and there is also more space on the longboard to accommodate electrical elements - the motor, etc.
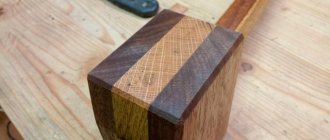
If the project starts from scratch, the base is cut out of plywood or carbon fiber. The straighter the board, the better; it may not even have the usual bends. You just need to take into account that there is enough space for the electrical unit and immediately determine the location for its installation.
skate base
A board without wheels can be purchased at special sports stores.
But if the spare part is created independently, this gives room for imagination - the board can be given any shape - and saves the budget.
DIY skate base
Motor and wheels
The interaction between the motor and wheels is carried out using gears. You can buy them in a special store, or you can use a regular bicycle chain for this.
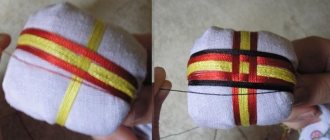
A gear with 36 and 5 teeth is taken, which are connected through a belt (or chain). The shaft is modified with two M4 thread nuts. In the smaller gear, you need to drill a hole and fix the gear on the motor shaft.
wheels
The motor must be fixed close to the axis, and it is important to calculate everything so that the belt does not slip off the gear while moving.
The tension should be optimal.
fitting
Engine mount
The engine is mounted on the underside of the board using clamps and bolts. This could be an aluminum mount or any other. But in order for the electric motor to be safe while moving, it is advisable to build a durable housing that can withstand impacts.
This housing is made of mesh, so the motor will be ventilated.
strong mesh
Before placing all the motor elements in the housing, it is advisable to make a drawing on a scale of 1:1. Or simply lay out all the elements of the motor on paper comparable in size to the size of the box. Only then, when everyone has found their places, should they be placed “in reality”.
Inside the case, the controller is attached with double-sided tape. The wires must be in a free niche.
placement of elements
If you do without a housing, it is important to assemble the engine in the correct order:
- Place the large roller on the wheel axle. Pin.
- Place a small roller on the engine pulley.
- Place a belt over both rollers.
- Tighten the belt while moving the engine and secure it, leaving it taut.
- Then position the battery - secure it closer to the center and the board.
- Place the controller on the front side of the electric skateboard.
bringing out the controller
Skate is ready to be tested on the street! It may seem too heavy to perform some tricks, but this product is unique and made by hand.
If desired, such a skateboard can later be upgraded: change the motor, controller, etc.
Skateboard made from planks of a wooden pallet - Magazine “Myself an Inventor”
Recently, products made from pallets have become very popular. Inexpensive material allows a person with creative thinking to realize his ideas. One idea for implementation is a skateboard made from pallets.
Making a skateboard with your own hands is not difficult.
What will it take?
Required materials and tools:
- pallet,
- nail puller,
- hammer,
- pliers,
- ticks,
- plane,
- drill,
- wheel mounts – 2 pcs.,
- wheels – 4 pcs.,
- construction glue,
- hacksaw or jigsaw,
- skateboard template,
- Sander,
- clamps,
- veneer,
- screwdriver,
- sandpaper or special skateboard sandpaper.
- simple pencil,
- screws,
- linseed oil,
- polyurethane.
Preparatory stage
To begin with, the selected pallet should be thoroughly dried. Then begin the disassembly process. To do this, we hammer a nail puller at an angle between the cube and the board. We stand on the board and pull the nail puller towards ourselves. It is advisable to choose a nail puller that is larger in size, it will be easier to disassemble and there will be more emphasis. We beat the bent ends of the nails with a hammer and pull them out with pliers.
Important: It is worth considering that when assembling a Euro pallet, notched nails are used and it will be more difficult to disassemble them. It's easier to use a hammer and break the cubes in the tray.
After parsing, we prepare the boards. We plan them with a plane and saw them into slats. Next, we glue the slats together with wood glue and tighten them with clamps. Leave until completely dry.
Now we prepare the template for the skateboard. There are many options on the Internet. Select and print.
After drying is complete. Remove the clamps and polish. Glue the veneer over the workpiece and level it with a soft cloth. We transfer the template onto the prepared one with a pencil, or you can use a thin marker. And we cut out the shape with a hacksaw or jigsaw and grind it.
Important: Before applying the template to the workpiece, be sure to check it. To do this, you should stand on the template and see if it is too small or too large. In this case, reduce or increase it.
Marking and assembly
We mark with a pencil the places for future mounting of the wheels. We measure with a ruler and draw a line from top to bottom right in the center. Set aside 8 cm from the beginning of the board, mark it, now 22 cm from the end. Apply fasteners and mark places for drilling for screws. We drill holes with a drill. Take measurements very carefully; the balance of the skateboard will depend on this.
We apply it to the mounting location and fully tighten the screws to the maximum. We put the wheels in place. It is better to choose polyurethane, or rubber ones at worst. And cover the board with linseed oil. Let it dry. Then we apply polyurethane for complete protection. Let's dry it.
We glue thick sandpaper on the outside and carefully remove the air. If you have the opportunity to buy factory-made skin, then it’s even easier. It has a bottom adhesive layer. We remove the protective film and carefully remove the air by sticking it on. We cut off the excess. Lightly sand the edges. Ready!
With your own efforts, you can make a board from a pallet that meets your requirements. Of course, for some, the whole work process will seem too complicated. But those who decide will be very pleased with the result. Especially the fact that it was made by hand.
Source: https://www.asusfone.ru/svoimi-rukami/skejtbord-iz-dosok-derevjannogo-poddona
DIY electric longboard. Mountainboard.
So, another, almost annual post about electric boards. This year we will talk about mountainboarding. I would like to point out right away that this mountain was made for riding on asphalt or what we call this word. No one will knead dirt on it.
This board is based on Trampa 685 BLACK. Great board. If you take it for the city, choose softer bushings (Dampa).
The pulley has 66 teeth per wheel, also from Trampa.
Price: about 44-46k rubles (depending on the exchange rate) for the whole board and pulleys with 66 teeth.
The brackets were found on one of the foreign forums. I was captivated by their compact appearance. They fit perfectly on the tracks.
The fruit of labor, tears, sweat and blood for three weeks.
In short, we smear, grind, smear, grind,... repeat until an acceptable result is achieved. In between, apply release agents. I used polyester resins, glass mat 300 and 450 for the mold, and T-11 fiberglass for the body itself.
As a result, we get a body with 6 segments, which bends perfectly along with the board.
Price: 6-7k rubles for materials (I took a lot and with a reserve). Plus a lot of rubles for the instrument.
Two 6368 150kv 2.3kW. Probably the main one is plus the minimum number of holes into which dust gets in. This gives me some hope for a longer lifespan compared to their more leaky counterparts.
Price: $120 for 2 motors
10S5P battery made from 18650 Samsung 30Q cells. Spot welding, connection between successive cells - flexible cable in silicone insulation. Estimated mileage 25-30km.
Price: about 14.5k rub
This year it's time to experiment. Just for fun, and in order not to inflate the budget at all, I decided to take a cheap Chinese esc for longboards with two motors and a remote control included.
Impressions about him are mixed. The disadvantages (compared to VESC) are a sharper start, lack of telemetry, lack of settings, strong heating. Pros: price, board charge indicator on the remote control, reverse from the remote control. This esc was purchased consciously, so strong heating is not an obvious disadvantage, because... In principle, putting it on such boards is a so-so idea. But I decided that if it survives an asphalt mountainboard, then life on regular boards will clearly be easier for this controller.
⇡#Embrace – watches that save lives
Embrace is a project whose goal is not only to improve the quality of life of their owner. Smart watches are unlikely to save the life of an ordinary person, but the developed system helps control epilepsy attacks in people suffering from this disease. And for them Embrace will become an excellent companion in everyday life. However, we will try to look at this watch from the point of view of an ordinary user.
Embrace tracks your physical activity and stress levels. This information allows people suffering from this disease to be warned about possible epilepsy attacks. For the average user, such data will allow them to avoid overvoltage situations. All information received during the operation of the watch is systematized and analyzed, after which the user will be able to draw certain conclusions for himself and learn to relax and rest in time, without bringing stress to a critical level.
Embrace was developed primarily as a medical device, so it meets all medical standards. The watch can be linked with a smartphone and with other watches - due to this, a guardian or parent of a person with epilepsy will be able to help in time, thereby reducing the risk of dire consequences. Embrace warns not about the onset of an attack, but about its possibility, analyzing the body's vital signs. And this is really useful, because preventing a possible attack is much more important than simply warning about it. At the same time, the watch is sold under a promotion, within the framework of which, when you buy one copy for yourself, you automatically purchase a second one for a child with epilepsy who does not have the funds for Embrace.
| Embrace Specifications | |
| Battery life | Up to 6 hours |
| Material | Leather, metal |
| Price | 189 euros |
Yet the Embrace campaign is not a charity. The watch itself is a fashion accessory, with a strap made from Italian leather and a choice of strap and case colours. The fastener on the bracelet is made using magnets. Embrace can either work as an analog clock or serve as a means of notifying events on your smartphone.
You can purchase Embrace either at retail through the official website or through the Indiegogo platform. You can support the campaign on Indiegogo for $189, receiving a watch and a gift for this, and another watch, as mentioned above, will go to a child with epilepsy. The gift includes, in particular, a subscription to the support service for 6 months. The service will process all information about your life activity and analyze it, displaying the results in a special application. The campaign has raised more than $500,000, so there should be no financial barriers to Embrace's exit. The watch will be delivered in December this year.
Is it possible to make a skateboard with a motor with your own hands?
A skateboard equipped with a motor is a modified and improved version of a skateboard. It operates using a small electric motor. This board is easy to use. It doesn't take up much space and goes fast. Prices for it start from 25,000 rubles.
More and more people are wondering whether it is possible to make an electric skateboard with their own hands. One craftsman has already assembled an electric skateboard on his own. Moreover, the invention can compete with purchased branded products. This is possible even with a relatively limited budget.
The inventor claims that his skateboard with an electric motor reaches speeds of up to 30 km/h, has brakes and a range of 10 km. The author had to buy most of the spare parts.
Specifications
There are different models of hoverboards, hoverboards and electric boards on the market. All types differ from each other in external parameters and internal characteristics.
Hoverboard
The hoverboard itself is descended from the Segway and is not a skateboard; it is not intended for tricks and high speed. But the device is easy to operate and suitable for daily walks.
Gadgets vary in wheel size. For example, models with 4.5-inch wheels are comfortable for children, but not designed for rough roads. The average size is 8 inches, and more powerful and faster hoverboards have 10-inch wheels.
Battery power also varies depending on the size of the device. The more massive, the higher the power.
The speed of the hoverboard will depend on the above characteristics and the weight of the user. Thus, the fastest gadget on a flat road can reach a speed of 25 km/h.
The device is controlled by moving the body. Bend forward - start and move. A slight tilt of the body back will slow down the hoverboard.
Hoverboard
This is a type of hoverboard, but a hoverboard has its own characteristics. Outwardly, it looks more like an electric skateboard, but has 1 large wheel in the middle.
It is controlled by tilting not forward and backward, but to the right and left. And the rubberized surface allows you to stand firmly on your feet and deftly maneuver on the road, avoiding bumps.
The batteries in it are also lithium-ion, and their capacity is approximately 4000 mAh. On one charge, the hoverboard can travel up to 20-25 km, and it takes a couple of hours to fully charge.
The gadget has built-in speakers with which you can control the battery charge, speed and amount of distance traveled. Additionally, the device has a backlight for driving in the evening and at night.
Electric skateboard
There are many models of electric skates with different characteristics, powers and for different purposes.
One device can have several motors, which will increase its power. It varies from 150 to 330 W. The maximum speed on different gadget models can be from 15 to 40 km/h. But some sports skates accelerate to 90 km/h.
The batteries are located on the reverse surface, they are charged in a few hours, and they last for 20 km or more.
There are boards for urban use that have narrow and smooth wheels, average weight and low power. As well as off-road models, with wide tires and larger dimensions.
Works well in wet weather. However, you should ride it carefully on wet surfaces, as traction will be weakened.
Additionally, you can install a headlight that will illuminate the way.
Required tools and materials
Making a skateboard with a motor is an inexpensive project. A homemade product can consist of either an old board or be new. In the latter case, it includes a base, wheels, an engine and some other elements. The skate design can be anything you want. This will depend on personal preference. In appearance, an electric skateboard is not much different from simple boards.
To make a similar vehicle, you need to take care of the necessary tools and consumables for assembly:
- large wheels;
- driven sprocket and chain;
- batteries;
- plywood;
- bolts and nuts;
- motor;
- regulator for the engine;
- cable;
- charging controller;
- screwdrivers and wrenches;
- soldering iron;
- drill;
- Bulgarian, etc.
The author used a brushless motor for his homemade product. Thanks to the large wheels, the motorized skateboard easily overcomes uneven asphalt and dirt roads.
Step-by-step instructions for making an electric skateboard
There are a lot of step-by-step instructions on how to make an electric skateboard yourself. Below is one of them.
For a platform, the best choice would be a longboard, which is longer than conventional boards. It is quite stable. This board has more space for installing electrical parts.
Attaching the driven sprocket to the wheel is one of the most important steps. Such an element must be located strictly in the center of the wheel. Otherwise, the sprocket will often fall off and it will not be possible to tighten it. It is necessary to ensure reliable and correct fixation. There are different types of wheels. Therefore, sprockets are also attached in different ways.
The inventor preferred fixation using a special adapter cut from plywood. First you need to cut a disk of suitable diameter. It will be attached to the wheel. Then you need to drill 5 holes. They will be needed to secure the screws. Additionally, you need to make a hole in the center. The axis will pass through it. You will also need to drill 3 more holes for the screws that secure the sprocket. At the end you will need to widen the hole for the axle.
We need to figure out the electrical circuit. If the motor is brushless, then you need an ESC speed controller. It is necessary to determine the capacity of the power supplies and their type. The most preferred are lithium. To assemble electronics, you need to be patient and take care of heat shrinks.
The chain drive is necessary for engine torque. A belt is also suitable for similar purposes. However, it is important to get the star ratio right. This calculation depends on the characteristics of the electric motor. The higher the speed, the more you need to lower the sprockets, which you can buy or make yourself. It is easy to find such a spare part in scooters and other equipment.
The mounting plate ensures reliable fixation of the engine on the skateboard. This part is made of aluminum. Holes are made in the corner for fastening. You will need to make several brackets. They are needed to fix the motor on the plate. All assembly is carried out using nuts and bolts. The material will be aluminum corners and plates.
After installing the engine, the skateboard is almost ready. Then you need to connect the electronics. You also need to secure the batteries and controller. Controls should be installed in the most convenient location. At the end of the installation of the chain, unnecessary parts can be removed. It is worth trying to turn on the engine and make sure that the chain is properly secured. It shouldn't subside. The engine works properly if it creates the necessary traction for driving.
Riding an electric skateboard brings a lot of positive emotions. Moreover, now you can assemble it yourself thanks to various training videos and step-by-step guides. The main thing is not to forget about safety precautions when driving and wear a helmet.
Results
After these steps, your skateboard is absolutely ready, and you can start testing its capabilities. The main thing is not to forget about your safety. Therefore, you should not neglect the protective equipment for a skater. There may be one small drawback - this skate is somewhat heavy, which makes it difficult for the skater to perform certain tricks. However, no one else will have such a skateboard, since it is unique in its kind, and assembled with your own hands. If over time you want to upgrade the unit, you can install a more powerful motor or replace any other parts and elements.
DIY electric skateboard
This article is for those who want a quick guide on how to build DIY electric skateboard on a relatively small budget that can compete with a new branded skateboard costing over $1,200. I built a skateboard that can reach speeds of about 30 km/h, has brakes and can travel 10 km. Below are videos and photos of my work. Below them will be a description of the parts and changes I would make if I were to make a skateboard like this again.
Please don't try to replicate this design because there is no guarantee it will work after some of the changes I made to it. This is just a prototype.
As when driving any type of transport, do not forget to wear a helmet. All this is dangerous! I am not responsible for any injuries or damages that you may receive. Be careful!
Electric board control system
In most cases, the electric skate moves and slows down according to commands given by the remote control. All magic consists of three simple actions:
We turn on the gadget from the remote control and carefully fix the remote control on your wrist.
We place one foot on the platform, push off with the second and place it there. Now we are moving, just like on a regular board with wheels.
We move the power lever on the remote control and then the movement is gently picked up by the electric motor. When the need to slow down arises, we move the lever in the opposite direction and brake as on a regular board. That's all. From this moment on, there is no need to push off with your foot from the road surface; the power unit will do all the work for you. In principle, if you really want to turn up the heat, you can push off with your feet, so the movement will be more intense.
As for turns, they occur as smoothly as in ordinary skateboards. Many may think that the electric motor and battery interfere with adequate control of the gadget, but this is not the case. They are compact, lightweight and also perfectly centered, so they cannot significantly affect handling.