DIY candy clock for the New Year - step-by-step instructions with photos
Creating a holiday attribute out of candy is a method of “killing two birds with one stone” at the same time. Firstly, thanks to such an accessory, your home will have not only a beautiful, but also a tasty element. And secondly, after the holiday, children and adults can happily treat themselves to decoration elements.
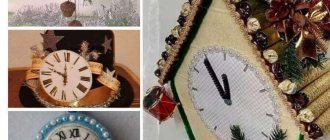
Clock made of candy, foam plastic and corrugated paper
A circle is cut out of foam plastic, wide enough so that it is convenient to attach sweets to it. A printed image of the dial is glued to the front surface. The back side and edges are covered with corrugated paper. A rectangle is cut out of cardboard, also covered with paper and complemented with a chain of beads.
The candies are each wrapped in corrugated paper and glued in a circle to the clock, leaving a small gap at the bottom empty.
The product is wrapped with tape over the candies and glued with the base to the rectangular part. The top can be supplemented with other candies, and the bottom can be decorated with any desired decoration.
New Year's clock made from candies and a round box
You will need a round candy package, which needs to be covered with corrugated paper. The box is wrapped in a circle with double-sided tape, onto which the candies are glued. The sweets can be additionally secured on top with a strip of beads, and the dial can be made from the same or other materials.
Clock made from candies and foam base
A minimalist and bright decoration can be made from the same circle of foam, corrugated paper, candies and ribbons. The circle is covered with paper, the edges of the “bow” are folded over the candies so that they do not stick out, and the sweets are glued in a circle to the base. The weaknesses are wrapped with ribbon on top and tied into a neat bow. A few more candies and other decorative elements are used to complete the image of the craft.
DIY embroidered New Year's watch + diagram
The New Year's panel will be a wonderful home decoration or an original gift for loved ones. Download a cross stitch pattern with images of chimes and New Year's paraphernalia on our website. It will take a lot of time and patience to create such a watch, but the result will delight your guests. Place the embroidery in a beautiful frame. You can take a ready-made one and make it yourself, for example, from felt and further decorate it.
New Year's cardboard clock - how to make it yourself
Cardboard crafts are easy to implement and can be a decoration for almost any room. They can be placed on a table or shelf, hung on a wall or door, and in general, choosing a place for the product is not difficult.
Painted cardboard clock
The simplest and fastest way is to cut out a frame from white cardboard, paint it at your discretion and add arrows to it, placing them in the desired position. The product is ready and can decorate any place.
Volumetric cardboard cuckoo clock
Details of the future mechanism are cut out of cardboard. A pre-printed dial and hands are glued to the front. This part can also be further decorated by painting. Afterwards, all that remains is to connect all the parts and hang the finished decoration in the chosen place.
Cardboard grandfather clock with moving mouse
A clock is drawn on a large rectangular piece of cardboard, and in several places the cardboard is stitched with thread or fishing line. One end of the thread remains outside at the bottom and a printed mouse or other animal is glued to it. The other end of the thread is fixed to the arrow. As a result, when “translating” the arrows, the mouse moves up and by midnight on New Year’s Day it will be at the top.
Cardboard cuckoo clock + template
All templates are transferred to colored cardboard or thick paper. They must be carefully cut out, folded along the fold lines and fastened together. The result of this work will be a three-dimensional figure.
A simple New Year's clock made from a cardboard circle and Kinder trays
A circle shape is cut out of thick cardboard. Inside the circle, at a distance of about 1 cm from the edges, halves of kinder “eggs” or similar objects are glued. They should be positioned similarly to the time stamps on a watch. One half is also attached to the center of the circle. All this is painted over in one color with paint of any desired shade.
Then arrows are attached to the central part, which can be made from a broken snowflake or printouts. The edges of the circle are wrapped with colored thin rain, and the center can be decorated at your discretion.
New Year's cuckoo clock made of cardboard - master class + template
Before the New Year, make an unusual cuckoo clock out of cardboard and decorate your home with it. Before starting work, prepare:
- cardboard of different colors;
- ready-made template (available on our website);
- cog;
- scissors and stationery knife;
- glue.
The necessary parts are cut out from colored cardboard using a template. First, assemble the dial and attach the hands to it with a screw. Window openings are inserted. Decorative elements are glued: a fence to the house, shutters to the windows, tiles to the roof. Now all that remains is to assemble all the parts: the clock is attached to the front of the house, weights on chains are attached to the bottom, and the house is glued together. The New Year's cuckoo clock is ready.
New Year's watch out of the box - 2 step-by-step MKs with photos
Almost every person at home can find at least one unnecessary box of shoes or some other thing. And instead of throwing this item away, it should be put to good use. So, one box can serve as the basis for creating a unique homemade decoration for the New Year.
Clock with a surprise
One part of the box is carefully cut and glued to create a pointed “tower” shape. A circle is cut out of the front wall, but not completely, but so that it has a connection with the frame. The box is completely covered with colored paper and complemented with Christmas tree figurines and other decor. The dial is drawn on the central circle, and the top is tinted with paint to create the effect of snow.
New Year's clock from a cardboard box in the form of the Spasskaya Tower
The box is covered with paper of the same shade. In accordance with the diagram, the dial, top and top decoration are cut out of colored paper, folded and glued. They are attached to the box using glue or tape.
Step-by-step MK Cuckoo clock. Textile souvenir.
Greetings to everyone who stopped by!!!
I propose to sew together a New Year’s interior decoration:
Cuckoo-clock.
We will need:
- any fabric (several colors). For the dial – plain.
— synthetic fluff and a stick for stuffing;
- threads, scissors, needles, pincushion, tailor's pins with flat heads;
- cord, braid or string;
- accessories for decorating toys (beads, lace, yarn, buttons, etc.)
- acrylic paints on fabric, dry pastels;
- PVA glue, Moment Crystal glue;
- buckwheat or other cereals.
The process itself:
Print the pattern (it takes up the entire A4 format), cut out the parts.
The scale of the pattern can be changed to the size you need and transferred directly from the computer monitor.
1. House. Fold the fabric in 2 layers or two different fabrics with right sides facing inward. Pin item No. 1 (or No. 2, whichever you prefer) and stitch over the pins on a sewing machine with a 2mm stitch. Don't forget to backtack at the beginning and end of the stitching. To turn it inside out, leave a 2cm section unsewn. We cut taking into account an allowance of 3-4 mm.
Turn the house right side out. Iron it.
2. Roof. I offer several options:
a) sew according to the principle described in paragraph 1. Sew up the opening for turning inside out. See photos 5-8;
b) cut a strip of fabric resembling matting or burlap (make a fringe);
c) find lace of a suitable size.
3. Clock face. A plain, dense fabric (linen or cotton) is well suited for this detail. Attach part No. 3 to the fabric, pin it with a pin and sew with a stitch of 2-2.5 mm. Pull the threads to the wrong side and tie knots. Cut with sharp scissors taking into account a 2mm allowance. Set aside.
4. Window. We repeat the same procedure as with the dial, but with part No. 6.
5. Cuckoo. The sewing algorithm is the same as in step 1. We only use part No. 4. We stuff it lightly with synthetic fluff. We sew the hole by hand.
6. Kettlebells with cones. The clock mechanism provides for the presence of this element, which is responsible for striking and running the clock. I offer several options for cones:
a) sew (see photos 13,14 and 17,18)
b) tie
c) use real small decorative cones;
d) pick up oval beads.
If you choose the option of sewn cones, then we sew in the same way as step 1. We stuff it not with synthetic down, but with buckwheat (to make it heavier and give it a “bumpy” shape). I used brown jersey fabric.
We prepare a cord, braid or rope. You can crochet it from yarn. Or weave a braid from several threads, or replace it with twine (ribbon, lace, etc.). One cord for 2 cones - 9cm long.
Sew to the bumps.
7. Patches (optional).
I really love fabrics with patch fragments. Comfortable! I cut out a piece, sewed it where it should be and the patch is ready.
If the design is printed evenly on the fabric, then you can make a fringe along the edges. If it’s uneven (and this often happens), then I do the following. I cut out the desired piece from colored fabric. I coat its surface with liquid PVA, paying special attention to the edges. During the heating season, I send the shreds to the battery for 5 minutes. In the warm season - in the sun. If your PVA is thick, just dilute it with water. And, keep in mind, this method is good for colored fabrics, not white. Since PVA may turn unsightly yellow over time.
8. Take PVA and process the patches, dial and window. At the same time, we coat the unsewn section with glue to turn it inside out onto the “house” part.
9. Pendulum. Cut out item No. 7 from fabric resembling matting or burlap. Fold in half and sew along the sides and bottom. Prepare a cord 9 cm long. Place it in a bag and secure with thread. Fill the bag with buckwheat. Tie with thick thread or twine.
10. Meanwhile, our parts have dried out. We glue the dial. Window too.
We add lace shutters to the window.
11. Fill the watch with synthetic fluff. We sew up the opening for turning it inside out.
12. We sew the patches by hand.
13. We put our cuckoo in the clock.
We make stitches in the area of the eye, wing and legs.
14. Now it’s time to sew on the pendulum cord and cone cords.
15. And behind them, secure the roof to the top of the clock (mark the location with pins and sew with a hidden seam).
Then - the pendant. Its length including the bow is 45 cm.
16. Draw a clock and hands on the dial using fabric paint. Can be embroidered with thread.
17. Tint the dial and patches with dry pastel.
And here is the result:
The cuckoo clock will fit perfectly on the New Year's tree, easily fit into the festive interior, and on the most important night it will count down the minutes until the New Year.
By changing the texture and color of the fabric, as well as decorative fittings, you can make different watches.
Create nice souvenirs for friends and family.
The important thing is that they are unique and will keep your hands warm.
Happy creativity and New Year's mood!
If you have questions, ask.
New Year's watch made of felt - 3 options for DIY crafts
Felt is a popular material for making various crafts, and holiday watches are no exception.
Simple felt clock for the New Year
Circles of different diameters are cut out of felt of 2 shades. The main numbers from the dial are sewn to the largest circle: 3, 6, 9 and 12. Snowflakes are sewn or glued between them, replacing the remaining time marks. Then a smaller circle is attached in the center and arrows cut from felt of the 3rd shade are fixed onto it.
You can complement the design with the help of decorative stones.
Volumetric felt New Year's watch + pattern
Parts are cut out of felt of 3 shades in accordance with the diagram. They are connected by stitching or gluing in appropriate places.
New Year's clock made of felt on a cardboard base - step-by-step MK with photos
It is necessary to transfer the part templates onto thick cardboard, then cut them out and repeat the contours by applying them to the felt, in order to then glue the fabric onto the cardboard. Then you need to assemble all the parts of the watch together, add various parts and a felt dial to them. An owl is also cut out and glued from fabric, which is installed in the window on the clock and the craft is ready.
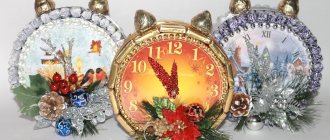
New Year's clock made of candies and polystyrene foam - step-by-step master class
Prepare an original gift for the New Year - a festive watch decorated with candies. The base for them is cut out of foam plastic. The sides are covered with wrapping paper.
The front and back of the watch are decorated. To do this, you can take a ready-made New Year's picture or corrugated paper. Candies are glued to the sides of the clock using a heat gun. The satin ribbon on top will not only decorate the watch, but will also secure additional candies. The craft is additionally decorated with pasta, coffee beans and beads. You can also make arrows from them. A sweet and unusual gift is ready!
Paper clocks for the New Year - 3 ideas with photo instructions
Paper is a universal material present in most crafts. Therefore, it is not surprising that it is often used in creating homemade watches for the New Year.
New Year's paper clock with accordion
The colored paper is folded like an accordion and bent to form a triangle. You need 4 such triangles and they should all be fastened together with glue or tape. The end result is an accordion circle onto which you need to glue the hands and dial markers to complete the look.
Volumetric paper cuckoo clock
The diagram is printed on paper or transferred to colored paper, if desired. Then they carefully cut it out, bend it in the indicated places and glue it together, obtaining a voluminous result.
Clock for the New Year made from newspaper tubes
Any paper and even newspapers will be suitable for such a thing. The sheets need to be rolled into thin tubes, then rolled gradually, forming a large circle.
This circle is beaten with a hammer to make it denser, flatter and smoother, and painted in the desired shades.
Any decor is added to the edges of the circle, the dial itself is drawn on it and all that remains is to fix the hands.
Finally, you can make a mount from wire so that the product can be hung somewhere.
LiveInternetLiveInternet
Quote from ADELERA
Read in full In your quotation book or community!
DIY cuckoo clock
I propose to sew together a New Year's interior decoration. Wonderful cuckoo clock
we need:
- any fabric (several colors). For the dial – plain.
— synthetic fluff and a stick for stuffing;
- threads, scissors, needles, pincushion, tailor's pins with flat heads;
- cord, braid or string;
- accessories for decorating toys (beads, lace, yarn, buttons, etc.)
- acrylic paints on fabric, dry pastels;
- PVA glue, Moment Crystal glue;
- buckwheat or other grains
A small digression. If you are in Ukraine and cannot imagine your life without sports, then this site is exactly what you need! Here, without any effort, you can choose the equipment you need from the catalog and rent bicycles, rollerblades and even premium snowboards. Also, on the site you can get acquainted with the latest sports news.
The process itself:
Print the pattern (it takes up the entire A4 format), cut out the details
The scale of the pattern can be changed to the size you need and transferred directly from the computer monitor.
1. House. Fold the fabric in 2 layers or two different fabrics with right sides facing inward. Pin item No. 1 (or No. 2, whichever you prefer) and stitch over the pins on a sewing machine with a 2mm stitch. Don't forget to backtack at the beginning and end of the stitching. To turn it inside out, leave a 2cm section unsewn. We cut taking into account an allowance of 3-4 mm.
Turn the house right side out. Ironing
2. Roof. I offer several options:
a) sew according to the principle described in paragraph 1. Sew up the opening for turning inside out. See photos 5-8;
b) cut a strip of fabric resembling matting or burlap (make a fringe);
c) find lace of the right size
3. Clock face. A plain, dense fabric (linen or cotton) is well suited for this detail. Attach part No. 3 to the fabric, pin it with a pin and sew with a stitch of 2-2.5 mm. Pull the threads to the wrong side and tie knots. Cut with sharp scissors taking into account a 2mm allowance. Set aside
4. Window. We repeat the same procedure as with the dial, but with part No. 6
5. Cuckoo. The sewing algorithm is the same as in step 1. We only use part No. 4. We stuff it lightly with synthetic fluff. Sew the hole by hand
6. Kettlebells with cones. The clock mechanism provides for the presence of this element, which is responsible for striking and running the clock. I offer several options for cones:
a) sew (see photos 13,14 and 17,18)
b) tie
c) use real small decorative cones;
d) pick up oval beads.
If you choose the option of sewn cones, then we sew in the same way as step 1. We stuff it not with synthetic down, but with buckwheat (to make it heavier and give it a “bumpy” shape). I used brown jersey fabric.
We prepare a cord, braid or rope. You can crochet it from yarn. Or weave a braid from several threads, or replace it with twine (ribbon, lace, etc.). One cord for 2 cones - 9cm long.
Sew to the bumps
7. Patches (optional).
I really love fabrics with patch fragments. Comfortable! I cut out a piece, sewed it where it should be and the patch is ready.
If the design is printed evenly on the fabric, then you can make a fringe along the edges. If it’s uneven (and this often happens), then I do the following. I cut out the desired piece from colored fabric. I coat its surface with liquid PVA, paying special attention to the edges. During the heating season, I send the shreds to the battery for 5 minutes. In the warm season - in the sun. If your PVA is thick, just dilute it with water. And, keep in mind, this method is good for colored fabrics, not white. Since PVA may turn unsightly yellow over time.
8. Take PVA and process the patches, dial and window. At the same time, we coat the unsewn section with glue to turn it inside out onto the “house” part.
9. Pendulum. Cut out item No. 7 from fabric resembling matting or burlap.
Fold in half and sew along the sides and bottom. Prepare a cord 9 cm long. Place it in a bag and secure with thread. Fill the bag with buckwheat. Tie with thick thread, twine 10. Meanwhile, our parts have dried. We glue the dial. Window too.
Add lace shutters to the window
11. Fill the watch with synthetic fluff. Sew up the hole for turning inside out
12. Sew patches by hand
13. We put our cuckoo in the clock.
We make stitches in the area of the eye, wing and legs
14. Now it’s time to sew on the pendulum cord and cone cords
15. And behind them, secure the roof to the top of the clock (mark the location with pins and sew with a hidden seam).
Then - the pendant. Its length including the bow is 45 cm
16. Draw a clock and hands on the dial using fabric paint. Can be embroidered with thread.
17. Tint the dial and patches with dry pastel
And here is the result:
The cuckoo clock will fit perfectly on the New Year's tree, easily fit into the festive interior, and on the most important night it will count down the minutes until the New Year.
By changing the texture and color of the fabric, as well as decorative accessories, you can make different watches
Adelera
Source: livemaster.ru/topic/506235-poshagovyj-mk-chasy-s-kukushkoj-tekstilnyj-suvenir
DIY clock for the New Year from foamiran - MK + template
Foamiran is a comfortable and interesting material, not without reason called plastic suede. With its help you can create a unique design for New Year's watches.
To do this, the main parts of the watch are cut out of cardboard, they are also covered with cut out foamiran overlays. A single composition is assembled that can be hung on any clock in the house.
Clocks made from disks for the New Year - make an original craft with your own hands
Even old discs can be given a second life by using them for crafts. In the case of a watch, you need to take one disk and attach plastic forks to it in a circle.
Glue the dial in the center.
All that remains is to complement the craft with arrows, ribbons and other decorative attributes to give it a festive look.
Salt dough clock for the New Year - step-by-step master class
For a puff pastry item, first take a round box, which will be the frame of the watch. And in this box you need to make several holes into which the rope is threaded for further fastening. The bottom of the box is covered with puff pastry, and watch parts are formed from it and fixed to the base. To complete the look, all that remains is to color the dough, giving it detail and an overall festive look.
Creation from scratch of a cuckoo clock with chiming and “performance”.
A few months ago I got the idea to make a wall-type clock, which in functionality would be close to a clock with “performance” (i.e. presentation, action, movement of various figures). This idea was prompted by watching a video of a number of antique clocks or German watches, where when a whole number of hours comes, this very movement of some figures occurs. On one of the forums, a good person, at my request, wrote a program for the Atmega8 controller. I checked it on the simulator in Proteus. Everything works as intended. That is, in principle, the electronic part is ready. Let me describe the functionality a little: in a case with an antique design there is a digital clock on the controller. The numbers are small, located inside the case, have an auxiliary function and serve only to set the time and events. On the outside of the clock there is a pointer mechanism of a quartz clock with a pendulum. The electronic part of the digital clock provides various design options: a cuckoo clock, a striking clock, a clock with retractable figures. You can also do everything at once: chimes, chimes, performance. In fact, quartz pointer clocks may not be synchronized with digital ones at all. True, in this case, from time to time you will have to make a small correction of their readings manually. The issuance of all signals for the operation of the cuckoo, chiming and performance is provided by a digital clock. From them we receive signals to trigger the above devices. Now about obtaining the necessary sounds: this task is supposed to be solved on the basis of 10-second digital Chinese sound recording boards. They have a built-in microphone and allow you to record and then play back the recording continuously or once until it ends. Based on them, you can make a cuckoo, a clock striking, or a sound effect for the “performance” of figures. The output of these boards is rather weak, but you can use audio amplifiers. The simplest and smallest digital 2-3 watt. His fee is slightly larger than a postage stamp.
As for electronics, I think everything is clear. Now about the mechanics. We need to think through the mechanics of the cuckoo and the performance. With the cuckoo you need to solve two problems: opening doors and twitching the cuckoo. Twitching the cuckoo can be done relatively simply by shifting the center of the cuckoo's swing forward, and the electromagnet will attract the cuckoo's tail at a given frequency, which will create the overall desired effect of movement. I don't know how the doors open yet. I would like to make it simpler, without complex lever systems.
Now about the most interesting thing, about the “performance”: in different watches there are a variety of character figures. I found especially interesting the figures of all sorts of saints emerging from the clocks in one of the cities of Europe. I would like something similar here. There are also German clocks in which the figures of domestic animals move, the wheels of a water mill, etc. Of course, such a project requires a lot of time and effort to implement, but it seems quite interesting in terms of creativity. I would like to know the opinion of watch lovers. Will there be anyone interested in promoting it together? I started to draw him in Solid, but life got in the way. There's no time at all.
Embroidery clock - detailed MK + 5 embroidery patterns
You can also create a festive decor in the form of a clock using embroidery, if you have the desire and some skills.
Miniature watch - simple embroidery pattern + step-by-step instructions
The counter and general appearance of the watch is embroidered on the fabric; thicker fabric is sewn to the back so that the figure holds its shape. Feathers on chains are attached to the bottom of the watch, and a thread is added to the top so that it can be hung somewhere.
New Year's clock cross stitch - 5 patterns
In accordance with the pattern, the complete appearance of the watch is embroidered on white fabric.
A more complex pattern that requires a larger piece of fabric as a base, on which you can embroider another New Year's clock.
Monochrome scheme of New Year's clock.
A simpler, but no less attractive scheme, in which you can use any desired shades to create a New Year's watch.
A charming embroidery pattern with a squirrel will help you make a unique decoration for the holiday.
Crochet New Year's watch - master class with diagram
A real winter clock in the shape of a snowflake is easy to make if you know how to crochet. To work you will need:
- “Snowflake” threads with white and blue lurex;
- hook No. 0.95;
- blue felt;
- needle;
- mother-of-pearl round bead.
First you need to knit the base of the clock and 12 small snowflakes according to the patterns that are on our website. Small snowflakes are sewn to the base. The finished watches are washed, heavily starched so that they keep their shape and dried in a straightened position. Small snowflakes are connected with threads. 2 hands are cut out of blue felt and attached to the clock with threads. You can attach a bead to the junction for beauty.
Clock for the New Year, crocheted
Knitting is a hobby for many people, and in preparation for the New Year, it will come in handy. It is enough to make all the bases in accordance with the diagram and fasten them together. All that remains is to add arrows cut out of cardboard to complete the look.
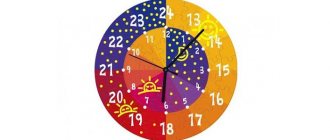
Large New Year's clock for a home photo zone - DIY New Year's decor
What holiday would there be without photos? That's right, none. And to get unique photos, you can make your own photo zone with a homemade holiday clock.
Clock for New Year's photo zone on the wall
From sheets of black or other paper that is quite dark and stands out against the background of the wall, you need to cut out numbers and stick them like a dial on the wall. To complement the surroundings, you will also need to cut out arrows from whatman paper or other dense and large material, which will serve as part of the composition in the hands of those taking photographs.