Hello!
We are slowly starting to prepare for the holiday of the year! This means it’s time to prepare sweet gifts, make cards and crafts on a snowy and frosty theme. And the New Year's watch suits us very well.
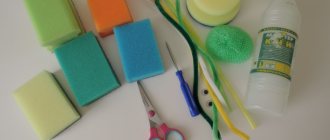
I have prepared a large number of ideas and master classes for making them. We use not only cardboard and paper, but also a tape reel, a disposable plate, felt, boxes and other available materials.
I ask you to prepare the decor in advance, because it is what creates the festive atmosphere. You may need pine cones, tinsel, beads, sequins, decorative snowflakes and stars, braid and even candy.
You may also be interested in how to make a Snowman and Santa Claus with your own hands, make garlands and create different Christmas trees for decoration or for a competition. And stick vytynanka with the symbol of the year on the windows.
DIY New Year's clock for kindergarten made of paper and cardboard (2 master classes)
Before the New Year, you often come across tasks to make a toy or craft for the Christmas tree. We now try not to miss such competitions, because even for simple participation a child receives gifts. Therefore, a wide variety of ideas are used. But preschool children themselves cannot yet repeat some ideas, and we select something simpler. Usually colored paper and cardboard are used.
For the first master class, let's take:
- 2 sheets of A4 size green,
- 2 sheets of A4 orange (can be changed),
- a strip of black paper
- some pink paper
- PVA glue,
- scissors,
- pencil.
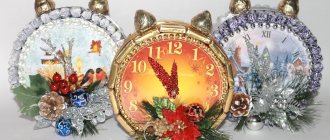
And we will make similar watches. You can change color combinations and add any additional decor.
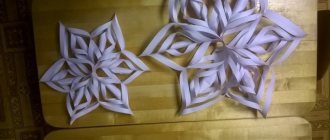
First, we need to make four fans.
To do this, take one sheet of colored paper and start folding it. First, fold it in half lengthwise. Then these halves are cut into halves again, and so on, until you get an “accordion” with a side of about 1 cm.
For an even bend it is convenient to use a ruler!
Next, the “accordion” needs to be folded in half and the edges that are in the center glued together.
It turns out just like in the picture.
We make four similar blanks and glue them into a circle. Lubricate the side edges with glue.
All that remains is to cut out arrows from black paper and fix them in the center. You can decorate the middle with a circle of pink paper or a snowflake.
The numbers can be drawn or printed on a printer. We also glue them along the diameter.
The next master class will also appeal to children.
And we will make a flat clock on cardboard.
Let's take:
- Round cardboard blank of any diameter,
- decorative paper,
- glue,
- scissors,
- decor in the form of snowflakes and stars,
- paper letters.
First, we outline the cardboard blank on a sheet of thick decorative paper. Cut out the template and paste it onto cardboard. This is the dial.
Next, we evenly distribute the numbers around the perimeter. When they are in place, fix them with glue.
Glue a star or snowflake into the center; it will hide any sloppiness. We distribute the decor.
We cut out the arrows from paper and fix them on the dial in the desired position.
Now we take an awl and wire. We twist the head of the wire like a carnation. We use an awl to pierce the center of the dial along with the arrows. Insert the wire with the cap facing up.
Turn the craft over and bend the wire leg to the side. This will give us movable arrows. And you can even study the time on the clock with your baby.
Best Clock Making Ideas for Children's Education
First you need to prepare: watch master classes on how to make a clock with your own hands from cardboard.
The best period for training is senior preschool age.
First you need to decide which watch will interest your child. They may contain images of his favorite characters, photos of toys that he likes to play with. The dial itself can be made in the shape of a sun, a flower, or a butterfly. If the baby does not yet know the numbers, they can be replaced with some pictures. There are plenty of templates and layouts available. The main goal is to interest the child and turn the learning process into a game.
It is also important to think about how the dial will look. This could be a dial with only hours or hours and minutes marked. You can designate hours in two formats at once. This way it will be convenient to explain why it is 1 hour at night and 13 hours during the day. The main thing is to show everything competently and clearly.
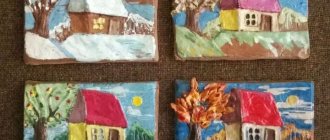
How to make a clock in the shape of a house from a cardboard box for a school competition
Also, every year the child needs to make crafts for a competition for school. In order not to rack your brains, let’s do something clear and concise. For example, a clock in the shape of a house made from an ordinary cardboard box.
Let's take:
- box,
- white cardboard,
- clock mechanism or just hands,
- gouache or acrylic paints with a brush,
- scissors,
- decor for decoration: cotton wool and beads,
- glue,
- 2 small diameter Christmas tree toys and a cord (chain or braid).
First let's measure the box. Then we put a sheet of white cardboard on it. It is better if the box is completely hidden behind the sheet.
Then you can simply cut the top of the cardboard at an angle to create a roof. We make two identical blanks and seal the front and back of the box with them.
We cover the sides of the box with the same white cardboard.
Next, close the lid. To do this, you need to cut out two parts from white cardboard. They should be 1-2 cm wider than the box in width, and 3-4 cm longer in length. We fix them on the sides of the roof with glue. If desired, we can make a pipe.
Paint the sides, bottom and top of the cardboard gold. Or any other one you wish.
You can draw perpendicular lines with brown paint, then you will get an imitation of brickwork.
On the front side we draw a circle - this will be the dial. Separate the roof and draw a window on it. Everything behind the dial can be painted gold.
You need to make snow on the roof. To do this, stick cotton wool on it.
Let's open our box from the bottom and pierce the dial with an awl. We will install the clock mechanism and decorate the dial as desired.
We draw the numbers and the upper part of the clock is ready.
Now take two round Christmas balls. We tie one to the braid. We make two holes in the bottom of the clock with an awl. Next, take the free end of the braid and thread it first into one hole, then into the other. The tape should stick out. Now we tie the second ball to its edge.
All is ready. Instead of balls, you can use cones.
Another cardboard house idea for you.
We cut out blanks from thick cardboard. You can halve a shoebox or any other box.
We need 2 identical parts for the front and back of the watch. Two identical parts that will become the sides. They should be the same length as the first two. And two more identical parts, which coincide in length with the length of the roof. You can immediately cut out the arrow.
In order not to get confused with the part that will become the front part, we cut out a window in the roof.
We print any dial you like. We glue it onto the blanks and decorate the front side of the clock.
Now, using adhesive tape or masking tape, we assemble our house. We attach and fix the side parts of the clock and the roof.
We glue them. Close the bottom and decorate our craft to your liking.
3 master class. I will also show you the idea of creating a watch from two boxes. Breakfast cereal packaging will do. You need two of them. We use one completely. And we cut the second one diagonally so that the sides are equal. This will be the roof.
Then we cover all the parts with wallpaper. Separately, we cut out the dial from cardboard and also glue it over it. We drill a hole in the middle and use a self-tapping screw or wire to fix the arrows in this place. To prevent the dial from “moving”, we will also fix it in place with glue or double-sided tape.
Attach the lid. We coat the edges of the box with Silicone hot glue from a hot glue gun and attach the roof. For better grip, it is better to place the craft on its side.
All that remains is to draw numbers, add snow from a veil and other New Year's decor.
Decorate as desired.
Not difficult right?
Ideas
What to hide For a modern person, no matter how big or small, the wrapper is important. Even the same candy may seem tastier if it is wrapped in a candy wrapper with your favorite movie character, rather than in parchment. Therefore, the learning process should be packaged in a beautiful wrapper: use your favorite Lego men, cars, stickers, prints of super heroes, everything that your child likes, that he is willing to look at for hours, and that he is even willing to sleep with.
Or even make it in the form of a wrist bracelet; I think kids will also appreciate this option.
Regarding the teaching system, choose the one that you think is more understandable to your child and which you can teach “without stuttering.” Some people make watches like real ones without minutes, others hide the minutes under a leaf so they can “peep.” Someone, on the contrary, makes a double dial, where both the hours and minutes are clearly visible, and even the hands move in their own circle, clearly pointing to the number. And someone makes a clock with the task of sticking the corresponding number of minutes on Velcro, and even below you can put in separate numbers what happened (for example, 10:30). Of course, it is more convenient to make such watches with Velcro from felt, although Velcro can also be glued onto cardboard. The main idea!
Or you can improve your regular home clock by sticking minutes in a circle for quick learning.
In a word, what are we still talking about? It's time to get down to business! We have a universal, basic master class coming up that you can take as a basis for your idea.
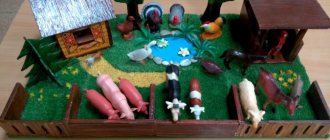
DIY New Year's clock on the Christmas tree
ABOUT! This idea captivated me. And this year we will do exactly that for the city competition. I show it the way it was done by the master. It was made from wooden blanks. But we will make it from thick cardboard. It won't turn out any worse.
Let's take:
- thick cardboard,
- printout of the dial,
- scissors,
- glue,
- decor
- acrylic paints or gouache.
First, take this template and print it out. Cut it out and transfer it to cardboard. We will have all the necessary details.
Separately, print out a dial of the same diameter as the circle on the part. Namely 10 cm.
Glue the drawing to the cardboard. You can place it on the ground, but it is better to use glue.
The surface can be coated with acrylic varnish for reliability.
Now we paint the remaining parts blue. Then, after it dries, we take a sponge, dip its edge in white paint and process the edges.
Let it dry, and then assemble the craft.
Using hot silicone glue from a hot-melt gun, we fix our decor. The bump fits perfectly here.
Now we will tie the clock dial and the Christmas tree together with a ribbon.
For beauty, the cone can be slightly colored with whitewash or white gouache.
It turns out very beautifully!
What are the benefits of needlework?
The main advantage of handmade creations is that you don’t have to worry about manufacturing standards, which can lead to defects.
The most important thing here is you, consisting of creativity and imagination. You are a master and creator. Any craft you make will give people joy and beauty.
But before you start creating, you need to understand the basic ideas of making crafts. More on this in the next heading.
Craft “Clock for the New Year” for a Christmas tree made from disks
You may have accumulated unnecessary CDs. I propose to give them a go and send them into creativity.
Let's make a watch out of them.
Let's take:
- disk,
- cardboard of different colors,
- glue, scissors and felt-tip pen.
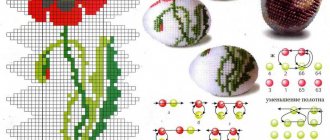
First, we cut out 12 identical circles with a diameter of 2-2.5 cm from cardboard. We write numbers from 1-12 on them. And we fix the numbers in their places.
Then we place the disk on a blue sheet of cardboard. And we outline its upper part. From this round line we draw two semicircles. We connect them with a line. This is an alarm clock handle. Cut it out and glue it onto the disk, taking the back part of it.
We cut out the arrows and fix them in the middle using a paper clip or wire.
From the wrong side you need to bend the sharp edge of the paper clip or wire. So that no one gets pricked or cuts themselves.
Now we’ll make this option with a disk and disposable forks.
Let's take:
- 2 disks,
- dial printout,
- 32 forks,
- ribbons and braid of different colors,
- decor,
- cones,
- glue.
First we take one disk. We place all the forks under it so that their cloves point upward. Fix them well with glue. Use the second disk to hide the reverse side, where the fork handles are visible.
We decorate the front part with a printout.
Now we thread the ribbons, alternating forks. On top we alternate them through a clove.
Glue the arrows and decor.
We connect the cones with braid. We distribute them so that they are at different distances from each other. One is higher, the other is lower. And we fix this fold of the braid on the wrong side of the watch.
The cones can be painted with gold or silver paint.
Here are more ideas for watches using CDs.
If desired, you can make a very beautiful shape.
Materials for work
Clocks are made for children as educational props. Older children are able to make real specimens from scrap materials. An old clock, crafts from which will turn out to be original, will serve as a decorative element in the house. The material for the dial can be:
- cardboard;
- paper;
- disposable tableware;
- ropes;
- threads;
- pencils and markers;
- natural materials;
- fabrics;
- used CDs, other materials.
Video: master class on how to make a New Year's clock from candies
Watches made from candy often come in the form of gifts. They look very beautiful. To make it easier for you to make them, I found video instructions.
As you go, everything is not quite difficult. If you have mastered this simple master class, then here are some more complex ideas.
It is better to take the most delicious candies, such as Korkunov or Rafaello. Kinder chocolate will also work.
Let's take a look at the dial
A homemade design, in addition to aesthetics, will teach the child to understand time. Obtaining information in a playful way gives the best results.
In today's rhythmic life, time plays an important role; its correct distribution guarantees precise regularity in the future.
We recommend reading:
- Can compulsory motor liability insurance be issued by someone other than the owner?
- Stencils for crafts - beautiful stencils and a master class on making beautiful crafts (125 photos + video)
Crafts with a jigsaw - 85 photos and videos on how to cut beautiful jewelry and crafts with a jigsaw
In order to manage a lot, you need to have a good understanding of how to manage it correctly. Don’t forget the saying: “time is money”, it is still relevant today.
New Year's clock in 10 minutes from a disposable plate and beads
Now I want to share with you the simplest craft creation. It's done quickly, literally in 10 minutes.
Needed:
- disposable plate,
- beads for the Christmas tree,
- double sided tape,
- batteries and clockwork,
- scissors and awl.
It is better to take beads with glass beads of the same size, then the watch will turn out neater.
It is better to use a paper plate; it does not rustle like a plastic one. Make a hole in the center with an awl.
Then we turn it with the convex side towards us. And cover the entire side with double-sided tape. Without tearing off the protective film, unfold the plate and cut off the unnecessary edges of the tape.
Now we tear off the protective layer.
We insert the clock mechanism.
We take the beads and begin to glue them from the mechanism, twisting them into a spiral.
This is how it all works out.
We attach arrows.
In the light of the garland, the beads will begin to shimmer and play with reflections.
It turned out very festive.
Quick craft from a plastic container and tinsel
I found another quick craft option in the form of a clock.
Let's take:
- cake container,
- tinsel,
- colored paper,
- plasticine,
- foil,
- scissors.
First, we place numbers on the top of the package around the perimeter. We fix them in place with glue.
We'll put tinsel inside.
To prevent it from falling out, pierce the edge of the package with a needle and tie it with thread.
Roll two ovals from plasticine. We will immediately attach two thick threads to them. Wrap the surface of the plasticine with foil.
Now decorate the sides of the container with tinsel. We fix it with terminals so that it does not fall off the packaging. And all that remains is to tie our bells to the tinsel.
The clock is ready!
Let's start small
Any mastery begins with training; having a choice, you can achieve results much faster.
We recommend reading:
- Crafts made from epoxy resin - stylish, original and beautiful products and decorations made from epoxy (110 photos)
Crafts from seeds: step-by-step instructions and tips for choosing the most beautiful ideas for crafts
- Crafts from airy plasticine - ideas for creating beautiful crafts, the main steps and a description of how to make a craft correctly (100 photos)
Having become acquainted with several options for executing the same idea, you can choose the one you like.
Clock crafts in kindergarten are the most common homework topic. So, let's get creative, let's do it together.
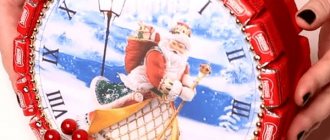
New Year's clock from a tin of cookies or tea
You may have previously purchased tin boxes with tea or cookies inside. Manufacturers often release them before the holidays as gifts. This is the packaging we’ll use as the basis for such a beautiful New Year’s watch.
Let's take:
- cookie tin,
- tinsel,
- 2 wine corks,
- printout of the dial,
- glue sticks and heat gun,
- decor
First, let's measure the diameter of the box so that we can print the design in the size we need.
Cut out the picture and try it on the front of the can.
Cut out two arrows from green cardboard. They can be decorated with beads.
Using glue sticks and a heat gun, we fix two plugs at the bottom of the box. Our watch will be on it. And also glue the dial pattern.
We decorate the sides with tinsel.
All that remains is to make the decor.
You can glue pine cones onto the tinsel.
That's all, also a quick craft for your piggy bank.
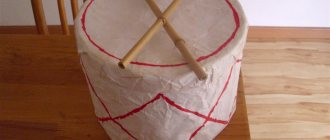
Making a Christmas tree craft from a reel of tape
I also liked the idea of a New Year's watch made from a reel of tape.
Let's take:
- a reel of tape,
- printout of the dial,
- awl,
- cocktail straws,
- foil,
- 2 shoe cover containers,
- paints,
- brown thin braid or thread,
- glue,
- shaggy wire and decor as desired.
First of all, we make two holes in the bobbin with an awl. One at the top, the other at the bottom.
Measure the width of the side of the bobbin. We measure the resulting value on the tubes and cut off many pieces of the size we need.
Glue them end to end on the side of the bobbin.
Now take the foil and tightly wrap it around the sides. So that the ribbed surface of the tubes becomes visible. We bend the foil inward from the edges and fix it from the inside with glue.
This is what happens.
Now we’ll make acorns from shoe cover containers. First, glue a thick thread to their wide part. Wrap the colored part of the container with brown thread or braid.
And paint the transparent part with brown paint.
Now we cut out the dial of the diameter we need, which coincides with the diameter of the bobbin. We outline our dial on a sheet of white cardboard. This will give us the front and back of the clock.
We use paints to draw the arrows and numbers on the dial if we printed it without them.
Glue the dial to the front empty side of the reel using hot glue. We also cover the wrong side with a round piece of white cardboard.
We decorate the edge with shaggy wire.
We decorate our watches with decor: these can be small Christmas tree decorations, pine branches, pine cones and ribbons. We tie our “acorns” from below.
All is ready.
Cuckoo clock from a candy box for the New Year
You can also use a box of chocolates. Most often, it is quickly emptied and thrown away. But we will save it to make an antique cuckoo clock with pendulums.
Let's take:
- box of chocolates,
- printout of a watch with dial,
- two more larger sheets of the same shade as the clock,
- glue, scissors,
- picture of a cuckoo,
- a wooden stick, maybe a skewer or something from sushi,
- brown double-sided cardboard.
First, let's attach the printout to the box and trace the roof.
Let's cut it out of the box.
Now it needs to be covered with colored sheets on the outside.
We close the back side too.
You can immediately cut out a window for the cuckoo and open it.
From the wrong side you need to decorate it and glue the stick. Let's sit a cuckoo on it.
This is what happens at the back.
We need to attach pendulums to the lower part. To do this, cut two holes at the bottom of the box. We take a pendulum from cardboard, make a hole in its upper part and thread a piece of wire or a paper clip and insert it into the holes at the bottom of the box.
This is how the pendulums will swing.
All that remains is to decorate the craft as desired.