DIY chests: how to make them from plywood, boards and other materials? Diamond and magic chests for children with and without keys, storage and seating options
For decoration, it is best to use sheets of scrapbooking paper, and colored stationery paper is best used for other purposes.
Expert opinion
Strebizh Viktor Fedorovich, leading construction foreman
Beginners can quickly make a drawing and sketch for plywood wood using a special application using the following diagram. If you want to clarify something, please contact me!
Blueprints
Before you start making a tree from plywood, you must first prepare a sketch, which will then be used to make a paper model and a template for cutting out the necessary parts. You can create your own drawings.
For beginning craftsmen who plan to make such a craft for the first time, experts recommend choosing simple models. They will be much easier to cut and assemble.
Beginners can quickly make a drawing and sketch for plywood wood using a special application using the following diagram:
- first you need to select the picture you like and transfer it to the working window of the program;
- then you should select the scaling section, taking into account the dimensions of the existing sheet of plywood;
- the finished drawing is divided into fragments, each of which is printed in turn;
- The preparation of the template is completed by gluing all the fragments into one sheet, after which the contour is carefully cut;
- Next, the template is applied to a sheet of plywood and outlined with a simple pencil.
Expert opinion
Strebizh Viktor Fedorovich, leading construction foreman
After this, the individual fragments of the picture are glued into one sheet, the template is carefully cut out along the contour, applied to the plywood and traced with a simple pencil. If you want to clarify something, please contact me!
Device power supply
The device is powered by an uninterruptible unit from Dantom . It has a built-in 12V/7A gel battery. You can assemble the same one, the circuit is very simple, it produces a constant small charging current (several milliamps with a fully charged battery, and 70 - 100 with a discharged one). This is enough to power several electric locks and electric strikes. Or make a smaller unit if you only have one door with a combination lock. Let's say on: L7812CV, LM317, KR142EN8B. Also, the system can be powered from switching power supplies.
Schematic diagram of power supply unit RIP
Printed circuit board BP RIP
In the proposed backup power supply (RPS) circuit, a moisture-proof transformer is used, but you can use any other 20-40 Watt, with an output voltage of 15-18 Volts. If there is only one car actuator under load, then a less powerful transformer will do. For several electric locks, the electrolytic capacitor C1 must have a higher capacitance than that indicated in the diagram - for a greater energy reserve when triggered and, accordingly, a smaller voltage drop across the load. Capacitor C2 – 0.1-0.33mF, C3 – 0.1-0.15mF. The radiator for IC1 is larger, about 100-150 cm2, since in a case with a battery, extra heating is not needed! The output load current for L7815CV is 1.5A. Moreover, if a plastic box is used as a housing, do not forget about the ventilation holes. Diode D8 and fuse FS2 serve as short circuit protection.
Security RIPs have a tamper button against unauthorized hacking of the device - we don’t need it. On the board, to connect wires, it is better to use soldering instead of terminals, as the most reliable method of fastening. Also, it is appropriate to play it safe and take the spare power wiring out of the room, in case of an unforeseen event (stuff happens in life).
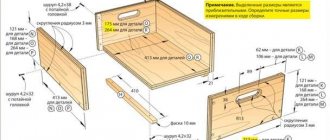
If you need a drawer
In general, a wooden box with a drawer is made in the same way as the classic version, but there are a number of features.
A simple rectangular shape of the lid and bottom will spoil the appearance of the product. It is better to make the long sides of these elements wavy using an electric router. In addition, by choosing this option, the lid and bottom are not placed inside the body, but left outside.
The walls are made of different heights. In particular, the back part and ends are made of the same height and glued together. For the front wall, cut out a die half as wide as the back part. This element is not recessed between the ends, but is installed overlapping and fixed with glue.
The box consists of two parts: the box, which fits freely between the walls, and the front part, which is similar in size to the top die. The elements are also mounted on wood glue.
A partition is installed between the upper and lower parts, which will serve as the bottom of the upper compartment of the box. Inside the retractable and stationary drawers, you can make partitions from thin plywood, delimiting the internal space into several compartments. The lid is installed on decorative hinges, the wood is covered with several layers of furniture varnish.
Expert opinion
Strebizh Viktor Fedorovich, leading construction foreman
For beginners who decide to try their hand at wood carving, experienced craftsmen recommend starting with simple geometric shapes and large patterns. If you want to clarify something, please contact me!
General provisions
First, let's look at the motivation why it's worth taking on making a dollhouse with your own hands:
Advantages of making it yourself
- Saving. The price of factory-made models is quite high, while homemade wood products will significantly save the family budget;
- Uniqueness. The project you implement will be one of a kind; your daughter will definitely not find the same toy among her friends;
Unique toy castle made of plywood
- Compliance with desires. In your dollhouse there will be exactly the kind of rooms, the kind of colors and the kind of decorations that the child wants to see;
You can even put a dinosaur in the attic, because this is original handmade work
Advice: involve your child in the work, this will allow you both to have more fun and make the homemade toy even more loved.
Advantages of choosing plywood
So, we figured out why you should get to work with your own hands and not run to the store. Now let's decide on the material.
Wood-laminated board consists of several sheets of wood veneer glued together, which determines the following advantages:
- High strength characteristics. Durable children's toys always last much longer than their flimsy counterparts;
- Ease of processing. Plywood is easy to saw, paint, drill, mill and fix with nails or self-tapping screws;
It is easy to cut a plywood sheet into pieces of the required size
- Aesthetic appearance. The top veneer has a beautiful original textured pattern and a warm shade that is pleasant to the eye;
Wood-laminated board looks attractive even without additional decorative processing
- Low thermal conductivity, due to which wooden plywood is always warm to the touch. This is an important factor for a child;
- Relatively low cost. Wood-laminated board is not expensive, and you will need very little material to complete the task in question.
But, speaking about the advantages of plywood, it is necessary to mention its possible disadvantage, which is of no small importance. The adhesive used in the production process of wood-laminated board may contain formaldehyde, which is highly toxic.
Therefore, be sure to pay attention to the appropriate labeling and choose an environmentally friendly product, because your child will come into contact with it, and the following labeling will help you with this:
| Symbol | Formaldehyde content, mg/100 g |
| E0 | No more than 6 – environmentally friendly product |
| E1 | 7-9 – permissible standard for use in residential premises |
| E2 | 10-20 is a rather dangerous type of plywood, the use of which is best limited to external work |
Templates for cutting out figures for the garden | 6 acres
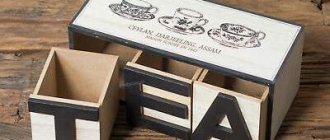
- for jewelry. Such wooden models have a traditionally rectangular shape, but the internal surfaces are lined with velvet, and the lid is complemented by a mirror. As a result, jewelry is not scratched and is convenient to try on;
- for jewelry, trinkets. A characteristic feature of this product are drawers that move freely inside the case. The number of retractable elements is unlimited, and a tight fit does not require special guides;
- A small box for treasured, memorable items. Made in the shape of a heart and great for storing letters, cards, photographs and other things;
- Puzzle . A rather complex product that simultaneously serves as a decorative decoration and a children's toy. A system of wooden gears, reminiscent of a clock mechanism, is installed here, and the lid opens after rotating the handle or one of the wheels;
- to hide a small amount of money. It is made in the form of a rectangle, but the external decoration is made to resemble a book;
- for needles, threads. Such wooden boxes usually have several compartments where you can store sewing supplies. The case is often complemented by a carrying handle.
Briefly about the main thing
The prospect of doing without keys looks tempting, so more and more owners prefer combination locks. These devices differ in shutter mechanisms and installation methods, and according to the locking method they are divided into mechanical, electromechanical and electronic.
When choosing an outdoor device, pay attention to its degree of protection against burglary and negative weather factors; Comfort of use and availability of certificates are important. The greatest capabilities are provided by electronic models that can be integrated into a home security system and work through remote access.
How to put a lock
An interesting solution is a mortise lock, which will be opened with a small key, but such work is difficult to do even for an experienced specialist. Therefore, it is better to limit yourself to a padlock or a decorative hook.
To install a padlock, loops are placed in the central part of the side wall and lid, which are screwed with small screws. The location of the hinges must be calculated in advance: even a slight displacement will break the symmetry, and the box will lose its attractiveness.
Combination lock on microcircuits
The disadvantage of the diagram in Figure 1 is that the code buttons must be pressed simultaneously. A more convenient option is to press the buttons sequentially according to the sequence of numbers in the code number.
Such a circuit is shown in Figure 2. The circuit is built on two microcircuits K561TR2 and K561LA7. In addition to sequential code dialing, there is also a sound indication of pressing each button.
The power-up keyboard consists of ten buttons S0-S9 (for convenience, the buttons are numbered with the same numbers as they are labeled). The code consists of four numbers, the buttons of which must be pressed sequentially.
In this case, code: 0478, respectively, you must first press the S0 button, then S4, then S7 and finish by pressing S8. Only in this order. Naturally, the code may be different, it all depends on the wiring of the buttons.
Rice. 2. Schematic diagram of a combination lock based on K561TR2 and K561LA7 microcircuits.
The K561TP2 microcircuit has such a feature that its RS triggers have priority over the “S” inputs. That is, while there is a one at the input “S”, the state of the flip-flop “1”, and it does not change when one is applied to its input “R”. All four flip-flops of the microcircuit are connected so that the output of one flip-flop is connected to the “S” input of the other.
As a result, this entire system of four RS flip-flops can be set to zero at output D1.4 only by sequentially setting to zero states, first D1.1, then D1.2, then D1.3 and only after that, D1.4 . And nothing else.
To set the triggers to zero states, you need to apply a logical one to the “R” input. Here this is done with four buttons, selected by numbers according to the code. In this case, the code is 0478, respectively, these are the buttons SO, S4, S7, S8.
These buttons are turned on so that when they are pressed, a logical one is sent to the “R” input of the corresponding trigger. After sequentially pressing the code buttons, a logical zero appears at output D1.4. It is inverted by element D1.4 and the control electrode of thyristor VS1 receives the opening current through resistor R9. The thyristor opens and relay K1 turns on the load or equipment with its contacts.
In order to set one at output D1.4, you need to apply one to input “S” of D1.1. In this case, all four triggers of the D1 chip will be sequentially set to the single state.
All buttons whose numbers do not correspond to the code are connected in parallel and connected to pin 14 of D1.1. When any of them is pressed, all triggers return to their original single state.
For audible signaling of button presses, a multivibrator is used on logic elements D1.1 and D1.2. When you press any of the buttons, one of the diodes VD1-VD5 opens and supplies a logical one voltage to pin 2 of D1.1. At the same time, the multivibrator starts and the piezoelectric sound emitter BF1 sounds.
The sound lasts as long as the button is pressed.
To automatically reset the trigger circuit after turning on relay K1, use a circuit using capacitor C1, resistor R7 and logic element D1.3.
The load or equipment is turned off using the S10 button. In this case, the power circuit opens and the thyristor closes; after S10 is released, it remains closed until the next correct code is dialed.
Original flower bed made of plywood
Plywood is widely used not only for creating home crafts. This material is very successfully used for the manufacture of garden figures, decorations, and flower beds.
- Depending on the wishes of the owner, these can be hanging flower pots, beautiful carts for flower pots, or vertical flower beds.
- For work, choose a more durable material, the thickness of which is more than 3 cm. It is also important to pay attention to the condition of the plywood, for example, the absence of cracks, chips, defects, and signs of delamination of the layer.
In independent work, detailed attention is paid to impregnating the finished product with a mixture of drying oil, melted wax and turpentine, which will protect the product from moisture and seasonal rains.
Expert opinion
Strebizh Viktor Fedorovich, leading construction foreman
The location of the hinges must be pre-calculated; even a slight shift will break the symmetry and the box will lose its attractiveness. If you want to clarify something, please contact me!
Manufacturing process of automatic door latch lock with access code
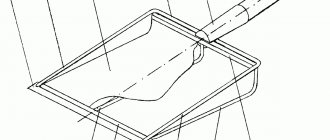
Cut out a strip of 130×30 mm. On a rectangular plate, set off the diameter of the washer from the long side, draw a line and at one end make a protrusion 5 mm wide. Cut out a strip with a protrusion. We apply the strip with the protrusion to the strip 130x30 mm in length, joining the sides, mark the contour of the protrusion on the latter and make a corresponding cutout.
We draw a vertical line from the inner edge of the protrusion. Between it and the far end of the strip we draw a median line. We step back 5 mm to the right and draw a second line. We measure 25 mm from each line and drill two matching holes with a diameter of 10 mm.
On the strip with a cutout at the far edge, mark and drill two holes with a diameter of 8 mm. The center of the outer hole is 10 mm from the sides of the strip. The distance between the centers of the holes is also 10 mm.
We insert the protrusion into the cutout of the strip and place it on a rectangular plate so that the ends of the strips are 20 mm from the edge of the plate.
We transfer the centers of the right holes in the strips to the plate and drill two lower holes with a diameter of 10 mm and the upper one with a diameter of 8 mm. We remove the jumpers between the three pairs of holes in the strips and get three elongated holes.
We find the middle between two holes with a diameter of 10 mm on the plate, put 5 mm to the sides and drill two of the same holes, and we get one elongated one.
Insert an L-shaped piece of reinforcement into the hole of the strip with a cutout with a diameter of 10 mm with the short side and weld it, and a piece of reinforcement to the strip with the protrusion.
We draw radii on wide washers and make grooves 10 mm deep.
On the ends of the washers welded under the bolt heads, we apply 12 marks evenly in a circle and make grooves with a file, marking every second one with numbers from “I” to “VI”.
Using bolts, we assemble a plate, a strip with a protrusion and large washers with the grooves oriented to the left. We mark on the strip the points of intersection of the circle line of the washers and the axis of the grooves.
Drill two holes with a diameter of 4 mm. We insert pins into them from the side opposite to the piece of reinforcement and weld them.
We connect the strip with the L-shaped handle with a washer and a bolt, which we weld to the plate so that they can move relative to each other. We combine the protrusion of the strip with the cutout of the other and insert bolts with marked washers on top.
We make two shaped parts with a cutout and a hole with a diameter of 12 mm from sheet metal and a corner. We weld the sheet part vertically along the edge of the plate so that the strip with the handle moves freely within the cutout.
We install the strip with the protrusion in place, insert bolts into the holes from below the plate, put washers on top, tighten the nuts, then large washers with slots and secure with nuts. We cut off the protruding ends of the bolts.
We fasten the assembled structure with screws from the inside to the door leaf, and opposite to the jamb - a part from the corner. When the door is closed, the latch slides along the inclined edge of the part on the jamb and eventually falls into the gap.
When the slots on the large washers do not coincide with the position of the pins, the closed door cannot be opened from the outside. If there is no need for a latch, then lift the plate with the handle and move it to the right. To engage the lock, move the top plate to the left.
To open the door from the outside, you must enter the code correctly. To install a different code, unscrew the nuts and change the position of the slotted washers, then tighten the nuts again.
DIY plywood crafts: diagrams, templates for flat and three-dimensional products
- First of all, you should choose a sketch. Today, black and white portraits or shadow images are very popular.
- The sketch is drawn on the back side of the plywood using a pencil.
- The sheet of material is firmly fixed, for example, using clamps.
- The edges under the clamps should be wrapped with a soft rag or sponge so that the surface of the plywood does not crumble under strong pressure.
- The details are cut out according to the applied template, forming the desired image.
- Using a hard sponge, sand both the surface of the plywood and the edges of the cuts.
- The next step is to impregnate the material with a moisture-resistant composition (homemade mixture or industrial oil).
- After the impregnation has dried, you can begin decorating.
- A layer of stain and transparent acrylic varnish will not only protect the material from premature deterioration, but also create a beautiful glossy finish.
Electronic code lock
Advantages of a combination lock:
- durability;
- work in any weather conditions and temperature changes;
- affordable cost of necessary elements.
Diagram of the simplest lock with four buttons
If you have all the details, the question of how to make such a lock with your own hands is not difficult.
- A set of radio components with a board is purchased.
- An automobile electric drive is installed on a relay as a motor.
- The latching device is selected in accordance with the existing lock.
- A board with a relay is installed on the door frame, to which electrical wiring is connected.
- For the housing, you can take a plastic cover with holes drilled in it for installation.
- Holes are drilled in the U-shaped aluminum profile into which buttons are inserted. The diameter should be equal to the button on the cambric. This is important for high-quality signal operation, so that there is accurate centering.
- Wires are soldered to the buttons and LEDs, and the entire structure is filled with epoxy resin.
- The panel is attached to the door using screws.
- To ensure uninterruptible power supply, a UPS is connected.
What does an electronic device look like from the inside?
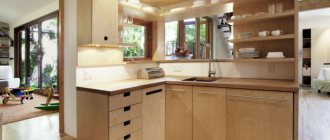
Setting up the kitchen
Taking into account the specifics of the application, kitchen crafts are made from dense, water-resistant plywood.
This material is not afraid of moisture and steam, so it can last for several years. Plywood is usually used to make carved shelves, boxes for storing spices and other necessary small items, cutting boards, hooks for potholders, and souvenir refrigerator magnets.
If you have some experience, you can assemble an entire kitchen set with your own hands, which will not differ from the products of furniture factories. To do this, use thick sheets of plywood, a jigsaw or a hacksaw. And of course, you need to have some free time and desire.
Expert opinion
Strebizh Viktor Fedorovich, leading construction foreman
To perform such work, you will need a jigsaw, including a hand tool for cutting out the smallest details in the image. If you want to clarify something, please contact me!
Dollhouses for children: we make them ourselves
The uniqueness of do-it-yourself dollhouses lies not only in their originality, but also in the opportunity to become closer with your child. It is better to make such a structure together with the baby: ask for her opinion, draw a house plan together, choose furniture, arrange the home like a real one. According to the general opinion of psychologists, such joint activity will benefit both parents and child.
Making a house for a doll is not difficult, and the child will be impressed for the whole year. You can show off a doll house made by your parents to your friends, and it’s also much more interesting to play with.
A classic dollhouse does not have a front wall to make it more convenient for a child to play with the dolls located in it. A homemade house can be different: without a wall, with a curtain simulating a wall, or with a real opening wall.
The choice of one option or another depends on the size of the house and the room in which the toy will be located, the age of the baby and the design features of the structure itself. Wooden or cardboard houses can be equipped with a spectacular closing wall, but a fabric house is traditionally made open.
The dimensions of the future doll house also depend on a number of factors. You should take into account the age of the baby who will play with dolls: small children find it difficult to use bulky products, while older children love large toys with a lot of parts.
Be sure to consider the size of the children's room or the room in which the toy will be placed. A massive house may turn out to be too bulky, it will get in the way and eventually end up on the balcony.
Little dollhouse in a box
A compact toy is an ideal option that is not too troublesome or time-consuming to make, it does not take up much space, and playing with such a doll house is no less interesting.
Big doll house
Houses for dolls made of different materials
Doll houses are made from everything from wood to cardboard folders. The breadth of possibilities gives parents the chance to create a unique, original product for their baby that will take into account the interests and preferences of a particular child.
Compact soft houses made of fabric are more suitable for kids, light cardboard houses for children 3-6 years old, and solid buildings made of plywood or old furniture for younger schoolchildren.
But it’s not enough to make a beautiful house - you also need to furnish it: decorate the walls and floor, arrange furniture, add accessories, house dolls. A self-made doll house is a constant creativity: searching for new solutions, adding original details and settling in new residents who need new rooms and additional furniture.
Psychologists advise using the creation and arrangement of such a doll house as an ideal means of communication with a child, because during the game you can find common ground and better understand each other.
From cardboard boxes
Houses made of plywood, laminate, wood
There are many requirements for a dollhouse: the child needs a bright and interesting product, mom cares about the environmental friendliness of the toy, and dad cares about the strength of the structure. It is unreliability that is the main problem of purchased doll houses, which do not always withstand the active play of active children.
Dollhouse made of wood
Making a house for dolls from laminate or plywood means getting an original, creative and durable housing option for all the baby’s dolls.
Designer house made of plywood
ADVICE. A house made with high quality according to plans found on the Internet with neat finishing will look no worse than a purchased one. And its uniqueness and unusual details will make such a toy a reason for pride.
Toy house house made of laminate
To make a durable and beautiful house for dolls, laminate or plywood (at least 7 mm thick) is cut according to pre-prepared patterns and securely fastened with inconspicuous corners and small nails, then glued with wood glue to ensure the strength of the entire structure.
The glue will also help eliminate any crevices that may look unattractive and become a place for small toy parts to get lost. After the body of the house is assembled, you can begin finishing: the ideal option for walls, floors and ceilings is self-adhesive film.
Plywood doll houses
Dozens of available colors and textures make it possible to create a dream house in any style. Such a house is very durable, so it can withstand not only light cardboard or plastic furniture, but also more reliable wooden parts.
Houses made of boxes or cardboard
An ideal option for joint creativity is to create a dollhouse from cardboard boxes. It can be any size: tiny figures will feel comfortable in a shoebox, larger dolls will need a vacuum cleaner box, and if you want a doll mansion, look for a washing machine or refrigerator box.
House for dolls made from boxes
ADVICE. A large house can be made not from one, but from several small boxes carefully fastened together. Such a structure can have several floors and rooms, a spacious attic and even a basement.
Cardboard dollhouse
Work with the box begins with removing one of the walls, as well as installing partitions between the rooms. The hollow box becomes a blank for the future home: the walls, floor and ceiling are decorated with paper, and plastic furniture that the house can support can be placed in the rooms.
Such a home for dolls is attractive due to its light weight, so moving it to another room or taking it outside in the summer is not difficult at all.
In addition, it is easy to renovate such a dollhouse: just purchase a few sheets of designer paper and a new interior is ready. Usually such construction is so exciting that adults and children begin making furniture and decor for dolls without stopping.
You can make a house not only from ready-made boxes, but also from sheet cardboard: you will need patterns, glue, scissors and colored paper, as well as imagination and the desire to turn boring brown cardboard into a real fairy-tale castle.
DIY dollhouses made from cardboard boxes
Plasterboard houses
It’s easiest to make a doll house when the apartment is undergoing renovation. A huge amount of building materials allows you to build quite an attractive home for dolls of any size without much expense.
At the same time, the doll house will resemble a smaller copy of the apartment, because to decorate it you can use the remains of real wallpaper, laminate, linoleum and even tiles.
To make a full-fledged house from plasterboard you will need a diagram of the parts and the material itself. Carefully cut drywall is connected with small corners, and then the walls are puttied and painted (or wallpapered). Such a house looks like a real one, especially if you follow the layout of the rooms, as in a real home.
Houses made from old furniture
You can make an excellent dollhouse for your child from old furniture that has been collecting dust in the garage or on the balcony for a long time. An old chest of drawers, a part of a kitchen unit or part of a bookcase after simple transformations can turn into an attractive and interesting house for dolls.
ADVICE. A significant advantage of such a house is its size, which makes it possible to use large toys, as well as the presence of doors: all the dolls will sit in the closet, and the room will be in perfect order.
To turn an old cabinet into a stylish toy, you will need the help of your dad or grandfather, because you will need to cut out windows with a jigsaw, rearrange shelves, or change the configuration of the contents of the cabinet by adding partitions. For maximum comfort for a playing child, all surfaces are covered with a thin layer of putty, which also allows the house to look more attractive.
The final finishing of the finished house is entrusted to the mother, who, together with the baby, chooses wallpaper for all rooms, floor coverings, furniture and decor. The walls of the house can be simply painted, or covered with wallpaper, colored or wrapping paper.
In the interior of such a doll house, ready-made or self-made furniture looks great: cabinets made from boxes, sofas made from juice bags, shelving made from cardboard and a bathtub made from a soap dish.
Photo: playhouse in a suitcase
Houses made of fabric or stationery folders
Fabric dollhouses are a great option for kids 2-5 years old. At this age, a child needs educational and safe toys, and a home for fabric dolls is absolutely safe. A fabric house can be of two types: a hanging version with folding shelves or a handbag house that folds out into a full-fledged home. Both options look decent and deserve attention.
Fabric houses
The fabric house is mounted on the wall and does not take up space when folded, so it is chosen for small children's rooms or small apartments.
Playhouse made from a paper folder
Even a beginner can sew such a house:
- you need to make a dense back wall with a thematic pattern,
- provide space for future shelf rooms,
- sew the “floor of the room” and place cardboard inside,
- sew the improvised floor with one edge to the base and secure it with ribbons or ribbons in a horizontal position,
- pick up light furniture, soft dolls and populate the house.
Sewing a house for dolls in the shape of a handbag is a little more difficult: for this you will need a diagram of the parts, multi-colored fabric, filler for the walls, decor for decoration and the ability to work with a sewing machine or a hand needle.
Since the walls of such a house must be solid, the role of the base is played by a plastic mesh or cardboard, which should be wrapped in soft material (cotton wool, thin foam rubber or sheet synthetic padding), and then covered with the selected fabric. The walls of the house can be decorated with ribbons, buttons, applique, embroidery - making the toy interesting for a child of any age.
A slightly easier way to create a fun home is to use stationery folders as the base of the home. Such a home for dolls resembles a book with bright pictures that can become a platform for active children's games.
It’s easy to make such a toy: cover the inside of the folder with beautiful paper that imitates wallpaper, stick furniture on top - and the room is ready. 3-4 vertically standing folders already look like a real house in which you can put dolls.
Any doll house that parents can make for their baby will be an original creation, suitable for the child’s play and development. Large or compact, durable or soft, fabulous or realistic, such a house is an excellent gift for your daughter or son for any occasion.
Plywood painting
- strength . The structure of the sheet is multilayer, which ensures a certain rigidity and resistance to deformation;
- availability . Available in any hardware store and sold in an affordable price segment;
- ease of processing. Cutting crafts does not always require a power tool; you can get by with an ordinary jigsaw;
- safety . The material is environmentally friendly, so you can even make toys from it without fear that your child will develop an allergy.
How to treat the surface → Room decoration → How to choose the right paint → Surface treatment technologies → Leveling and finishing the walls → Selecting and applying a primer → Removal from the surface → Stretch ceilings and technologies → Reviews and testimonials
Electromechanical lock with Arduino
I, like most people who have one, associate Cottage with the words: relaxation, barbecue, comfort and other pleasant movements for the spirit and body, but there is also a downside: gardening, digging, repairs, construction, etc.
For 10 years, my family and I have been trying to improve and create maximum comfort in our dacha. We build, repair, etc. House, barn, bathhouse…..and finally it came to the street fence, gate and gate. Do this according to conscience, budget and convenience.
After discussing some details, it was decided that the gate should be automatic and the gate should have some of the properties of an access control system. With the gate, the issue was resolved by purchasing an automation kit (drive, rack, remote control, etc.), but with the gate it was necessary to solve some problems, more about them below.
The tasks were the following:
- The lock had to work in conjunction with a previously installed video intercom (open the gate without leaving the house)
- Be able to open the door with a regular key and without a key from the street and yard.
- Will fit within the remaining budget up to 5000 rubles.
Searches in RuNet presented the following price range from 7000 to infinity. Purchasing a ready-made solution was no longer necessary and an alternative with wide possibilities was conceived, namely to cut down the door yourself!
After some calculations and calculations, it was decided to buy an electromechanical lock for about 2000 rubles, a waterproof keyboard for 350 rubles, and a microcontroller that will drive here. Since there were several Arduino nano boards, relays and loose parts and some wires, the difference between the cost of the finished kit was more than 4000 rubles. For me, it’s a great bonus for your wallet and self-development.
Well, now from words to action:
After purchasing all the necessary components, I began sawing.
Keyboard connection diagram
Additional LED indication (white, green, red) of the keypad panel signals (input, correct password, door open, refused).
- pin 9 yellow
- pin 10 green
- pin 11 red
A panel (grid) made of plexiglass, cut for a box of chocolates and a smile by office neighbors. But the smallest cutter turned out to be a little fatter, so I had to work with a needle file.
Well, it’s the weekend, I went to the dacha.
To open an electromechanical lock, you need 12 V. The power supply supplying the MK was 5 V, the decision was to install a boost dc-dc converter from the Middle Kingdom for the castle. I connected everything and started checking it, it works, but when voltage was applied to the lock solenoid, the Dunya rebooted, causing a short to the power supply. Further more, after connecting the calling panel from the video intercom to the lock, when you pressed the button to open the door, nothing happened, a small current to the lock. Running new wires is not an option; they were already concreted at the exit from the house. I decided to add another relay for the panel and install an additional 12 V power supply. for the castle. After parsing/assembling, everything worked, the MK stopped rebooting. I hid the whole thing in a moisture-proof junction box, hid the wires, glue, silicone and ready!
The wire for the keyboard is a regular wire 8.
The code itself is attached.
Pros of DIY
The advantages of making a dollhouse with your own hands from plywood include the following:
- A product made according to an individual drawing involves the use of its own dimensions, design and functionality. The main advantage of such a toy is its uniqueness and the ability to take into account the child’s wishes when arranging and decorating rooms, choosing layout and furniture, accessories and decor.
- The house can have the necessary and convenient size, which is selected taking into account the free space in the children's room and the wishes of the child. This can be a tabletop or floor-mounted design.
- You can involve the child in decorating and arranging the interior space even at the stage of drawing development - joint work brings the child together, allows him to reveal the creative potential of the child, teaches him to make independent decisions and bear responsibility for them.
- Working with plywood is a creative and fun process that the whole family can participate in.
If you make it yourself, you can give the house any appearance.
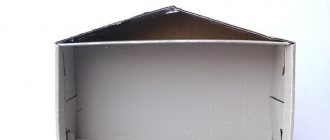
Cardboard housing
A budget housing for toys can be made from ordinary cardboard. The material is easy to work with, it can be painted and deformed. Craft materials:
- corrugated cardboard;
- plain and thick colored paper;
- development of parts - windows, doors, roof, stairs;
- glue gun;
- scissors, stationery knife;
- acrylic paints;
- pieces of fabric.
The sketch is applied to a large sheet of cardboard and cut out. If there are only small pieces of paper, then the walls, roof, floor and ceiling are made separately. There is no need to make the front wall, otherwise it will be uncomfortable for the girl to play. They fasten the frame of the future house. Sometimes it is inconvenient to bend the cardboard, then to facilitate the process, small grooves are made at the bend points with a ruler. Be sure to install partitions between rooms in the house. They will not only divide the home into parts, but will also play the role of load-bearing structures.
Windows are cut out in the walls according to the patterns, and doorways are cut out in the partitions. The staircase to the second floor can be made from cardboard folded into an accordion. For supports and railings, use wooden skewers or pieces of thick paper coated with glue. The interior surface of the house is covered with colored paper, decorating the walls, ceiling and floor. It is advisable to also make all furniture from cardboard. To do this, draw drawings of each item, cut out parts from them and fasten them with glue. The interior is complemented with textiles.
If the toy will be located against the wall, then there is no need to make a back cover. The roof can also be stationary - just draw its outline with acrylic or black insulating tape. In a similar way, they decorate a house from office folders. They are covered with fancy wrapping paper, printed furniture is attached to each page. The folder is opened, placed vertically, and the remaining interior items are placed next to it.
Preparatory work
At the first stage, you will need to decide on the dimensions of the structure. To do this, you should take into account the size of the doll the child is playing with - the toy should fit freely at full height with a margin of a few centimeters to the ceiling. There should also be enough space for arranging toy furniture - a crib, a table with chairs, kitchen furniture.
Houses for Barbie
The number of floors in the house depends on the size of the toys and the height of the child. If the figures do not exceed 20 cm in height, then the house can have up to 3 floors. If the structure is assembled for a standard Barbie doll, then it will not be possible to make more than 2 floors - then it is better to arrange the rooms horizontally.
Floor-mounted 3-storey house for playing with small figures
Having decided on the concept, you can begin to develop the project in more detail by drawing a design drawing to scale on a piece of paper.
Project details
Drawing
The drawing of the details of the house must be done to scale - you can draw it on a sheet of paper or in a special computer program. This will allow you to reflect the dimensions of the product, the number and sizes of parts, and determine the methods and locations of fastenings. Also, at the stage of creating the project, you should decide on the internal layout, shape and design of the house. This stage of preparatory work should not be skipped, as it allows you to determine the required amount of material and the sequence of assembly of the product.
Basic elements of a dollhouse
Note! To make a house, you can use a standard drawing. It is worth remembering that when changing (increasing, decreasing) one size, a proportional change in the remaining sizes follows.
When developing a drawing yourself, you will need to consider the following:
- The shape of the rear wall is a rectangle or pentagon, which allows you to make a gable roof.
- To make the assembly process easier, the base is made slightly wider than the space inside.
- The ceilings of the upper floors should have smaller dimensions than those at the base.
- The main structural elements also include sidewalls, interior partitions and roof parts.
Sketch diagram of the house
Preparatory stage
First of all, you need to determine what size the structure will be. To do this, take into account the size of the dolls themselves that the child plays with: the toy must fit completely into the house in height (with some margin). In addition, sufficient space must be provided for the arrangement of toy furniture: kitchen, bedroom, etc. The number of floors in the structure is determined by the height of the child, as well as the size of the toys. If the height of the figures is no more than 20 cm, then the house can be made three-story. For a standard Barbie doll, two floors will be enough. When the general sketches have been made, you can move on to the details, for which you make a drawing to a certain scale on a sheet of paper.
Drawing
To make a plywood doll house, you need a drawing on which the exact dimensions of all elements will be marked. After determining the approximate dimensions, they think about the shape and style of the house. It is worth considering that when using a finished drawing and changing the dimensions of individual parts, other dimensions will also need to be adjusted.
When preparing a drawing yourself, it includes the following parameters:
- The back part of the structure should be made in the form of a five- or rectangle. The first option is considered more preferable, since this shape will make it possible to make a roof that will have beveled edges.
- The size of the base should be slightly wider than the internal space. This makes the assembly process easier.
- Interfloor ceilings should have the same dimensions, slightly smaller than the bases.
- The data of partitions, side and roof elements are taken into account.
Scheme of the simplest combination lock on a relay
Here's my four-digit diagram. The principle of operation of the lock is very simple. The figure shows a diagram of the lock in its original position with the door open. When the door is closed, the reed switch closes and power is supplied through the normally closed contacts P1 to the normally open contacts P2 (second relay). Relays P2 - P5 are connected according to the self-retaining circuit. The code dialing involves buttons KL2 - KL5. When the KL2 button is pressed, relay P2 is energized, and accordingly the relay receives power and its contacts close. When CL2 is released, the relay continues to be powered through its own contacts. Then power is supplied to the contacts of relay P3 and in the same way to relay P5. When the contacts of relay P5 are closed, power is supplied, but the actuator (in my case it is an electromagnetic latch, but it can also be a high-voltage relay, when the lock mechanism is powered from 220V.) There are also buttons KL1 and KL6. When you press the KL1 button, the entire further circuit is de-energized, all relays are reset to their initial position. In parallel with CL1, all free keypad buttons are turned on. Button KL6 is used to open the lock from inside the room. When CL6 is pressed, relays p5-p4-p3-p2 are activated alternately and continue to hold their contacts until the door opens (the reed switch opens and the entire circuit is de-energized. The same thing happens when the code is entered correctly, only the relays operate in the reverse order 2-3 -4-5). The relative disadvantages of this lock include the following: 1. Opening the door and pressing all the “correct buttons” at the same time. 2. Lack of backup power source. If there is a power failure, the lock cannot be opened. Although you can reserve using Akum and another relyushka. 3. You cannot select a code with repeating numbers, for example this: 2325. Here is a photo of my two locks. They have been working for over a year without problems. The main thing is to come up with a code panel, but this is a matter of taste.