A full-size play kitchen is the dream of many girls, because there you can not only copy the actions of adults, but also conduct your own culinary experiments. A set of furniture and appliances for children usually consists of items that are in the actual cooking area: several cabinets, drawers, an improvised stove, a sink, a refrigerator, a cutting table. For such a mini-headset, a space of 1-1.5 square meters is quite enough. m, or a small free area along the wall. It’s easy to build a beautiful, multifunctional children’s kitchen with your own hands, and from what and how to make it – read below.
Kitchen from scrap materials
Before we start tinkering, it’s worth addressing a few questions:
- Where will the craft be placed?
- Based on the first point - what size will it be?
- What material will be used (perhaps some are already in stock, but others will have to be purchased)?
- What is the age of the baby for whom it is made. And also, right there, at this point: are we going to make crafts for a girl or a boy?
- Will this be a long-term design or a short-term one?
Of course, it wouldn’t hurt to make a layout or drawing on paper to at least roughly see what we will be aiming for.
If there is a suitable place for a large structure in a child's room, that is wonderful. Then you can create a play area where the house will find its place (we talked about it in one of the articles), and the kitchen will also be located here.
Space allows, we can make a craft that will not be for our child’s toys, but for him. That is, according to its size, both tables and stoves.
The most suitable material for “furniture” would be a simple box. We will also need pieces of wallpaper, colored and multi-colored paper, paints, and also children's dishes. And among the tools - scissors, a stationery knife, glue, tape, possibly a stapler (but only for fastening parts where the baby will not get caught and get hurt). For realism, you can take fittings from old furniture. Plastic bottle caps are also very helpful.
The size will depend on the age. The comfort of the baby is important, so that when playing, he does not hunched over, but also does not stretch. And yet, it will be more interesting for a boy if there are more “technical devices”, such as a toaster, microwave, etc. Perhaps your baby will enjoy fixing all these things more than fiddling around in the kitchen.
If you plan for your little one to regularly play in his kitchen, you will need to try and make the structure more durable. Perhaps then something from the real kitchen can be transferred. For example, chairs or some dishes.
What can be made:
- bake;
- table;
- washing;
- fridge;
- closet;
- devices;
- dishwasher, etc.
It seems that we have not forgotten all the main points. All that remains is to put everything into practice. Let's see how to make both a toy and a game for toddlers. A small master class.
Base materials
The process of making a toy set consists of the same steps as the production of real furniture. It is necessary to correctly design the product, outline the parameters, and take care of its stability and practicality. This craft is intended for children 3-6 years old, so it does not require much strength. Thus, to create a children's kitchen, light improvised means and unnecessary household items are quite suitable.
Carton boxes
Packaging cardboard is the most affordable and easy-to-process material that can be found in almost every home. You can turn it into a toy set in a matter of hours. To work, you only need a stationery knife, glue and tape. To compact the product, it is advisable to fasten the cardboard sheets in pairs, and place boxes of similar size one inside the other.
A frame made of wooden slats or plywood will provide additional rigidity to the structure. You can make a viewing window in the oven door by cutting a hole and sealing it with a hard transparent film (this is often found in boxes from large dolls). If you approach the process creatively, a cardboard kitchen for a girl will be in no way inferior to an expensive factory craft.
Old cabinet furniture
Unnecessary chests of drawers, walls from the 90s, cabinets, coffee tables and even chairs can be easily adapted for gaming purposes - in most cases, they can simply be decorated and supplemented with the necessary elements. Unlike creating a set from scratch, converting old furniture into a children's cooking area makes it possible to save on fittings (curtains, handles) and get a stable, neat, durable product that a child can use for several years.
Furniture confirmations: dimensions, drills and holes for euro screws (euro screws)
Wooden pallets (pallets)
Moisture-resistant transport containers made of wooden or plastic slats are an ideal option for installing an outdoor play kitchen somewhere in the country or in a kindergarten. Whole pallets can be used as a base and open shelves, and individual fragments can be used to create doors, lintels and table tops.
Plywood
Having a minimal set of tools and carpentry skills, it is not difficult to make a kitchen set for a girl from plywood with your own hands. A master class on how to make it can be seen in the video at the end of this article. For one small kit you will need a sheet of laminated veneer with a thickness of 6 mm, an electric jigsaw, a drill, wood glue and ordinary furniture fittings. Windows can be made from transparent or tinted plexiglass, securing them on the inside with liquid nails and protective edges.
Where to start
What can be used as the basis for a future kitchen? Of course, if it is possible to use any wooden materials, that would be great.
However, not many people know how to handle wood. Therefore, it is easiest to use cardboard; it is quite durable and easy to use.
Still, let's list what is usually needed for work:
- Cardboard boxes - suitable for old household appliances. You can buy such products; the price in special stores is quite reasonable.
- Scotch tape or any adhesive tape. It is best to use transparent tape.
- Self-adhesive film - you will need several rolls to cover all the parts of the children's kitchen.
- Felt pens or markers.
- Plastic bottles - you can replace them with small lids from small jars.
- Old and unnecessary CDs.
- Aluminium foil.
- Gray or silver plastic cup.
- Scissors and a sharp knife (stationery).
As you can see, all materials can be processed with your own hands, so no difficulties should arise during the work process.
It is best if you do this with your child, as this process allows you to instill in him the seriousness of the event. Once you have a kitchen corner, you will definitely be the first to receive “meals” prepared with love.
If plywood is chosen as the material, it should be of medium thickness to support the toys. The optimal thickness is 12 mm. The tree must be sanded so as not to plant a splinter. A DIY kitchen made from plywood will last longer if you coat it with varnish.
Old benches, bedside tables, chairs, cabinets, as well as wooden fruit pallets are suitable for remodeling.
For cabinets you will need furniture fittings - handles, hinges, latches. They must be of high quality so that the child does not get hurt.
The water tap can also be made like in an adult kitchen. This idea is suitable for a summer house, where you can freely play with water without fear of getting wet.
For a cardboard kitchen you will need thick corrugated cardboard. Suitable packaging for large household appliances: washing machine, TV, stove. The structure is assembled with tape and decorated with self-adhesive film.
How to decide on sizes
The dolls, their houses and furnishings are smaller copies of us and our homes. And the most reliable way to make doll furniture with your own hands and not make a mistake is to measure real objects, reduce them several times, and then work with the obtained values.
Furniture for dolls - copies of our furniture
How much to reduce the actual dimensions depends on how small or large the doll is, because they range from 7 cm to 60 cm or even higher. Accordingly, they need furniture of different sizes. To determine the number by which the actual dimensions should be divided, divide the average human height in centimeters (170 cm) by the height of the doll. Let's get some number. This is how you will need to divide the dimensions of real furniture.
For example, the height of the doll is 15 cm. We calculate: 170 cm / 15 cm = 11.3. It is by this number that we divide all the parameters of “human” furniture. It is also worth saying that 14-15 cm is the most popular size among the doll population. Therefore, most of the finished furniture is made in a ratio of 1:12. We can also use the existing dimensions, at least so that we can navigate the scale of the required parts and the amount of materials.
Approximate dimensions of furniture for doll children
So, the most common doll sizes are:
- male doll 150 mm;
- female doll - 140 mm;
- child doll - 75-100 mm;
- toy baby - 65-75 mm.
If you need furniture for dolls of similar sizes, its parameters will be as follows:
- Bed: double – 160*130 mm;
- single - 160*75 mm;
If the toys you have are slightly larger/smaller, you don’t have to adjust the sizes. If the difference is large, you will have to increase or decrease (or you can calculate it yourself).
Diagrams and sketches for assembling kitchen equipment
A cardboard box kitchen is made in accordance with certain patterns and layouts. It’s worth immediately highlighting a few basic items that will definitely be present in the project. Here are several miniature layouts with minimal finishing and decor:
Subsequently, each item will be manufactured in accordance with individual preferences and requirements for parameters and functionality.
Step-by-step assembly of a children's kitchen
There are several main steps regarding how to make a kitchen out of cardboard:
- Select boxes of the required sizes.
- Prepare each piece of furniture in accordance with the sketch - cut the doors, fix the shelves.
- Paint or tape the inside and outside surfaces of each element.
- Fix functional elements (switches, taps, burners, sink and much more).
- Carry out the final decoration - hang curtains, draw details, fill shelves with dishes and products (toys).
Structural design
A DIY kitchen involves creating a project. In this case, each structural element is placed on the plan.
It is recommended to choose the correct sizes. The children's furniture project is made from adult structures, but at the same time proportionally reduced in size.
The parameters vary depending on the height of the child and the size of the room.
When designing a kitchen, you can replace expensive elements with cheaper ones.
The children's design may contain lighting sources. Light bulbs with low power are used.
Children's furniture is made in the same style as the room in which it is installed.
The kitchen set is made of wood. The following options apply:
- The product is made of plywood. Using a jigsaw, rectangular parts are cut out and fastened with special slats. Additionally, cabinets are installed, a faucet and a sink are installed. The surface is painted with special paint.
- You can remodel a kitchen from an old cupboard. The product is modified to suit the child's height. The surface is cleaned and painted. Hooks are attached to the structure. A water container and lanterns for lighting are installed.
- The structures are made from cardboard.
Making children's furniture yourself is not difficult.
You can also make a toy kitchen from wood. For this you will need special materials.
Option 1. Step-by-step instructions with your own hands from cardboard boxes
- For this design we will need 3 boxes of the same size. This will be a work area with lower cabinets.
- One flat box. It will stand in place of a kitchen apron. The dividers will be reinforced partitions.
Instructions
- All opening parts are sealed with tape.
- We cut the doors in each box with a stationery knife.
- Then we combine all three boxes into one, wrapping them tightly with adhesive tape.
- We place a long box on them and secure them with tape again.
- Now it is important to strengthen the sides and vertical partitions. To do this, you need to glue two or three cardboard pieces of the same size.
- In the countertop we cut a place for the sink and recesses where the dividers will fit.
- Then we cover everything with self-adhesive wallpaper.
- We install the sink in place, the role of which is a metal or plastic cup.
- Now you need to think about how the doors will close. To do this, I propose to make a cardboard version of the latch. Take two rectangles of different lengths. They are connected by any solid object that will act as a handle. When you close the oven door, you turn the handle and the long rectangle moves to the side. And then you return it to its place and the door remains closed.
- We will make the cooking surface from glass from a photo frame and circles of black and red colored paper. We need three circles of red and two black for 1 burner. We take all five parts of different diameters, which decrease from the previous one by 1 centimeter. We glue them on top of each other on the glass. This can be done using hot glue.
- Cover the back side with a black sheet of paper.
- This is the kind of slab you will get.
Here's another interesting idea.
All sides are reinforced with double cardboard. One long strip is laid, which will hide the unevenness from the joints.
You can paint with acrylic paints or sprayers in well-ventilated areas.
Or you can just cover the cardboard with wallpaper.
Functional elements
It is impossible to imagine a real kitchen without appliances. It’s quite easy to imitate it, because most of the necessary items can be found in any apartment. For this purpose the following will be useful:
Washing. The function of a sink can be successfully performed by a basin of any shape, a stainless steel bowl, a deep baking sheet, or a plastic tray.
Mixer. As a rule, old taps are used, but an elbow from a small-diameter pipe or a special toy set will also work.
Cooking surface. The burners can be made from appropriately sized items such as CDs, computer fan grilles, plastic lids, drainage strainers, or simply black cut out circles (like on an induction hob).
Oven. In fact, this is an opening bedside table with a window and a characteristic cross handle. The lighting and grill installed inside (for example, from a broken refrigerator or grill) will help bring it even closer to the real prototype.
Washing machine. Although this piece of furniture is not related to cooking, it is also sometimes installed in a play kitchen. The resemblance to a real machine is ensured by a round transparent window on a magnet with a glass salad bowl mounted inside. A colander without a handle, or a PVC jar with holes made, will work well as a drum. Buttons can be made from plastic covers, buttons, and the touch panel can either be taken from a broken device or drawn.
Option 2. Children's kitchen made of cardboard
- You will need a construction knife with replaceable blades. We cut 4 identical layers of cardboard, 2 on each side of the refrigerator.
- On 2 of them we glue ready-cut strips of cardboard with a zigzag.
- Let's wait a bit for the glue to dry. Apply glue to the other two layers and glue on top. It is advisable to press it on top and let it dry.
- I still have scraps of decorative paper. I pasted them over the sides of each back of the refrigerator so that there were no gaps.
- I covered the outside of each back of the refrigerator with regular wallpaper. Classic PVA carpentry glue for working with wood and cardboard, diluted with water 1-water to 3-glue.
- We are preparing 3 more parts of the refrigerator - the ceiling, floor and middle, which separates the “refrigerator” from the “freezer”. All in the same way as the previous ones.
- Glue them together.
- Now the doors. I think everything is clear from the following photos. I won't comment.
- I put the refrigerator doors on their hinges. First I glued it with superglue, then screwed in the screws.
- I even installed a light bulb on the ceiling. The light in the refrigerator comes on when you open the door.
- The drawers are also made of cardboard. Covered it with adhesive wallpaper.
- Back view. Instead of cardboard, fiberboard, to make it stronger.
- Now the kitchen itself.
- Here under pressure, it dries.
- There is also a light in the oven, albeit with a switch. I tried to do it as best as possible so that it would look very much like the real thing. And still, sometimes the little girl takes her plasticine cookies to “my oven” to bake.
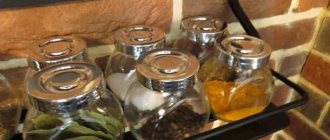
Accessories, dishes
When the furniture set and appliances are ready, you can offer your child joint creativity in making decor, dishes and “food” for the new kitchen with your own hands. This is much more interesting than buying ready-made sets in a store; moreover, it develops imagination and evokes many pleasant emotions.
The best materials for such crafts are:
- polymer clay;
- felt and soft filler for it;
- cardboard, colored paper, PVA glue;
- play dough.
During this activity, children under 6 years old should not be left unattended - they can get hurt by scissors, swallow something, or get pieces of plasticine stuck in their noses, so they need constant adult attention. For the same reason, it is not recommended to share cereals with children or allow them to use sharp kitchen utensils.
Additional accessories in the toy cooking area can include oven mitts, small towels, and cute curtains for open shelves. And the young cook will surely love his own apron with pockets and a special baking cap.
Option 3. DIY structures for the street or cottage
For outdoor games, you can also make a kitchen corner. Children love to play with water, so a good solution is to add a sink to the design. You can wash dishes and toys in it without fear of spilling the contents or getting splashed.
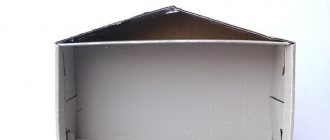
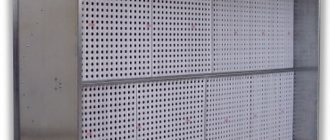
It is better to make a kitchen for a summer residence from moisture-resistant materials. The design should be simple and functional. A small kitchen corner with shelves and a sink can be mounted directly on the wooden wall of a country shed.
The basis of a children's kitchen for games in the country is the wall of a barn.
When building a play area with a kitchen, you can use wooden blocks and remnants of boards that were not used for their intended purpose.
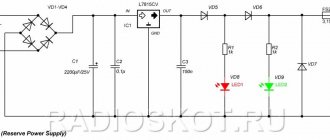
Backlight and mechanics
Using all kinds of battery-powered lights and hidden wiring, some areas of the kitchen can be realistically illuminated. This is especially true for burners and ovens, where imitation fire is needed. An excellent effect is achieved by LED strips located along the edges of the “heating” devices, or light bulbs mounted under a transparent surface. In addition to warm yellow, red and blue tints of diodes would also be appropriate.
konforki_iz_diskov_i_svetodiodnoy_lenty.jpg
To ensure that the mechanisms of the hood, microwave, and washing machine can rotate, mini-fans from a PC or battery-powered motors will be useful. It is advisable to securely hide the batteries from children’s eyes, and additionally secure all wiring with electrical tape. Many engineering solutions for children's kitchens are presented in this video.
Option 4. Play corner made of a chair and cover
The cover kitchen option is very relevant for small apartments. This design helps save space and money at the same time.
Any mother can make a kitchen chair cover.
To create such a kitchen you will need:
- scissors;
- ruler;
- a sheet of thick paper or cardboard;
- cotton fabric for the base - 2 m;
- fabric for curtains - 50 cm;
- fabric for side pockets - 50 cm;
- scraps of colored material for functional elements (windows, handles, oven doors, burners);
- fabric for edging the cover - 8 m;
- hooks;
- strip of fabric with Velcro;
- large buttons - 4 pcs.;
- sewing machine;
- iron;
- pencil or felt-tip pen.
Stages of work.
- Measure the dimensions of the chair on which the cover will be placed (A - height from the floor to the seat, B - width of the chair in front, C - depth of the seat, D - width of the seat at the back, E - height of the back). And cut out the base.
- Cut the fabric, remembering to leave some extra for the seams.
- Cut out a circle from paper and trace it on the wrong side of the material. These are stove burners. Cut out fabric blanks.
- Cut the handles for the stove from the same material as the burners, only with a smaller diameter. Sew them to the cover and glue a button in the middle.
- Sew the oven door from two pieces of fabric: white (the door itself) and black (the oven window). Sew the black piece to the white one, and make a border on the sides from a strip of fabric of a different color.
- Attach the door to the cover in the place where it will be placed. Trace with a pencil to mark the edge to which you will later sew the bottom part. Secure the sides of the door with adhesive tape. Mark the boundaries of the door on the cover.
- Make a window on a piece of fabric that will be on the back of the chair.
- If desired, sew small curtains.
- Sew a pocket for kitchen utensils to the side of the cover.
- Now all the pieces of the cover need to be fastened together. First sew the window with the stove and oven, then the side elements and the back of the chair back. Add a border with a different color ribbon.
- Sew fastening ribbons.
- Sew felt pies and cakes that will be baked in the oven. Attach Velcro to the back of the toy food.
Main stages of installation
A children's play kitchen is assembled in the same way as an adult's. In this case, the same fasteners are used as in adult models.
Fastening is carried out using special screws, self-tapping screws, a screwdriver, a hammer and metal corners.
It is recommended to strengthen all fasteners so that they can withstand loads.
A toy kitchen for girls is assembled taking into account the following features:
- To fasten the upper shelves, it is recommended to use special dowels that have the shape of a hook.
- Planks are used with which the drawers can move along the guides.
- For fastenings, standard hinges are used that are attached to the wall.
Children's kitchens for girls are not much different from their adult counterparts. During construction, standard fasteners and shelf arrangements are used.
A toy stove is a joy for any girl
Installation of the structure consists of the following steps:
- The material is selected or parts are cut from an old cabinet or sideboard.
- Cutting lines are marked and cut out with a jigsaw.
- The tabletop is attached, which is a chipboard.
- An additional wall is installed between the refrigerator and the kitchen.
- An iron container is selected for washing. A circle with a smaller diameter is drawn and cut out. This item is inserted into it.
- The door to the toy refrigerator is mounted using hinges. A magnet is attached to prevent the door from swinging open.
- Instead of burners, old disks or jar lids are used.
- Railers are installed in the oven on which the baking sheet will move.
- The oven door is cut out and mounted on the hinges.
- Handles for adjusting burners are created using plastic bottles or empty cream tubes. The upper part of the tube or bottle is inserted into the hole on one side, and the cap is put on on the other. At the same time, the handles rotate.
- An inexpensive crane is purchased on the construction market. It is attached to a special stand. Holes are made for the tap, which is mounted with self-tapping screws.
The girl's kitchen is almost ready. All that remains is to fill the cracks and apply sealant. Then the surface is sanded and painted. The jar lids are painted and screwed into the table surface. Additionally, light bulbs are screwed inside the refrigerator and on the kitchen surface in the upper part.
There are plexiglass shelves inside the refrigerator. Curtains, towel hooks and shelves are hung.
The kitchen set for girls consists of a countertop, refrigerator, sink and stove. These elements are performed independently.
Old benches or vegetable pallets are suitable as starting material.
If you have some imagination, a chair will also come in handy.
The idea of an open bright children's kitchen. All toy devices are stored underneath.
Another idea with a real tap. By the way, children can use water when playing in the garden. After all, you will make a sink from an enamel deep plate.
There are actually two shells here.
Another option, made from boards.
This kitchen was also created by a creative dad. I bring it to you for inspiration.
You can also assemble a children's composition from the remains of furniture. You can use doors from old cabinets or shelves.
To make it convenient for your child to play, complement your creativity with handles and door hinges.
If you don’t want to make doors, you can simply pull a curtain over a rope or wire.
Wood must be painted with safe paint. You can simply varnish it so that the structure of the wood remains visible.
And now the finished project with dimensions in the drawing. It is, of course, made schematically, but all the numbers are visible.
the entire kitchen will take 90 centimeters. We'll put 30 of them in the oven. The height of the entire structure will be 1 meter.
This drawing is suitable for girls from 1 year old. For 7-year-old children, this height of cabinets will be small. Therefore, I present another drawing.
The original kitchen looks like in the photo.
And now the sizes. By the way, they are indicated in millimeters.
Here, we see that the lower cabinets are 20 centimeters higher than those in the previous picture.
I also bring to your attention a short video where dad makes cabinets out of plywood and explains in detail what materials he used and why.
I think that if you wish, you can make any drawing yourself. The main thing is to ensure comfort and safety for the child.
Option 5. Children's kitchen from an old cabinet
The possibilities of selecting the starting material for creating a children's kitchen with your own hands are limited solely by your imagination and capabilities. In order to make such a toy from an old cabinet or bedside table, you don’t need to be an outstanding craftsman, but you need to have basic skills in working with wood.
- We find a suitable cabinet or bedside table that is strong enough to be safe for the child and will not fall apart with one touch.
- Sand the surface first with coarse sandpaper, then with fine sandpaper.
- Together with your child, we choose the color of the future kitchen so that it pleases him and does not irritate you.
- Paint the bedside table with paint of the chosen color. For this purpose, choose acrylic paint without a strong odor, then wait until it dries.
- We determine the places where the stove, sink will be located, and if the cabinet capacity allows, then an oven and refrigerator.
- It is proposed to play the role of a sink in a white or metal bowl. We measure the diameter of the bowl on the countertop and cut out a circle, stepping back 1 cm inward from the edge of the drawn circle. Insert the bowl into the resulting hole - the sink is ready.
- On the other part of the countertop we “equip” a stove. For the burners, you can use black round-shaped computer mouse pads, CDs, black and red pieces of felt, in general, anything that will ultimately resemble a hob. History knows of cases when light was supplied to the burners and water was supplied to the tap. But this is already a peak that you need to strive for, but it is not necessary to achieve it.
- The switches can be installed with real ones, or replaced with door handles, plastic bottle caps, in general, something similar.
- You can also screw on a real faucet, or you can use a curved piece of pipe, a liquid soap dispenser, etc. instead.
- To make the toy oven look like a real one, you will have to rehang the door so that it hinges from top to bottom (the hinges should be attached to the bottom).
- The rest of the design is subject only to your imagination. You can hang holders for towels and kitchen utensils (ladles, skimmers, brushes for washing vegetables, etc.).
- If there are shelves, you can place children's dishes on them and close them with a door or curtain.
The kitchen is ready, it's time to fill it with toy utensils, food and enjoy a new game with your child.
By the way, if something doesn’t work out for you, don’t be upset, it’s still a toy, it can’t and shouldn’t exactly copy the prototype. Give a boost to a child's imagination, and she herself will make a horse, a gun, an oar or a teacher's pointer out of a stick.
Finishing set
The design of a children's kitchen is carried out at the stage when the base is already ready, but “engineering” parts have not yet been attached to it - burners, mixer, buttons, handles, etc. There are several finishing methods, for example:
- self-adhesive PVC film;
- remnants of wallpaper (preferably washable);
- acrylic paint;
- decorative stickers;
- decoupage
You can involve a child in this process - let the future housewife or owner choose the color, texture, and decorations for the play area. Interesting ideas and harmonious combinations of shades are often found in “store” models that are available in online catalogs.
I consider the simplest options to be a design made of shelves without doors and drawers. This idea is for those who don't have enough material or don't have all the right tools.
What about the products?
Pizza made from cardboard
Felt products
How delicious they are! You don't even need to sew them.
And the bones and veins can be drawn with wax crayons or felt-tip pens. If desired, of course, you can sew it together and stuff it with cotton wool for volume.
Look how easy it is to make bow pasta.
And what a delicious sandwich you can make from felt. You need bread, tomatoes, cheese, salad. And your baby will be able to treat all guests with sandwiches or pizza. Pizza requires the same ingredients. Only instead of bread you need to make a circle or slices - triangles.
Origami and small item patterns
A kitchen for girls made from cardboard boxes should be equipped not only with dishes and all pieces of furniture and household appliances, but also with other small things. Some items can be made from paper using the origami technique. Vegetables and fruits created using the principle of modular origami can decorate a children's kitchen.
A few examples:
- Carrot.
- A pineapple.
- Cherry.
To prevent the modules from falling apart during the game, it is best to glue them together.
A large-scale kitchen craft of this type has a lot of advantages - you can implement any kitchen design; spend a minimum of finance on production; use boxes that litter the room; get an environmentally friendly toy for your child. You can work on creating a kitchen corner with your child, which will help develop the little one’s imagination and creative thinking. In addition, you will get a real masterpiece with maximum approximation to the original.
DIY children's kitchen ideas: photos and videos
Sources
- https://daynotes.ru/kuhnya_iz_kartona_dlya_rebenka_svoimi_rukami/
- https://gearbestblog.ru/dizain/699-detskaya-kuhnya-iz-korobok-svoimi-rukami
- https://uborka-v-dome.ru/detskie-igrushki/detskaya-kuhnya-svoimi-rukami.html
- https://mognotak.ru/detskaya-kuxnya.html
- https://e-ipar.ru/podelki/podelki-iz-bumagi/kuhni
- https://www.passionforum.ru/posts/37655-detskaja-kuhnja-iz-kartona.html
- https://postroika.biz/12282-detskaya-kuhnya-svoimi-rukami.html
- https://legkovmeste.ru/remont-i-izgotovlenie-mebeli/igrovaya-kuhnya-dlya-rebyonka-ostrovok-detstva-v-mire-vzroslyih.html