An antler knife handle is an exclusive product that can be made from material from elk, deer, saiga, and roe deer. The horn requires preliminary processing: it needs to be boiled, cored, polished, and sometimes heated in a special oven. But such difficulties are inherent in working with fresh, unsettled horns; in all other cases, the master’s algorithm of actions is quite simple.
You can make horse-mounted handles, attachment-type handles, and set handles from horns, but overhead ones will present difficulties - you will need to cut the material strictly along and without cracking the surface. Horns are a “grateful” material, because if properly processed they will last a long time, they do not absorb moisture and odors, do not slip in the hand and can be decorated with artistic miniatures, pieces of genuine leather and wood.
Advantages of a knife handle made of horn
Horn knife handles have clear advantages:
- have a pleasant structure to the touch;
- the material always maintains the optimal temperature, regardless of whether it is hot outside or frosty;
- does not slip from moisture, even if it is the blood of a killed/butchered animal;
- The surface of the horn has a beautiful texture.
To fully experience and appreciate the advantages of a knife with a horn handle, you need to be able to make the right choice of source material. And it is important to consider the following nuances:
- whether the animal shed its horns itself or “lost” them forcibly - in the first case, the material will have a loose and spongy structure;
- what part of the horn fell into the hands of the master - experts say that only the upper part of the original material should be used to make a knife handle (the structure will be as dense as possible);
- age of the animal - if the horns were shed when they were young, they will not have sufficient strength, but will actively absorb moisture.
Masters of making knife handles from horns and users of such weapons have compiled a kind of rating of the source material in ascending order:
- cow, goat horns;
- shed deer;
- cut down deer;
- shed elk;
- hunted elk antler (cut from a killed animal);
- walrus tusk.
The worst option is cow and goat horns, which have weak strength and high porosity. Of course, this material can be used to make a knife handle, but it will have to be pre-treated with special moisture-retaining agents.
We recommend reading the article about knife handle options. From it you will learn about the characteristics and properties of knife handles, types of fastening, and options for making handles from different materials. And here is more information about the characteristics of the pchak knife.
What horns are used for the handle?
The handle is made of animal horn.
To obtain a high-quality result, it is necessary to have an understanding of the horns of various animals. The age and type of a quadruped can be determined by the condition of its headdress. How the product came into the hands of the craftsman is of considerable importance.
Was the animal killed by a hunter or a predator? Perhaps the mammal itself threw them off. The possibility of an animal illness cannot be ruled out. All these points affect the final quality of the horn. If horns with a porous structure are used, they will require additional processing.
You will have to apply a coating with special compounds to prevent the absorption of moisture and dust. There is an unspoken rating of the quality and strength of animal bone structures:
- Walrus tusk.
- An elk horn obtained by a hunter.
- Cut down deer.
- Dropped by a moose.
- Discarded deer.
- Cow, goat and others.
The upper part of the horn is older and has a denser structure. For this reason, this part is often chosen.
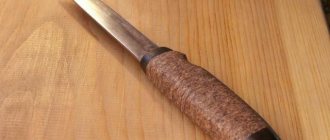
Knife handle made of deer antler
The material lends itself well to the application of artistic miniatures and coloring. Sheaths can also be made from this raw material. To prevent temporary deformation, the horns must be aged. This material is no exception.
The composition of the deer mountain is simple: the spongy part inside, the bone itself and the periosteum. When processing raw materials, you must use a respirator. When grinding the horn, there is an unpleasant odor. The best deer antler is considered to be the animal sambar, originally from India.
In pursuit of material, poachers destroy many individuals of this beautiful mammal. Eastern European individuals have more valuable material on their heads than those from Central and Western Europe. To acquire better quality horn, animals are fed with minerals.
Knife handles made from deer antler.
Knife handle made of elk horn
All parts of an elk antler have value. Masters find use for all the branched parts of bone formation. A small sawn-off horn is preferable when making small blades.
The very tip of the horn is distinguished by good hardness and is used for mounted mounting of the handle.
The middle part of the horn also has its own value. It can be cut into two halves and used as an overhead handle. The option is beautiful, reliable and convenient.
knife handles made of elk horn.
What is good about a knife handle made from elk horn?
Elk antlers are distinguished by the fact that all their parts can be “used”; experienced craftsmen make their choice in favor of the branched part of the entire elk “structure”. Even if a small horn is sawed off, it will be possible to make a handle for a small knife from it, which will have high strength and an aesthetic appearance.
Small-sized elk horns are used to make handles that are mounted on the blade using the mounted method.
The middle part of the horn, the so-called “scapula,” is also considered valuable. It is sawn lengthwise into two halves and used to make overhead handles - reliable, convenient and quite beautiful.
From deer horn
Not only handles, but also sheaths are made from deer antler, because such material can be easily processed, painted, various decor can be applied to it, and even artistic miniatures can be created. Deer antlers consist of periosteum, bone and spongy tissue, and therefore they must be aged - if this period is ignored, then deformation of the product is inevitable.
The best deer antlers are those that are removed/dropped from sambar - this type of animal is found only in India. But experts prefer to use in their work the antlers of deer living in Eastern Europe - in nature reserves, these animals are regularly fed with minerals and vitamins, which makes the material for the handles especially durable and hard.
The natural lines especially located on the surface of the horn make it convenient to use the knife with the right hand - the handle fits perfectly into the palm. During grinding, a cloud of dust rises into the air, so you only need to work with deer antlers while wearing a respirator.
Are they made from roe deer horns?
Knife handles are made from roe deer horn, but there are several nuances in the process that need to be taken into account:
- You only need to grind the horn by hand and with slow movements - this will prevent the pores from opening;
- if pores do open on the surface of the material, then they are filled/mask with epoxy resin;
- try not to overheat the material, because at too high temperatures it becomes brittle.
Vintage guillotine knife for cigars with roe deer horn
Roe deer horns look great under a varnish coating - every natural line is “drawn”, and when polishing the product you can achieve its pearlescent shine.
Experts do not make handles from goat and cow horns, but this material is suitable for beginners to gain experience and understand the essence of the process. The only thing that professionals risk getting involved with is the horns of mountain goats or rams, which have:
- sufficient strength of the top layer;
- bizarre shape;
- soft/porous/spongy core.
They cannot be straightened even when heated in a muffle furnace (they break and become very brittle), but they are very easy to make hollow and use as a horse-mounted handle. The surface of the horns of mountain goats and rams “wears” the varnish coating well.
How to make a knife handle yourself
There are two types of handle mounting: overhead and mounted. In terms of fragility, the horn is quite capricious. When cutting the material, cracks may appear. To prevent cutting along the raw material, craftsmen prefer mounted mounting of the handle.
But from an antler blade, it is possible to make only an overhead type handle. Another method will simply be inconvenient. The work is quite delicate and requires special skills.
Necessary materials
To make a handle from an animal horn you will need materials and tools. They are not much different from the production of wood products. There are subtleties, but basically the list looks like this:
- hacksaw for wood and metal;
- pencil, clamps;
- Sander;
- epoxy adhesive;
- horn and birch bark;
- drill with drills;
- impregnating oil for wood.
Do you have a knife made from animal horn?
YesNo
Making a pen
As a result, the mounting method is more interesting and attractive. Its variety is a typesetting pen. The process will be described using deer antlers with birch bark inserts. You should prepare a respirator; breathing horn dust is not recommended. The process will look like this:
- The horn must be cleaned of possible contamination. Then it should be cut into small pieces crosswise. It is better to make them of different sizes, so the handle will be prettier. We also divide the birch bark into several pieces.
- Next you need to prepare the blade shank. Bone tissue does not bond well to metal. To do this, leather is first glued onto the shank. All this is held together with clamps and dried. After drying, the shank is ready for use.
- You should carefully check the horn pieces for rotting. If there are small pockets, such pieces are rejected; you only need to work with good material. There should be no problems with birch bark blanks.
- We cut the guard out of a piece of steel. Next comes the process of fitting the handle parts. It is better to make a piece of horn first; it will stick to the guard better. The holes in the parts are made in accordance with the thickness of the shank.
- After adjusting the blanks, we begin the gluing process. Alternating the material, generously lubricate it with epoxy resin and place it on the shank. Then the future handle is compressed vertically with a special device to reliably glue the workpieces to each other. Finally, the pommel is screwed onto the shank.
- Let the epoxy resin dry, this will take a day. Next, you should process the handle on a grinding machine; if you don’t have one, then a file will help. It is necessary to grind the handle to the required size.
- Next, we impregnate the wooden layers with wood oil. Horn parts do not require additional processing.
When making a horse-drawn handle from a single piece of horn, it is necessary to clean the cavernous body from the inside. Then you need to examine the workpiece for rotting processes. If places of rotting are found, they are cleaned out. And then the epoxy resin will act like a filling on a bad tooth.
Handle manufacturing process.
How to make a handle for a knife from horn with your own hands
To make a handle for a knife from horn with your own hands, you must first master the technology of processing the source material:
- The horns are cleaned of stubborn dirt and dust. The grooves on the surface of the material can be easily cleaned using thin wooden sticks, a brush (you can use a toothbrush) and turpentine. All treatment areas must be dried by blotting with a textile napkin.
- If the horns are not laid down and have an immature core inside, then it needs to be removed - this can be done with a narrow spatula, a narrow knife and any other suitable/convenient tool.
- Boil the prepared horn in a lime solution. To prepare it, place 0.5 kg of slaked lime on a bucket of water and heat it to a low boil (“on the boil”). It takes 2-3 hours to cook the horn in this mode. This stage is necessary to stiffen the “fresh” antlers. If you use already rested material as a trophy, then there is no need to boil them in a lime solution.
After all stages, the horns are polished, cleared of the top layer and used for their intended purpose.
There is another option for preparing horns for work, which is considered quite extravagant - mummification . The essence of the method is to mix equal amounts of kitchen salt and washing soda, clean the workpiece from the internal contents and place it in the prepared dry mixture for 2 months in a warm place. If everything is done correctly and fresh material is used, the result will be a flawless knife handle blank.
The ideal combination for work, which does not require specific preparation of the material, is horns shed independently and rested for at least 12 months.
Materials
The set of materials that will be needed to make a knife handle from horn is practically no different from that required for working with wood:
- impregnating oil;
- epoxy adhesive;
- clamps;
- a simple pencil for marking;
- grinding machine;
- a piece of genuine leather, the horn itself and a small block of wood;
- hacksaw for metal and wood;
- drill with a full set of drills.
Impregnating oil Epoxy glue Hacksaw for metal and wood Grinding machine Carpenter's clamp Deer antlers
This set is needed for making a mounted mounted handle - its installation is quite complicated, but the product looks impeccable.
How to do it yourself
If a stacked handle is made from horse-drawn horn, then the operating algorithm will be as follows:
- The prepared horn is cut crosswise into bars of different sizes. Do the same with wood cuttings.
- Glue pieces of genuine leather onto the shank of the blade, secure the entire structure with clamps and dry completely. This will make it easier for the metal to adhere to the glue and the horny surface.
- Check each horn cut for the presence of rotting of the internal contents, and if any is present, then discard the block. The second option, suitable for a small area of rot, is to clean the problematic fragment and fill it with epoxy resin, leaving it to dry completely.
- Make a guard and start assembling the bars. It is recommended to install the tree first; all parts should be lubricated with epoxy glue and the excess should be immediately removed with a textile napkin. Clamp the finished pen with clamps and leave it alone for 24 hours.
- After the glue has dried, you need to remove excess glue with a grinding machine and grind the handle to the desired size and desired shape. Periodically you need to stop work so that the horn bars do not overheat.
- Coat the wooden parts with impregnating oil; the horn bars can be left untreated.
Watch the video on how to make a handle from elk horn and oak:
If the handle is made of an overhead type, then the main difficulty in this process is sawing the horn strictly lengthwise into two equal parts. A beginner is unlikely to cope with such work, because there is a high probability of cracking and splitting of the material. And if in the first option you can use epoxy resin and “save” the workpiece, then nothing can fix the split.
The attachment handle is made much simpler, but only from resting material. It will be necessary to drill holes inside the horn, having first checked this part of the material for rotting processes - just pick it slightly with an awl or a narrow knife. Then the blade shank is inserted into the prepared middle and all free space is filled with epoxy resin. This product takes at least 4 days to dry.
Common mistakes
Inexperienced craftsmen make typical mistakes when working with horny material:
- they make a hole in the material that is too small for the attachment type of handle - it needs to be made with a margin of 0.5 mm;
- when placing the handle on the shank of the blade, tap on the horn - this provokes cracking and splitting of the material;
- the stratum corneum of the material wears off greatly (during grinding) - the handle begins to crack.
Any cracks on the surface of the handle can be filled with epoxy glue or varnish, but hunters do not recommend using such knives when working with animals.
Watch the video about mistakes made in making a handle from a deer antler:
Horn processing technologies
Having found antlers in the forest, you should definitely inspect the location of the find. If there are animal remains nearby, you should not take them. The reason is banal: the causes of death of the animal are unknown. On the horns it is possible that there are remains of the larvae of the leather beetle, cadaveric poison or an infection from which the animal died. The processing process looks like this:
- Having received decent material, it must be cleaned of stubborn dirt and dust. The grooves get clogged with resins from coniferous trees, and then various debris sticks. To soften problem areas, use a turpentine solution. Then, using wooden sticks and brushes, the old dirt is carefully cleaned out. Be sure to dry the area with a napkin after treatment.
- It is preferable to make a handle from a resting product. Trophy material usually has blood residues and an immature core inside; this should be removed. The horn is then boiled in a lime solution. To give it rigidity. Next, it is dried, polished and cleaned. Options include varnishing or removing the top layer. Depends on the master's idea.
- An interesting method that is not often encountered is mummification. The most suitable one is “Egyptian”. The principle is to mix regular salt with washing soda. The workpiece is cleared of bone marrow and placed in this mixture for a couple of months in a warm place. With the right process, fresh material will produce an excellent handle blank.
Professionals specializing in this type of pen material. They prefer horns that have been shed on their own and have lain for no more than a year. The perfect combination for work.
Technique for processing a handle for a knife made of horn
The finished handle for a knife made of horn can be treated with varnish, but it lies quite unevenly on the surface and takes a long time to dry, and over time it begins to split and come away from the handle in small fragments. Experts recommend using a mixture of acetone and glue for finishing and working using the following technique:
- Combine acetone and glue in equal proportions in a bowl (ceramic, glass). The latter must have high quality characteristics and be superglue. But there is no need to use standard miniature tubes for such work - it will be expensive and not effective enough. The glue must contain cyanalocrylate - this is a hardener.
- Take a swab of bandage/gauze and cotton wool, moisten it in the prepared mixture and quickly rub it over the handle. The entire handle is processed in this way; you need to work quickly so that whitish, cloudy streaks do not form on the surface.
- Dry the surface with a construction hairdryer, operating it at a temperature of 130-140 degrees. Leave it alone for a day, then polish it with felt or felt until it has a characteristic pearlescent shine.
Ready-made handles for a knife made of horn can be treated with varnish
. The process can be simplified; to do this, you just need to pour a mixture of acetone and glue on the handle or lower it into a suitable container with finishing material. But after removal, the knife will need to be suspended so that excess mixture drains and no sagging forms - you should prepare the place and the fixing structure in advance.
For processing, you can use carnauba wax or a mixture of epoxy resin and acetone in a 2:1 ratio, respectively. The working technique remains the same, but the wax does not need to be heated with a hairdryer; it must harden well under natural conditions.
Knives with Navajo horn handles
Navajo is a classic Spanish knife that is made with a horn handle. The shape of the handle is curved, so there is no need to straighten the horns or change their configuration. The main thing is to choose the right part of the animal’s head “decoration”. Since this is a folding knife, the horn for the handle is processed in full - for example, the core is completely cleaned out, only the upper horny layer remains as material.
In addition, before boiling the horn in a lime solution, you will need to make a cut in the curved part of the horn - this will be the place where the blade is removed when the locking mechanism is snapped into place. The cut is made 0.2-0.5 mm larger than the width of the blade.
Experienced craftsmen do not recommend making handles from Navajo horns yourself, because the main problem is making the cut - it must be done carefully, without cracking the material.
Common mistakes during production
Craftsmen with little experience. There are some errors in manufacturing. Unfortunately, they become irreversible and work down the drain. When mounting a solid workpiece onto the shank using the push-in type, the hole is drilled too small.
In an attempt to put on the handle, force or tapping is used, which inevitably leads to the destruction of the horn. It is necessary to foresee this situation in advance and make the hole with a small margin of 0.5 mm.
Strongly grinding off the horny crust leads to a violation of the integrity of the product. Cracks appear under light loads. The matter can be corrected with various mixtures of resins, but you should no longer work with such a blade. Or dismantling the old handle and making a new one.
Saiga horn like a knife handle
Saiga horns are highly porous and have a soft “core,” so this material must be carefully prepared before making a knife handle. Experts recommend soaking such horns in water for a week, changing the water daily. After such a “procedure”, it will be possible to clean the inside of the material by removing all softened tissue from there - the smell is very unpleasant, so the work will have to be carried out in a well-ventilated area and in a respirator.
If you need to bend the horn to create the desired shape of the handle, then this is done only in a muffle furnace - expensive, specific equipment where the temperature is maintained as high as possible. As soon as the horn begins to bend on its own in the oven, it must be immediately taken out, given the desired shape and left to cool naturally.
After such processing and polishing, the saiga horn becomes almost transparent and can be coated with dark decorative varnish.
We recommend reading the article about German bayonet knives. From it you will learn about famous products of German bayonet knives from the Second World War, the characteristics of the Mauser 98k bayonet knife, as well as how much a German bayonet knife costs and where you can buy it. And here is more information about the Nepalese kukri knife.
Knife handles made from horns are the most successful option, which makes the weapon interesting, extraordinary and turns the product into a gift option. Making pens from such material is not easy, but if you strictly follow the algorithm and do not violate the technology, then even beginners will succeed.