Whatever pipeline you are laying, most often you have to use taps into it for more comfortable use. In this case, a tee (fitting) made of polymer or metal helps, capable of correctly designing the junction of its branches. The article will be devoted specifically to this element, without which it is difficult to imagine the supply or drainage of water.
Tee for polypropylene pipes for water supply
What you need to make a galvanized pipe
At home, to make a galvanized pipe, you need a sheet of tin; the material does not require much effort due to its softness and ductility.
Tin plates are industrially made from thin sheet steel with a thickness of 0.1 to 0.7 mm on rolling machines, after which they are coated with an anti-corrosion protective layer of chrome, tin or zinc. Finally, the workpieces are cut to standard sizes, ranging from 512 mm to 2000 mm wide.
Types of pipes in the house
Before upgrading pipes, check their type and operating features. Failure to comply with the rules for using them is fraught with unpleasant and dangerous consequences. Pipes running inside the apartment are usually divided:
| By purpose | water, gas, sewer, ventilation, heating pipes |
| By room type | in living quarters, in the kitchen, in the bathroom, toilet, corridor |
| By type of material | polymer, steel, metal-plastic, non-ferrous metals |
| By location | on the ceiling, along the wall, along the floor. |
| Towards | vertical, horizontal, diagonal |
| By size | long and short |
| By section | round, profile (rectangular) |
Pipes as part of the decor
A number of pipes are hidden not only for aesthetic reasons, but also for their safety. For example, plastic pipes are vulnerable to mechanical damage, and steel pipes are vulnerable to corrosion. But you shouldn’t hide them “for good” (concreting them, walling them up). You may need access to them at any time to prevent or eliminate malfunctions.
Important: do not allow excessive pressure or tightening of pipes from the outside - especially in the area of connecting seams.
Pipes in the bathroom
Each type of pipe has its own service life and nuances of use. But there are several general rules for all types of communication pipes. They are unacceptable:
- cover with a permanent box or panels that are difficult to dismantle,
- cut and move by yourself,
- leave without ventilation.
The gas pipe requires especially careful handling. Combustible and explosive materials should not be placed near it. It must not be hermetically sealed and the hoses leading to the stove must not be deformed.
Tip: It’s safest to hide the gas pipe behind a removable ventilated box or false wall made of moisture-resistant plasterboard.
Floral decor for pipes
Design - tee
The design of a straight equal tee (Fig. 153, a) includes a trunk of a constant cross-section and a branch (transition 2) with a reduced cross-section.
The design of a straight equal tee (Fig. 151, a) includes a trunk of constant cross-section - a straight section / and a branch (transition 2) with a reduced cross-section. The design of the tee shown in Fig. 151, in, is designed in such a way that the cross-section of the barrel is changed using the connecting transition 2, the larger side of which is equal to the side of the barrel. The cross (Fig. 151, d) consists of two transitions 2 and a straight section 1 of constant cross-section. In Fig. 151, e shows the design of the outlet.
How does a deflector work?
Let's look at the operating principle of the described structure using a simple example. This deflector has an outer (upper) cylinder and an umbrella.
The simplest deflector consists of a body (deflector) and an umbrella
During its operation the following processes occur:
- The wind carries air masses. They hit the outer cylinder.
- Then the flows swirl along its surface.
- Some of them, rising after swirling above the outer cylinder, pick up smoke from the stove. Traction increases.
- The umbrella, in turn, prevents precipitation and dirt from penetrating the heat generator.
How to make a pipe from tin - making tin pipes with your own hands
Home builders try to select the most budget-friendly options to solve problems. Therefore, the question of how to make a pipe from tin with your own hands is relevant for many amateur craftsmen. After all, a homemade pipe product made from tin can be compared with gutters or casings that are on the shelves in specialized stores.
Therefore, you need to learn in more detail the process of manufacturing a tin pipe that has characteristics similar to factory products.
Is it necessary to install a cap - recommendations
Regarding the installation of umbrellas on chimneys, the regulatory documents of different countries put forward different requirements. For example, in European countries it is allowed to install nozzles only on ventilation ducts, but on chimneys it is strictly prohibited. In Ukraine, caps cannot be placed on pipes connected to gas boilers. In the Russian Federation and Belarus there is no direct ban, but the wording of SNiP is very vague:
“Deflectors, umbrellas and other attachments on chimneys should not interfere with the free exit of combustion products.”
In this chimney, emissions pass through a through pipe and do not encounter obstacles.
We propose to approach the issue from the point of view of safety and practicality, and only then think about beauty. Before making and installing a cap on the chimney, consider the following recommendations:
- Round steel pipes that remove smoke from highly efficient boilers with an efficiency of more than 85% cannot be covered with traditional fungus. Use a conical nozzle in the form of an open nozzle, which will not freeze up in any frost.
- A brick chimney without inserts, connected to a high-efficiency heat generator, can be protected with a cap-shaped nozzle with a pipe passing through, as is done in the photo.
- It is allowed to install umbrellas on vertical ducts from stoves and TT boilers. To ensure that the iron hood performs a protective function on the chimney for a long time, provide a stainless steel plate inside.
- It is highly advisable to install gable or hip hoods on smoke exhaust blocks made of brick and equipped with side vents. The goal is to protect the upper part of the masonry from precipitation and wind, without touching the flue openings on the sides.
It is noticeable here that the cap does not prevent smoke from escaping through the side vents, but over 15 years of operation, the iron above the flue has become covered with rust.
To protect the brick block, where the exhaust and chimney pipes are open at the top, order or make a box with several through pipes inserted into these channels. Place regular mushrooms on top of the ventilation terminals, and conical nozzles on the gas terminals, as shown in the photo.
Exhaust and smoke ducts are equipped with different nozzles
How is the chimney constructed?
Making a chimney with your own hands is not difficult if you understand its internal structure and the operating principle of the entire system, since their quality directly determines the profitability and productivity of the heating itself.
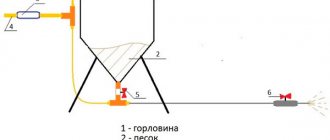
Both the stove flue and the fireplace chimney originate from the boiler in which it is built, into which firewood, coal or other combustion products are thrown. There is also a valve at the bottom to control the draft; it can also be opened if you need to free the pipe from soot or soot. Next, the chimney rises up as much as necessary, but if it needs to be moved to the side, then an outlet is installed. The outlet goes into the floor passage and the roof passage, which guarantees fire safety. And the final element is the head, which prevents rain or snow from penetrating down.
Why do you need a deflector?
The purpose of the device is obvious - the product increases the draft of the stove and at the same time protects the heating installation from snow, rain and dirt. Without a deflector, the wind blows out the stream of escaping smoke, causing an obstacle or even resistance. The heat generator's draft drops.
Experienced data suggests that the presence of the described device on the pipe of a private house provides an increase in the efficiency of the heating installation. The amount of such winnings is up to 20%.
Required Tools
To work you will need:
- hammer,
- a screwdriver or screwdriver for working with self-tapping screws;
- tools for cutting PVC pipes: special scissors, a hand hacksaw for metal, a jigsaw;
- if fittings are used to connect PVC pipes, you will need either a pipe soldering iron or plastic glue.
To tighten the screws, it is best to use an electric screwdriver. Either battery-powered or wired, if there is somewhere to extend the carrier from. Screwing screws with a screwdriver is very inconvenient and time consuming - it will take a lot of time. A screwdriver allows you to tighten fasteners with one hand while holding the structural elements with the other. This allows you to work independently.
How to make a pipe body from tin
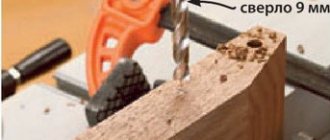
The purpose of this stage is to form the pipe profile. A line is drawn along the length of the workpiece at the bottom and top along which the folds will be folded. In this case, 5 mm are measured on one side, and 10 mm on the other. The folds must be bent at an angle of 90 0. To do this, the workpiece is laid on a steel corner, aligning the fold line with the edge of the corner. Hitting the edge with a mallet, bend it to the perpendicular side of the corner.
It is recommended to bend the product gradually, passing the hammer along the entire length. In this case, you can start bending using pliers.
Now, on the fold, the size of which is 10 mm, another fold of the fold is made to form a kind of letter G. In the process of bending the fold, you need to ensure that the upper bend is parallel to the workpiece, and its length is 5 millimeters. Therefore, when drawing a fold line, measure 0.5 cm once on one side, and 0.5 cm twice on the other side.
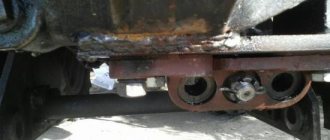
Welded transition of a pipe from a larger diameter to a smaller one
I took a diameter of 76 millimeters as an example of a large diameter pipe. We mark the pipe into six equal parts and use an angle grinder to make cuts of approximately 50 mm.
Add markings in the form of the letter V on all six “cuts” and continue cutting.
The result is a shape that is more reminiscent of an ancient tower)
Next, using a hammer, bend the edges inward to the diameter of the small pipe.
We fix the position of the pipe by welding in several places. I recommend using electrodes with a diameter of 2.5 mm with a rutile coating (for example OK-46, MP-3 or OZS-12). The welding current is constant, the polarity is reversed (+ on the electrode), the current for tacks is approximately 75-80 A (with an increased welding current, it is easier to install tacks).
Carry out the welding process in a position more convenient for you. Reduce the welding current for welding to 60-70 A. There are two options for welding this connection. Vertical or bottom position. We discussed types of welding positions in space and types of oscillatory movements in previous articles.
After welding, to give the welds more “elegance”, you can use a power tool “grinder”. As a result, we get the final form of our connection.
How to cut into a plastic pipe: features of the work + analysis of all the important nuances
In special tables placed in the instructions and standards issued by the Promventilatsiya trust, the dimensions of the elements of tees and crosses with different central angles are indicated.
When marking round tees and crosses with a diameter of up to 900 mm using combined templates, compliance with the geometric dimensions established by the normal is ensured, while maintaining a constant central angle of the tee and crosses.
These methods for marking branched tees are applicable for all rotation angles.
When compiling tables for marking tees with offset axes, we were guided by the z dimension, measured from the vertical tangent to the circumference of the trunk to the generatrix of the branch, taking into account that it is this dimension that is oriented towards during the installation of pipelines.
Each individual template is designed for marking tees or crosses with one trunk root diameter for various combinations of trunk and branch diameters.
Typically, the greatest difficulties are encountered when marking tees and oblique transitions, and therefore we have given Table. 6 - 8 to determine the ordinate lengths of both shoots and holes in the trunks.
Pages: 1 2 3
How to choose a cap
Most often, heads with a hipped roof are used for brick pipes, and chimneys with cone-shaped umbrellas are used for round pipes.
However, it is worth paying attention to other options. For example, a cap with a gable top provides better protection from snow
IMPORTANT!
The shape of the chimney cap is not so important. In order for it to fully perform its functions, the main thing is to choose the right size. The overhangs of the umbrella should protrude several centimeters beyond the outer perimeter of the pipe on all sides.
If you want to ensure that leaves and other debris, as well as birds, do not get into the pipe, you need to opt for a cap with a mesh located under the umbrella. The role of the mesh can be played by artistic openwork forging; such heads not only cope with the tasks assigned to them, but also have an excellent appearance.
- Painted chimneys are not suitable for wood stove pipes, as the paint fades quickly.
- Heads with a sealed double lid better withstand exposure to hot air, and two-story models allow for better ventilation.
- A cap with a deflector will provide the best possible draft and thus increase heating efficiency.
- If you install a cap with a hinged lid on the pipe, it will be easy to clean.
When choosing a cap, you need to find a model that not only looks good, but also harmoniously combines with the rest of the elements of the roof and the house in general and will fit well into the exterior of the building.
Types of different caps
For buildings that have a distinctly modern look, caps with a flat roof are suitable, and for most standard “classic” brick houses, the best choice would be a cap with a hipped, gabled or semicircular cap.
To correctly select the size of a cap umbrella for a brick pipe, you need to measure its length and width. If there is an extension at the top of the chimney, the umbrella must cover it too, which means that it is necessary to focus specifically on the dimensions of the outer perimeter of such an extension. The base of the cap should fit easily onto the chimney, but it should sit tightly; to find the required dimensions of its long and short sides, add 4-5 mm to the length and width of the pipe.
Peculiarities
Materials
Requirements for materials and assembly are standard. The bass reflex box must be strong, sealed and not vibrate. Material - plywood or MDF from 18 mm. and thicker.
Please note that all wire entry channels, terminal blocks, etc. must be reliably sealed , internal partitions (port walls) must not have any gaps .
Rounding of the bass reflex port
If the slot port is long and has turns, then stagnation zones may appear in the corners; to avoid this, the bends are smoothed out - as a result, efficiency increases, since the resistance to air movement decreases . It is quite difficult to determine the improvement in quality by ear, but for the fight for a high result in sound pressure, this solution works.
Port smoothing options
The ends of the ports can open up, which can eliminate parasitic noise from air friction at the outlet, but this problem is not common. Also, due to the openings at both ends, the tuning of the port (bass reflex) is lowered, or its length is reduced. That is, for the same setup, a port with extensions at the ends will be shorter than a straight one and will take up less volume.
Slot Port Expansion
Practical video on rolling out a pipe for a port:
It is worth understanding that selecting the correct expansion (opening) geometry is a separate task when calculating the bass reflex housing.
Two types of rotary bends in plumbing, which can be used to make any angle in a couple of seconds. No tool
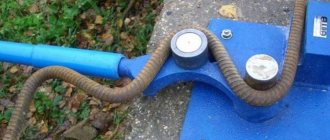
A fairly reliable, but also very rare option is a ball swivel bend.
This is a rotary bend with a ball. Diameter 110 mm. Photo by the author This is a rotary bend with a ball. Diameter 110 mm. Photo by the author
To meet him in an ordinary plumbing store is out of the realm of fantasy. Rotation occurs due to the ball joint. Very convenient and at the same time reliable. Available in diameters of 50 mm and 110 mm. I have never seen the 40 mm size, although this is also sometimes needed in work.
This is another type of rotary elbow - with a union nut. Such a tap performs similar tasks, but its device is different. In its design, the main element is a plastic cap nut; to change the angle, you need to loosen it, make an adjustment and tighten it again. This is also a good option for your tasks. With such a 50 mm outlet you can, for example, connect a shower tray. Auger is a good option for your tasks. With such a 50 mm outlet you can, for example, connect a shower tray.
Photo by the author Photo by the author
Also a good option for your tasks. With such a 50 mm outlet you can, for example, connect a shower tray.
Photo by the author Photo by the author Photo by the author Photo by the author
And a 110 mm outlet connects the toilet.
They look very brutal))) Photo by the author They look very brutal))) Photo by the author
The rotary outlet is designed simply. Just like “American” (that’s what a detachable connection is called in plumbing, after the place where it was invented). When disassembled it looks like this.
Photo by the author Photo by the author Photo by the author Photo by the author
How not to do it. Or rather, it is not recommended. But, of course, they do and will continue to do so.
If such a universal solution is not at hand, then installers usually get out of the situation by connecting two ordinary angles by 90 degrees to each other, obtaining the desired non-standard angle. But this is a bad decision, because the more angles, the worse, the higher the risk of blockages in the pipes. The more connections, the higher the risk of leakage. And so on. I'm not even talking about the aesthetic component, when the toilet is connected using two corners with a diameter of 110 mm - it looks really scary))) And this is often visible, it is not sewn up, but remains open.
Some installers, without further ado, use plastic corrugated pipes to make their work easier; they bend in any way, and there are no problems with them during installation, even if an unusual angle is needed. But the corrugation has one big drawback - it clogs well, I don’t recommend installing it on the sewer, except perhaps for your worst enemy, but certainly not for yourself or your dear clients. It’s better to get by with two corners than with corrugation.
Watch a video about how rotary bends with a ball and a union nut are constructed here:
If you liked the article, like and subscribe so as not to miss new publications.
How to make a tee from a pipe with your own hands
Making a reamer (pattern) for marking the elements of an oblique equal tee
Tees are used for arranging branches and connections of pipelines. To make tees, tee elements are cut out of a pipe (electric cutting machine, “grinder”) and then welded. An oblique equal tee is welded from pipes of the same diameter.
Marking of tee elements for subsequent cutting and welding is done using patterns (reamers) applied to the pipe, along which a cutting line is drawn with chalk on the pipe.
The proposed Excel table allows you to obtain dimensions for constructing patterns (reamers) of the process and holes in the barrel for the manufacture of oblique equal tees of any diameter, with any angle of inclination of the process. Enter the outer diameter of the pipe and the angle of inclination of the branch into the yellow cells of the table and you will instantly receive the ordinates and abscissas of the points for marking the branch and trunk.
Transfer these points to paronite or cardboard and smoothly connect them together. The pattern (scan) of the process is ready.
When marking a pipe, the pattern must be applied so that the generatrix of the pipe is perpendicular to the x-axis of the pattern.
Similarly, we build a pattern for the cutout in the trunk.
We place the template on the pipe so that the red line (zero value axis) is perpendicular to the longitudinal axis of the pipe, and point 10 coincides with the axis of the process.
To automatically construct life-size scans, we use a table containing a macro.
A life-size model of the appendage.
A life-size pattern of the hole in the trunk. Print, cut and use.
When marking and cutting the parts of this tee, you need to know the following. After marking, the branch is, as it were, cut off from the pipe by an imaginary plane on both sides. The cutting plane is adjacent to the contour of the pattern. The hole in the barrel is also selected using two planes. (We chop a sausage like a knife or like a shovel into the snow). You should get flat cuts. Ideally, parts placed on the table after cutting should have no gaps. Only after this we prepare the edges for welding. The red line on the barrel pattern divides the length of the pattern in half (and the cutout too) and shows the center of the tee. Must be perpendicular to the generatrices of the trunk and branch pipes.
At work I was making a “collar” - a guide for the cutter. In a sheet of metal S = 2-3 mm, I cut out a pipe section with an angle equal to half the angle of inclination of the extension and a diameter of D + (2-3) mm, put the extension or barrel on the pipe, aligned it and grabbed it, taking into account the thickness of the cutter head and its number. Then you press the cutter against the collar and cut.
Based on materials from the book “Marking of welded shaped parts of pipelines”, I.Kh. Brodyansky 1963
To install a cap or not
From a technical point of view, a cap is a special metal device that protects the chimney outlet from the negative effects of atmospheric factors. It should not in any way affect the calculated draft parameters, not distort the initial conditions of air flow, etc. The presence of other more complex devices on the chimney should be provided for at the heating design stage.
Chimney pipe cap
Important. Before installing the hood, carefully study the requirements of regulations, industry documents and SP 7.13130.2013.
As you noticed, not all chimneys have caps, since the owners of the building have their own beliefs, often they are contradictory, but everyone has the right to life. Before making a final decision, you should familiarize yourself with the point of view of opponents and supporters of such structures.
Table. Pros and cons of installing hoods
| Functions performed | Brief description of actual characteristics |
| On the roof of buildings, the wind direction changes taking into account the size, location and angle of inclination of the slopes. To prevent the occurrence of reverse draft, special engineering heating calculations are made, which regulate the height of the chimney depending on its location and distance from the ridge. The wind on level ground never blows from top to bottom; only turbulence from the roof can give it such a direction. Another reason for reverse draft is the complete lack of natural air flow into the room or too powerful forced exhaust ventilation. The protective hood, if only it is correctly selected in size and type, breaks up the air flow and ensures normal draft in the chimney. |
| There is one problem here - only a net protects from birds; the canopy must be fenced around the entire perimeter. Frozen condensation may appear on the grid and critically reduce draft. It is useless to clean, the water will freeze again under certain climatic conditions. Sometimes in winter you have to climb onto the roof, remove the mesh and thus restore traction. This is undesirable; doing any work on the roof in winter is very dangerous. |
| Completely correct statement. But for this you do not need a complex decorative product, but only one of its elements - a cap. |
| The beautiful cap of the original design really has a positive effect on the appearance. There are exclusive projects that allow you to emphasize the prestige of the building and the solid financial position of their owners. |
As we can see from the list, the number of positive and negative consequences from installing a cap is approximately equal, hence the conclusion - make the decision yourself. But remember one universal requirement of regulations: all nozzles and accessories must not interfere with the free exit of smoke and not impair the calculated performance.
Types of chimney caps
Processing the seam joint
The final stage involves processing the joining seam, that is, crimping it. To do this, the upper part of the L-shaped fold is folded down, wrapping the edge of the other fold. The result should be a kind of sandwich located perpendicular to the pipe. To obtain a joining seam, you need to press the sandwich to the product.
For greater reliability, the joining seam is strengthened using rivets. However, do-it-yourself tin pipes using this joining method do not require additional reinforcement.
Which speaker is suitable for a bass reflex
To choose a subwoofer for a bass reflex, you need to start from the Thiel-Small parameters (Fs, Qts, Vas). Usually this data is in the documents, but if you don’t have it, the parameters can be found on the Internet.
In order to understand whether the speaker is suitable for FI, carry out some simple calculations. Divide the Fs by the Qts and if the answer is between 60 and 100, then such a sub will be optimal for a bass reflex.
For example, the SUNDOWN AUDIO E-12 V3 speaker has Fs = 32.4 Hz, and Qts = 0.37.
Fs / Qts = 32.4 / 0.37 = 87.6 - such a subwoofer is quite suitable for FI.
If the value for your speaker is outside the 60-100 range, it may be worth finding a different design for it using this very useful plate. Please note that the table above does not prohibit the use of speaker enclosures that do not meet the Fs / Qts value. She shows options that will definitely work well.
Plumber's trick. When installing sewer pipes. Sharing my experience
I warn you right away that this method on a 110 mm sewer pipe should only be used if you have an assistant. The force for connecting two pieces of pipe is quite large, the pipes are massive. One person holds it, the second warms it up and sticks it in.
It is easier to demonstrate this method on pieces of 50 mm pipes. There, in this way, you can connect with the effort of one person. Like coating two fingers. Here you also need to grunt enough.
Why do this?
- Saving.
- Waste-free installation.
- Correction of errors in case of incorrect material calculation.
Socketless technology
In order to connect a piece of pipe without a socket with a sewer pipe and a part with a diameter of 110 mm. it needs to be warmed up. It is advisable to use a burner with high heat output. In this case, I use a weak gas burner, it does not heat well. Requires more time to warm up. You can also warm it up with a hair dryer. Do not overheat. In case of significant heating, the pipe will curl into an accordion when trying to put the required part into it
Photo gallery: ready-made options for awnings made of profile pipes
A gable carport is also suitable for a car.
A lean-to shed with trusses is the simplest option.
A canopy made from a profile pipe is also suitable for firewood
A flat canopy should be at an angle
The arched canopy over the terrace has an original look
A lightweight arched carport will be an excellent decoration for your garden plot
The canopy for rest areas can be made mobile
A canopy made from a profile pipe is multifunctional. It can be a good replacement for a garage. Its production is accessible even to non-professional welders. Also, such a canopy does not require large financial investments. Owners of country houses and full-fledged country houses should pay attention to this.
Types of bass reflexes
The bass reflex port is the main element of the body; it can be round (pipe) or rectangular (slit).
Round port (pipe)
It is impossible to say for sure which of these ports is better. They do what is more convenient or what they like best. The only point is that in sports (sound pressure competitions) pipes are used more often , since their use makes it easier to change the bass reflex setting by changing the length of the port.
Separately, it is worth noting this type as a passive radiator. A passive radiator (more correctly, a passive reflector) is the same bass reflex and the principle of its operation is the same. It is used in cases where the desired port for the FI does not suit the dimensions. A passive radiator uses a speaker without a magnetic system instead of a port .
Operating principle of a passive radiator
Types of deflectors
There aren't many basic options.
Vane
This product consists of several interconnected visors that rotate in the wind. For such movement, a weather vane is located at the very top of the structure. Thanks to its flat surface, using the effect of a sail, it reacts to the flow of air masses and turns the entire structure behind it.
A modern deflector with a weather vane includes several visors and rotates under the influence of the wind
In many products, the direction of the wind is indicated by a special arrow-shaped pin.
The visors increase the draft of smoke from the heating unit. This is due to their location - they obstruct the wind, as if cutting it. At the same time, they protect the heating unit from the penetration of precipitation and dirt. The advantage of this design is that it is always installed in the desired position - exactly where the wind blows. But this type of deflector has a drawback. The rotation of the visors is ensured by a bearing, but it is short-lived and requires periodic lubrication. And in cold weather the mechanism can jam.
H-shaped deflector
The following design is based on the use of additional pipe sections.
The use of H-shaped deflectors is only justified in regions with strong wind loads
These elements are arranged in the shape of the letter "H". Hence the name: “H-shaped”. It is clear that in this case it is impossible for precipitation to enter the chimney due to the horizontally located pipe. Two vertical elements on the sides of the structure provide increased smoke draft from the heat generator. Gases from combustion products are picked up by air masses and blown out simultaneously in several directions. The described design is often used in regions with constant strong winds. However, in temperate climates the effectiveness of such a device is low.
Spark arrestor
There are also types of devices that are used to get rid of combustion products remaining in the smoke. Usually, for this purpose, a classic deflector with a cylinder and an umbrella is equipped with a mesh. It extinguishes sparks.
A fine-mesh mesh prevents hot sparks from escaping beyond the spark arrestor deflector
This happens like this: combustion products hit the edges of the cells. When colliding with such an obstacle, the sparks immediately die out. The described advantage attracts owners whose chimney is located next to trees or other flammable objects. The mesh surface of this deflector can be integral with the walls of the cylinder, or it can be a horizontal barrier inside the pipe in the path of smoke.
The spark arrester has one drawback: if manufactured incorrectly, this design can, contrary to its purpose, reduce thrust.
TsAGI deflector
This is one of the most common options. It was developed at the Central Aerohydrodynamic Institute. The abbreviation of this establishment is in the name of the product. This deflector consists of a main pipe connected to the chimney, as well as a diffuser, a wide ring and an umbrella.
The advantage of the TsAGI deflector is the low position of the umbrella: warm air easily exits the chimney channel, which greatly increases draft
The principle of operation here is simple. The wind, breaking against the surface of the ring, picks up the smoke both from above and from below. And the umbrella, located inside this outer cylinder, protects from precipitation. The advantage of the described type of deflector is precisely that the umbrella is located below the top point of the ring. Consequently, the smoke coming out from under the specified element does not experience any obstacles in the form of wind at all. Disadvantages of the design include the complexity of manufacturing.
Grigorovich deflector
This is the simplest option that is easy to recreate with your own hands. The assembly includes an umbrella, a diffuser and a pipe.
The Grigorovich deflector can be easily made with your own hands
The wind hits the surface of the diffuser (part of the channel in which the flow speed increases due to a change in diameter). At the same time, external air masses from above pick up the smoke. The advantage of the design is its simplicity. The disadvantage of the product is that the umbrella is located high above the diffuser, and part of the wind still blows the smoke from the side. A cylindrical body can also be rectilinear in the absence of a diffuser. Due to the simplicity of the design, the Grigorovich device does not increase traction very effectively, but it protects well from precipitation.
Which is better: a deflector or just an umbrella?
Some owners prefer not to bother. They simply fit the end of the chimney with an umbrella on a holder. The latter is made in the form of a cylinder of the same diameter as the chimney. In essence, it turns out to be the same Grigorovich deflector, but with a straight body, without a diffuser. This device does not increase traction. But it justifies itself in a summer dacha, where a private house is not used as permanent housing. If the owners heat the stove only a few times in spring and autumn, then they will be quite happy with the option with an umbrella on a holder.
If you live permanently in a country house, increasing traction due to the deflector is absolutely necessary. Otherwise, approximately a fifth of the heating fuel will simply be wasted. Therefore, in this case, it is better to add at least a wind-breaking ring to the design and get a full-fledged deflector.
Why take PVC pipe as a basis?
Until recently, wood or metal was mainly used to make a greenhouse frame. Both of these materials have significant disadvantages.
Tree:
- short service life;
- low strength.
Metal:
- heavy weight;
- high cost;
- complexity of the work (welding is required, you cannot do without an assistant).
Wooden structures do not tolerate high humidity that is created in a greenhouse. The metal profile is expensive, it rusts over time. Both wooden and metal structures need to be painted periodically.
Plastic water pipes turned out to be an almost ideal material for construction. Anyone can make a PVC greenhouse with their own hands. They are durable, not afraid of the sun and precipitation, do not require painting, are elastic and retain their shape well. In addition, they are much cheaper than metal. Most private greenhouses are made from them.
Do-it-yourself greenhouse. How to make a greenhouse in the garden for cucumbers
To work with metal and wood, qualifications are required. Metal structures are connected by welding, they have to be cut with a grinder. To bend along a radius, special devices are needed. Due to the severity, it is impossible to do without at least one assistant. Not everyone can handle welding on their own.
Wood also requires at least minimal experience. It must be treated to protect it from rot, fungus, and insects. It is difficult to make a greenhouse with an arched vault from boards. Just like with metal, installation without an assistant is difficult.
But making a greenhouse yourself from plastic pipes is easy for one person in a very short period of time. Such rods bend easily without breaking.
It is enough to anchor one end to the ground so that it maintains a perfect dome shape. Fittings such as double and tee are suitable for connection. To do this you will need a pipe soldering iron or PVC glue. It is also possible to connect using clamps and self-tapping screws.
Preparing the openings of the 110th and 160th pipes (bass reflexes)
If you plan to assemble a bass reflex box for a subwoofer yourself, and plan to make not a slot port, but a “port on a pipe,” then you cannot do without open pipes. What does a properly opened pipe give? With proper opening, the air flow passing through the pipe (bass reflex) has less turbulence, which in turn reduces the efficiency of the port. There are two types of pipe opening: exponential and radial.
example of exponential and radial opening
What is the main difference between these two openings? There is only one difference - efficiency! An exponential opening has less air turbulence than a radial opening! Fewer turbulences mean fewer extraneous sounds from the port.
We prepare the correct pipes (pipes open exponentially), which means that the subwoofer you assemble, with proper calculation, will play amazingly and will play to the delight of not only you, but those around you!