When arranging a home interior, the question of organizing a place to store household items, belongings, and small accessories certainly arises. For this purpose, various cabinets, chests of drawers, wardrobes, and shelves are provided. However, such furniture is more suitable for storing large, medium-sized items. It is much more convenient to store various small things in drawers. This article discusses their main advantages and provides detailed manufacturing instructions.
Convenient storage of small parts in drawers
Advantages of drawers
The main task when arranging a home interior is to create a comfortable, functional, practical space. Ordinary cabinets cannot always cope with this task. In standard furniture, part of the space remains empty - you simply cannot reach there with your hand. Things that are in constant use should always be at hand. Drawers will help you store items easily.
Kitchen drawers allow you to place the necessary utensils as compactly and functionally as possible.
Such systems have become simply irreplaceable. They save space, have an attractive appearance, and are easy to assemble yourself. They are very convenient for storing underwear, cosmetics, kitchen utensils, towels, shoe laces, and other small items. Such furniture is needed in any room.
Very convenient drawers for shoes
Drawers for storing jewelry
home_and_garden
Stylish and comfortable home
Order in the closet with clothes
In our fashion community Freshjournal.ru
norub
conducts training “Effective wardrobe”, for whom this topic is relevant - please join..
And here we will talk about the problem of organizing storage in the closet, which never loses its relevance, so we are again turning to this topic. How to get rid of chaos in your closet? How to find what you need right now? We tried to select for you the tips and principles that work.
Things in the closet should be arranged so that you can easily find everything you need. And this just means that they must be visible. Something that is difficult to get, you are unlikely to wear often. What rules should you follow when organizing your own closet?
| Space If, in order to put another jacket on the shelf, you have to “crush” the others, there is not enough space in your closet. Hanging a hanger with a suit shouldn’t be a problem either. Solutions: Remove clutter from your closet, add extra storage space, or choose a larger closet. |
| Rods One way to add extra storage is to have two storage rods instead of one. You can install double rods in a closet or part of it yourself. |
| Additional shelves If there is space left on the rod in your closet, and there are sorely not enough shelves, purchase hanging sections for storage. |
| Contrasts You will be surprised, but the color inside your closet also plays an important role. Dark trousers and sweaters will easily get lost in the depths of a dark closet. And white T-shirts will disappear in a white closet. While white is a decent option, consider painting (or wallpapering) your cabinets a pastel shade or a bright color. Remember when Mammy Scarlett had a red taffeta skirt? And you will have red or bright orange interior walls of the closet, which will definitely cheer you up in the morning! |
| Priorities when placing clothes Let me remind you that things that don’t suit you, don’t fit well, and things that you won’t wear should not take up space in your closet. Therefore, before looking for a place for things, put your wardrobe in order and get rid of unnecessary things. Separate your clothes by season. It is advisable to store what does not belong to the current season in boxes or vacuum bags (after cleaning or washing it first). If you are the happy owner of a large dressing room, these things can be “pushed” into the far corner. |
Varieties
Chipboard drawer
Chest of drawers made from furniture board
Spacious drawers are made in different sizes, shapes, and types. It is simply impossible to list all the variety of types developed by furniture technologists. Let's look at the types of such furniture, depending on the two most common classifications, in the table.
| Classification feature | Kinds |
| Case material | Chipboard. Cheap material, easy to process. Elements made from chipboard can last a long time with proper fastening and handling. |
| Furniture panels. Sold ready-made. They are distinguished by high strength and have sufficient density. Panels are more expensive than chipboards and last longer. | |
| Guides | Roller. The most popular type. Roller guides are inexpensive, have a reliable mechanism, and a simple design. |
| Telescopic. There are guides with full rollout and incomplete rollout. The first ones are more practical and allow you to fully use the space. These guides are highly reliable. They are able to withstand a lot of weight - about forty kilograms, and are more expensive. | |
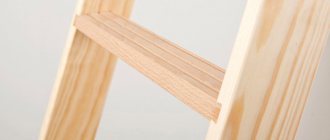
| Wooden planks. The most budget-friendly, simple option. Guides of this type can be made on your own from ordinary wood. They can be used to install small drawers. |
Roller guides for partial extension drawers
Full extension telescopic slides
Rails made of slats for drawers
How to “shove in what you can’t fit in”: 5 secrets for organizing your closet
How to organize storage if the closet is small and inconvenient, but there are a lot of things? Moreover, in such a way that nothing is ever lost in it, and the contents of the shelves always look neat. It turns out it's quite simple. We tell you 5 secrets of “rebooting” your closet, thanks to which you can achieve approximately the same results as in the photo below (it was then).
Secret 1. Vertical storage
If you have tried the vertical storage method, be sure to give it a try. The easiest place to start is with T-shirts. Then you can deal with the laundry. Well, then - with whatever you want.
- The essence of the principle is simple: things should not be stacked on top of each other, but in a row in a vertical position, that is, upright. At the same time, in order for the clothes to stand, they must first be folded into a rectangle. You may also need boxes for vertical storage.
As a result, storage will be more compact and convenient. Firstly, you will have an excellent overview, and secondly, you will be able to take things out and put them back in place so that neighboring things do not fall into a heap.
Here are some practical tips:
- To quickly reorganize your wardrobe, use this trick: simply take a stack of clothes, knock them over and put them in a drawer. Voila! Perhaps this is all you need to know about vertical storage.
- Once you've mastered vertical storage and folding items into rectangles, you can play with the height and width of the rows and customize the system specifically for your closet.
- On the Internet you can find many videos about ways to fold things. Basically, all of them are not very useful. As practice shows, in this matter you just need to follow your intuition and over time, the skill of neat and compact folding will come by itself.
- You need to fold bulky items or clothes with a complex cut into rectangles according to the principle: first we form a large rectangle from the clothes, then fold it into a small one.
Secret 2. Additional shelves
If the cells in your closet are more than 30 cm high, then you can build additional shelves into them. There are several options on how to do this:
- Shelf inserts – you can buy them on Aliexpress (see photo below). The good thing about this method is that the inserts are installed in a spacer without the need to drill into the walls and they hold quite securely. If necessary, you can always remove or rearrange them.
- Shelves made of MDF - you can order MDF cutting to the desired size, then install them on 4 shelf holders (sold in construction stores). Unfortunately, in this case you cannot do without drilling the inner walls of the cabinet.
Secret 3. Long boxes for deep cabinets
For deep shelves that are more than 50 cm deep, you can use cute long boxes like the KNOCK boxes from Ikea. They are especially convenient for storing back piles of clothes.
Secret 4. Focus on folding things
Many of us think that storing clothes on hangers is convenient and correct - clothes don’t wrinkle, nothing needs to be folded, there is a good overview. Well, there really are advantages. However, there is one significant drawback - clothes on hangers take up an unacceptable amount of space. But clothes on shelves, on the contrary, use space sparingly, and in practice it turns out that folded items hardly wrinkle. The only exceptions are jackets, trousers, clothing made from light fabrics, and designer clothing.
- If your closet is not large, focus on folding clothes. And if you are just about to purchase a wardrobe, then we advise you not to get carried away with the hanger compartments.
- To fit more things in your closet, you can use a module with hanging shelves as in the photo below.
Secret 5. Getting rid of unnecessary things
And finally, the last secret and the most important one. In 99% of cases, wardrobes do not hold the required number of things only because there are too many of them. Think about it, why put things in order that you just need to get rid of? If you carry out a quality audit of the closet, then its reorganization will be easy and quick, all things will fit and will no longer be lost.
- What things should you get rid of? Of course, from old and worn, obsolete and out of fashion. We also recommend that you decisively say goodbye to things that don’t suit you or that you feel insecure about. You can read in more detail about how to properly conduct an audit here.
vote
Article rating
Do-it-yourself features
Making drawers with your own hands is quite simple, following the detailed instructions presented below. Many people will find it easier to purchase ready-made products. However, the required size is not always available.
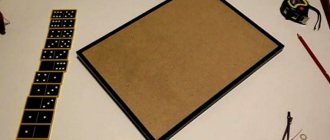
Making furniture yourself has its own characteristics. First you need to clearly decide on the materials. An excellent option would be to purchase the following elements: chipboard for the sides, fiberboard for the bottom, full roll-out guides. This is an excellent set of materials from which you can build a good-quality box.
The next stage is creating a graphic plan. On a regular piece of paper you need to draw the components of the future product, note their sizes and attachment points. This plan will help complete the assembly as quickly as possible. The most difficult of all of the above is calculating sizes. It is difficult to determine the required dimensions by eye. Incorrectly selected drawer sizes will significantly complicate the assembly and operation process.
Euroscrews
Increasingly, Euroscrews are being introduced into furniture production, which show good fastening efficiency. To create such a fastener, you need to screw the part into the end of the shelf into a pre-prepared hole. As a rule, products with a diameter of 7 millimeters and a length of 50 to 70 millimeters are used for this. The main disadvantage of the Euroscrew is that the furniture cannot be disassembled and reassembled frequently, since after three or four such procedures the fasteners may simply collapse. In all other respects, the Euroscrew is ideal for fixing shelves in a closet with your own hands.
Calculation of parameters
Drawing for making a retractable furniture drawer
Designing drawers is not difficult. First you need to calculate the required width. It should be 26 mm less than the width of the cabinet body - its internal opening. There should be about thirteen millimeters left on each side to install the guides.
Next you need to find out the length. It will depend on the depth of the cabinet. This parameter is required when selecting guides. They come in different lengths: from 250 to 800 mm. You need to calculate the length of the products in advance, only then buy guides for it. We measure the depth of the cabinet with a regular tape measure. Don’t forget to leave a few tens of millimeters in reserve, depending on the design features of the furniture. Due to the standard dimensions of the guides, sometimes it is necessary to slightly reduce the length of the drawers.
Now is the time to decide on the height of the sides. The dimensions of the sides depend on the furniture design of the cabinet. In the production of furniture products, the rule is that the height of the drawer should be 40-50 mm less than the height of the facade. There are no reasons to deviate from this rule. The space left will provide an opportunity to correct errors and correctly adjust the operation of the finished product.
Dimensions
As mentioned above, the standard depth of a closet in a bedroom or living room is 60 cm. The depth of a hallway closet is 40 cm. It is subtracted from this size (for the door mechanism) to get the actual depth.
For clothes on hangers
The width of the section with a compartment with rods should be larger than with conventional shelves. The section for rods located parallel to the rear wall is 90 cm. The same size accommodates 2 rods perpendicular to the rear wall. The height is necessary for blouses and shirts, for long dresses and coats.
You can easily calculate this size yourself. Try on your longest shirt or dress and add 20 cm to this value.
For horizontal shelves
The width of the sections for ordinary horizontal shelves is 60 cm.
The vertical distance between shelves should be for clothes and books.
Tools, materials
To assemble drawers, you need to prepare the following list of tools and materials:
- drill (sometimes it can be replaced with a screwdriver, but you need a very powerful screwdriver);
- an electric jigsaw (it will allow you to cut chipboard as efficiently as possible, eliminating damage and chips);
- ruler;
- construction corner;
- rag;
- knife;
- pencil;
- roulette;
- nails, screws, fasteners;
- guides;
- the main material for the manufacture of the structure.
When purchasing slats and structural elements for future drawers, you need to take into account several important criteria. The first is strength, high quality. Materials must withstand loads and not lose their qualities after several years of use. The second criterion is resistance to damage. The peculiarity of such boxes is their frequent use. Pulling out the structure can easily cause minor damage. Durable material must withstand small impacts and collisions with the structure of the cabinet.
The nuances of performing work.
Each person can do incredible things if they want, and if you have all the tools at hand, the process is simplified. Approximately all processes have the same sequence; the only difference between a plywood box is the selection of material thickness. In order for such a box to last a long time, you need to consider the following:
- The bottom should be made of the most durable material.
- The walls are a thin structure, but you shouldn’t skimp on them.
- Lid - it all depends on the purpose of the box.
- Handles – there are ready-made ones in stores or you can make them yourself.
- Decor elements.
To avoid mistakes, you need to make a preliminary diagram with actual dimensions.
Types of structures
More than one type of sliding structures has been invented, but to make installation simple, it is better to choose from two types:
- Rollers sliding along guides. They are given different names, including "side mount" and "bottom mount". Such rollers are inexpensive, adjustment takes about 2 minutes, and the design is almost impossible to spoil. Disadvantage: Most rollers only stretch 3/4 of their length.
- Ball bearings slide on tiny bearings. The advantage is that they completely move apart, providing full access to all items. This design is approximately 3 times more expensive than rollers.
Disadvantage: it is difficult to install.
If the retractable structure is too large or small, it stops sliding. Ball guides hold heavier objects and rotate more easily than rollers.
Features of installing sliding shelves
A sliding shelf adds personality and uniqueness to any room. It is convenient for large items and helps organize the interior. It is important to ensure that the shelves do not sag or get stuck under the weight of things.
- In a small space, even narrow spaces are used by installing the sliding model perpendicular to the wall.
- For cabinets, designers recommend creating retractable structures with a width of 30 to 60 cm with your own hands. It is important to take into account that the more massive the structure, the less convenient and heavier it is.
- The so-called remote pantries are interesting - single vertical narrow structures with long shelves, drawers, and baskets. They will become an effective means of “mastering” narrow spaces.
- The most convenient places for drawers are those that are located closer to the floor; there is no need to take uncomfortable positions, bend over and squat when searching for things.
Optional equipment
- To store heavy items, steel baskets are chosen, which are made from different grades of metal. It is advisable to visually and physically compare the weight and density of steel used by manufacturers.
- Plastic inserts are fine for lightweight items, but they crack, bend, and scratch when loaded with heavy loads.
Final stage
The guides are attached to the cabinet with an indentation of about 3 mm from the front edge of the side part. On drawers - flush with the front edge. Due to the indentation, you will be able to align the facades and the main part of the cabinet. Attach the facades from the inside using 4x30 self-tapping screws.
The trick to getting the fronts to fit evenly is to first drill holes in it for the handles, then place it in place and screw it from the outside. Pull out the drawer, fasten the façade from the inside as usual, and unscrew the outer “rough” fasteners. Then you drill holes for the handles through the front wall of the drawer and install the last element of the fittings.
Limiters
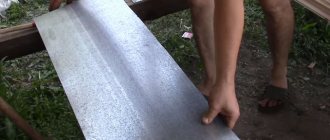
Each shelf needs stops to prevent the contents from falling out. I decided to make them from aluminum tubes with a diameter of 1 cm , cut into 14 pieces with a hacksaw.
Yes, I know the picture shows 12 limiters. A little later, I made changes to the design and installed two rows for the bottom shelf so that I could store both tall bottles and low cans on it.
According to my idea, the rods are inserted through pre-drilled holes in the rear wall and fit into grooves (holes underdrilled by 1 cm) in the front wall. Therefore, we cut the rods 1 cm shorter than the total depth of the shelf.
14 (or 12) rods with a diameter of 1 cm and a length of 57 cm
Important: if the diameter of the tubes is 1 cm , then to drill holes for them you need a drill of the same diameter or a maximum of 2 mm thicker. If you take it much thicker, the rods will dangle in the grooves. I used a ten from the cheap drill set in the photo.
Open shelves
As a rule, all kinds of containers for storing cereals and spices, bottles of oil, candlesticks and other decorative items are placed on open shelves. You can use live indoor plants in pots as decoration.
The advantages of such shelves include comfort in their use, because in order to take the desired item you just need to stretch out your hand.
- Open shelves in the kitchen - 55 photos of ideas for use in design
- Kitchen furniture: from dining tables to sets
IKEA kitchens in the interior: real photos of room design
Roller guides and their “convenient” brothers – metaboxes
The advantage is simplicity, low cost, ease of installation, the design is such that the box closes under its own weight - the last few centimeters of closing are downhill. Thanks to this, such guides have become very widespread. The photo of the metabox clearly shows which part of the guide is intended for what. One is attached to the furniture wall (small parts in the photo, load-bearing), the second is attached to the drawer structure. In the case of a metabox, the second part of the set forms the entire side wall of the box. A box with roller guides installed looks like this
However, the main disadvantage of this type of guide is incomplete extension. The drawer can be safely pulled out to approximately 75% depth. Let's see what problems most often arise with such guides. Naturally, we will assume that everything was normal in the “freshly purchased” furniture.
Incorrect installation
This problem is usually diagnosed immediately, even before purchase. A box with a roller guide correctly installed according to the technical gaps moves smoothly, it has a fairly small horizontal play. It is easy to check - try to “sway” the almost closed box left and right by the handle. If there is more than three to five millimeters of play, the installation is incorrect. This may be caused by errors in the dimensions of parts during design, or it may be a technological error in the guide itself. It is no secret that in the modern furniture market there is a sea of small firms that save on literally everything. And cheap guides have questionable gap thickness.
Over time, this problem may arise due to deformation of the structure. A heavily loaded furniture box will become deformed if it is made from a slab of improper thickness. Again, the manufacturer saved and used the material without thinking about the safety factor.
Problems caused by changes in technical clearance are difficult to cope with. Here you already need to intervene in the design, this can be done in 90% of cases and is not very difficult, but this is another rather voluminous topic.
If the drawer does not close on its own when pushed in under its own weight, this is an incorrect installation of the supporting part of the guide. Most often it is not installed horizontally. There is no need to touch the front part during this repair - we don’t want to mess with the appearance of the drawer gables. We unscrew the fasteners - except for one point near the very front roller, align them, and screw them into place. We do this with part of the guide, which is located on the furniture wall.
Excess load
This problem is not as rare as it might seem. The reasons can be either banal, like “the manufacturer saved money” or “well, they put a lot of stuff in,” or non-standard - children simply love to climb the handles of dresser drawers as if on a ladder or use them as a support to climb higher. And since the last thing people save on now is the handles, the guide suffers.
The problem can be solved in two ways. The main symptom is that the front wheel of the supporting part of the guide, the one on the furniture wall, “twists” - the plane ceases to be vertical, the metal in the mounting area is deformed and the wheel begins to catch on the second guide. You can return the wheel to its original position. There is no need to hit with a hammer, the roller can simply be split, but with the help of a vice, holding the bushing, you can return the part to its original position.
However, more often this problem is caused by the manufacturer. There are two main applied standards for metal thickness for such guides - 0.5 and 1 mm. The manufacturer could simply save money. Replacing the guides with thicker ones is not a problem - all fastener locations match. Simply remove the old ones and replace them with new ones.
The older brothers of the roller guide – metaboxes – have the same “diseases”. If it seems to you that this will not help, replace the roller guides with telescopic ones. This is quite easy to do. Below we will talk about roller guides.
Exceeding the effective service life
There's nothing you can do about it. The rollers are plastic and will simply wear out over time. Backlash appears, drawers no longer open so confidently. There is only one way out - replace it. You can, of course, use silicone lubricants for a while, but this will not solve the problem.