Today, one of the areas of self-production of metal structures is the use of profile pipes. And if round pipe is used in most cases for laying pipelines, and sometimes for constructing frames and racks, then profile pipe today is a material with a much wider range of applications.
In this article we will look at the most significant aspects of the use of this material, as well as the most common homemade products from a profile pipe.
Pipes of different profiles
Profile pipe
General information about profile pipes
The term “profile pipe” most often refers to a pipe having a cross-section other than round.
The most common profile pipes have the following cross-section:
Most often, the profile pipe is made from carbon or low-alloy steel (grades St3SP, 09G2S or similar). Stainless steel pipes are also available. Aluminum profile pipe can be placed in a separate category - the use of this material differs from the use of steel pipes.
Profile pipe production
Profile pipes are produced by hot or cold deformation of a round pipe blank.
- From the workpiece (the so-called “strip”), a round welded pipe of the required diameter is made by bending and welding (determined by the calculation method).
- The round pipe blank is fed into a forming machine, where it is deformed to the required shape and cross-section.
- To relieve mechanical stress, the pipe (now we can talk about a profile pipe!) is subjected to heat treatment, followed by mandatory inspection of the weld.
Thanks to the formation of stiffening ribs on the pipe, products made from a profile pipe are quite strong - their metal frame can withstand loads many times greater than a frame made from a round pipe of a similar configuration.
Spring
The essence of this option is to place a spring of the required diameter, made of steel, into a bendable workpiece.
When bending, it holds the pipe, preventing it from being deformed incorrectly. The pre-profile element with a spring inserted into it is heated and then bent using pliers.
In certain cases, the spring can be replaced with a wire. Its bundle is installed in the pipe in separate pieces, and after the bend is completed, it is gradually pulled out.
Application of profile pipe
Profile pipe in industry
The widespread industrial use of profile pipes has become one of the factors that ensured the popularity of this material.
The most popular in industry are profile pipes 200x200 mm and 150x150 mm - various load-bearing structures are most often erected from such pipes, and the connection of profile pipes is made by welding.
Profile pipes of the specified section with a wall thickness of 6-12 mm provide the structure with strength equal to the strength of reinforced concrete load-bearing trusses.
At the same time, the economic effect of using a profile pipe is quite noticeable!
Canopy frame made of profile pipes
In industry, smaller profile pipes are also used - the use of such pipes is allowed when constructing frames that do not experience significant loads. For example, a 120x120 or 100x100 pipe is acceptable for the construction of warehouse-type structures, change houses, etc.
Read also: Do-it-yourself repair of LED lamps era
DIY products from profile pipes
Along with very wide industrial use, today profile pipes are very actively used in private construction.
What can be made from a profile pipe? - Yes, almost anything!
Gazebo on a pipe frame
Profile pipes with a cross-section smaller than that used in industrial construction (for example, 100x50, 80x80 mm, etc.) are used for the construction of small architectural forms. Frames for country houses, domestic and outbuildings, pavilions, kiosks, advertising media, etc. are made from profile pipes.
In addition, fences and gates made from profile pipes have recently become quite popular. Indeed, it is much easier to dig columns of pipes of the appropriate size into the ground than to install concrete pillars or pedestals of appropriate size and strength.
Also, profile pipes can (naturally, with certain precautions) be used as a frame for frame-type residential buildings.
The advantages of using profile pipes for such tasks are obvious:
- With a profile pipe wall thickness of 4-8 mm (the most common parameters), the weight of a linear meter is 12-15 kg. This weight allows you to manipulate frame fragments without the involvement of heavy equipment, which is important if you are building structures from profile pipes on your own.
- Installation of profile pipes, both detachable (using brackets and couplings) and one-piece methods, is quite simple.
- The service life of such a frame is estimated in decades, and with proper protection from moisture, the structure turns out to be almost eternal.
Profile pipes with a cross section of 50x50 and 40x60 mm are widely used for internal frame structures: as frames for workbenches and small machines, for the manufacture of racks, shelves, display cases, trade and exhibition equipment, as well as furniture.
Due to the fact that such furniture made from profile pipes does not experience extremely high mechanical loads, thin-walled pipes (2-4 mm) are used for its manufacture. As a result, the structure itself, as a rule, has little mass.
To produce furniture from profile pipes (most often this is furniture for common areas, such as benches, desks and chairs for educational institutions), a profile pipe with a cross section of 40x25 or 20x20 mm is used. The wall thickness of such a pipe is 1-2 mm, which makes the furniture quite light with high strength values.
A profile pipe made of thin metal (0.8 - 1.5 mm) can be easily processed using a blowtorch.
With a sufficiently low level of heating, you can give such a pipe any shape you need.
That's why profile pipes are so valued by metal craftsmen!
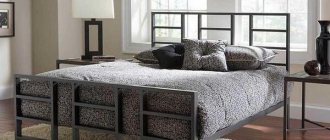
Bed made of profile pipes
Aluminum profile pipes are also widely used for the manufacture of furniture and interior items. Despite the somewhat higher cost, its anti-corrosion properties make aluminum profile pipes very popular.
As you can see, the number of situations in which the use of a profile pipe will be justified is almost innumerable. That's why we strongly recommend that all craftsmen keep this wonderful, inexpensive and practical material in mind. And it’s quite possible that the acquired skill of working with profile pipes will come in handy!
Read also: Circuit design of delta 12 volt switching power supplies
Analytical calculation
The natural lengths of the generators can be calculated using the formula
Formula 1 where
- Lk is the natural length of the corresponding generatrix;
- kα is the angle that determines the position of the projection of the generatrix;
- α = 180º/n when dividing half the base of a circle into n equal parts.
To do this, you need to first determine the value of c.
From Figure 1, it is clear that:
Formula 2
Then, the divisions of the circle of the base of the transition must be numbered: put the number 0 at the horizontal projection of the largest generatrix and start counting the angles kα from it. The value of cos kα for the corresponding division can be determined from the table.
General information about the profile pipe
The profile pipe can be made with a rectangular, oval, or square cross-section. As a rule, the material for its production is carbon or low-alloy steel. Stainless steel is less commonly used for these purposes.
Since profile pipes have stiffening ribs, they, like the products made from them, are characterized by increased strength. The resistance of such a metal frame to mechanical loads is much higher than that of a frame made from standard round pipes.
Profile pipes are convenient to store and transport. Pipes with a parallelepiped cross-section take up less space when stored and are more secure than pipes in the form of a cylinder.
Features of bending polypropylene blanks without a pipe bender
The need to bend a polypropylene pipe occurs very rarely, since it is not recommended to perform such actions with the material.
However, if you cannot do without this process, you can use the following methods:
- Heating the bend . To achieve the desired result, it is best to use a hair dryer, heating should be brought to a temperature of 1500C. Then you can bend the product to give it the desired shape. All actions must be performed with gloves that are resistant to high temperatures. It is important to remember one rule: the bend is made towards a less thick wall, that is, the thickened wall of the polypropylene blank should be placed on the outside of the bend. After the product has completely cooled, you should carefully inspect it. There should be no dents or cracks on the surface.
- The second method is cold bending . A polypropylene pipe can be bent by hand, but the bend must have a radius not exceeding 8 diameters of the workpiece. Otherwise, the material will simply break.
Necessary tools for working with corrugated pipe
To cut the workpieces, you should use a circular saw - an angle grinder; a hand saw is also suitable. The parts are connected using a welding machine, but those who do not have one or are not skilled enough in handling one can take an electric drill and a set of drills for metal and wood. Also, to work with a profile pipe, you need to prepare a hammer, tape measure, chisel, screwdriver - or an electric screwdriver and a set of attachments, emery cloth.
Those who plan to create a structure with rounded elements are recommended to use a tool such as a profile pipe bender.
Surface developments for transitions from round to rectangular (square) cross-section
Figure 1
For the transition shown in Fig. 1, the given values are: hole diameter d, base sides a and b, height H.
Having drawn horizontal projections of the upper and lower bases, i.e. circle and rectangle, connect the vertices of the rectangle with points 0 and 3 of the circle, then construct a frontal projection of the transition. The lateral surface of such a transition is a combined surface: it consists of four flat triangles, marked in Fig. 1a with numbers I and II, and four conical sections, marked with number III. The vertices of these four equal conical surfaces lie at the vertices of the rectangle (point s), and their bases coincide with the circle of the upper base of the transition.
In Fig. 1, b, the construction of the transition scan began with the construction of triangle I along side b and height H1 equal to the segment s'O' (Fig. 1, a). Attached to it on both sides are developments of conical surfaces adjacent to it and tangent to it III.
The natural lengths of the generators S1, S2, S3 are determined in Fig. 1,a by the right triangle method and are respectively equal to S1, S2, S3. The length of the side l is taken to be equal to the length of the chord of one division of the base. Further construction of the development is clear from the drawing.
The error when replacing an arc with a chord for the corresponding number of divisions will be for an angle α = 30º
1% (with the number of divisions 3), and with the number of divisions equal to four (α = 22.5º),
0.56%. (Errors associated with the graphical construction of the scan are not taken into account here).
Options for the use and application of profile pipes
Now we will look at a number of examples of the use of profile pipes for various structures.
Manufacturing furniture from profile pipes
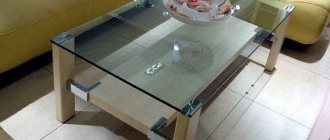
In the design and production of furniture, the key property of profile pipes is versatility. This material is great for shelves, benches, coffee tables, hangers, open kitchens and desks.
To make furniture from metal elements, you need to follow the following step-by-step instructions: 1) study the drawing of a piece of furniture, cut the profile pipe into parts for blanks; 2) cleaning the cut burrs and drilling the necessary holes; 3) bending of frame structural elements using a tool; 4) welding work to connect structural parts; 5) tie the structure using bolts; 6) preparation and installation of fittings on furniture; 7) installation of wooden and plastic structural elements; painting furniture parts.
Greenhouse frame made of profile pipe
Self-construction of a greenhouse frame from profile pipes requires a certain amount of time, money and effort, but such a structure will last for many years and, as a result, will constantly bring benefits. When planning the construction of a greenhouse, the question of choosing frame material often arises. In this case, a profile pipe is one of the best solutions. The manufacture of a greenhouse, the frame of which is made of corrugated pipe, is described here.
Steel profile pipes for greenhouses are advantageous because different types of coverings, in particular polycarbonate, can be easily attached to them.
Read also: Do-it-yourself device for applying plaster
Gazebo made of profile pipe
To build a gazebo, a steel pipe with a square or rectangular cross-section is often used. The combination of the strength of the material and the rigidity of the pipes due to their shape ensures uniform distribution of the load on the gazebo, while at the same time the design is lightweight. With this profile, the required dimensions of the gazebo can be easily adjusted, which also has a neat and stylish design.
A gazebo made of profile pipes has many positive characteristics. The main ones are: • lightness of construction due to the absence of a massive base; • stability and long service life; • relatively low cash costs for the material; • fire resistance; • no need to carry out repairs from time to time.
Canopy made of profile pipe
Those who have a private house or just a plot outside the city often think about building a canopy. In addition, canopies made from profile pipes are often found in commercial organizations and public places, such as outdoor cafes, parking lots, recreation and entertainment areas. The main advantage of such canopies is their ease of manufacture - they are quite capable of being made independently. This task does not require special skills or knowledge, you just need to do everything according to the instructions. How to make a carport is described here.
View Queue
Queue
- delete everything
- Disable
Homemade technology
We are talking about how a square pipe is made from a finished round pipe. For this purpose, the rolling process is used. It is clear that GOST does not provide for such products, and the assortment according to GOST is also not applicable to them, that is, the sizes can be very diverse.
Bars for making seamless square pipes
Such products also have one more drawback. Their strength characteristics are distributed unevenly along the entire length. This is due to the fact that after cold rolling the product does not undergo heat treatment, that is, internal tensions are not removed. It turns out that such products are less durable and less wear-resistant, but, accordingly, they will cost much less.
DIY chaise longue
The summer season is approaching and it’s time to think about creating a chaise lounge with your own hands.
It will allow you to enjoy your outdoor recreation to the fullest. Chaise longue in French means long chair. This is a chair for relaxing. It can, at the owner’s request, change the position of the backrest.
Sun loungers are widely used on beaches and by pools. On personal plots, dachas.
Sun loungers are made from various materials:
Wooden sun loungers are the most popular and environmentally friendly. They come in a variety of shapes and designs. The disadvantage of monolithic wooden sun loungers is their weight. But this problem can be solved with the help of wheels.
Plastic sun loungers are characterized by easy mobility, ease of maintenance, and relatively low cost. Their minus is their fragility.
Fabric loungers are versatile and comfortable. Their frame is made of wood, metal or PVC pipes. They fold easily and do not take up much space.
Rattan sun loungers look great in the lap of nature. They are environmentally friendly. However, purchasing them is expensive. If you have sufficient skills, you can simply weave a rattan lounger yourself.
In this article we will tell you how to create wooden sun loungers with your own hands.
Oblique transition from square to round cross-section
Figure 2
To make it, in addition to dimensions H, d and a, you need to set dimension e (offset of the centers of the upper and lower bases). As in the previous case, by connecting points s with points and 3 circles, they divide the lateral surface of the transition into four conical surfaces, designated IV and V, and four triangles, designated I, II, III and tangent to the conical surfaces.
The construction of the scan is similar to the previous one and is not shown in the drawing. The only difference is that the developments of the conical elements IV and V will in this case be unequal, and for triangles we will also have three different shapes.
Simple sun lounger
To create a wooden chaise lounge with your own hands, you need the following materials, as well as tools:
- tape measure and square;
- pencil;
- saw;
- electric drill;
- screwdriver or screwdriver;
- screws, self-tapping screws and studs for fixation;
- sandpaper or grinder;
- wood putty;
- dye.
Wooden beams used in the work:
- for the back of the chaise lounge, take boards 5×10 with a length of 88 cm - 2 pieces, 39 cm - 3 pieces, 60 cm - 1 piece;
- 2 longitudinal bars for a frame 215 cm long;
- 2 cross beams -50 cm;
- 6 legs -35 cm;
- 13 slats for a seat measuring 2.5 x 8 x 60 cm;
- 6 slats for the back - 2.5? 8? 88 cm.
Monolithic chaise lounge made of wood
Solid models are heavy. Therefore, to make it easier to carry, wheels are added to the headboard. The following instructions will help you make a chaise lounge on wheels with your own hands.
You will need tools:
- electric jigsaw or hacksaw;
- drill;
- screwdriver;
- self-tapping screws;
- fine grain sandpaper;
- spirit level;
- roulette.
When choosing a tree, pay attention to coniferous species. They are sold at affordable prices and are characterized by increased water resistance. Materials needed for a sun lounger:
- glued slab made of wood, its thickness should be 2 cm or more; at least 2 cm thick.
- boards 0.25 cm thick.
- wooden beam with a square section of 50x50 mm;
- 4 wheels with a diameter of 10cm;
- corners for strengthening the bed;
- door hinges;
- varnish or paint.
We suggest you make a chaise lounge according to this pattern.
- Front legs.
- Hind legs.
- Bearing longitudinal.
- Back support.
- Back support.
- Bearing transverse.
- Fixing bar.
- Backrest support.
- Wheels.
- End beam.
- Back slats.
- Seat slats.
- The support beam is transverse.
- Fixing bar.
You can independently determine the size of the desired sun lounger and make calculations. Or use the standard size 60x190 cm. It is the most optimal and ergonomic for the average adult.
How it's made, how it works, how it works
The most educational LiveJournal community
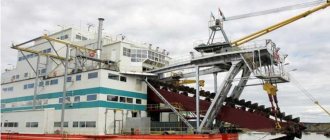
Let's start in the photo below you see a strip (I don't know how correct, that's what we call them).
They are made from a single roll of metal. There is a special line that cuts this roll, after which it gets to us. We take this stripper and use a tap to load it onto the “helicopter”
From here it unwinds and ends up in a storage bin. The drive is needed to dock the strips without stopping the line. We throw in more metal and calmly join it together.
And here the line itself comes into play. He pulls the stripper out of the accumulator and drags it into the rollers.
The line itself is divided into round and square parts. In the round rollers, the strip is bent into a circle. This all happens smoothly. The round part has 7 racks with vertical rollers and 9 boxes with horizontal ones. In the photo above you can see that they alternate. Thanks to this, the metal does not crack or burst.
The middle of the round part, you can see how the metal bends.
Still the round part. Photo from above. The metal has already been bent into a round pipe, all that remains is to weld the seam.
This is already a welding box. Here in the photo you can see the coil thanks to which welding occurs. There is also an electrode inside the pipe. Thanks to all this, as well as magic and spells, the seam is welded. According to our Kipovo resident, a voltage of 15 kilovolts is supplied to the coil. Whether it's true or not I don't know. But at another plant the operator was electrocuted. They say the coil hit. So to speak, I burned out at work.
This is after welding. Here you can also see the cutter, which removes excess on the seam. Next comes the "shower"
There is already a pipe here, cooling after welding. And it goes into the square part.
In the square part, there are five racks and five boxes. They are already bending the pipe into a square profile.
Each roller has a different diameter and thanks to this, compression into a square, as well as in a round part, occurs smoothly. There are two more crosses in the square part
They give the profile the finishing touches. Level the walls and corners. In the photo on the right, in the corner under the pipe there is a speed sensor. It is needed for the saw. Which automatically cuts off a pipe six meters long.
This is the saw. after that there is a roller table along which the pipe is rolled and then two people collect it into a bundle.
This particular line produces pipes ranging in size from 60x60 to 120x120. Also a round pipe from 96 to 126 diameters. The transition in size occurs by the usual replacement of rollers on racks and boxes.
Those same videos. In total, this plant has four pipe production lines. The smallest fiftieth. She makes pipes from 15x15 to 50x25. Then line 69, then 76. Well, I showed you 152. At the moment, line 219 is still being assembled. The lines get their name from the largest size they can roll. And finally, a little TB.
Photo of my colleague's finger. Who, due to his stupidity, almost lost him. I pulled my gloved hand under the rollers. When I cut off the little finger glove, it looked like a flattened mess. Thanks to the doctors we collected, at least that’s it. Another colleague was not so lucky; two fingers were torn off. Little finger and nameless. And the middle one stopped bending. All the best and take care of yourself!
If you have a production or service that you want to tell our readers about, write to Aslan ( [email protected]
) and we will make the best report, which will be seen not only by readers of the community, but also by the site.
How it was done
Let me remind you once again that posts can now be read on the Telegram channel
and as usual on Instagram
. Click on the links, subscribe and comment, if you have questions about the matter, I always answer.
All original videos are uploaded to my channel, support it by subscribing by clicking on this link - How it’s done
or according to this picture. Thanks to everyone who signed up!
General recommendations
To ensure the longevity of the effort expended, the materials used must be processed.
Antiseptics and special impregnations will help protect wood from moisture, harmful insects, rot, and mold. It is better to carry out processing before assembling the structure.
After installing the sunbed, the wooden parts should be coated with primer, drying oil, varnish or paint. This will extend the life of your masterpiece.
Fabrics should also be protected from rain and sun. Water-repellent impregnations will help preserve their brightness and service. Their effect lasts 2-4 weeks.
And, of course, remember the famous Russian proverb when working. Measure seven times, cut once.
Oblique transition from square to round cross-section
Figure 3
The lateral surface of the transition in Fig. 3 is divided differently than that of the transitions shown in Fig. 1 and 2. The midpoints of the sides of the base a and b (points s and s1) are connected to points 2 of the circle.
As a result of this construction, the lateral surface of the transition will consist of eight triangles I and II tangent to four conical surfaces III and IV. The construction of this scan is clear from Fig. 3, b. It is similar to the previous ones, but requires a larger number of constructions.
Based on materials: “Technical developments of sheet metal products” N.N. Vysotskaya 1968 “Mechanical Engineering”
Assembling a chaise lounge on wheels
We assemble the base frame from the bars. We secure the load-bearing parts with corners similar to those that secure the base of the bed.
We sheathe the resulting frame with pre-prepared and sanded boards.
We make blanks for the legs from timber. Their height usually ranges from 5-10 cm. Choose one that is comfortable for yourself and your household.
We drill holes with a drill, retreating 5-7 cm from the ends of the longitudinal sides. We secure the legs with long bolts. We control the horizontal side with a spirit level.
We screw the wheels to the center of the legs with bolts with a diameter of 30mm.
Let's start cutting the lattice elements. Use a hacksaw or jigsaw to cut 8x60cm boards.
Using self-tapping screws and a screwdriver, screw the slats to the chaise lounge frame. Since the boards are not screwed tightly, we use spacers to obtain even gaps.
We should have two parts. The smaller one is intended for the headboard. We connect both grilles with door hinges. We install a support bar under the opening part.
All that remains is to sand off the production flaws. Apply wood primer. Paint it in your favorite color and the chaise longue with your own hands is ready.
For a more comfortable stay, you can sew additional mattresses that fit the size of the bed.
Birch lounger
It must be said that our Russian craftsmen are distinguished by their ingenuity and creative approach. This chaise lounge is made by hand from birch logs. It is distinguished by Russian folk flavor. Perfect for garden plots.
- logs with a diameter of 75-120mm;
- drill and set of drills;
- electric saw;
- staples and screws;
- marker;
- electrical tape or chalk for drawing.
Let's start creating a sun lounger.
We saw the trunk into logs 45 cm long.
On the floor we draw a line for the future sunbed using chalk, or glue it with electrical tape.
We lay the logs according to the diagram. We drill holes with a drill and connect the logs using long self-tapping screws. We use a socket wrench for this.
Turn over the almost finished product. We are testing. We eliminate shortcomings.
For greater stability, we fix the back side of the lounger with brackets.
A monolithic birch chaise lounge is ready to delight you and your guests.
Unusual do-it-yourself sunbed for a summer house
DIY fabric chaise lounge. Model 2
For this chair you will need:
- wooden slats measuring 2x4 cm. Two slats each with a length of 122cm, 112cm, 38cm. One piece each 61 cm, 65 cm, 57 cm. And four slats 60cm long;
- slats measuring 2x6 cm. One each 61 and 57 cm;
- 65cm wooden rod with a diameter of 1.2cm;
- a piece of fabric 137 cm long and 116 cm wide;
- bolts, washers, nuts, screws;
- glue;
- round needle file, sandpaper or grinder;
- electric drill.
Manufacturing process:
Process all the details of the future chair in advance. Sand them using a machine or fine-grained sandpaper. Cover with special impregnations that protect the wood from corrosion. Appreciate your work.