how to make a glass table
Glass tables go well with many styles and always look great. Making a glass table with your own hands is easier than a model with another type of tabletop, because all the work involves making a durable frame. But more attention needs to be paid to the base, although this is a plus because with a transparent top you can also show off the interior decoration. If you have a small room, then a table with a glass top will visually make the room much larger than a regular table. In addition, glass countertops are needed to protect furniture made from soft wood or textures that can be easily damaged without the need to hide a beautiful surface. This is especially useful if you have valuable antiques in your home. When making a glass table with your own hands, you can create an amazing design without much experience or complex tools. You just need to come up with a unique base, for example, from driftwood, unique frames of antique furniture, from pipes - you can use anything. Or make a glass dining table , and even an original table with a glass top over a pot with succulents. There are many ideas, however, only ten examples are presented here, but believe me, there are a million of them.
Varieties of glass tables
How is one table different from another? Design and materials of manufacture. Let's focus on the first point. It includes:
- tabletop shape;
- height;
- number of levels;
- structure (monolith, sliding, folding).
The easiest one to make at home is a monolithic single-level table. It is more difficult to make a folding or sliding one, since it will require calculation and proper installation of sliding mechanisms.
The second point is manufacturing materials. The choice depends on the design, functional purpose of the future product and the skills of the home craftsman.
The table may consist entirely of glass.
The simplest option is to assemble a glass tabletop with legs made of wood, metal, or rattan. It is more difficult to make a table entirely made of glass. In this case, you cannot do without professional equipment.
The glass of the table can be ribbed.
To make the tabletop, tempered, reinforced glass, triplex or lacobel (glass painted at the production stage) can be used. Ordinary thin glass is not suitable for work: it is less durable, which means the product will not be practical.
Wooden base
To make such a table you will need a 50 x 50 mm beam if you are planning a coffee table. You can use a board, it all depends on the design of the structure.
Let's consider making a glass table for the kitchen with your own hands, measuring 800 x 1400 mm. For such a massive product you will need a beam of 150 x 150 mm. The surface of the timber must be carefully sanded, it must be perfectly smooth. To protect the wood, you need to apply varnish, stain or paint. If you want the structure of the wood to be visible, then use varnish or stain.
To join beam elements, it is better to use an open tenon joint in half a tree. This will disguise the joint and increase the level of strength at the junction. Even a person with a minimum amount of experience in this field can make their own legs for a glass table and a base made of timber on which the tabletop will rest.
What should it be and how to choose the right one
The main question that the master must answer is: what will the product be used for? If the ultimate goal is to decorate the room, then a simple table without additional levels will do. You can put souvenirs, arrangements of dried flowers, and magazines on it.
Often such tables are installed in a corner/along a wall. In this case, the square shape of the tabletop is justified, but it can also be round. A coffee table that will be used for tea drinking, snacking while watching movies or gatherings with company is best made with 1-2 additional shelves. This will add useful space.
A coffee table can be of different shapes.
The optimal shape is oval or rectangular. If the room area is limited and the table is needed only occasionally, it is logical to consider a folding model. Dining tables have no fundamental connection to the shape of the tabletop.
The size of the table depends on the intended purpose of the furniture.
You need to start from the shape of the set and the number of people who will regularly dine at it. For greater convenience, you can make an extendable table, but it is worth considering: the strength of such a tabletop is lower than that of a monolithic one.
Product Features
In this section I will talk about the main varieties and aspects of their choice. Just read everything below carefully and you will have a good understanding of the topic.
Types of material
There are several main options:
How to choose the right one - basic recommendations
There are many aspects of choice, you need to remember the most significant of them:
To make the plexiglass look thinner, a chamfer is often cut around the perimeter, this gives the product additional attractiveness.
- The table top closes completely. It is convenient because the entire surface is protected and kept in the best possible condition.
- The option is not used for the entire size of the table. Most often this is the workplace where your hands are located. This solution is much cheaper and takes up little space.
If you need to completely cover a large tabletop, sometimes several elements are taken so as not to place too large a piece of plexiglass.
If you choose an option with patterns or photo printing, then it is important to think in advance which image or pattern will best fit into the environment.
In what rooms should it be used?
Most often, plexiglass table covers (also called plexiglass) are used in the following rooms:
| Illustration | Description |
| Children's room . Here the overlay serves both as a decorative decoration and as full-fledged protection, because in the process of creativity and learning, ink, paints and much more often get onto the surface. It is much easier to wash all this off from plexiglass than from a countertop. You can use both transparent options and products with photo printing; younger children love cartoon characters, and older ones prefer photos or abstract patterns. | |
| Cabinet . In this case, the glass may not occupy the entire tabletop, but only the work area, if you do not want to place an element that is too large. If necessary, you can put business cards or important reminders under the glass, which is very convenient, because all the relevant information is in front of your eyes. | |
| Living room . Most often in this room, plexiglass is used on the coffee table. Usually this furniture option is not very large, so the overlay will not be expensive. As for the type, the most popular are the transparent options that are laid on a wooden surface. | |
| Bedroom. Most often there are dressing tables here, which are covered with a transparent spacer and protect the surface from adverse influences. |
How to properly care
In order for plexiglass to retain its attractive appearance for a long time, you need to follow simple rules of care:
- Wipe the surface regularly with a soft cloth . Do not use detergents containing abrasive particles.
- Avoid placing objects on the table that could scratch or damage the material..
- Minor scratches can be removed . To do this, use sandpaper P1000 and P2000. First, the surface is carefully treated with a harder option, then with a finer one. The last thing you need to do is go over the plexiglass with a special polishing paste, and it will sparkle like new again. You can purchase all these materials at any auto body repair store.
How to make a table with a glass top
The main element of the future product is the tabletop. It’s worth starting work with its production. So how to make a glass table with your own hands? Make calculations, choose a design, prepare materials, tools and become familiar with safety precautions when working.
Prepare a sketch of the table before making it.
Design selection
There is no need for a novice master to choose complex multi-level, sliding structures. It is better to focus on simple monolithic models with wooden or metal legs. The most convenient to manufacture countertops are square and rectangular in shape.
A designer table can be of any shape.
To achieve an even oval, you will have to prepare a pattern (layout), and you can get a circle using a compass-shaped glass cutter. Depending on the style of the interior, the following legs are suitable for the glass table:
- made of wood - for eco and country styles;
- chromed metal - for design in the spirit of modern minimalism or high-tech;
- wrought iron - for classic styles.
If you plan to move the table around the apartment, then it is logical to equip the legs with wheels.
The table can be on wheels.
Tools and materials
Materials for making a glass table are sold in any hardware stores. To work you will need:
- plywood or chipboard;
- a sheet of glass with a thickness of at least 6 mm;
- legs;
- suction cups for attaching legs to the tabletop;
- transparent glue for glass and metal (transparent universal glue will do);
- sandpaper of various grain sizes (processing begins with paper with the coarsest grain and ends with paper with the finest grain);
- vegetable oil (for lubricating the roller glass cutter) and acetone;
- pencil/marker for marking.
Use quality glass.
Tools:
- glass cutter;
- metal ruler;
- rubber hammer;
- grinder, drill with felt attachments for polishing;
- emery block.
Use only professional tools.
To ensure safety while working, you will need gloves and goggles. Perhaps the most important thing will be the choice of glass cutter:
- the roller blade must be pressed firmly against the surface (pressure of at least 2 kg); a cut can be made on one section of glass several times until the desired result is obtained;
- Diamond cuts glass in one movement, stopping and turning will not work.
Before you start cutting the part, you should practice on similar material.
The thickness of the glass affects the life of the table.
Glass cutting and processing
Before starting work, you need to prepare plywood or chipboard on which the sheet of glass will lie. It must be carefully treated to remove dust and dirt so that scratches and chips do not appear during glass processing.
Use tempered glass as it is more reliable to use.
The markings are applied to the underside of the glass (which is adjacent to the plywood). To work with a glass cutter, a thin metal ruler is used. It needs to be applied along the line and then a cut is made. Afterwards the line is tapped with a rubber hammer and the edges are carefully separated from the workpiece.
Strictly follow the instructions and advice of specialists.
Several tools are used to process the edge:
- a file to remove large irregularities;
- grinder and grinding wheels for more precise alignment;
- sandpaper to smooth rough edges and give them shape.
The final stage is polishing the glass with paste and a felt wheel.
You can polish glass with a special tool.
Assembly and decoration
On the finished tabletop, you need to make markings for where the legs will be attached. It is applied at a distance of 7-10 cm from the edge and 13-15 cm from the corner. Suction cups are attached to the top of the legs, on which the tabletop will be placed.
You can decorate the table yourself.
For greater strength, you can apply transparent glass glue to the suction cups. The tabletop is attached with suction cups, and any remaining adhesive is removed. Self-adhesive tapes and film are suitable for decorating a glass table. Decorative elements are glued to the inside of the tabletop.
You can order photographic film for the kitchen table.
Another option is stained glass painting. If you lack artistic skills, you can make/buy a stencil and apply the design with paints or glass markers (also on the inside surface).
Tools
To process the material with your own hands, you will need to use certain tools, but it is not necessary to buy them. To create products at home, simple techniques and equipment will be enough. For example, using strong thread, you can make products of the most complex shapes.
Therefore, you can prepare a similar set:
- table;
- ruler;
- sharp knife;
- spiral made of nichrome wire. It can be taken from an old step-down transformer. You can see what it looks like in the photo.
You can make a thermal cutter yourself. It is a wooden frame containing nichrome wire. The device operates under a voltage of 6-12 Volts.
To bend a sheet of plexiglass in a straight line, you should heat the area along the bending axis.
To cut sheets, you can use an improvised cutter made from an old blade from a hacksaw for metal. For ease of use, one end of the canvas should be wrapped with electrical tape. You need to cut the sheet on a flat surface. The blade can be sharpened with a stone. We put a ruler on the sheet, draw it several times with a cutter, then remove the ruler and cut it. As a rule, edges after cutting do not require further processing.
The advantages of plexiglass shelves are as follows:
- quality;
- ease of installation;
- excellent aesthetic qualities;
- do not require special care;
- good light transmittance;
- the material is not exposed to moisture;
- the opportunity to bring various design ideas to life;
- durability;
- large selection of colors (shelves can be not only transparent, but also colored).
Plexiglas is produced in different color variations, which allows you to choose its appearance to suit your taste.
Pros and cons of the design
What advantages, besides beauty, does a glass table have? It is easy to care for: a household mirror cleaner will do. Glass is one of the few materials that does not absorb odors, and there are no permanent marks left on its surface from drinks or hot objects.
The glass table is easy to care for.
Transparent or painted countertops will not fade, even in direct sunlight. The only drawback is the need for polishing. If high-strength glass was chosen to make the table, then the product is unlikely to break under the influence of normal mechanical loads.
Self-production of plexiglass products
Doing something with your own hands is always pleasant and somewhat unexpected. Moreover, today you can do this not only for the soul, pleasing yourself and your loved ones, but also to produce some products for sale. The Internet world provides all the tools for this: you don’t need to go to the market, stand behind the counter - everything can be done through advertisements or your own online store on the Internet.
Therefore, a new direction has become very popular - creating plexiglass products with your own hands. Let's figure out how this can be done, what you can get and what nuances and secrets there are in all this.
How to remove defects from a glass table
Any furniture requires maintenance, even “ultra-practical” glass furniture. Therefore, periodically the surface of the tabletop will have to be polished with paste and a felt wheel. But after processing, the glass table will again shine with its original shine.
A glass table with a properly selected base is weightless.
If glue or another difficult-to-remove substance was accidentally spilled on the table, you can remove it using a solvent and a hard sponge. Then remove the resulting scratches with a soft cloth and paste or polish with a felt wheel.
Useful tips
A glass coffee table requires special operating conditions. First of all, we note that you need to handle it carefully, trying not to break the tabletop. Caring for such a table is not difficult; the glass just needs to be wiped from time to time with a soft rag or a piece of microfiber using window cleaner.
Scratches sometimes appear on the glass table. A special GOI paste will help correct such a defect. It is crushed to the state of very fine crumbs, applied to a piece of cotton wool, a stick or a swab, and then the damaged surface is polished. There is no need to apply strong pressure. The scratch is treated for 15 seconds, then the paste is washed off and the procedure is repeated again. In some cases, the number of approaches may be large.
There are other ways to remove or disguise scratches on glass. You can buy Polarit or some of its analogues in the store, you can use simple toothpaste, although its effectiveness is much lower. You can also disguise the damage using ordinary transparent nail polish.
To prevent scratches, it is better to place napkins or small bamboo mats on the glass table.
Glass coffee tables, photo:
Options for glass tables in the photo
Metal base
Not every carpenter can afford to use metal. To work with such material you will need special equipment and skills. To connect the elements of the table frame you will need a welding machine. You can use metal tubes, corners or even a profile.
Consider how the glass will be attached to the tabletop. In this case, the tabletop is installed in a special recess, which was formed when connecting metal profiles. All you need to do is fix the glass to the profile with glue. A self-made glass kitchen table on a metal base will ideally complement a minimalist kitchen.
If you intend to manufacture a forged product, then it is better to connect the tabletop and base using mechanical fastening. Holes are drilled into the surface of the glass and fasteners are inserted.
Kitchen set
Kitchen. They spend a significant part of their lives here. And this room should be comfortable and cozy. If there is a bar counter, it will be complemented by a stool made of plexiglass, in particular, matte. You can take the finished structure as a basis, and replace the upper part with an original plastic part with a thickness of at least 20 mm. The edges are carefully processed and polished.
Tabletops and aprons are also made from acrylic. They are supplemented with lighting, photo printing, sandblasting or laser engraving. The main advantage of such a countertop is that it is easy to clean from any grease and dirt. Got scratches? A few minutes of polishing, and the surface sparkles like new again.
What should you pay attention to when purchasing?
For starters, this is, of course, the quality of the glass countertop. Its thickness is usually 10-12 mm. There should be no scratches or chips on the surface, and no bubbles, inclusions or voids inside.
As for the structure itself, it is necessary to make sure that the fasteners and components are reliable, as well as the presence of all seals between the table top and the frame. Finally, read the information about the manufacturer and read reviews from other customers.
A glass sliding table in your kitchen is not only interesting and unusual, but also practical. It will easily decorate your kitchen and also complement the atmosphere of family comfort.
Coffee table with shelves
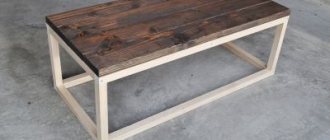
This is a typical mid-century design to which the author has added some details. This coffee table with shelves was made without preliminary drawings, the author simply proceeded from the dimensions of the existing furniture in the living room, the result was a table of 60 x 120 cm, a box of 24 cm, and legs of 15 cm. All materials for this project amounted to approximately $175. This is for wood and trim. Trim the boards to size a couple of inches longer and then run them through a planer to ensure a perfect bond. This will save a lot of time by not using a jointer.
Then glue the panels together, assemble the box, and attach the legs. What you'll need most is a bunch of clamps. Link to instructions below.
Photo source: www.instructables.com/id/Mid-Century-Coffee-Table/
Coffee table in 15 minutes
Do you like this simple and slightly decorative coffee table? As it turns out, it's not hard to do, all you need is a sheet of plywood, a bunch of old boards and some dowel legs. The idea is to cut the plywood to the desired size and shape and then cover it with angled boards. After sanding and painting, you'll have a beautiful decorative table top and all that's left to do is install the stud legs. Overall, if you need a quick DIY coffee table, this is a great option. And although painting and finishing the table took the author of the project most of the day, the assembly itself took about 15-20 minutes. Start with a sheet of plywood, here you don’t have to worry too much about exact measurements, just need to get an idea of how big the finished table will look in the room (the boards at the top are sticking out on all sides above the plywood, so this is more of an estimate). Collect as many 2x4s as you can find. Ultimately, there should be enough for a good slab to make a coffee table. Experiment with the corners to use more planks. A 45 degree angle looks best, so cut more pieces on the miter saw at a 45 degree angle and then start leveling. Once cut, use wood glue and a set of clamps to secure the pieces to the plywood. This is just the first step, later reinforce at the back with screws once the legs are screwed in. Sand a few times and use a router to round the outer edge. Apply impregnation and polyurethane.
Photo source: www.uglyducklinghouse.com/easy-2×4-hairpin-leg-coffee-table/