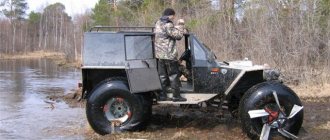
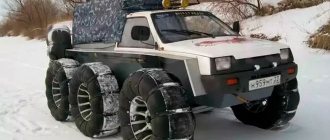
Homemade 4x4 all-terrain vehicle, equipped with a motorcycle or car? engine or a motor from agricultural machinery, is able to overcome deep snow and swampy areas of the forest. The articulated connection of the frame sections provides increased maneuverability and maneuverability on soft soils. The design uses parts from cars, which further reduces the cost of building an all-terrain vehicle.
Design Features
Fracture all-terrain vehicles are equipped with steel frame bases connected by a hinge (for example, a steering knuckle from UAZ vehicles). The axles are rigidly attached to the frames, but there are versions with leaf spring suspension. The turning point allows the swamp vehicle to maneuver while moving; Classic steering with tilt wheels is rarely used in DIY technology. The engine with a mechanical transmission is connected by a driveshaft to a transfer gearbox, which distributes the power flow between the drive axles.
Completing the build
- The brake system is removed from cars or motorcycles and installed without modification.
- The fuel tank is selected for specific tasks. On average, a tank of 10 liters of fuel will be sufficient. If necessary, the container dimensions can be increased.
- If you plan to work in the field at night, you should install a path lighting system on your homemade breaker tractor. To do this, headlights, wiring, battery and generator are installed.
- The driver's seat must be installed taking into account the stiffness of the suspension, otherwise the driver will feel every uneven terrain.
- The cabin will help to give an aesthetic appearance to the assembled agricultural machinery, and will also protect it and the driver from weather conditions. Finishing is done based on your own tastes and preferences.
The use of a homemade tractor is permitted only after it has been fully tested under various conditions. Otherwise, shortcomings may appear at the most crucial moment.
The attractiveness of a homemade tractor from Oka can hardly be overestimated. The cost of spare parts and components needed to manufacture a tractor is quite low. The total cost can be recouped in one harvest season. This solution is suitable for beginning farmers who do not have the funds to purchase factory-made agricultural machinery.
3.9 / 5 ( 73 voices)
Common models
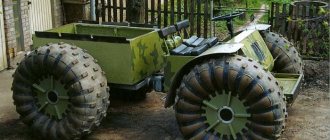
Among homemade structures, the most common are all-terrain vehicles made of 2 sections; Three-segment machines are rarely created because, due to their increased length, they have low maneuverability. The units are equipped with 2 permanent drive axles. There are modifications with an additional drive axle. In this case, a leaf spring from GAZelle trucks is introduced into the suspension circuit, which is mounted on a balancer.
The most common designs:
- Design with a Lifan engine, which is connected to a gearbox from classic VAZ cars by a belt drive. To control the machine, a worm gearbox or a rack from front-wheel drive Lada cars can be used, which is connected by a rod to a lever securely mounted on the steering knuckle. In front there is a hard seat for the driver; it is possible to install a seat from a car with foam padding. The rear compartment is used to transport cargo or people; Some vehicles are provided with a tarpaulin cover.
- Scheme with a liquid-cooled power unit with 2 or 4 cylinders, borrowed from VAZ cars or foreign-made equipment. The advantage of all-terrain vehicles is an increased power reserve and a pedal-driven clutch. The vacuum brake booster is retained; Hydraulics are used to drive the mechanisms. The cars are heavier; To maintain low ground pressure, tires with an increased tread width are used.
- A rare modification of a 6x6 all-terrain vehicle with a balanced suspension for 2 rear axles, which allows you to install a cargo compartment with increased capacity. The transmission design may use driveshafts or ball joints from front-wheel drive vehicles.
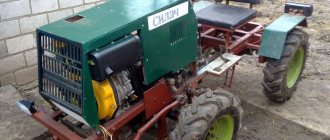
Reworking a walk-behind tractor
Walk-behind tractors are rightfully considered one of the most versatile types of agricultural machinery, which is why they are often used as the basis for various home-made units. Among them, homemade 4×4 mini tractors with a breakable frame are very popular, as well as caracats made from a walk-behind tractor, which are in no way inferior to other types in terms of technical performance.
To successfully manufacture such a device from a walk-behind tractor, you will need to follow the following instructions:
- Weld the frame using a metal profile/pipe.
- Mount rear and front drives. To simplify the process, it is recommended to take the front axle, steering system, and other elements from the vehicle’s chassis.
- Install the motor, as well as the gearbox included in the design of the walk-behind tractor.
- Construct and secure the slopes, and then roll in the resulting structure.
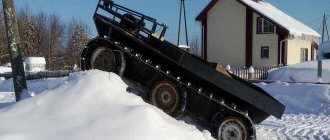
It is important to note that for this type of swamp vehicle it is recommended to use a wheelbase with increased belt-type traction. Structures made from walk-behind tractors, as a rule, have impressive dimensions and can reach speeds of up to 70 km/h, which makes them universal and reliable off-road solutions.
In order for the karakat to have the necessary characteristics, it is necessary to use high-power walk-behind tractors, since the vehicle must not only move successfully, but also transport the driver, as well as various loads.
How to make a fracture with your own hands
A 4x4 all-terrain vehicle of the utilitarian type can be manufactured independently. Assembly will require drawings (developed from scratch or using documentation from magazines), as well as a place for installation work.
It is necessary to prepare a set of metalworking tools, a welding machine, measuring devices and a drilling machine (it is possible to use an electric drill).
During the assembly process, the design will need to be refined, since the drawing documentation cannot take into account all the design features of the parts and assemblies used.
Required materials and parts
Minimum set of components for assembly:
- power unit with attachments and exhaust system;
- drive axles with installed differentials and identical main pairs;
- gearbox and transfer gearbox;
- cardan shafts;
- cooling system radiator;
- steering knuckle for connecting sections;
- steel profile of closed section;
- tires (of the “flap” type);
- additional materials for the manufacture of steering and body elements.
Frame making
For the manufacture of space frame sections, pieces of steel profiles are used, held together by resistance welding. During manufacturing, the dimensions of the engine and transmission units are taken into account, and the installation of attachment points for the units is provided. The frame design must withstand the weight of the installed equipment and additional loads that arise when moving through a swamp or deep snow. If cracks and breaks appear during operation, the load-bearing frame will need to be reworked.
The frame is provided with end plates with holes for attaching the movable fist. There is a hole inside the knuckle through which the driveshaft is passed. This solution reduces the risk of damage to the drive when driving over rough terrain. The semi-frames have points for installing bridges, equipped with reinforcements. To determine the correctness of the construction, a trial installation of the units is carried out. It is recommended to clean the frame from traces of corrosion and cover it with a layer of acidic primer to prevent corrosion.
Installation of box and bridges
The box is attached to the power unit or installed separately (for example, in designs with a Lifan engine from agricultural machinery). The gearbox and transfer case are installed on cushions with rubber inserts that reduce the level of vibrations. The bridges are placed on brackets and then secured with stepladders and nuts. It is not recommended to weld the parts, since the bridge stockings warp, which causes bending and damage to the axle shafts. The cardan shafts must be trimmed, and then the pipe must be connected to the hinges by resistance welding.
Painting
For painting, a special paint for metal structures is used, which has increased resistance to impacts. The enamel is applied with a spray gun; Points and parts that cannot be painted are first covered with tape. External body panels can be painted with automotive paint; some owners use sheets of corrugated aluminum that do not rot under the influence of natural precipitation.
Installation of the power unit
The power unit is installed in the front of the all-terrain vehicle; When using liquid cooling, space is provided for mounting a radiator. The direction of the antifreeze supply and intake pipes, which must be connected with rubber hoses, should be taken into account. The motor is mounted on standard points on cushions with elastic elements that reduce vibrations and prevent the motor from moving to the sides. Since homemade structures use an electrical circuit, a relay and fuse box is installed.
A fuel tank is mounted on the frame, which is connected by lines to a mechanical pump. If you plan to use a motor with distributed gasoline injection, then consider a place to install the control controller. The Check Engine indicator is displayed on the instrument panel, allowing timely detection of malfunctions in the power unit systems. Regardless of the type of fuel supplied to the engine, a coolant temperature gauge or indicator is provided.
Wheel installation
To install 4 larger wheels, modified wheels from VAZ passenger cars are used. Standard - allow you to mount tires on factory hubs without using new bolts or studs. An additional rim is welded on top of the disk; the symmetry of the structure is ensured by installing a steel profile of a suitable size into the gap. The structure is tacked by welding and then checked for absence of runout. If the disk is assembled correctly, then it is necessary to carry out final welding of the parts.
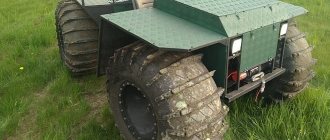
The homemade all-terrain vehicle is equipped with wheels on low-pressure tires, which are additionally stripped with an abrasive tool. The steel cord is pre-removed from the tire structure, which reduces weight and increases the elasticity of the tire. There is a tube inside the tire; the tube with the nipple is brought out onto the side of the disk and then covered with a removable steel shield. After assembly is completed, the snow and swamp-going vehicle is checked on rough terrain - if any breakdowns are detected, the design is repaired and modified.
Homemade wheels and tires
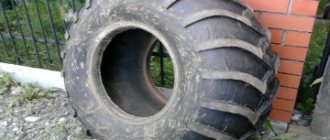
First of all, you need to select the source material on which such tires will be made. It is best if the design is based on aircraft tires - they are made of high-strength rubber and the best quality. Tires from agricultural machinery or industrial all-terrain vehicles are also suitable.
Each bus consists of several interconnected elements. To manufacture the SND, it is necessary to remove excess rubber from the tread and side surfaces, and remove the seat cores from the inner part. If necessary, you can even remove the rubberized part of the cord base, but this is quite difficult to do without affecting the nearby layer. So, the main task is to lighten the tires and make them such that they will allow the car to move over difficult terrain and weak-bearing soils.
The manufacturing procedure includes several stages:
- We clean, wash and dry the workpiece. We mark the patterns of the new tread (the places of the cuts) with a marker.
- We cut through the rubber along the inner perimeter of the circle to rip out all the excess wire.
- After this, we cut out small “windows”.
- Through the holes we see a wire, which we pry up using available tools.
- We fix the tire and hook the wire to the winch.
- Using a winch we pull out all the wire.
- We trim the perimeter of the circle just below the cord and fix it with pliers.
- We tear off the excess rubber using a winch.
- We cut the pulled piece of rubber using a knife.
- We remove the bulk of the material from the surface of the tire (treads and sidewalls), layer by layer, until the tire is represented exclusively by the original carcass.
- We clean the surfaces with sandpaper.
- We assemble the frame. We weld metal tubes (plates) to the disk and weld them together using similar tubes of the appropriate size.
- We carefully polish the resulting workpiece so that the wheel chamber is not damaged by sharp fragments left after welding.
- Pull the tube onto the rim and inflate the tire. As a result, we obtain a ready-made wheel design that can be used for predetermined purposes.
- The time has come to “put” the resulting wheels on the vehicle and test it on the move.
Homemade products and Syrians on unusual wheels
Examples of factory vehicles and products produced by folk craftsmen, in the design of which SND are used.
- Industrial:
- Mini swamp rover KIT TM06.
- Amphibious all-terrain vehicle Tiger XBH 8X8.
- SUV TRACK.
- Homemade:
- Snow and swamp vehicle XPEN.
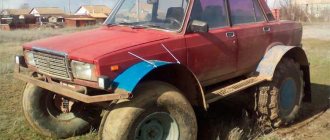
- Lightweight 4WD car.
- MVH all-terrain vehicle.
As you can see, snowmobiles, swamp vehicles, caracats and ATVs cannot do without SND, the special design of which allows you to easily move along swampy or snowy surfaces. ATVs and cross-country motorcycles also often have similar tires installed. Thanks to them, all-terrain vehicles can traverse rough terrain faster and more efficiently.
Major failures of all-terrain vehicles
The main malfunctions of home-made structures are associated with the low residual life of the components used. For example, due to increased loads in the transmission (due to the lack of a center differential), the gears of the main pairs and the transfer gearbox are destroyed. The all-terrain vehicle's fracture unit generally does not experience loads exceeding the design values, so there are no problems with the hinge. When driving off-road, the keys on the cardan shafts and the outboard bearing (used on some modifications of Karakat all-terrain vehicles) may be damaged.
Engine
The power indicator on a homemade unit determines the performance of the selected walk-behind tractor. The higher this parameter, the more efficiently the equipment will function. On the other hand, high power causes increased fuel consumption. If the owner lives in the outback, far from a gas station, this aspect will play a significant role.
Those users who plan to use the equipment only in the warm season are advised to opt for a budget modification with a two-stroke engine. It is simpler and launches quickly. For fishing and hunting in winter, the best option would be a four-stroke power unit. Such variations warm up more slowly, providing longer engine life.
Video selection
Karakat-all-terrain vehicle based on the Neva walk-behind tractor:
A lightweight all-terrain vehicle with the working title “Bruise”, as the body is sheathed in polycarbonate. In general, this is the first model where this light, warm and more or less durable material was used. So far there are no complaints about polycarbonate, this plastic should withstand frosts of up to 40 degrees and does not deteriorate in the sun, most importantly, it is much lighter than any iron and aluminum and cheaper.
The all-terrain vehicle turned out to be quite light for its size, capacity and large wheels. Approximate weight is about 600kg. Dimensions: length-3400 mm, width-1960 mm, cabin height 2100 mm, kung height 2350 mm.