DIY folding table on the wall
Sometimes finding space for a desk in a crowded apartment can be a challenge, but there's a perfect solution by making a DIY wall-mounted folding desk . This solution makes it possible to save space and organize any space without changing the overall interior design. Wall-mounted folding tables have specific strength, compactness and design features that make them unique. Making a folding table , unlike traditional models, is much simpler and cheaper. This wall design will fit perfectly into the decor of any room, will allow you to use every centimeter in the room and solve the problems of free space with maximum ease. The kitchen folding table is ideal for those who want extra space in the kitchen to prepare their favorite dishes and enjoy a meal with company. A folding desk will come in handy in a bedroom or any small room. Small folding tables are also extremely functional for children's rooms, bathrooms, small studios or balconies. Here are different options with instructions on how to make a folding table with your own hands , there is even an example of a wall easel . I hope you will enjoy.
What it is
Not everyone has the concept of a table picture together.
Therefore, it is necessary to discuss in more detail what it is, where and what it is used for.
This is a folding table with a mechanism that allows you to install it on the wall. And when unfolded, the supports or legs are lowered to the floor, turning the rectangular wall structure into a full-fledged table. Moreover, it can be lunch or written.
When assembled, a picture flaunts in front of you, which can contain an image of everything you want to see. Some prefer portraits, others prefer abstractions, and still others prefer something unusual made of epoxy resin that emphasizes the beauty of natural wood.
This type of folding table is wall mounted. An image is applied to its bottom, which plays a decorative role. From the outside it may seem like there is just a picture hanging on the wall. Even the legs or supports are invisible because they act as elements of a picture frame.
How to properly attach a tabletop
In order to attach a folding tabletop with your own hands, you need to stock up on the following set of tools.
- Tape measure, ruler, pencil.
- Screwdriver to speed up work. If the table is made of chipboard or plywood, then it will be difficult to do without this tool.
- An electric drill is necessary for drilling holes when assembling structural elements and attaching them to the wall.
- Set of drills for wood and concrete.
- The simplest is a folding table with one support attached to hinges. The model has many variations. General criteria - simple tabletop shape: square or semicircular, single solid stand, small size. The installation algorithm is as follows. The tabletop is attached to the fastening strip using two butterfly loops, which ensure folding.
- If the table is to be installed on a wall, then first drill holes and drive in dowels. Screwing the mounting bolts into them, install the support.
- After this, the fastening strip with the tabletop is screwed with self-tapping screws.
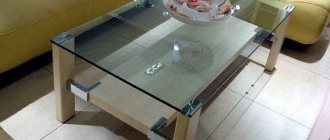
- Designer tables may contain glass or mirror elements. In this case, before installing the work surface, it is necessary to secure the glass or mirror that is part of the structure.
- For mounted options, either stationary fasteners or fasteners in the form of bolts, angles and hinges are used.
- Folding tabletops are most often secured using hinges, however, factory designs may contain backlashes and closers, which allow the structure to be unfolded and folded more accurately. Typically, fastenings of this type are already complete, so the owner only has to install the fastening strip using conventional methods.
Lighting and accessories
Well-thought-out lighting can also become a kind of accessory, placing the necessary accents and creating a special atmosphere.
- Alternatively, several chandeliers can be installed under the ceiling above the bar counter, which looks very stylish from the outside.
- In addition, you can specially make a suspended ceiling into which to mount several light bulbs.
- You can play with their color and lighting power. A dimer is perfect for this, as it allows you to change the light intensity.
Standard accessories for a bar counter include coasters with dishes, multi-tiered fruit stands, baskets with sweets and cookies, and so on.
Your imagination shouldn’t be limited to this list; don’t be afraid to experiment and come up with something of your own.
Exterior finishing
As mentioned above, all wooden parts used in assembling the kitchen table must be well polished so that the surface is smooth and perfectly flat. This will demonstrate the natural structure and beauty of the tree.
It is best to use high-density wood that can withstand increased mechanical loads. When there are small defects in the array, they are leveled, puttied and decorated using acrylic paint.
The finished product is given a finished appearance. This is done using stain and epoxy varnish.
The more layers are applied to the wooden surface, the more solid the finished product will look from the outside. In addition, coloring compounds protect the array from high humidity, external damage and extend its service life.
Painting work should be done in stages. The surface to be treated is cleaned of dust and dirt particles, covered with stain and varnish. To obtain the desired shade, dye is added to the mixture.
The table can also be painted by pre-impregnating the surface with a primer. The tone is selected according to the personal preferences of the owners.
The main thing is that the table harmoniously complements the interior. It is better to give preference to a quick-drying, water-based paint composition that does not have a sharp, unpleasant odor.
DIY table made of wood and epoxy resin
To make a tabletop, it is worth preparing wood with a characteristic pattern. It must be seasoned, dry, with original edges. This will add personality to the countertop.
1. Depending on the configuration, size of the elements and dimensions of the future table, choose the optimal arrangement of wooden fragments. Control the tightness of the elements.
2. Before making the tabletop, the bark is removed from the surface of the boards, and all damage and defects on the surface are removed. The slab is sanded twice on both sides. For the first processing, a router is used to level the boards. The second treatment is finishing. Aimed at removing defects that could worsen the appearance of the finished product.
3. A frame is put together from the boards, repeating the configuration of the future tabletop. The form is placed on a table covered with linoleum. Wooden elements are placed inside the mold. The latter must be sealed to prevent the composition from leaking beyond the established boundaries.
4. All recesses and cavities on the surface of the boards are filled with epoxy resin. After two hours, the main volume of epoxy is poured. During the hardening process of the epoxy, the treated areas are heated with a gas burner to get rid of air bubbles present in the formed layer.
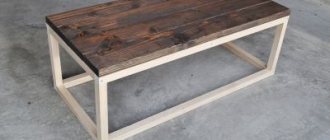
5. After the composition has completely hardened, the tabletop is given the desired shape. Carefully sand, polish and coat with a layer of varnish. Legs are made. Cross-shaped metal supports coated with black paint look impressive. They are connected to the tabletop, ensuring that the latter is horizontal.
Source https://www.youtube.com/watch?v=Rjcr7gGaVZk
Rack manufacturing process
Now let's move on directly to performing the work. First, prepare all the necessary tools so that you don’t have to frantically run to the store during the process. The list of what you need depends on what materials you are going to use for production. But there are some elements that are included in the general list:
- fasteners. These can be self-tapping screws, screws, corners, staples, etc.;
- pencil, tape measure, ruler;
- building level. Do not neglect using this tool, this is the only way you can get a perfectly level tabletop.
Also stock up on all the necessary materials for making the tabletop and base. Let's get started.
laminated chipboard
The easiest way to start is to purchase a table top or window sill made from this material. At the same time, in most stores you can immediately order slab cutting. To do this, the service needs to provide specific measurements, or better yet, a drawing.
However, you can make the cut yourself. In this case, it will be necessary to then cover the sections with a special film, which will protect the internal structure of the chipboard from external influences.
Everything else is simple.
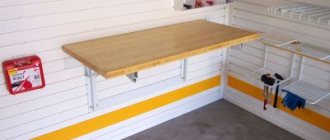
- Screw the support to one edge of the tabletop. This could be a special bar “leg” or just a piece of metal pipe.
- Screw two brackets (large corners) to the other edge.
- Then turn the prepared tabletop over, place it in the place intended for it and mark on the wall the places where the fasteners will be located, and on the floor - the location of the support.
- Remove the stand. Drill holes in the wall and drive dowels into them. Attach a thrust bearing to the floor into which the support will be inserted.
- Put the stand back in place so that the “leg” fits into the heel. Using self-tapping screws or self-tapping screws, attach the tabletop to the wall.
You can install a kitchen sink in the same rack. To do this, first cut a hole of the appropriate size in the tabletop slab, and then follow all the above steps. After installing the stand, you can mount the sink and connect it to the sewer.
Board and foam blocks
To make it you will need boards for the tabletop, foam blocks for the base and elements for wood paneling.
- Place the foam blocks in the location chosen for the rack, securing them with cement.
- Lay one or more boards on top of the foam concrete, securing them securely to the base.
- Sand the countertop thoroughly. This will protect you from splinters, and at the same time help show off the beautiful grain of the wood.
- Paint the boards intended for cladding the base in the chosen color. After complete drying, sand.
- Attach a sheathing of wooden slats to all sides of the foam concrete. This can be done using self-tapping screws.
- Secure the boards to the sheathing using nails.
- Paint the countertop. To do this, you need to choose the most durable, but non-toxic paint.
- After the countertop has completely dried, coat it with varnish.
Instead of foam block, you can use part of the wall left after redevelopment. This often happens when complete dismantling is prohibited. Place a countertop on top of the remaining area and you will get aesthetic and functional zoning of the room.
Wood
Consider creating a wooden bar counter with a closed base. You will need timber, plywood, a sanded board for the tabletop, and wood varnish.
- First of all, you need to assemble the base frame. Connect the beams according to your drawing. At the same time, each angle between the frame elements must be strictly straight so that the stand is level.
- Next, the frame should be covered with cladding. Plywood is often used for this, but MDF panels can also be used. If the frame is completely closed, then it needs to be sheathed on all sides. If there are supposed to be niches or cabinets inside it, then leave the corresponding space uncovered.
- Place the bar top on the finished base and secure it. Cover the ends with decorative strips.
- Thoroughly sand all surfaces of the structure so that they are perfectly smooth.
- Treat all surfaces with impregnations: first with an antiseptic, then with a composition that makes the wood fire-resistant. Wait for it to dry.
- Next you can do the finishing touches. This can be coating furniture with varnish or paint, creating patterns on the surface, stuffing decorative strips, etc. It all depends solely on your taste.
Drywall
All actions are performed in exactly the same way as in the case of wood. There are only a few differences:
- to make the base lighter, it is better to use a thin metal profile instead of a wooden beam;
- For the countertop, you can choose not wood, but, for example, glass or plastic. This way there will be less load on the drywall;
- The finishing can be absolutely anything; both plaster and panels are suitable. You can even cover the base with wallpaper. Drywall has a perfectly flat surface, so any finishing material fits perfectly on it.
Stone
A stone countertop requires a very strong base. The best option is the same foam blocks that were already mentioned above. Foam concrete is good because it has high strength despite its fairly low weight. In addition, it is very easy to attach sheathing to it, due to the porous structure of the material.
The process of making a stand is no different from one made from foam blocks and boards. Just replace the wood with a stone countertop here. By the way, you should approach the choice of a specific material thoughtfully. Not every stone is well suited for kitchen furniture.
Marble is considered the best option. It is beautiful, almost impossible to break or scratch, but it is very easy to clean from any dirt. True, the cost is high. If you are not ready to bear such expenses, then you can pay attention to granite. It also has excellent characteristics and beautiful appearance.
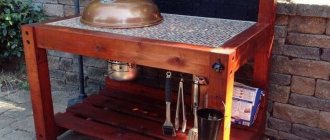
Board and bricks
Another design option with a monolithic base and a wooden tabletop. This bar counter is perfect for loft-style interiors or for use in a gazebo in a country house, in a private house, etc.
As you might guess, the base of the rack is ordinary brickwork of appropriate dimensions. A wooden tabletop is placed on top of it. If you are planning a loft-style counter, then the base does not need to be decorated in any way - bare brickwork would be quite appropriate. As a last resort, it can be whitened.
Pallets
To make a rack from pallets, you need very little time and effort.
- Remove all nails from the pallets and replace them with self-tapping screws. This will increase the strength of the structure.
- From the pallets placed on the end, assemble the rack body.
- Place a plywood tabletop on top of the body and secure it.
- Finally, apply the finishing touches.
This design is characterized by its low weight and, therefore, mobility. You can place it on the balcony, since it will not load the ceiling in any way. If you make the tabletop removable, then this option is perfect for small-sized apartments - for example, for Khrushchev. You can put up the counter only when you are receiving guests, and then put it away in the pantry.
Foldable design
The best option for small homes is a folding stand. It is a tabletop mounted on the wall using hinges. Both the narrow side and the long side can be used for fixation. In the first case, the length of the stand will be limited, but in the second there is no such problem.
- Make markings on the wall to indicate where to place the fasteners.
- Drill holes and screw hinges to the wall.
- Screw the second part of the hinges to the tabletop.
- Also attach the support tube to the tabletop using a hinge mechanism.
- Fix a thrust bearing on the floor, against which the pipe will rest when the tabletop is raised.
Recommendations for a beginning carver
To make the pattern as neat and accurate as possible, use the advice of professionals:
- It is more convenient to apply ornaments to supports when the structure is dismantled;
- The rolled part should be securely fixed with clamps. This will ensure the surface remains motionless;
- after 20 minutes of operation, the blades of the cutters should be polished with a leather belt or fine sandpaper, which will maintain their sharpness throughout the entire process of use;
- during fine sanding, wood flour is formed; by mixing it with PVA glue, it is possible to obtain a good putty;
- when cutting dense wood, the rolled surface must be periodically treated with boiling water;
- If the finished ornament has defects (darkening), a chlorine-containing solution is used to discolor them.
How to properly cut wood, watch the video:
Wood carved organ ornament
Watch this video on YouTube
Woodcarving Baroque Flower Ornament ►► Timelapse Wood Carving Baroque Ornament
Watch this video on YouTube
Wood cutter. Why won't the carving work?
Watch this video on YouTube
Esercizio 003 elemento decorativo.wmv
Watch this video on YouTube
Folding table with vertical wall mounting
The easiest option is to attach a wooden plank to the wall on hinges and raise it as needed. But today's furniture and interior design has gone further: a table made from a wall can become an independent element of decor.
The main advantage of this piece of furniture is its compactness. This is an ideal solution for a balcony, loggia, small kitchen. While cooking, you can fold it, and for lunch, spread it out and gather as a family.
Compared to regular tables, folding tables are much cheaper. But the disadvantage is that the surface is small - you can’t arrange a 12-course holiday dinner on it.
Supports used in the product
With your own hands - How to make it yourself Beautiful and unusual shelves with your own hands How to make a beautiful and unusual shelf for books, etc.
To securely fix it, supports are made for the table. They may look like a triangular headscarf or the letter P.
If the structure is short, use a triangular support. The bracket is attached with hinges under the bottom of the tabletop. You cannot install a folding table in this way above the radiator, since the entire weight of the product will fall on it.
A triangle is suitable when attaching the structure to the wall surface. By installing two strips on the sides, you can strengthen it.
To make U-shaped supports, beams are used, connected to each other by the letter P. They are installed under the bottom of the tabletop, on the sides. The finished structure is attached to the tabletop using hinges. This will allow you to fold the finished table.
Preparation stage
Table for a small kitchen
At this stage, you should decide what you are going to make yourself a table from, after which you can move on to deciding how to make a folding table. Preparation will also include collecting the necessary material and tools that you will need.
Securing the table top to the windowsill
Let's start by collecting tools and materials:
- A flat board, plywood, metal or any other material strong enough to create a tabletop. The choice here is not limited to anything; you should make it based on your preferences and design wishes.
- Accessories for the operation of the system. As a rule, curtains are used for this, several pieces to secure the tabletop and one or two to secure the legs.
- Self-tapping screws and dowels for fixing and connecting all components.
- Tape measure, square, pencil.
- Screwdriver with appropriate attachments.
- If the table is attached to a concrete wall, then you will need a hammer drill to make holes in it.
- Well, a cutting tool for cutting and adjusting the table top and legs.
- Construction bubble level. It will be required in order to make the entire structure level, since the skew of the table can affect the ease of work and will significantly reduce comfort. It is almost impossible to determine the exact level of the table by eye, so it is better to use a special meter.
Folding table mechanism
After you have collected all the listed components, you can move on to the next stage of assembly with your own hands.
Selection of materials for manufacturing
You can make a bar counter from different materials. Each of them has certain advantages and disadvantages. Most often, to create such furniture at home, the following is used:
- plastic. Lightweight and inexpensive material, which is presented in stores in a very wide assortment. The advantage lies in the wide choice of designs, as well as the simplicity of work: plastic is easy to cut and process. The downside is that the material has low strength;
- Chipboard. Cheap material consisting of sawdust and resins. It does not tolerate moisture well, so it needs a waterproof topcoat. In addition, it can be quite harmful due to the adhesive component;
- Chipboard. This is the same particle board, but covered with a laminate. Kitchen worktops and other similar furniture are often made from this material. Lamination reliably protects the base from various external influences;
- drywall. The best option for complex structures (for example, two-level). A stand from it can be made into a shape, since drywall can be given any shape - it is easy to cut. The material is absolutely environmentally friendly and perfectly accepts any finishing. Minus - not very high strength;
- wood. Natural wood always looks very advantageous in interiors. It is durable and beautiful, and treatment with various impregnations helps make it resistant to water and fire. But working with wood is quite difficult. Besides, it is expensive. It is better to take on making your own bar counter from wood when you already have at least some experience working with this material;
- bricks. This is a rather original option, which is usually used for a certain stylization. As a rule, loft interiors are created using bricks. Brick blocks are used to lay out the base. The tabletop in this case is usually a board;
- natural or artificial stone. Of course, this means that you will purchase a ready-made countertop from this material, and will not process it yourself;
- wooden pallets. The use of pallets has recently become very popular in the hand-made industry. Among the undeniable advantages are the low cost and high strength of the source materials.
As you can see, there are many different materials you can use. You should choose one of them based on the following criteria:
- complexity of the work. If you are new to making furniture, then take something simpler: drywall, pallets, plastic;
- style requirements. Many design areas require the use of only natural materials. For example, plastic will be completely unacceptable in eco-style. For such interiors it is necessary to choose wood, stone, brick, etc.
Also consider the weight of the future rack. For example, a brick product has a large mass; not every floor can withstand it. The same can be said about a bar made of stone.
Small kitchen is the solution
The folding tabletop is always fixed on a vertical plane. To support it, one leg, a corner and a folding structure are provided. This is the most common design principle; it combines a large number of products of different types. The tabletop can be lowered or raised.
Fully metal folding structures are rare, because they are not universal, which means they are suitable only for interiors of certain styles. Stone and glass countertops are practically not used. This is due to the intricacies of their operation and high price. For example, artificial/natural stone is characterized by greater weight, although it looks attractive. Glass products are dangerous, so they are not used as folding tabletops.
Small tables for a small kitchen are characterized by a number of positive aspects:
- thanks to such designs, space is saved, which can be used to install another, more necessary piece of furniture in everyday life;
- simplicity of the device, which allows you to assemble and disassemble the tabletop as quickly as possible;
- possibility of DIY installation;
- There are a large number of design options for folding structures.
The disadvantages of such kitchen tables are few, but they are significant. First of all, note the small dimensions of the structure. Because of this, it is not always possible to fully use such a piece of furniture for its intended purpose. In addition, of all existing materials for the table, it is advisable to use only wood.
Calculation of dimensions for drawing
Before you start making a rack, you need to build a drawing or diagram. This will help you correctly calculate all the necessary indicators, and also not get confused during subsequent assembly.
The construction of the drawing is based on the dimensions of the structural elements. There are standard dimensions that you can use as a guide:
- height: for island structures from 110 to 130 cm, for those adjacent to the set from 85 to 90 cm;
- the width can vary from 55 to 80 cm. The wider the stand, the more convenient it will be to use;
- length depends on the expected number of users. Installed at the rate of 60 cm per person.