Many skilled people need a miter saw, since with its help you can cut any lumber, plastic, ceramic and porcelain tiles, and metal profiles at different angles. It is possible to install such a tool on your farm, so I propose an article on how to make a mobile table for a miter saw with your own hands. Of course, there is no point in talking about how the saw itself works - those who need such a tool know this very well.
DIY miter saw table
First, let's figure out what a miter saw is and why it is needed.
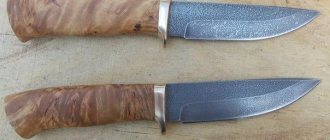
It is worth noting that, first of all, this is an electric tool designed for working with lumber. Secondly, the main feature of this tool is the ability to cut the ends of wooden parts at exactly the right angle. Of course, such a tool is necessary to have in a carpentry workshop with large volumes of work. How to make such a tool yourself will be discussed in this article.
Additional safety precautions
Please note the following points.
- When making a table with your own hands, choose only high-quality materials.
- Keeping your work area and the area around you tidy reduces the possibility of various types of injuries.
- It is necessary to periodically check the table for imbalance and correct it. It is also important to check that the saw is secure before starting work.
- Do not place your hands close to the cutting blade while processing products.
- Wear safety glasses to avoid getting chips in your eyes.
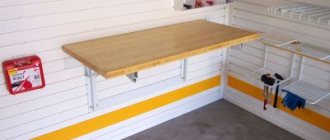
- The cross-cutting table looks like a lightweight and compact structure - a support made of a metal profile, designed for processing wooden products, timber, panels and pipes. This product is the basis for interaction with a miter saw both in production and at home.
You can easily make this tool yourself, even at the dacha or in the workshop, following the instructions and using the drawings.
Product assembly
It is recommended to begin assembling the entire product by studying the drawings and all the parts necessary for assembly. It is also necessary to check the availability of plumbing tools, without which it will be impossible to assemble the table. It is important to consider the order in which each assembly is assembled. Descriptions of these nodes are given below.
We begin the manufacture of a table for a miter saw by assembling the base or platform on which the tool itself will be installed directly. The dimensions of this plate largely depend on the dimensions of the miter saw itself. Moreover, if we want to make a universal table so that it is possible to install other compatible tools on it, for example, such as a slotting machine, then the size is taken according to the maximum size of the tool.
It is better to use 19 mm plywood as a material; if this is not available, you can use chipboard or MDF boards of suitable sizes, but plywood is more reliable.
- Installation of side extensions. Quite often, parts are used that are much longer than the saw frame, and to process such parts, removable side extensions are installed. Moreover, you can use them both on the right and on the left of the bed. Extensions are usually made of the same material as the frame itself. That is, 19 mm plywood will be quite enough.
- Upper shelves: an important detail of the table. In order for the part to be freely attached to the extension, as well as for more comfortable attachment of the extension itself to the frame, it is necessary to make upper shelves. They are attached with screws to both the frame and the extension. Shelves are also usually made from 19mm plywood. An important feature of the shelf is the presence of a tongue along the entire length of the part, 19 mm wide and 3 mm deep. Its purpose will be explained later.
- Application of clamping plates. Clamping plates allow the most accurate and reliable alignment of the bed and extensions in width. To do this, it is best to use clamps that will tighten the extensions and the base of the table together. After this fixation, the extensions can be attached to the base of the table.
- Collaboration of machines. When several machines work together, as mentioned earlier, it is necessary to align their planes. If, for example, you want to use a slotting machine together with a miter saw, then it must be installed so that the working planes of both machines coincide. This means it will be necessary to equalize the heights of both machines. They are the ones that are inserted into the tongues made in the shelves installed on the extensions.
- Movable stops are also important. Mobile stops are designed to fix parts using guide rails made from hardwood blocks. The quality of trimming of parts also largely depends on the quality of their manufacture.
- How else can you use extensions? Extensions allow you to fasten parts of a sufficiently long length. In order to use them correctly, you need to reconfigure the table for such a part. Of course, this will take some time, but then it will pay off when producing a large number of long parts.
So, to summarize: you can make a table for a crosscut plate even in your home workshop. Moreover, the result of manufacturing parts on this table will be much better than on an ordinary workbench.
Add extension supports
1. For extension supports D, cut four blanks measuring 152 x 508 mm. To determine their final width, place a miter saw on top panel A. Place a long straight board rule on the saw table and support handle B so that its ends extend beyond the edges of the platform. Measure the distance from the rule to the underside of the bottom panel. Saw the support blanks D to this width and save the scraps.
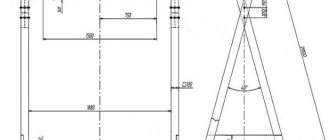
2. To mark the centers of the holes on the supports of the extensions D into which the ends of the pipes are inserted ( Fig. 1), mark on one end of the bottom panel A the centers of the openings between the pipe guides C. Draw center lines for the outer opening at the front and for the inner opening at the back.
Align the ends of the support D with the bottom panel A and transfer the center marks of the openings for the pipes.
Rotate the support 90°. Mark on its end the position of the underside of the top panel A.
Now, pressing the edge of the extension support D against the bottom panel, extend the indicated center lines of the openings (photo C). Turn the support over to press it against both panels and the rule, and mark the position of the bottom of the top panel with a line on it (Photo D). This line defines the top edge of the pipe holes so that the top of the supports is flush with the surface of the miter saw table. Using a square, mark the crosshairs by drawing lines from the marks made on the support. Transfer these marks and draw lines on the remaining supports of the extensions.
DIY circular saw table. Drawings, photos, tips.
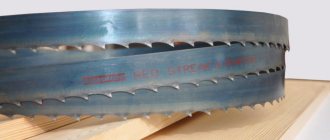
A circular saw is used to cut wood.
Using a hand saw is not always comfortable; using a table allows you to make the sawing process smoother and more accurate.
The cutting base has a disc-like plane equipped with an outer edge with teeth. There are models not only of the manual type, but also with the ability to be fixed on the table.
It is difficult to work with large volumes of wood with a regular circular saw, so it is better to place it on a table
There are several ways to acquire the latter for ease of manipulation. You can build a table for a circular saw yourself, strictly following a certain pattern.
Table arrangement for a circular saw
Making the bottom shelf
I cut 3 pieces from a sheet of plywood for the bottom shelf and attach them to the frame with self-tapping screws. I first made cutouts around the legs using a jigsaw.
Then he placed his power tools on the shelf:
- plane,
- grinding machine,
- hand saw,
- sawing machine,
- compressor,
- grinding machine.
The benefits of making it yourself
The table is made taking into account the fact that the hand tool will be installed and secured on the table, thereby turning into stationary equipment
Constructing the element with your own hands allows you to make the saw most suitable for individual conditions. There will be no difficulties in the process if you carefully study the issue. You can adjust the product to the desired size, distribute everything so that it is convenient for you.
Making a table for a circular saw is within the capabilities of every craftsman.
A handcrafted model will be one of a kind, which makes it unique.
Small table stand for circular saw
Connecting the electricity
Installed 4 sockets in a 2 block box on the front of the table so both saws could stay plugged in with 2 extra sockets for other tools.
Deciding on design and construction
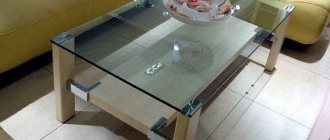
The simplest version of a table for a circular table is a design made of fairly thick plywood and boards
The base can be made of wood or metal. Leaf tree species are chosen for the tabletop. A special hole should be made in it for the disk. The key property of the created table should be convenience.
Circular machine bed
Care should be taken to ensure its stability. No loosening is allowed, otherwise it will negatively affect safety. The tabletop should have as smooth a surface as possible. This will reduce the likelihood of injury while working.
A table for a circular saw requires the presence of guides
The structure can be supplemented with a special riving knife. He can be removed. It is equipped with a special disk protection that allows you to get rid of chips flying at the worker.
Table guide carriage for circular saw
Some people remove the factory cover and replace the factory platform with a homemade one. If you are not going to cut at an angle, you can remove the parts that adjust the tilt of the blade.
Edge stop
This is already a rather complex device that requires time and precision in manufacturing. It allows you to cut parallel to the edge of the material being cut. It will be useful to make a drawing of it before starting work so as not to miss the dimensions. Actually, such a stop is included in the circular saw kit, but its short length does not always ensure an even cut. The large size and the desired strength require the base of the stop to be made of plywood with a thickness of at least 15 mm. You can also make a thrust bar from it.
Stages of manufacturing the stop:
- longitudinal grooves for dowels are made at the base;
- hardwood dowels are mounted on a stop bar;
- Another through groove is made between the longitudinal grooves to secure the thrust bar during operation;
- a hole is cut in the base for a circular saw blade;
- On the sides of the base, restrictive strips are placed for installing the circular and clamps are provided to secure it securely.
When installing the stop on the material being processed, the stop bar moves in the grooves of the base to the required distance and is secured through the through slot with a clamping wing screw. In order not to have to worry about the ruler every time, you can attach it (or a piece of tape measure) to the base of the stop along the guide grooves.
Necessary materials
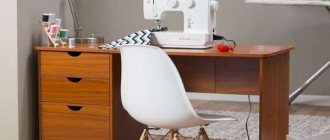
A homemade table can be made from wood
For such a table, wood, plywood or chipboard can be used. MDF and chipboard are also suitable. Some people prefer to choose steel or aluminum.
Steel plate table saw
It is not recommended to use plastic; it is completely unsuitable for a table of this purpose. If wood is chosen, then after completing the assembly the product should be treated with a special antiseptic composition. This will provide reliable protection from moisture and help avoid rotting.
To make a saw table yourself, you need to prepare the materials.
- Selected raw materials for the base. The thickness should be 21 mm.
- The timber required for the frame. An edged board 3 meters long with dimensions 50 by 150 mm is suitable. A total of 5 pieces are needed.
- Dowels made of wood with dimensions of 10 cm. At least 12 pieces.
- Wood glue.
- Metal fasteners in the amount of 4 pieces.
- Metal corners. 10 pieces are enough.
- Self-tapping screws.
These elements must be prepared in advance and placed near the workplace.
Manufacturing process: step-by-step instructions
Marking the place where the saw is attached to the table
Marking and fastening of stiffeners
Tabletop for a circular saw in finished form
To make a quality structure, you need to follow some tips. The process consists of several steps presented in the table.
Attaching the legs to the table
Attaching the saw to the tabletop
Fixing the start button
The design is completed and ready for use. When performing the described manipulations, it is important to remember to follow safety precautions. This also applies to any manipulations with a circular saw.
Regularly check the position of the table and its strength. The structure must be stable, without loosening.
An example of a manufactured work table for a circular saw
Table version for hand-held circular saw with lifting mechanism
First make sure the saw is securely fastened, only then turn it on. Do not hold the cut material with your hands. This will help prevent wood from hitting your face when the knots start to bounce. Additionally, it is recommended to use special safety glasses when working.
For safety, be sure to wear safety glasses
These simple tips will help you avoid injuries in the workplace.
Rip fence
A regular rip fence for a circular saw is a good example of how a small addition can make a big difference. Almost every hand-held circular saw is equipped with a rip fence for longitudinal cutting of a given width. This is a really useful device.
The standard stop has one drawback. For safety reasons, it is set to values that allow it to be used to make cuts less than 20–25 mm wide. This is done so that the stop does not interfere with the movement of the saw guard. But it is enough to attach a wooden block with self-tapping screws to the parallel strip of the standard stop - and its capabilities will increase, while the minimum cutting width will not be limited in any way.
Note! We must remember about safety - when making cuts of less than 15 mm, the block does not allow the protective casing to cover the saw blade.
DIY table for a hand-held circular saw
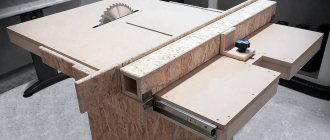
No woodwork is complete without sawing. A manual circular saw is not very convenient for my tasks, and I have long had a desire to make a table for a circular saw. Because My workshop is small, so I needed a small table. Last week I finally made it. (“Laziness is the engine of progress.” It was necessary to saw for the next wooden product, and I didn’t even want to start without it) It took 4 evenings to make the table with equipment.
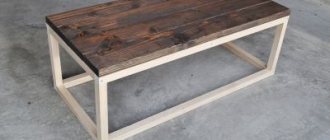
The table turned out to be simple, but quite functional. Table dimensions (W520 x D500 x H230 mm), crosscut sled (W580 x D170 x H 80mm)
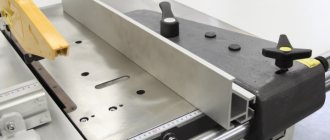
Stop for longitudinal sawing.
For the tabletop, I managed to find a sheet of 9mm laminated plywood on the market. What was very pleasing was that it was sawn off perfectly: all sides were strictly 90 o. I attached a Black&Decker CD601 manual circular saw to the tabletop. (1100 W, 5000 rpm, 170mm). The saw can change the depth and angle of the cut.
Having perfectly aligned the saw with one of the edges of the table, I attached it with M4 screws. To do this, I had to drill the iron base of the circular in four places.
In general, any circular table is suitable for installation on a table, but if you choose the type of fastening with screws to the base, then it is better to choose a model with an iron base. Cast material may crack.
There is another popular way to attach a circular table to a table without drilling holes in the base - attach it using clamps that fix the base, pressing it to the surface. Only this method did not seem to me to be correct enough in terms of accuracy and reliability of installation, and I did not use it.
Another important parameter of a manual circular saw is the ability to connect a vacuum cleaner. If you cut without a vacuum cleaner, fine wood dust rises into the air.
The base was made from 22mm chipboard panels. I chose the dimensions of the base so that equipment could be attached to the edge of the tabletop.
The disc sawed through to the top side of the tabletop. Height - 40mm (Bosh wood disc 160mm). The table top reduces the cutting depth by 9 mm. The cutting depth is set on the circular saw itself. It’s convenient that the disc can be completely hidden in the table.
UPD: IMPORTANT! On a number of budget circular saws, it may turn out that the disk is at an imperceptible angle. And all the cuts will be beveled. Be sure to check with a tool square that the disk is at 90 degrees relative to the table surface. (before installing the saw, you can check the angle relative to the original platform. If the disk is not at a right angle and it is not possible to set the ideal angle of the site, you can place several strips of tin on one side under the platform, achieving an ideal angle (you can use washers for the screws that secure the saw to the table, but this solution is worse)
To make it more convenient to control the start of the saw, I installed a start button (it turned out that this is the most expensive part of my table