There are many articles on the Internet on the topic of making a knife from a mechanical saw. But on one well-known resource, I found an entire article containing negative statements about the people who make such blades. And that the products turn out to be useless. Everyone has their own opinion, but that’s not the whole point; is a knife made from a saw blade really as bad as described by the author of the article? Let's try to figure it out.
Knife from a mechanical saw.
Tools and materials
Tools
The raw material for making a homemade knife can be any new or old cutting part made of hardened steel. It is better to use metal cutting discs, hand and pendulum saw blades as a workpiece. An old chainsaw is a good option. From its chain you can forge and sharpen a blade that is not inferior in quality and appearance to the famous Damascus steel.
In order to make a knife with your own hands, you will need the following equipment and materials:
- Bulgarian;
- grinder;
- electric drill;
- ruler;
- hammer;
- sandpaper;
- whetstones for sharpening;
- files;
- core;
- epoxy adhesive;
- copper wire;
- marker;
- bucket with water.
Separately, you need to think about the issue with the handle. The finished product should fit comfortably in your hand.
To make a handle it is better to use:
- non-ferrous metal (copper, bronze, brass, silver);
- wood (oak, alder, birch);
- organic glass (plexiglass, polycarbonate).
The raw materials for the handle must be intact, without traces of cracks, rot or other defects.
Features of a saw blade
A power saw can be used to make a blade in almost any condition. Even if it has deteriorated and rusted, it will still be suitable for homemade work. The product has enough advantages:
- the knife will be made for yourself, so that it will be unique and will fit well in the hand;
- wide choice of material both in length and width of the butt;
- does not require hardening;
- it is possible to make several knives from one blade;
- such a blade will be in the price category of $100 and above, better than the “Chinese” one for $30-40.
This is true. Having spent not a lot of time, depending on experience, you literally get a product with good cutting properties for pennies. Don't overheat it during production and you'll get a great knife.
Types of saws for wood
There are several clearly distinguished classifications of hand saws:
Classic. The most common variation of the saw, which is kept at home by every man. It may have a different blade length and number of teeth on it.
Most often it has removable and replaceable blades, which, in turn, come with the saw when it is sold. It is usually called a hacksaw.
Electric hacksaw. Some improved version of a regular hacksaw. It is capable of performing a large amount of work in a fairly short time, does not tire the owner, and is often used when cutting material.
This saw is good because it can have different blade lengths, different blade widths, and also different tooth sizes. Due to this, the saw becomes almost universal.
If you look at how to make a hand-held circular saw with your own hands, it becomes clear that this is far from being an analogue of a regular hand hacksaw. This variation is capable of performing deeper and better cuts.
These four types of saws are the most common in life. They are the most popular. There are many more different types of hacksaws, but there is simply no point in loading your head with them.
Making a knife from a saw with your own hands
Looking at the finished blade, the average person will think – what’s so complicated about it? I sawed it off, sanded it, sharpened it and attached a handle. No. Knife making is a whole science, which gradually often turns into art. A self-made blade has multiple positive qualities:
- the handle is easy to make to fit the palm of the owner of the product;
- there is no need to worry about the quality of the workpiece and the final product;
- It’s not difficult to make a product unique.
Do-it-yourself knife from a saw.
Cutting and primary processing of the workpiece
The initial stage of making a blade from a hacksaw blade, similarly from other materials, is a preliminary sketch. You need to have an idea what the result will be. Marking will help you cut out the workpiece of the required shape:
- right angles should be avoided; the layout must be marked with a small margin of 1.5 - 2.5 mm;
- it is necessary to know the future purpose of the blade; the shape of the sketch directly depends on the role of the product;
- Along the way, it is worth remembering the laws of manufacturing edged weapons.
On our resource, the legislative aspect regarding the carrying of knives is considered separately. Having finished making the layout, you should transfer it to the saw blank. It is necessary to outline with a sharp object; a marker is used only when absolutely necessary. Seeing the contours of the sketch is the main task.
Blank for making a knife from a saw.
Having secured the workpiece in a vice, the future blade is cut along the contour. The part must not be overheated; it is necessary to pour water on it; excessive heating of the steel will lead to brittleness of the product. It is permissible to expose small areas to high temperatures; the margin when marking is made for a reason. It is better to remove them on a sharpening machine.
Rough finishing can be done with files. Having removed the burrs, it’s time to start making the handle. There is no need to harden the blade; factory heat is enough.
Making a handle
The previously made decision on the overhead method of attaching the handle gives full right to use a drill. A drilling machine is a luxury; if you have such a “miracle”, there is no shame in resorting to its help:
- In accordance with the sketch, there is a need to make two or three holes in the shank. Depends on the length of the handle.
- Split the prepared block of wood exactly in half.
- After fitting the wooden blanks to the shank, sand them until they fit tightly. In one of them you should cut a recess for the shank.
- Having perfectly adjusted the parts, holes are made in the wooden overlays.
- Rivets are cut from a copper rod. Final fitting and preliminary assembly.
- Wooden blanks are roughed and adjusted to the anatomy of the owner’s palm.
- Final sanding of the handle, making a brass bolster.
- Assembling the parts of the handle with coating the shank and pads with epoxy glue.
- Driving copper rivets. Drying the product.
Knife handles.
One day is enough for the glue to dry. Use a grinding machine to finally adjust the handle. Sand with fine grit sandpaper.
Trips and sharpening
Finally, the blade is sharpened to meet the necessary needs. The sharpening angle of the RK depends on the purpose of the knife. There are plenty of ways to derive the correct RK.
Previous Making a knife from rapid with your own hands Next Making How to make a knife from a chain with your own hands
Cutting and primary processing of the workpiece
The fastest way to saw a workpiece is with a grinder with a thin metal cutting disc. If it is not possible to use a grinder, you can use a hand hacksaw for metal
It is important to correctly install the file into the hacksaw. The saw teeth should be directed forward and the hacksaw should cut while moving away from you
Cutting and preparing the workpiece
First, the approximate shape of the knife is cut out using straight cuts. Then the bends are cut out. The easiest way to cut them is with several oblique cuts converging at one point.
It is important to leave an allowance of 2-3 millimeters to the drawn outline. This is due to the fact that when using a grinder, the metal at the cutting site overheats
By grinding off 2–3 mm using a file and sandpaper, you can remove the overheated edge of the metal.
Hacksaw blade knife
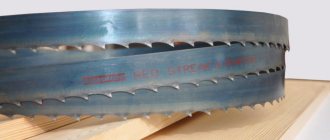
If you decide to use a hacksaw blade as a metal blank, then you need to take a blade from a pendulum saw. This saw performs work on thick metal (for example, rails) and meets the requirements for rigidity and strength. The size of such canvases ranges from length/width/thickness, 400-500:30-40:2 mm. The color is determined by the type of manufacturing treatment the saw has undergone and can be black or grey.
Before you start making a knife blade, you need to check the integrity of the metal. This can be done by ear, but this requires some experience and skill. A whole canvas produces a ringing sound, while a damaged one produces a dull sound. If it is difficult to do this by ear, then it is imperative to carefully inspect the metal workpiece.
The blade angle should be 20 degrees.
Moreover, this should be not only the blade, but also the allowance, which will then be hidden in the handle. After this, on a metalworking machine (or a carefully secured grinder with a circle), it is necessary to gradually and carefully remove the excess.
This should be done slowly, as the metal may heat up. To cool it down and continue working, take a bucket of water. This container should be enough for the workpiece to be placed completely in water. The contours of the blade are made using the same machine. It should be borne in mind that the peculiarity of this steel is that with a sharp change in the temperature of the metal, tiny cracks can form in it. This can lead to the knife breaking even with little force. Therefore, the metal should not be allowed to overheat during its processing. You should be especially careful when cutting the edge, because as the thickness decreases, the metal heats up faster.
Why is the file called “Friendship-2”
Surely everyone knows this type of chainsaw tool called “Friendship”. The next chainsaw model was to receive an appropriate name with the prefix “two”, but the name “Friendship-2” went to such a cutting device as a two-handed saw. It got its name due to its design features. A two-handed crosscut saw is designed to work in pairs, and not just two people. In a pair - this means well-coordinated friendly work with the device, which is where the name actually originated back in the USSR.
The Soviet two-handed saw was popular because its main advantage was its low cost. During the Soviet era, few people could afford to buy a specialized tool - a chainsaw, which cost astronomical amounts of money. Cutting thick logs and large trees with a hand saw is not only difficult, but it also takes a lot of time. That is why such a type of cutting unit as Druzhba-2 appeared.
Even if there is now a two-handed saw from the USSR era in your garage or attic, do not rush to get rid of it. It can not only cut trees and logs, but also make various tools, for example, a knife or a handsaw. If you remember that a two-handled hacksaw is gathering dust somewhere in the garage, then it’s time to find out all its advantages and capabilities.
Working tools and materials
Judging by the reviews of experienced knife makers. You can use any former saw blade as a blank. Two-handed, mechanical saw, band saw, hacksaw for metal or wood - any of the selected options guarantees strength and durability. All of them hold an edge perfectly, thanks to the steel from which they are made.
In the production of saw tools, factory hardening is used. Making a knife from a saw is a labor-intensive process; the workpiece is difficult to process due to the red-hardness of the metal. The effort spent on making the product will more than pay off in the final result.
You will need a tool used in the manufacture of knives:
- electric drill, with a set of drills of various diameters;
- sharpening machine (the presence of this will simplify the work);
- Grinder angle grinder, wheels for various purposes;
- files of various grain sizes;
- ruler, pencil, paper, marker;
- vice, hammer and sandpaper with different grains;
- container with water.
You may need a welding machine to weld the shank. It is necessary to clearly decide on the type of handle - overhead or mounted. Both types are easier to make from wood. Let's focus on the first option. Required materials:
- piece or whole saw;
- wood blocks, epoxy glue;
- a rod of copper, tin, brass or bronze;
- tools for working with wood: core, chisel, etc.
It makes absolutely no difference in what condition the saw blade was obtained. This will not affect the final product.
Is it possible to simplify the process?
Craftsmen say that the hole can be made without the use of drilling tools. The blade together with the shank is covered with a layer of varnish. Where there should be a hole, you need to clean the surface of varnish. You should place a knife from a wood saw in an electrolyte solution and lower a wire with a negative charge into the container with the workpiece, and connect the positive one to a power source, which can be used as a regular battery.
As a result of such an impact, you will get a hole in the metal, although it will not be perfectly round, but you definitely won’t be able to damage the blade in this way.
Giving the workpiece its final shape
The rough workpiece is brought to its final shape using a file or emery. To avoid overheating of the future knife from the saw, when processing it with sandpaper, it is necessary to periodically lower it into a container of water. This will allow the workpiece to cool. When processing a workpiece with a file, no additional cooling is required. The most optimal way would be to roughly process the workpiece on sandpaper, and then fine-tune it with a file.
Processing the knife blank
During finishing, special attention should be paid to smooth bends.
It is important to ensure that the bend is smooth, without depressions or bulges. Miniature depressions can be easily checked with a file
To do this, use a marker to paint over the end of the workpiece being checked. Next, apply a file with light pressure along the workpiece along the entire bend. In those places where the marker trace remains there are depressions
Miniature depressions can be easily checked with a file. To do this, use a marker to paint over the end of the workpiece being checked. Next, apply a file with light pressure along the workpiece along the entire bend. There are depressions in the places where the marker trace remains.
Processing continues until not a single depression remains.
Next, the workpiece is cleared of burrs and sanded using sandpaper. You can start with 60 grit and finish with 320 grit. The workpiece will still be subject to heat treatment, so finishing the blade will be polished later.
What to consider when getting started
Don't start sharpening your knife without practicing. Take an ordinary piece of metal and try to process it. Ruining a piece of hardware is not as bad as losing a good piece of equipment. You must not only regulate the pressure when turning, but also monitor the temperature so as not to overheat the iron. High temperature not only spoils the appearance of the metal. Even if it does not change in appearance, its structure may be seriously damaged: the metal will become much softer and more fragile. A circular saw blade made from low-quality metal will have to be sharpened more often.
Read also: Smoke generator for cold smoking dimensions
To check if the iron has started to overheat, drop a couple of drops of water on the workpiece. If it evaporates immediately, quickly cool the workpiece for the future blade. To avoid possible troubles associated with overheating of the metal, place a container of water near the machine and periodically cool the future knife from the saw.
Making a knife from canvas
Making a knife
If the blade is large and does not have much wear, then several blades for different purposes can be made from it. The effort and time spent are worth it.
A knife is made from a circular saw with your own hands in the following sequence:
- A pattern is applied to the canvas, and the contours of the blade are outlined. Scratches or dotted lines are applied over the marker with a core. This way, the design will not be erased when cutting out the workpiece and adjusting it to the desired shape.
- Workpieces are cut from a circular saw blade. To do this, it is better to use a grinder with a metal disc. You should leave a margin of 2 mm from the contour. This is necessary in order to remove the material burned by the grinder. If you don’t have a grinder at hand, you can sharpen the workpiece using a vice, a hammer and a chisel or a hacksaw.
- Any excess is ground off on the grinding machine. You will have to spend a lot of time on this process so as not to overheat the steel. To prevent this, the workpiece must be regularly immersed in water until it cools completely.
- The blade is outlined. Here you need to be careful to maintain the contour of the knife, not burn it and maintain an angle of 20º.
- All straight sections are leveled. This is conveniently done by placing the workpiece on the side of the grinding wheel. The transitions are given a rounded shape.
- The part is cleared of burrs. The blade is ground and polished. To do this, several interchangeable wheels are used on a grinding machine.
Separately, we should dwell on how the handle is made. If wood is used, then a monolithic fragment is taken, in which a longitudinal cut and through holes are made. After this, the blank is placed on the blade, and holes for fastening are marked in it. The handle is fixed to the blade using rivets or bolts with nuts. In the case of a bolted connection, the heads of the hardware are recessed into the wood and filled with epoxy glue.
When the handle is assembled from plastic, 2 overlays are used, which must be symmetrical. To give the knife originality, the plastic linings are painted on the inside. You can make cavities in the overlays that can be filled with jewelry, items made of non-ferrous and precious metals, small compasses and photographs.
After fastening to the blade, the handles are ground until they acquire the required shape and smoothness.
Working with a workpiece
Having formed the basis of the future knife, proceed to the most important and difficult stage of the work - removing the slopes. The bevel is a surface on a knife that gradually tapers towards the blade. The purpose of the knife directly determines the angle and width of the bevels. Therefore, choose the average value if you want to get a utility knife from a saw.
Before starting to work on the machine, draw the expected slopes on the metal sheet using a marker. Grind carefully, slowly, so as not to spoil the future knife. It is recommended, as in the previous step, to practice on a spare part. The slopes should be symmetrical and lie at the same angle on both sides. In this case, the blade should not be sharpened: leave an indent of approximately 0.25 mm.
To sharpen the blade, use sandpaper. For such purposes, sandpaper of 8-10 hardness is best suited. It is better to sharpen a knife from a metal saw on a wooden block. To prepare a makeshift sharpener, take a block and glue sandpaper to it.
Using coarse sandpaper, you will give the blade the necessary sharpness, and using a finer sandpaper, you will polish the metal blade completely.
At the final stage of processing, polish the blade. Cover the same wooden block with felt or leather, rub it with GOI paste and polish until you achieve the desired effect.
Hardening
Heat treatment will give the knife the necessary hardness; it will not become dull during use.
To harden the knife from the saw, it is necessary to heat it to a temperature of 750–920 degrees. If you do not reach this temperature, the steel will not be hardened, and if it is heated too much, the blade will be too brittle.
At home, it is not possible to determine the exact temperature. However, there is a way out. A simple magnet is suitable for temperature control. As soon as the blade blank stops being magnetic, it is heated to the required temperature.
After the temperature of the workpiece has reached the required limits, it must be kept in this state for approximately 1-1.5 minutes for every 1 mm of thickness. In the case of a homemade knife from a saw, the holding time for hardening is 3–5 minutes. It would be enough. Next, the workpiece is lowered into vegetable or machine oil preheated to 50 degrees.
This procedure should be performed carefully. Oil vapors can ignite from a hot workpiece, so you should have a fire extinguisher on hand.
A little about the hardening forge. If it is not possible to use industrial equipment, then you can make a forge yourself. To do this, it is necessary to build a fire of such a size that it is possible to evenly heat the workpiece. Next, as the firewood burns and coals appear, a homemade knife is placed on them. You can use a household hair dryer or a pump for inflating mattresses as bellows.
Materials and tools
To make a homemade knife, you will need the following equipment:
Graph of knife thickness versus steel hardness.
- Woodworking Machine. If you don’t have one, you can use an electric jigsaw to pre-cut the handle. For final sanding, sandpaper of different grits is used.
- Nails or better copper wire for rivets.
- Wood.
- Machine for grinding and sharpening. In its absence, you can use a grinder, a hammer drill, or a high-power drill. In addition, nozzles or circles are needed with which these operations can be performed. One of these tools should be firmly secured and then work done.
- Files with various types of cuts.
- Marker.
- Brass plate and rod, if the handle will not be attached with rivets.
- Epoxy adhesive.
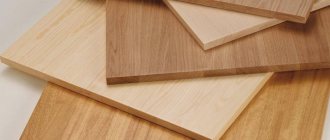
Knives should have a comfortable handle. The most suitable material for it is wood. The most commonly used are birch and oak blocks. These rocks are the hardest and are less susceptible to moisture during prolonged use. They are pleasant to the touch and have a beautiful texture. Since the manufacture of a knife handle does not require a large amount of raw material, for these purposes you can use 1 parquet board, a scrap of board or block
It is important that the wooden workpiece is not damaged, cracked and does not contain chips or other defects
After the blade is sufficiently calcined, you need to cool it.
In order to make a knife, it is necessary to use certain grades of steel. It should be remembered that the characteristics of the metal depend on how the metal was hardened technologically. For example, as hardness increases, the fragility of metal products increases. Steel grades R6M5 or R3M3F2 are suitable for the knife. In this case, a metal thickness of 2 mm will be sufficient.
The strength of a homemade knife does not depend on the thickness of the metal. It is influenced by its geometric dimensions: length, width, shape of the blade and trigger. With the right choice of these components and careful processing of the metal, an excellent knife is guaranteed. Such grades of steel are used in the production of disks, blades, and tools such as, for example, a circular saw.
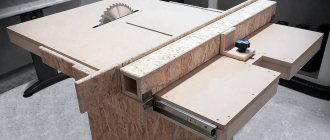
Design Features
Structurally, a homemade sawing table looks quite simple. The machine consists of a supporting frame for mounting the motor, a transmission unit and a work table with a slot for the cutting disk. The design is equipped with stops for guiding the workpiece and a protective screen that prevents chips from entering and also increases work safety.
Mandatory requirements for a sawing table:
- rigid, stable design;
- smooth surface of the tabletop;
- secure disk mounting;
- fencing protecting the operator of the machine (table);
- easy access to the control device (start and stop buttons).
The equipment must be installed on a frame supported not on solid sheets, but on legs. This improves ease of use, although it makes the saw table less stable. To increase durability, the frame can be made of metal or reinforced with metal elements. Safety is ensured not only by the protective screen, but also by securing the disk from the bottom (inner) side. Additional requirements depend on the specifics of the work - auxiliary elements help to process parts more accurately, saw longer boards, as well as thick logs.
By making a saw table with your own hands, you can get a number of advantages - from reduced costs to the ability to change the design as the master needs it. If desired, you can replace some of the parts with more economical ones, or use materials left over from repairs or construction. The only disadvantage of a circular saw independently fixed to the machine is a decrease in the accuracy of workpiece positioning. But this moment still largely depends on the skill of the performer himself.
Rigid, stable construction
Smooth countertop surface
Secure disk mounting
Guard protecting the operator of the machine (table)
How to make a knife handle
The easiest way is to glue a handle from two cut and prepared pieces of wood or plexiglass. It is much easier to make than attaching it to the tail of a knife. Naturally, you can choose a simple option and wrap the handle with electrical tape, but why try so hard to end up ruining the aesthetic appearance of the knife?
And now comes the most crucial stage of work. Since you will have to drill in the shank of the knife, the blade can easily burst. Therefore, be vigilant and careful.
Steel is a hard, but at the same time brittle material. If the pressure is evenly distributed when the saw is in operation, it is almost impossible to break it. But with spot drilling, the pressure increases and the metal can easily crack. Therefore, it is better to drill a hole at low machine speeds and do not forget to add oil to the drilling site. In this case, a screwdriver is an ideal tool for accomplishing this goal, since it has fewer revolutions and the possibility of breaking the part is not so high.
After completing the previous step and making holes in the handle, drill the same holes in the halves of the handle. Make a copper or aluminum rivet. For insurance, you can glue the area where the rivet will be located with glue, but it is better if you have epoxy resin.
Shank drilling
The handle on the shank can be secured with rivets or glue. The most reliable option for attaching the handle is to use rivets. To install them, you need to make holes in the shank. The holes are marked on the shank so that they are located approximately in the middle of the future handle. To prevent the drill from slipping at the initial stage of drilling, the holes are cored.
Due to the fact that the circular saw is made of alloy tool steel, drilling it will not be so easy. Ordinary metal drills will not last long here.
Drilling should be done with cobalt drills or a ceramic drill with a pobedite tip.
During the drilling process, it is important to add oil to the drilling area and not allow the drill to overheat. Drilling through hardened steel is quite a difficult task.
Therefore, it is possible to produce holes in the shank using an electrochemical method. To do this, attach a wire to the workpiece, then completely cover the shank with bitumen mastic or plasticine. In areas of future holes, the protective layer is scratched down to bare metal. Next, a saturated solution of table salt is prepared, into which the blade shank with a wire and an unnecessary metal plate, also with a wire, are dipped. Both wires connect to the battery or car charger. A “plus” is applied to the future knife from a circular saw, and a “minus” is applied to the plate. The etching process is accompanied by the release of gas. In 30–50 minutes the holes will be ready
Drilling through hardened steel is quite a difficult task. Therefore, it is possible to produce holes in the shank using an electrochemical method. To do this, attach a wire to the workpiece, then completely cover the shank with bitumen mastic or plasticine. In areas of future holes, the protective layer is scratched down to bare metal. Next, a saturated solution of table salt is prepared, into which the blade shank with a wire and an unnecessary metal plate, also with a wire, are dipped. Both wires connect to the battery or car charger. A “plus” is applied to the future knife from a circular saw, and a “minus” is applied to the plate. The etching process is accompanied by the release of gas. In 30–50 minutes the holes will be ready.
Making knives at home
Making a homemade sheath at home includes the following steps:
- making a pattern from paper (you need to put a blade wrapped in tape on it, add 1.5 cm from each edge and circle);
- creating a pattern from leather or thick fabric (the pattern is traced 2 times in a mirror image);
- cutting out from the material 2 side inserts 1.5 cm wide and a T-shaped part, which will then become a clasp;
- processing the edges of the cross element with wax, grinding on a felt wheel of the machine;
- sewing a T-shaped part and one of the main patterns with nylon thread;
- gluing the inserts of this part of the sheath;
- fixing the second half of the pattern with glue;
- turning the edges of the workpiece on a grinding machine;
- stitching glued parts;
- polishing the surface of the sheath, applying cream if it is leather;
- making holes at the ends of the fastener to secure the button parts.
Watch the video about how the knife is made:
The simplest homemade knives
Homemade knives, as simple as possible, are obtained from:
- scissors of different sizes;
- bayonet shovel;
- old knife;
- saw, hacksaw;
- car springs.
You can even make a product from a fairly thick stick. The simplest option is a homemade knife with a wooden handle. And if you use a file as a base, you can do the work without power tools.
Watch the video on how to make a knife from a bearing:
From scissors
Scissors can even make 2 knives for household needs if they are:
- divide into 2 parts by pulling out the fastening from the center;
- take one half, process the blade on a sharpening machine to the required thickness (the dull side is the butt, the sharper side is the blade);
- make slopes, sharpen a sharp edge;
- make suitable linings from wood, make recesses in each corresponding to the thickness of the metal part of the handle;
- attach the wooden parts using glue and fasteners screwed into the hole left from the scissors;
- Give the handle its final shape, remove any burrs, and polish it.
The knife will come with a ring at the head of the handle left over from the scissors.
From a piece of metal
From a piece of metal, if it is large enough, you can make any type of product. First, a sketch is prepared on paper, then a blank is cut out using this pattern. It is processed on a machine, bringing the blade into the desired form. 2 holes for bolts are drilled on the shank.
If the metal needs to be hardened, this is done using a forge furnace, and the steel is tempered. After cleaning, grind and polish the metal part. After cutting out the pads, they are attached to the handle using industrial glue and metal fasteners. If they stick out, this part should be cut off and sanded so that it does not interfere with holding the knife.
From a shovel
A shovel can be used to make any kind of knife as long as they don't have to cut very hard objects. Because this steel is usually of low quality and bends easily, even if the tool is bayonet-type. The manufacturing stages do not differ from what was described above. But due to the fragility of the metal, it must be hardened. And the handle should be made with wooden plates as long as the shank.
From an old knife
You can make a new tool out of an old knife if you simply replace the handle pads. To do this, the product will have to be disassembled. You can change the type, and hence the purpose, of a weapon if it is large enough. All you have to do is cut a blade of a different shape and combine it with an updated handle. The steel does not need to be hardened since it has already been heat treated at the factory.
From a stick
From a stick, that is, a knot with a diameter of 3-4 cm, you can make a fairly sharp weapon:
- cut a piece about 15 cm long;
- turn a blade about 6 cm on a lathe, the remaining 9 cm will be a handle;
- thin the sharp edge using a machine with an emery attachment;
- bring the blade to the maximum possible sharpness using an abrasive stone.
The quality of the product cannot be compared with metal, but it can be used for cutting.
From other available materials without tools
A knife can be made from scrap materials and, in addition to those mentioned above, from:
- a mechanical saw, the blade of which has good cutting properties;
- hacksaws for wood, they make decent kitchen tools;
- automobile springs requiring forging and heat treatment;
- a large drill, but it also needs to be heated and given the desired shape.
After converting the scrap material into a flat sheet, the manufacturing technology is still the same:
- drawing on paper;
- cutting a metal blank;
- sharpening, hardening, finishing;
- handle manufacturing, assembly.
A sample drawing of a knife on paper.
A knife without tools such as a band saw or grinder can be made from a file. It is enough to heat it with a blowtorch and let it cool so that the metal can be processed with a hacksaw. This is what gives the workpiece the desired shape. Then heat treatment is carried out, grinding with hand tools and emery. And you can assemble the product.
Sharpening two-handed saws yourself or how to simply restore an old long hacksaw
If you have an old two-handed hacksaw Druzhba-2 in the garage, then before using it, it is recommended to restore its integrity. Before using the tool, pay attention to the following points:
- Handles - wooden handles may have dried out over a long period of non-use, so it is possible that they could freely fall out of the holes. You can restore the serviceability of the handles by dipping them in water for several hours so that they swell. You can also machine new handles for the tool, which won’t take a lot of time and effort.
- The presence of corrosion on the canvas - signs of rust should be eliminated, and then treat the device with machine oil
- Sharpening the teeth - after storing the tool for a long time in the garage, there is a high probability that the hacksaw needs to restore the sharpness of the teeth
If there are no difficulties with restoring the handles and removing corrosion, then sharpening the teeth is just the opposite. A large saw requires a lot of time and effort to restore the integrity of the links. However, there is an advantage to this, since large teeth are much more convenient to sharpen. Although the tool differs from an ordinary hand hacksaw, however, the principle of restoring the sharpness of the teeth is similar. A step-by-step description of sharpening teeth on a two-handed saw has the following format:
- First you need to fix the tool. It will not be possible to do this in the jaws of even the largest vice, so we use two corresponding board lengths. We place the boards parallel to the blade, leaving only the teeth visible. If you don’t have a vice, you can use a clamp
- Work should begin with setting the teeth. All teeth must be the same height. You can determine the presence of protruding links by eye, and to align them with the rest, you should work with a flat file
- At the next stage, it is necessary to align the teeth at the same angle of deviation from the plane of the blade. To perform the wiring, you will need a special tool. It is also recommended that you first make a template (layout) to check whether the links are sufficiently spaced (or buy one). The teeth should be spaced 0.5 mm from the plane of the blade or 1 mm from each other. The wiring process is performed one by one. Not many craftsmen know how often to set teeth. According to the rules, it is necessary to carry out setting no more often than 1 time per 5-6 sharpening of teeth
- As soon as the teeth are set apart, you can move on to the final and most important stage - sharpening. For this, a special triangular file is used, the size of which must be no less than the height of the teeth
- Correct sharpening is performed by moving the file away from you with medium pressure against the tooth. In the reverse position, the file should not touch the blade. It is necessary to pass the file confidently, but not quickly
- First you need to go along one side of the teeth, and then along the other. When sharpening, you should also choose the appropriate angle from 35 to 70 degrees.
Finally, all that remains is to treat the tool blade with machine oil and use it for sawing thick logs, trees and even lumber. When carrying out work, it is recommended to follow safety precautions to avoid injury.
This is interesting!
If you have mastery of working with a grinder, you can sharpen the teeth with a power tool with an abrasive disc.
Manufacturing of rivets
The adhesive attachment of the handle to the shank is not reliable. To avoid breaking the handle, the wooden plates must be fastened with rivets. The rivets are made of metal that is not subject to corrosion. These can be alloys of non-ferrous metals or stainless steel. You can also use a copper or brass tube as rivets.
Making rivets for a knife
A blank for the future riveting is sawn off from a rod of suitable length. It should be 2–3 millimeters longer than the thickness of the handle. Holding the rivet in a vice, use a hammer to flare one end. It should look like a mushroom at one end of the rod. Next, the rivet, pre-lubricated with epoxy glue, is inserted into the holes in the handle and also flared on the other side of the handle. To flare a rivet made from a tube, it is best to use a ball from a bearing.
Sawing out the handle blank and preparing for gluing
To finish working with the knife, you need to make a handle. There may be different variations of materials used as a handle. The most popular material is wood. The wooden handle is impregnated with linseed oil to prevent the harmful effects of moisture on it.
Select a flat plank from the wood of your favorite species. The thickness of the board should be at least half a centimeter for convenience. A thick board can be sawn lengthwise. Using the knife blank as a template, markings are applied to the board, including holes for rivets. For a good fit of the future handle to the shank, it is necessary to create a plane of contact using sandpaper.
Techniques for handling metal
In order for the blade to be strong and tight, during its creation it is necessary to adhere to the rules of handling iron.
The semi-finished product should not have noticeable or unexpressed defects. Before starting work, the workpieces must be examined and tapped. A complete element sounds loud, while a defective element sounds muffled.
Circular disk for making a knife.
When creating a design and drawing of a cutting component configuration, you need to avoid corners. In such areas, steel can break. Transitions must be made smooth, without sharp turns. The bevels of the butt, fuse and handle must be ground at an angle of 90 degrees.
When cutting and processing, do not allow the metal to overheat. This leads to a decrease in strength. An “overcooked” blade becomes fragile or soft. During processing, the part must be cooled regularly by completely immersing it in a container of cold water.
When creating a knife from a saw blade, you must not forget that this element has already undergone a hardening procedure. Factory saws are designed to work with strong alloys. If you do not heat the product excessively during turning and processing, then it will not need to be hardened.
Forming the cutting edge
Before you begin shaping the cutting edge, it is necessary to carry out preparatory work. It consists of applying markings on the edge of the workpiece. The markings are placed exactly in the center and serve as a guide for making a symmetrical descent.
To do this, paint over the edge that will be cutting with a marker and, using a drill equal in thickness to the workpiece, scratch the markings. The drill has a conical sharpening. Therefore, if you place the drill and the workpiece on the same plane, the tip of the drill will be exactly in the middle.
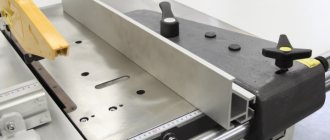
Edge cutting device
Then, using a coarse file, you can begin shaping the cutting edge. If you do not have the proper skills to create a smooth edge, you can use a simple device. It consists of a base, an angle and a guide with a platform for sandpaper. 180-grit sandpaper is glued onto the platform with the guide. Several holes must be pre-drilled vertically one above the other in the corner. The knife is fixed flat on the base and the guide is inserted into the hole at a height so that the angle between the plane of the base and the platform with sandpaper is the same as that chosen for forming the slopes. A universal angle is from 22 to 30 degrees.
Having made an even descent to the middle of the thickness of the workpiece, turn the knife over, then make the same descent on the reverse side. Using such a simple device, you can easily form an even blade.
Forming the upper part of the handle
The upper part of the handle is prepared in advance for the reason that after gluing the handle to the shank, processing the upper part will be difficult. Also, during the processing process, you can scratch the blade, which is extremely undesirable. Holes for rivets are drilled according to the markings made during the preparation process. A rod of suitable diameter is inserted into them. It allows you to firmly connect both parts of the workpiece and will not allow them to move during processing.
Finished knife handle
Forming occurs using files and sandpaper. At this stage, it is important to remember the permissible dimensions of the limiter and finger recess.
The final processing is carried out using 800-grit sandpaper. Before gluing, all parts must be thoroughly degreased. This can be done with acetone or solvent. Once the degreaser has dried, glue or epoxy can be applied.
How to make a knife from a mechanical saw with your own hands
The thickness of the mechanical saw is usually 2-2.5 mm, unless you find another option. This is quite enough to perform all knife tasks. They are light in the hand, hold an edge for a long time and are completely legal. Just don't go wrong with the length. And in terms of other qualities, the knife will not fall under the article on edged weapons.
Handmade knife from mechanical saw.